2006 CHEVROLET CORVETTE ECO mode
[x] Cancel search: ECO modePage 109 of 426
The Universal Home Remote transmitter operates on a
radio frequency subject to Federal Communications
Commission (FCC) Rules and with Industry Canada.
This device complies with Part 15 of the FCC Rules.
Operation is subject to the following two conditions:
1. This device may not cause harmful interference.
2. This device must accept any interference received,
including interference that may cause undesired
operation.
This device complies with RSS-210 of Industry Canada.
Operation is subject to the following two conditions:
1. This device may not cause harmful interference.
2. This device must accept any interference received,
including interference that may cause undesired
operation of the device.
Changes or modi�cations to this system by other than
an authorized service facility could void authorization to
use this equipment.Universal Home Remote System
Operation
Do not use the Universal Home Remote with any garage
door opener that does not have the stop and reverse
feature. This includes any garage door opener model
manufactured before April 1, 1982. If you have a newer
garage door opener with rolling codes, please be sure to
follow Steps 6 through 8 to complete the programming of
your Universal Home Remote Transmitter.
Read the instructions completely before attempting to
program the Universal Home Remote. Because of
the steps involved, it may be helpful to have another
person available to assist you in the programming steps.
Keep the original hand-held transmitter for use in other
vehicles as well as for future Universal Home Remote
programming. It is also recommended that upon the sale
of the vehicle, the programmed Universal Home Remote
buttons should be erased for security purposes. See
“Erasing Universal Home Remote Buttons” later in this
section or, for assistance, seeCustomer Assistance
Offices on page 7-4.
Be sure that people and objects are clear of the garage
door or gate operator you are programming. When
programming a garage door, it is advised to park
outside of the garage.
It is recommended that a new battery be installed in
your hand-held transmitter for quicker and more
accurate transmission of the radio-frequency signal.
2-47
Page 112 of 426
Using Universal Home Remote
Press and hold the appropriate Universal Home Remote
button for at least half of a second. The indicator light
will come on while the signal is being transmitted.
Erasing Universal Home
Remote Buttons
To erase programming from the three Universal Home
Remote buttons do the following:
1. Press and hold down the two outside buttons until
the indicator light begins to �ash, after 20 seconds.
Do not hold the two outside buttons for longer
than 30 seconds.
2. Release both buttons.
The Universal Home Remote is now in the training
(learning) mode and can be programmed at any time
beginning with Step 2 under “Programming Universal
Home Remote” shown earlier in this section.
Individual buttons cannot be erased, but they can be
reprogrammed. See “Reprogramming a Single Universal
Home Remote Button” following this section.
Reprogramming a Single Universal
Home Remote Button
To program a device to Universal Home Remote using
a Universal Home Remote button previously trained,
follow these steps:
1. Press and hold the desired Universal Home
Remote button. Do not release the button.
2. The indicator light will begin to �ash after
20 seconds. While still holding the Universal
Home Remote button, proceed with Step 2 under
“Programming Universal Home Remote” shown
earlier in this section.
For additional information on Universal Home Remote,
seeCustomer Assistance Offices on page 7-4.
2-50
Page 162 of 426
Automatic Operation
AUTO (Automatic):Press the AUTO button to
place the entire system in the automatic mode.
When automatic operation is active, the system will
automatically control the inside temperature, the
air delivery mode and the fan speed.
After a ten second display of the current settings,
the word AUTO, the driver’s temperature setting and
the outside temperature will be shown. The system will
operate to achieve your comfort set temperature as
quickly as possible. The AUTO control system works
best with the windows up and the removable roof
installed or the convertible top up.
1. Press the AUTO button.
2. Adjust the temperature to a comfortable setting
between 60°F (16°C) and 90°F (32°C). Choosing
the coldest or warmest temperature setting will
not cause the system to heat or cool any faster.
A setting of 73°F (23°C) is suggested.
In cold weather, the system will start at reduced fan
speeds to avoid blowing cold air into your vehicle
until warmer air is available. The system will
start out blowing air at the �oor but may change
modes automatically as the vehicle warms up
to maintain the chosen temperature setting. The
length of time needed for warm up will depend on
the outside temperature and the length of time
that has elapsed since your vehicle was last driven.3. Wait for the system to regulate. This may take from
10 to 30 minutes. Then adjust the temperature, if
necessary.
Do not cover the solar sensor located in the center of
the instrument panel, near the windshield. For more
information on the solar sensor, see “Sensor” later in
this section.
Manual Operation
Driver Power/Temperature:Press the driver
temperature knob on the driver side of the climate
control panel to turn the climate control system off.
This is the only setting that completely shuts off the
fan. The digital display will show only the outside
temperature. You can still adjust the driver and the
passenger set temperature and the air intake mode
when the climate control is off.
Passenger Power/Temperature:Press the passenger
temperature knob on the passenger side of the
climate control panel to turn the passenger’s climate
control system on or off. Turn the knob to increase
or decrease the temperature for the passenger. If the
passenger’s climate control system is off, the driver’s
temperature knob will control the temperature for
the entire vehicle.
3-26
Page 164 of 426
Air conditioning does not operate at temperatures below
about 35°F to 40°F (2°C to 4°C). In temperatures
above 40°F (4°C), the air conditioning cannot be turned
off in defrost and defog, as it helps to remove moisture
from the vehicle. It also helps to keep the windows clear.
You may notice a slight change in engine performance
when the air-conditioning compressor shuts off and
turns on again. This is normal. The system is designed
to make adjustments to help with fuel economy while
still maintaining the selected temperature.
On hot days, open the windows to let hot inside air
escape; then close them. This helps to reduce the time
it takes for your vehicle to cool down. It also helps
the system to operate more efficiently.
For quick cool down on hot days press the AUTO button
and adjust the temperature to a cool, comfortable setting.
To achieve maximum cool down, do the following:
1. Select the vent mode.
2. Select recirculation mode.
3. Select the A/C on.
4. Select the coolest temperature.
5. Select the highest fan speed.Using these settings together for long periods of time
may cause the air inside of your vehicle to become too
dry. To prevent this from happening, after the air in
your vehicle has cooled, turn the recirculation mode off.
The air conditioning system removes moisture from
the air, so you may sometimes notice a small amount of
water dripping underneath your vehicle while idling or
after turning off the engine. This is normal.
Sensors
The solar sensor on your vehicle monitors the solar
radiation and uses the information to maintain the
selected temperature when operating in AUTO mode by
initiating needed adjustments to the temperature, the
fan speed and the air delivery system. The system may
also supply cooler air to the side of the vehicle facing
the sun. The recirculation mode will also be activated, as
necessary. Do not cover the solar sensor located on
the top of the instrument panel near the windshield
or the system will not work properly.
There is also a sensor located behind the front bumper.
This sensor reads the outside air temperature and
helps to maintain the temperature inside the vehicle.
Any cover on the front of the vehicle could give a false
reading in the temperature.
3-28
Page 169 of 426
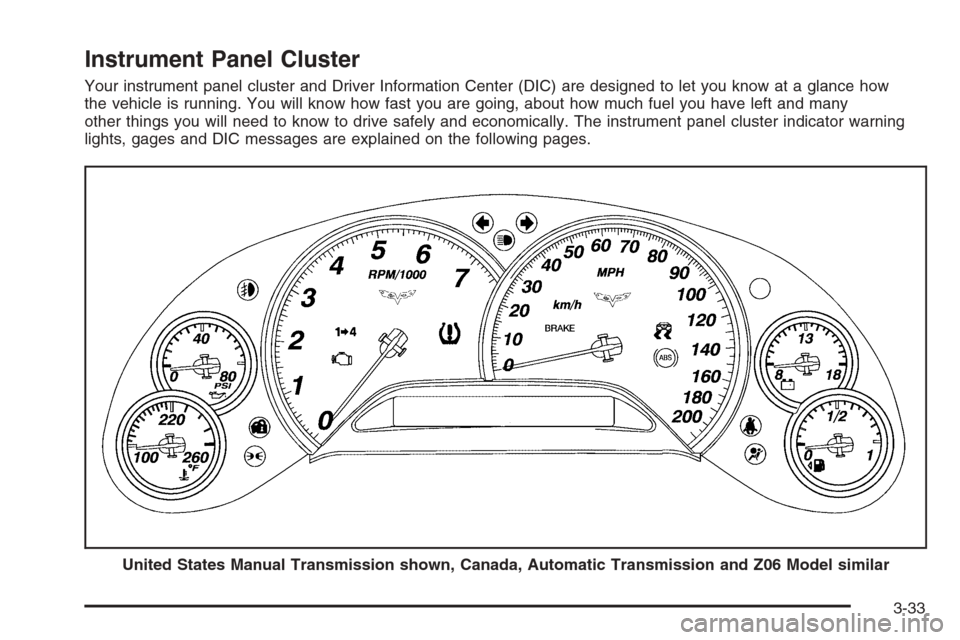
Instrument Panel Cluster
Your instrument panel cluster and Driver Information Center (DIC) are designed to let you know at a glance how
the vehicle is running. You will know how fast you are going, about how much fuel you have left and many
other things you will need to know to drive safely and economically. The instrument panel cluster indicator warning
lights, gages and DIC messages are explained on the following pages.
United States Manual Transmission shown, Canada, Automatic Transmission and Z06 Model similar
3-33
Page 170 of 426

Speedometer and Odometer
Your speedometer lets you see your speed in either
miles per hour (mph) or kilometers per hour (km/h).
For more information see “Personal Options” under
DIC Vehicle Personalization on page 3-68.
To read the odometer with the ignition off, turn on the
parking lamps.
You may wonder what happens if your vehicle needs a
new odometer installed. The mileage total of the new
odometer will be set to the original miles (kilometers) of
the old odometer. See your dealer if the odometer must
be replaced in your vehicle.
Tachometer
The tachometer displays the engine speed in thousands
of revolutions per minute (rpm).
Notice:Fuel will shut off at about 6600 rpm for the
base model and 7100 rpm for the Z06 model. If you
continue to drive your vehicle at the fuel shut off rpm,
you could damage your engine. Be sure to operate
your vehicle below the fuel shut off rpm or reduce
your rpm quickly when the fuel shuts off.
Safety Belt Reminder Light
When the ignition is turned on, a chime will be provided
for several seconds to remind people to buckle their
safety belts. The driver safety belt light will also be
provided and stay on for several seconds, then it will
�ash for several more. You should buckle your seat belt.
If the driver’s belt is
buckled, neither the
chime nor the light will
be provided.
Airbag Readiness Light
There is an airbag readiness light on the instrument
panel, which shows a deployed airbag symbol.
The system checks the airbag’s electrical system for
malfunctions. The light tells you if there is an electrical
problem. The system check includes the airbag
modules, the wiring and the diagnostic module.
For more information on the airbag system, seeAirbag
System on page 1-40.
3-34
Page 180 of 426
Have you recently changed brands of fuel?
If so, be sure to fuel your vehicle with quality fuel.
SeeGasoline Octane on page 5-5. Poor fuel quality will
cause your engine not to run as efficiently as designed.
You may notice this as stalling after start-up, stalling
when you put the vehicle into gear, mis�ring, hesitation
on acceleration, or stumbling on acceleration. (These
conditions may go away once the engine is warmed up.)
This will be detected by the system and cause the
light to turn on.
If you experience one or more of these conditions,
change the fuel brand you use. It will require at least
one full tank of the proper fuel to turn the light off.
If none of the above steps have made the light turn off,
your dealer can check the vehicle. Your dealer has
the proper test equipment and diagnostic tools to �x
any mechanical or electrical problems that may
have developed.
Emissions Inspection and Maintenance
Programs
Some state/provincial and local governments have or
may begin programs to inspect the emission control
equipment on your vehicle. Failure to pass this
inspection could prevent you from getting a vehicle
registration.Here are some things you need to know to help your
vehicle pass an inspection:
Your vehicle will not pass this inspection if the Check
Engine light is on or not working properly.
To perform a Check Engine light bulb check with the
keyless ignition, make sure the transmitter fob is in the
passenger compartment. SeeIgnition Positions on
page 2-22. Press the bottom of the ACC button on the
instrument panel and hold the button down for �ve
seconds. The instrument panel, including the Check
Engine light, will light up and the ignition will be on, but
the engine will not start — if you press the bottom of
the ACC button only brie�y, less than �ve seconds, the
accessory power mode will be turned on, but not the
ignition. After the bulb check, be sure to press and
release the ACC button again to turn the ignition off and
avoid draining the vehicle’s battery.
Your vehicle will not pass this inspection if the OBD
(on-board diagnostic) system determines that critical
emission control systems have not been completely
diagnosed by the system. The vehicle would be
considered not ready for inspection. This can happen if
you have recently replaced your battery or if your battery
has run down. The diagnostic system is designed to
evaluate critical emission control systems during normal
driving. This may take several days of routine driving. If
you have done this and your vehicle still does not pass
the inspection for lack of OBD system readiness, your
GM dealer can prepare the vehicle for inspection.
3-44
Page 181 of 426
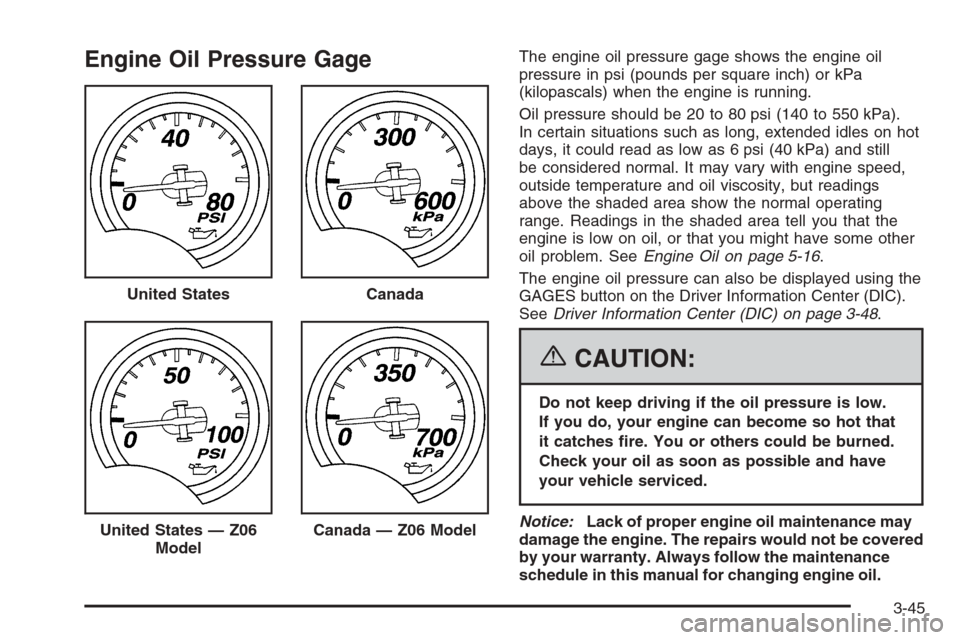
Engine Oil Pressure GageThe engine oil pressure gage shows the engine oil
pressure in psi (pounds per square inch) or kPa
(kilopascals) when the engine is running.
Oil pressure should be 20 to 80 psi (140 to 550 kPa).
In certain situations such as long, extended idles on hot
days, it could read as low as 6 psi (40 kPa) and still
be considered normal. It may vary with engine speed,
outside temperature and oil viscosity, but readings
above the shaded area show the normal operating
range. Readings in the shaded area tell you that the
engine is low on oil, or that you might have some other
oil problem. SeeEngine Oil on page 5-16.
The engine oil pressure can also be displayed using the
GAGES button on the Driver Information Center (DIC).
SeeDriver Information Center (DIC) on page 3-48.
{CAUTION:
Do not keep driving if the oil pressure is low.
If you do, your engine can become so hot that
it catches �re. You or others could be burned.
Check your oil as soon as possible and have
your vehicle serviced.
Notice:Lack of proper engine oil maintenance may
damage the engine. The repairs would not be covered
by your warranty. Always follow the maintenance
schedule in this manual for changing engine oil. United States
Canada
United States — Z06
ModelCanada — Z06 Model
3-45