2006 CHEVROLET COLORADO CD player
[x] Cancel search: CD playerPage 136 of 434
Driver Information Center (DIC).......................3-38
DIC Controls and Displays.............................3-38
DIC Warnings and Messages.........................3-41
Audio System(s).............................................3-45
Setting the Time for Radios without Radio
Data Systems (RDS)..................................3-46
Setting the Time for Radios with Radio Data
Systems (RDS).........................................3-47
AM-FM Radio...............................................3-47
Radio with CD (MP3)....................................3-50Radio with Six-Disc CD.................................3-65
Theft-Deterrent Feature (Non-RDS Radios).......3-76
Theft-Deterrent Feature (RDS Radios).............3-76
Radio Reception...........................................3-76
Care of Your CDs.........................................3-77
Care of the CD Player...................................3-77
Fixed Mast Antenna......................................3-77
XM™ Satellite Radio Antenna System.............3-78
Chime Level Adjustment................................3-78
Section 3 Instrument Panel
3-2
Page 180 of 434

Here are some ways in which you can help avoid
distraction while driving.
While your vehicle is parked:
Familiarize yourself with all of its controls.
Familiarize yourself with its operation.
Set up your audio system by presetting your
favorite radio stations, setting the tone, and
adjusting the speakers. Then, when driving
conditions permit, you can tune to your favorite
radio stations using the presets and steering
wheel controls if the vehicle has them.
Notice:Before adding any sound equipment to
your vehicle, such as an audio system, CD player,
CB radio, mobile telephone, or two-way radio,
make sure that it can be added by checking with
your dealer. Also, check federal rules covering
mobile radio and telephone units. If sound
equipment can be added, it is very important to
do it properly. Added sound equipment may
interfere with the operation of your vehicle’s engine,
radio, or other systems, and even damage them.
Your vehicle’s systems may interfere with the
operation of sound equipment that has been added.Notice:The chime signals related to safety belts,
parking brake, and other functions of your vehicle
operate through the radio/entertainment system.
If that equipment is replaced or additional equipment
is added to your vehicle, the chimes may not
work. Make sure that replacement or additional
equipment is compatible with your vehicle before
installing it. SeeAccessories and Modifications
on page 5-3.
Setting the Time for Radios without
Radio Data Systems (RDS)
Press and hold HR until the correct hour appears on
the display. Press and hold MIN until the correct minute
appears on the display. There is an initial two-second
delay before the clock goes into time-set mode.
Display the time with the ignition off, by pressing RCL,
HR, or MIN.
3-46
Page 192 of 434
Playing a CD
Insert a CD partway into the slot, label side up. The
player will pull it in, and READING will appear on
the display. The CD should begin playing. If you want
to insert a CD with the ignition off, �rst press the
eject button or the DISPL knob.
If the ignition or radio is turned off with a CD in the
player it will stay in the player. When the ignition or radio
is turned on, the CD will start to play where it stopped,
if it was the last selected audio source.
When the CD is inserted, the CD symbol will appear
on the display. As each new track starts to play,
the track number will appear on the display.
The CD player can play the smaller 3 inch (8 cm) single
CDs with an adapter ring. Full-size CDs and the
smaller CDs are loaded in the same manner.
If playing a CD-R, the sound quality may be reduced
due to CD-R quality, the method of recording, the quality
of the music that has been recorded, and the way the
CD-R has been handled. There may be an increase
in skipping, difficulty in �nding tracks, and/or difficulty in
loading and ejecting. If these problems occur, check
the bottom surface of the CD. If the surface of the CD
is damaged, such as cracked, broken, or scratched,
the CD will not play properly. If the surface of the CD is
soiled, seeCare of Your CDs on page 3-77for more
information.If there is no apparent damage, try a known good CD.
Do not add any label to a CD, it could get caught in the
CD player. If a CD is recorded on a personal computer
and a description label is needed, try labeling the top of
the recorded CD with a marking pen instead.
Notice:If you add any label to a CD, insert more
than one CD into the slot at a time, or attempt
to play scratched or damaged CDs, you could
damage the CD player. When using the CD player,
use only CDs in good condition without any
label, load one CD at a time, and keep the CD player
and the loading slot free of foreign materials,
liquids, and debris.
If an error appears on the display, see “CD Messages”
later in this section.
1 FLD
x(Previous):This button is inactive when
playing a CD.
2 FLD
w(Next):This button is inactive when playing
a CD.
3 REV (Reverse):Press and hold this pushbutton to
reverse quickly within a track. Press and hold this
pushbutton for less than two seconds to reverse at
10 times the normal playing speed. Press and hold it
for more than two seconds to reverse at 20 times
the normal playing speed. Release this pushbutton to
play the passage. ET and the elapsed time of the track
will appear on the display.
3-58
Page 194 of 434
Using an MP3 CD
MP3 Format
If you burn your own MP3 disc on a personal computer:
Make sure the MP3 �les are recorded on a
CD-R disc.
Do not mix standard audio and MP3 �les on
one disc.
Make sure playlists have a .m3u or .wpl extension,
other �le extensions may not work.
Files can be recorded with a variety of �xed or
variable bit rates. Song title, artist name, and
album will be available for display by the radio
when recorded using ID3 tags version 1 and 2.
Create a folder structure that makes it easy to
�nd songs while driving. Organize songs by albums
using one folder for each album. Each folder or
album should contain 18 songs or less.
Make sure to �nalize the disc when burning an
MP3 disc, using multiple sessions. It is usually
better to burn the disc all at once.
The player will be able to read and play a maximum
of 50 folders, 50 playlists, 10 sessions, and 255 �les.
Long �le names, folder names, or playlist names may
use more disc memory space than necessary.To conserve space on the disc, minimize the length of
the �le, folder or playlist names. You can also play an
MP3 CD that was recorded using no �le folders. The
system can support up to 11 folders in depth, though,
keep the depth of the folders to a minimum in order
to keep down the complexity and confusion in trying
to locate a particular folder during playback. If a CD
contains more than the maximum of 50 folders,
50 playlists, 10 sessions, and 255 �les the player will
let you access and navigate up to the maximum, but all
items over the maximum will be ignored.
Root Directory
The root directory will be treated as a folder. If the
root directory has compressed audio �les, the directory
will be displayed as F1 ROOT. All �les contained
directly under the root directory will be accessed prior
to any root directory folders. However, playlists (Px)
will always be accessed before root folders or �les.
Empty Directory or Folder
If a root directory or a folder exists somewhere in the
�le structure that contains only folders/subfolders and no
compressed �les directly beneath them, the player will
advance to the next folder in the �le structure that
contains compressed audio �les and the empty folder
will not be displayed or numbered.
3-60
Page 196 of 434
Playing an MP3
Insert a CD partway into the slot, label side up. The
player will pull it in, and READING will appear on
the display. The CD should begin playing and the CD
symbol will appear on the display. If you want to insert
a CD with the ignition off, �rst press the eject button
or the DISPL knob.
If the ignition or radio is turned off with a CD in the
player it will stay in the player. When the ignition or radio
is turned on, the CD will start to play where it stopped,
if it was the last selected audio source.
As each new track starts to play, the track number will
appear on the display.
The CD player can play the smaller 3 inch (8 cm) single
CDs with an adapter ring. Full-size CDs and the
smaller CDs are loaded in the same manner.
If playing a CD-R, the sound quality may be reduced
due to CD-R quality, the method of recording, the quality
of the music that has been recorded, and the way the
CD-R has been handled. There may be an increase
in skipping, difficulty in �nding tracks, and/or difficulty in
loading and ejecting. If these problems occur, check
the bottom surface of the CD. If the surface of the CD
is damaged, such as cracked, broken, or scratched,
the CD will not play properly. If the surface of the CD
is soiled, seeCare of Your CDs on page 3-77for
more information.If there is no apparent damage, try a known good CD.
Do not add any label to a CD, it could get caught in the
CD player. If a CD is recorded on a personal computer
and a description label is needed, try labeling the top
of the recorded CD with a marking pen instead.
Notice:If you add any label to a CD, insert more
than one CD into the slot at a time, or attempt
to play scratched or damaged CDs, you could
damage the CD player. When using the CD player,
use only CDs in good condition without any
label, load one CD at a time, and keep the CD player
and the loading slot free of foreign materials,
liquids, and debris.
If an error appears on the display, see “CD Messages”
later in this section.
1 FLD
x(Previous Folder):Press this pushbutton
to go to the �rst track in the previous folder. Pressing
this button while in folder random mode will take you
to the previous folder and random the tracks in that
folder.
2 FLD
w(Next Folder):Press this pushbutton to
go to the �rst track in the next folder. Pressing
this button while in folder random mode will take you
to the next folder and random the tracks in that folder.
3-62
Page 199 of 434
CD Messages
CHECK CD:If this message appears on the display
and/or the CD comes out, it could be for one of the
following reasons:
It is very hot. When the temperature returns to
normal, the CD should play.
You are driving on a very rough road. When the
road becomes smoother, the CD should play.
The CD is dirty, scratched, wet, or upside down.
The air is very humid. If so, wait about an hour
and try again.
The format of the CD may not be compatible.
See “MP3 Format” earlier in this section.
There may have been a problem while burning
the CD.
The label may be caught in the CD player.
If the CD is not playing correctly, for any other reason,
try a known good CD.
If any error occurs repeatedly or if an error cannot
be corrected, contact your GM dealer. If the radio
displays an error message, write it down and provide
it to your GM dealer when reporting the problem.
Radio with Six-Disc CD
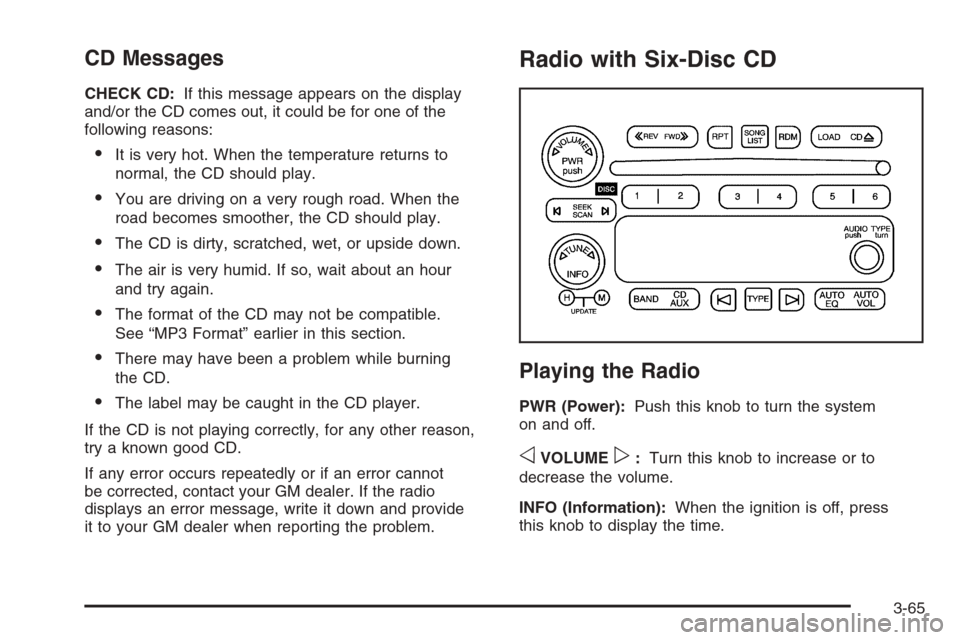
Playing the Radio
PWR (Power):Push this knob to turn the system
on and off.
oVOLUMEp:Turn this knob to increase or to
decrease the volume.
INFO (Information):When the ignition is off, press
this knob to display the time.
3-65
Page 204 of 434
RDS Messages
INFO (Information):If the current station has a
message, INFO will appear on the display. Press this
button to see the message. The message may display
the artist, song title, call in phone numbers, etc.
If the entire message is not displayed, parts of the
message will appear every three seconds. To scroll
through the message, press and release the INFO button.
A new group of words will appear on the display after
every press of this button. Once the complete message
has been displayed, INFO will disappear from the display
until another new message is received. The last message
can be displayed by pressing the INFO button. You can
view the last message until a new message is received
or a different station is tuned to.
Radio Messages
CAL ERR (Calibration Error):The audio system
has been calibrated for your vehicle from the factory.
If CAL ERR appears on the display, it means that the
radio has not been con�gured properly for the vehicle
and must be returned to your GM dealer for service.
LOCKED:This message is displayed when the
THEFTLOCK
®system has locked up. Take the
vehicle to your GM dealer for service.
If any error occurs repeatedly, or if an error cannot
be corrected, contact your GM dealer.
Playing a CD
If the ignition or radio is turned off, with a CD in the
player, it will stay in the player. When the ignition
or radio is turned on, the CD will start playing where
it stopped, if it was the last selected audio source.
When a CD is inserted, the CD symbol will appear
on the display. As each new track starts to play, the
track number will appear on the display.
The CD player can play the smaller 3 inch (8 cm)
single CDs with an adapter ring. Full-size CDs and
the smaller CDs are loaded in the same manner.
If playing a CD-R, the sound quality may be reduced
due to CD-R quality, the method of recording, the quality
of the music that has been recorded, and the way the
CD-R has been handled. There may be an increase
in skipping, difficulty in �nding tracks, and/or difficulty in
loading and ejecting. If these problems occur, check
the bottom surface of the CD. If the surface of the CD
is damaged, such as cracked, broken, or scratched,
the CD will not play properly. If the surface of the CD
is soiled, seeCare of Your CDs on page 3-77for more
information.
If there is no apparent damage, try a known good CD.
3-70
Page 205 of 434
Do not add any label to a CD, it could get caught in the
CD player. If a CD is recorded on a personal computer
and a description label is needed, try labeling the top
of the recorded CD with a marking pen instead.
Notice:If you add any label to a CD, insert more
than one CD into the slot at a time, or attempt
to play scratched or damaged CDs, you could
damage the CD player. When using the CD player,
use only CDs in good condition without any
label, load one CD at a time, and keep the CD player
and the loading slot free of foreign materials,
liquids, and debris.
If an error appears on the display, see “CD Messages”
later in this section.
LOAD:Press this button to load CDs into the CD
player. This CD player will hold up to six CDs.
To insert one CD, do the following:
1. Turn the ignition on.
2. Press and release the LOAD button.
3. Wait for the indicator light, located to the right
of the slot, to turn green.
4. Load a CD. Insert the CD partway into the slot,
label side up. The player will pull the CD in.To insert multiple CDs, do the following:
1. Turn the ignition on.
2. Press and hold the LOAD button for two seconds.
You will hear a beep and the indicator light, located
to the right of the slot, will begin to �ash and
MULTI LOAD # will appear on the display.
3. Once the light stops �ashing and turns green,
INSERT CD # will appear on the display, load
a CD. Insert the CD partway into the slot, label
side up. The player will pull the CD in.
Once the CD is loaded, the indicator light will begin
�ashing again. Once the light stops �ashing and
turns green, you can load another CD. The
CD player takes up to six CDs. Do not try to load
more than six.
To load more than one CD but less than six, complete
Steps 1 through 3. When �nished loading CDs,
press the LOAD button to cancel the loading function.
The radio will begin to play the last CD loaded.
If more than one CD has been loaded, a number for
each CD will appear on the display.
3-71