2006 CHEVROLET COLORADO ignition
[x] Cancel search: ignitionPage 126 of 434

Compass Operation
The mirror has an eight-point compass display in the
bottom of the mirror face.
When the ignition and the compass feature are on,
the compass will show two character boxes for
approximately two seconds. After two seconds, the
mirror will display the current compass heading.
For example, NE is displayed for north-east.
Compass Calibration
If after two seconds the display does not show a
compass heading, there may be a strong magnetic
�eld interfering with the compass. Such interference
may be caused by a magnetic antenna mount, note
pad holder or similar object. If the letter C appears in
the compass window, the compass needs calibration.
The mirror compass can be calibrated by driving
the vehicle in circles at 5 mph (8 km/h) or less until
the display reads a direction.
The compass can be placed in calibration mode by
pressing and holding the left map light button until
a C appears on the compass display.
Compass Variance
Compass variance is the difference between earth’s
magnetic north and true geographic north. If the mirror
is not adjusted for compass variance, your compass
could give false readings.
The mirror is set in zone eight upon leaving the
factory. It will be necessary to adjust the compass to
compensate for compass variance if you live outside
zone eight. Under certain circumstances, such as a
long distance, cross-country trip, it will be necessary
to adjust the compass variance.
To adjust for compass variance, do the following:
1. Find your current location and variance zone
number on the zone map that follows.
2-38
Page 143 of 434

Headlamp High/Low-Beam Changer
53(Headlamp High/Low Beam Changer):
To change the headlamps from low to high beam, push
the lever toward the instrument panel. To return to
low-beam headlamps, pull the multifunction lever toward
you. Then release it.
When the high beams are
on, this indicator light on
the instrument panel
cluster will also be on.
Flash-to-Pass
This feature lets you use your high-beam headlamps to
signal a driver in front of you that you want to pass.
It works even if your headlamps are in the automatic
position.To use it, pull the turn signal lever toward you, then
release it.
If your headlamps are in the automatic position or on
low beam, your high-beam headlamps will turn on.
They’ll stay on as long as you hold the lever toward you.
The high-beam indicator on the instrument panel
cluster will come on. Release the lever to return to
normal operation.
Windshield Wipers
You control the windshield wipers by turning the band
with the wiper symbol on it.
The windshield wipers work in all ignition positions,
except off. This includes the Retained Access Power
mode. SeeRetained Accessory Power (RAP) on
page 2-18.
8(Mist):For a single wiping cycle, turn the band to
mist. Hold it there until the wipers start. Then let go.
The wipers will stop after one wipe. If you want
more wipes, hold the band on mist longer.
3-9
Page 147 of 434

Increasing Speed While Using
Cruise Control
There are two ways to go to a higher speed:
Use the accelerator pedal to get to the higher
speed. Press the set button at the end of the
lever, then release the button and the accelerator
pedal. You’ll now cruise at the higher speed.
If the accelerator pedal is held longer than
60 seconds, cruise control will turn off.
Move the cruise switch from on to resume/
accelerate. Hold it there until you get up to the
speed you want, and then release the switch.
To increase your speed in very small amounts,
move the switch brie�y to resume/accelerate.
Reducing Speed While Using
Cruise Control
Press and hold the set button until you reach the
lower speed you want, then release it.
To slow down in very small amounts, brie�y press
the set button.
Passing Another Vehicle While Using
Cruise Control
Use the accelerator pedal to increase your speed.
When you take your foot off the pedal, your vehicle will
slow down to the cruise control speed you set earlier.
Using Cruise Control on Hills
How well your cruise control will work on hills depends
upon your speed, load and the steepness of the
hills. When going up steep hills, you may want to
step on the accelerator pedal to maintain your speed.
When going downhill, you may have to brake or shift
to a lower gear to keep your speed down. Of course,
applying the brake takes you out of cruise control.
Many drivers �nd this to be too much trouble and don’t
use cruise control on steep hills.
Ending Cruise Control
To turn off the cruise control, do one of the following:
Step lightly on the brake pedal.
Move the cruise control switch to off.
Lightly tap or press the clutch, if you have a
manual transmission.
Erasing Speed Memory
When you turn off the cruise control or the ignition,
your cruise control set speed memory is erased.
3-13
Page 149 of 434

Headlamps on Reminder
If a door is open, a reminder chime will sound when
your headlamps or parking lamps are manually turned
on and your key is out of the ignition. To turn off
the chime, turn the headlamp switch to off and then
back on. In the automatic mode, the headlamps turn off
once the ignition is in LOCK.
If your vehicle was �rst sold in Canada and the parking
lamps are turned on manually, the DRL will stay on.
Daytime Running Lamps (DRL)
Daytime Running Lamps (DRL) can make it easier for
others to see the front of your vehicle during the day. DRL
can be helpful in many different driving conditions, but
they can be especially helpful in the short periods after
dawn and before sunset. Fully functional daytime running
lamps are required on all vehicles �rst sold in Canada.
The DRL system will come on when the following
conditions are met:
The ignition is on.
The exterior lamps control is in AUTO.
The transmission is not in PARK (P) if you have
an automatic transmission.
The light sensor determines it is daytime.Your vehicle will have either the parking lamps or
reduced intensity low beams used as the DRL.
When the DRL are on, only those lamps will be on.
The taillamps, sidemarkers, and other lamps will not
be on. The instrument panel will not be lit up either.
When it begins to get dark, the headlamps will
automatically switch from DRL to the regular headlamps.
As with any vehicle, you should turn on the regular
headlamp system when you need it.
Automatic Headlamp System
When it is dark enough outside, your automatic
headlamp system will turn on your headlamps at the
normal brightness along with other lamps such as
the taillamps, sidemarker, parking lamps, roof marker
lamps and the instrument panel lights. The radio
lights will become more dim when the headlights are
off compared to when the headlights are on.
Your vehicle has a light sensor located on the top of
the instrument panel. Be sure it is not covered, or
the system will be on whenever the ignition is on.
The system may also turn on your headlamps when
driving through a parking garage, heavy overcast
weather or a tunnel. This is normal.
3-15
Page 152 of 434

Exit Lighting
With exit lighting, the interior lamps will come on when
you remove the key from the ignition. The lamps will not
come on if the dome override button is pressed in.
Battery Run-Down Protection
This feature shuts off the dome lamp if it is left on for
more than 20 minutes when the ignition is in LOCK.
This will help prevent your battery from running down.
Accessory Power Outlet(s)
Your vehicle may have accessory power outlets.
With accessory power outlets you can plug in auxiliary
electrical equipment such as a cellular telephone or
CB radio.
Your vehicle may have two accessory power outlets
located on the lower part of the instrument panel
below the climate control system and there may be
one located on the rear of the center console. A small
cap must be pulled down to access an accessory power
outlet. When not using an outlet be sure to cover it
with the protective cap.Notice:Leaving electrical equipment on for
extended periods will drain the battery. Always turn
off electrical equipment when not in use and do
not plug in equipment that exceeds the maximum
amperage rating.
Certain electrical accessories may not be compatible
with the accessory power outlet and could result
in blown vehicle or adapter fuses. If you experience a
problem, see your dealer for additional information
on accessory power outlets.
Notice:Adding any electrical equipment to your
vehicle may damage it or keep other components
from working as they should. The repairs would
not be covered by your warranty. Do not use
equipment exceeding maximum amperage rating
of 20 amperes. Check with your retailer before
adding electrical equipment.
When adding electrical equipment, be sure to follow
the proper installation instructions included with
the equipment.
Notice:Improper use of the power outlet can cause
damage not covered by your warranty. Do not
hang any type of accessory or accessory bracket
from the plug because the power outlets are
designed for accessory power plugs only.
3-18
Page 160 of 434

Airbag Readiness Light
There is an airbag readiness light on the instrument
panel, which shows the airbag symbol. The system
checks the airbag’s electrical system for malfunctions.
The light tells you if there is an electrical problem.
The system check includes the airbag sensors, the
airbag modules, the wiring and the crash sensing and
diagnostic module. For more information on the
airbag systems, seeAirbag System on page 1-66.
This light will come on
when you start your
vehicle, and it will �ash
for a few seconds.
Then the light should go
out. This means the
system is ready.
If the airbag readiness light stays on after you start the
vehicle or comes on when you are driving, your airbag
system may not work properly. Have your vehicle
serviced right away.{CAUTION:
If the airbag readiness light stays on after you
start your vehicle, it means the airbag system
may not be working properly. The airbags
in your vehicle may not in�ate in a crash,
or they could even in�ate without a crash.
To help avoid injury to yourself or others,
have your vehicle serviced right away if the
airbag readiness light stays on after you
start your vehicle.
The airbag readiness light should �ash for a few seconds
when you turn the ignition key to ON. If the light does
not come on then, have it �xed so it will be ready to warn
you if there is a problem.
3-26
Page 161 of 434

Passenger Airbag Status Indicator
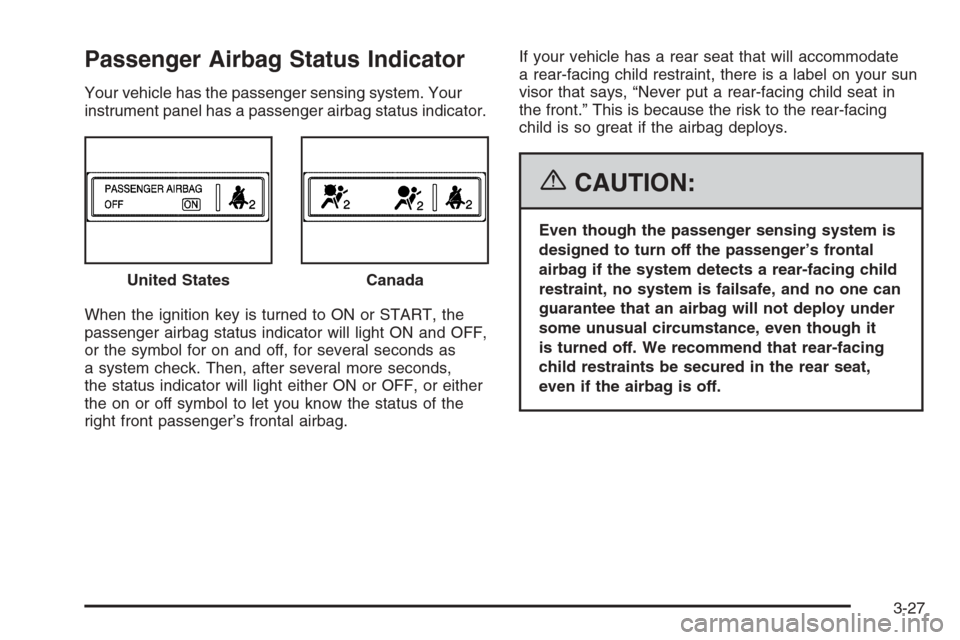
Your vehicle has the passenger sensing system. Your
instrument panel has a passenger airbag status indicator.
When the ignition key is turned to ON or START, the
passenger airbag status indicator will light ON and OFF,
or the symbol for on and off, for several seconds as
a system check. Then, after several more seconds,
the status indicator will light either ON or OFF, or either
the on or off symbol to let you know the status of the
right front passenger’s frontal airbag.If your vehicle has a rear seat that will accommodate
a rear-facing child restraint, there is a label on your sun
visor that says, “Never put a rear-facing child seat in
the front.” This is because the risk to the rear-facing
child is so great if the airbag deploys.
{CAUTION:
Even though the passenger sensing system is
designed to turn off the passenger’s frontal
airbag if the system detects a rear-facing child
restraint, no system is failsafe, and no one can
guarantee that an airbag will not deploy under
some unusual circumstance, even though it
is turned off. We recommend that rear-facing
child restraints be secured in the rear seat,
even if the airbag is off. United States
Canada
3-27
Page 164 of 434

Up-Shift Light
(Manual Transmission)
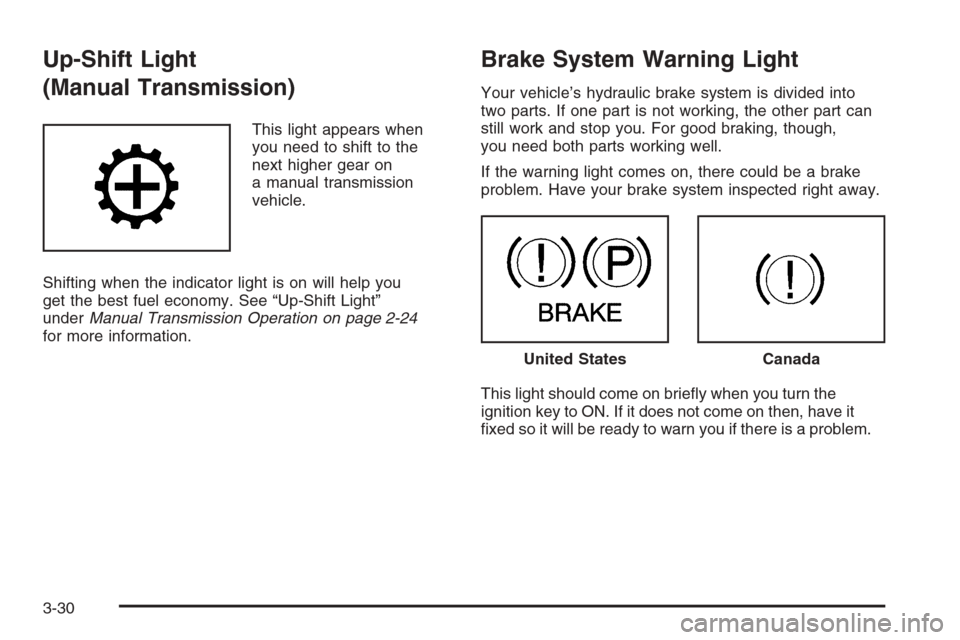
This light appears when
you need to shift to the
next higher gear on
a manual transmission
vehicle.
Shifting when the indicator light is on will help you
get the best fuel economy. See “Up-Shift Light”
underManual Transmission Operation on page 2-24
for more information.
Brake System Warning Light
Your vehicle’s hydraulic brake system is divided into
two parts. If one part is not working, the other part can
still work and stop you. For good braking, though,
you need both parts working well.
If the warning light comes on, there could be a brake
problem. Have your brake system inspected right away.
This light should come on brie�y when you turn the
ignition key to ON. If it does not come on then, have it
�xed so it will be ready to warn you if there is a problem.
United StatesCanada
3-30