Page 57 of 128

Reference
At a glance
Controls
Driving tips
Mobility
55
Lamps
Parking lamps/Low beams
0Lamps off and daytime running light*
1Parking lamps and daytime running light*
2Low beams
3Automatic headlamp control
* and daytime
running light
*
Parking lamps
In switch position1, the front, rear and side
vehicle lighting is switched on. You can use the
parking lamps to signal the position of the vehi-
cle when it is parked. For the additional option
of roadside parking lamps on one side of the
vehicle only, refer to page56.
The parking lamps will discharge the bat-
tery. Therefore, do not leave them on for
unduly long periods of time, otherwise the bat-
tery might not have enough power to start the
engine.<
Low beams
The low beams light up when the light switch is
in position 2 and the ignition is on.
When you switch off the ignition with the low
beam headlamps on, only the parking lamps will
remain on.
Defective bulb
The indicator lamp lights up:
At least one bulb of the vehicle's exte-
rior lighting has failed.
For replacing bulbs refer to page93.
Automatic headlamp control*
When the switch is in position3, the low beams
are switched on and off automatically depend-
ing on ambient light conditions, e.g. in a tunnel,
in twilight, or if there is precipitation.
When driving into tunnels with bright overhead
lights, there may be a delay before the head-
lamps come on.
The headlamps may also come on when the
sun is sitting low on a blue sky.
The low beams remain switched on inde-
pendent of the ambient lighting condi-
tions when you switch on the fog lamps
*.
When daytime running light is activated, refer to
page55, the low-beam headlamps are always
switched on when the switch is in position 3 and
the ignition is on.<
If desired, the light switch can remain in
position3. The exterior lamps are automatically
switched off after the vehicle is parked.
The automatic headlamp control cannot
serve as a substitute for your personal
judgment in determining when the lamps
should be switched on in response to ambient
lighting conditions. For example, the system
cannot detect fog or hazy weather. To avoid
safety risks, you should always switch on the
lamps manually under these conditions.<
You can have the sensitivity of your vehi-
cle's automatic headlamp control
adjusted.<
Daytime running light*
If desired, the light switch can remain in the
automatic headlamp control position. The exte-
rior lamps are automatically switched off after
the vehicle is parked.
In the Parking lamps position, the parking lamps
come on after the ignition is switched off.
If necessary, switch on the parking lamps as
described in the section about parking lamps.
Page 58 of 128

Lamps
56 You can have daytime running light acti-
vated/deactivated on your vehicle.<
Pathway lighting
If you activate the headlamp flasher after park-
ing the car, with the lights switched off, the low
beams come on and remain on for a certain
time.
You can have this function activated/
deactivated as well as the duration of the
pathway lighting set.<
LIGHTS ON warning
Whenever you open the driver's door after hav-
ing turned the key to position 0, you will hear an
acoustic signal for a few seconds to remind you
that the lamps have not been switched off.
High beams/Roadside
parking lamps
1High beams
2Headlamp flasher
3Roadside parking lamps
*
Roadside parking lamps, left or right*
When parking the vehicle, you have the option
to switch on the lamps only on the side facing
the road.
After parking the vehicle, press the lever up or
down, arrow 3, until it engages.
The roadside parking lamps discharge
the battery. Therefore, do not leave them
on for unduly long periods of time, otherwise
the battery might not have enough power to
start the engine.<
Fog lamps*
Press the button to switch them on/off.
The parking lamps or low-beam headlamps
must be switched on. A green indicator lamp
comes on in the instrument cluster to indicate
that the front fog lamps are on.
If the automatic headlamp control is acti-
vated, the low beams will come on auto-
matically when you switch on the fog lamps.<
Instrument lighting
Turn the rotary dial to adjust brightness.
Interior lamps
The interior lamps operate automatically.
Page 59 of 128
Reference
At a glance
Controls
Driving tips
Mobility
57
Switching interior lamps on/off
manually
Press button1 briefly.
If you want the interior lamps to remain off all
the time, press the button for approx.
3seconds.
Press the button briefly to revert to normal
operation.
Reading lamps*
Switch each lamp on and off with the adjacent
button2.
Page 60 of 128
Climate
58
Climate
Air conditioning
1Air flow toward the windshield and side win-
dows
2Air to the upper body area
Ventilation59
3Air to the footwell
4Air distribution
5Cooling function
*
6Recirculated-air mode
7Temperature
8Air flow rate
9Rear window defroster
Page 61 of 128

Reference
At a glance
Controls
Driving tips
Mobility
59
Air distribution
Direct the flow of air to the windows
, to the upper body area and to
the footwell . Intermediate settings
are possible.
Switching cooling function on/off
When the cooling function is on, the
air is cooled, dehumidified, then
reheated depending on the tempera-
ture setting.
Depending on the weather, the windshield may
fog over briefly when the engine is started.
Recirculated-air mode
If the air outside the car has an
unpleasant odor or contains pollut-
ants, temporarily shut off the supply
to the interior of the car. The system
recirculates the air within the vehicle.
If the windows fog over in the recircu-
lated-air mode, you should switch it off
and, if necessary, increase the air flow rate.
The manually controlled recirculated-air mode
should not be used continuously for lengthy
periods, otherwise the quality of the air inside
the car will gradually deteriorate.<
Temperature
For a higher temperature, turn the
rotary switch clockwise towards red.
For a lower temperature, turn the
rotary switch counterclockwise
towards blue.
Air flow rate
Adjust the air flow rate. The higher
the rate, the more effective the heat-
ing or cooling will be.
Switching the system on/off
Set the air flow rate to 0. Blower and air condi-
tioning are switched off and the air supply is cut
off.
To switch on the heater or air conditioning, set
any desired air flow rate.
Rear window defroster
The defroster switches off automati-
cally after a certain time.
Defrosting windows and removing
condensation
1.Air distribution1 in position .
2.Set air flow rate 2 to position 4.
3.Temperature3 to the right, red.
4.Switch on rear window defroster 4 to
defrost the rear window.
Ventilation
1Knurled wheels to set any vent position
from fully open to closed
2Slide for adjusting air flow direction
Ventilation for cooling
Adjust the vent outlets to direct the flow of cool
air toward you, for instance if it has become too
hot in the car.
Draft-free ventilation
Set the vent outlets so that the air flows past
you and not straight at you.
Page 62 of 128
Climate
60
Microfilter
The microfilter removes dust and pollen from
the incoming air. Your BMW Center replaces
this filter during regular maintenance. A sub-
stantial reduction in air flow indicates that the
filter needs to be replaced earlier.
Page 63 of 128
Reference
At a glance
Controls
Driving tips
Mobility
61
Automatic climate control*
1Air flow toward the windshield and side win-
dows
2Air to the upper body area
Ventilation63
3Air to the footwell
4Air distribution, manual
5Defrosting windows and removing conden-
sation
6AUTO program7Air flow rate, manual
8Cooling function
9Maximum cooling
10Temperature
11AUC Automatic recirculated-air control/
Recirculated-air mode
12Rear window defroster
Page 64 of 128

Climate
62
Comfortable interior climate
AUTO program 6 offers the ideal air distribution
and air flow rate for almost all conditions, refer
to AUTO program below. In addition, you can
select an interior temperature you find pleasant.
The following sections inform you in detail
about how to adjust the settings.
Air distribution, manual
Direct the flow of air to the windows
, to the upper body area and to
the footwell . Intermediate settings
are possible. The arrow lights up.
The automatic air supply remains unchanged.
You can switch the automatic air distribution
back on by pressing the AUTO button.
Defrosting windows and removing
condensation
Quickly removes ice and condensa-
tion from the windshield and side
windows.
AUTO program
The AUTO program adjusts the air
distribution to the windshield and
side windows, towards the upper
body area and into the footwell for
you. The air flow rate and your temperature
specifications will be adapted to outside influ-
ences as a result of seasonal changes, e.g. sun-
light or window condensation.
The cooling is switched on automatically with
the AUTO program.
The AUTO program functions only to a
limited extent when the convertible top is
open.<
Air flow rate, manual
Adjust the air flow rate. The arrow
lights up.
The automatic air distribution
remains unchanged. You can reactivate the
automatic mode for the air flow rate with the
AUTO button.The higher the air flow rate, the more effective
the air conditioning will be.
Switching the system on/off
Turn the rotary switch to 0. The automatic cli-
mate control is switched off and the air supply is
cut off.
To switch on the automatic climate control, set
any desired air flow rate.
Switching cooling function on/off
When the cooling function is on, the
air is cooled, dehumidified, then
reheated depending on the tempera-
ture setting.
Depending on the weather, the windshield may
fog over briefly when the engine is started.
The cooling function is automatically switched
on along with the AUTO program. The passen-
ger compartment can only be cooled while the
engine is running.
Maximum cooling
At outside temperatures above
327/06 and when the engine is
running, you obtain a maximum cool-
ing effect as soon as possible.
The automatic climate control switches to the
lowest temperature and operates in recircu-
lated-air mode. Air flows at maximum rate only
from the vents for the upper body area. You
should therefore open them for maximum cool-
ing.
Temperature
Set the desired temperature.
The values on the dial are approxima-
tions of the respective temperature
resulting in the passenger compartment.
The automatic climate control achieves this
temperature as quickly as possible regardless
of the season, using maximum cooling or heat-
ing power if necessary, and then maintains it.
If you switch between different tempera-
ture settings in quick succession, the
 1
1 2
2 3
3 4
4 5
5 6
6 7
7 8
8 9
9 10
10 11
11 12
12 13
13 14
14 15
15 16
16 17
17 18
18 19
19 20
20 21
21 22
22 23
23 24
24 25
25 26
26 27
27 28
28 29
29 30
30 31
31 32
32 33
33 34
34 35
35 36
36 37
37 38
38 39
39 40
40 41
41 42
42 43
43 44
44 45
45 46
46 47
47 48
48 49
49 50
50 51
51 52
52 53
53 54
54 55
55 56
56 57
57 58
58 59
59 60
60 61
61 62
62 63
63 64
64 65
65 66
66 67
67 68
68 69
69 70
70 71
71 72
72 73
73 74
74 75
75 76
76 77
77 78
78 79
79 80
80 81
81 82
82 83
83 84
84 85
85 86
86 87
87 88
88 89
89 90
90 91
91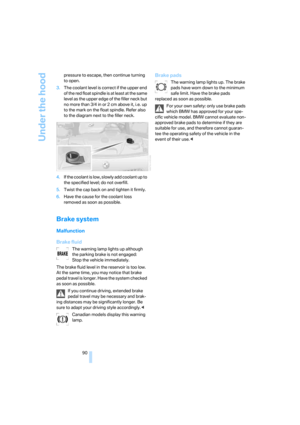 92
92 93
93 94
94 95
95 96
96 97
97 98
98 99
99 100
100 101
101 102
102 103
103 104
104 105
105 106
106 107
107 108
108 109
109 110
110 111
111 112
112 113
113 114
114 115
115 116
116 117
117 118
118 119
119 120
120 121
121 122
122 123
123 124
124 125
125 126
126 127
127


