Page 73 of 128

Reference
At a glance
Controls
Driving tips
Mobility
71
cannot be ruled out that vehicle electronics and
the mobile communications device interfere
with one another. In addition, it is not ensured
that the radio waves emitted during transmis-
sion are directed outside of the vehicle inte-
rior.<
Interior and exterior mirrors with
automatic dimming feature*
The automatic dimming feature of the interior
and exterior mirrors
* is controlled by two photo
cells in the interior rearview mirror. In the Road-
ster, one is located in the mirror glass, see
arrow. In the Coupe, it is located at the bottom
of the mirror frame. The other photo cell is on
the back of the mirror.
In order to ensure that the system functions
correctly, keep the photocells clean, do not
cover the area between the interior rearview
mirror and windshield, and do not affix adhesive
labels or stickers of any kind to the windshield
directly in front of the mirror.
Hydroplaning
When driving on wet or slushy roads,
reduce vehicle speed. If you do not, a
wedge of water may form between the tires and
the road surface. This situation, known as
hydroplaning, means that the tire can com-
pletely lose contact with the road surface, so
that neither the car can be steered nor the brake
be properly applied.<
The risk of hydroplaning increases with declin-
ing tread depth on the tires, refer also to Mini-
mum tread depth on page83.
Driving through water
Drive through water on the road only if it is
not deeper than 1 ft/30 cm, and then only
at walking speed at the most. Otherwise, the
vehicle's engine, the electrical systems and the
transmission may be damaged.<
Moisture inside the vehicle
Make sure that the passenger compart-
ment does not become wet and that liq-
uids are transported in closed containers.
Otherwise, moisture could penetrate and dam-
age electronic components inside the vehicle.<
Use the parking brake on inclines
On inclines, keep the vehicle from rolling
by using the parking brake rather than by
slipping the clutch, which would lead to a high
degree of clutch wear.<
Braking safely
Your BMW is equipped with ABS as a standard
feature. Applying the brakes fully is the most
effective way of braking in situations in which
this is necessary. Since the vehicle maintains
steering responsiveness, you can still avoid
possible obstacles with a minimum of steering
effort.
Pulsation at the brake pedal combines with
sounds from the hydraulic circuits to indicate to
the driver that ABS is in its active mode.
Wet roads
When roads are wet or there is heavy rain,
briefly exert gentle pressure on the brake pedal
every few miles. Watch traffic conditions to
ensure that this maneuver does not endanger
other road users. The resulting heat dries the
brake rotors and brake pads. Immediate braking
force is then available if necessary.
Inclines
To prevent overheating and, as a result,
diminished braking effectiveness, drive
down long or steep downhill grades in the gear
that requires the least braking. Otherwise, even
light but consistent pedal pressure can lead to
Page 74 of 128

Special operating instructions
72 high temperatures, brake wear and possibly
even brake failure.<
You can increase the engine's braking effect by
shifting down, all the way to first gear if neces-
sary. This strategy helps you avoid placing
excessive loads on the brake system. Down-
shifting in manual mode of the automatic trans-
mission, refer to page41.
Never drive with the clutch held down,
with the transmission in idle or with the
engine switched off; otherwise, engine braking
action will not be present or there will be no
power assistance to the brakes or steering.
Never allow floor mats, carpets or any other
objects to protrude into the area around the
pedals, otherwise pedal function could be
impaired.<
Corrosion on the brake rotors
Limited vehicle use, extended periods with the
vehicle parked or in storage, and operating con-
ditions in which braking is restricted to gentle,
low-pressure applications will all increase the
tendency for corrosion to form on the rotors and
contamination to accumulate on the brake
pads. This occurs because the minimal pres-
sure which must be exerted by the pads to
clean the rotors by brake applications is not
reached.
If the brake rotors are corroded, they will tend to
respond to braking with a pulsating effect which
even extended application will fail to cure.
When the vehicle is parked
Condensation forms while the air conditioning
or automatic climate control is in operation, and
then exits under the vehicle. Traces of con-
densed water on the ground underneath the
vehicle are thus normal.
Before driving into a car wash
For general information about taking care of
your BMW, refer to the Caring for your vehicle
brochure.
Cargo loading
Avoid overloading the vehicle so that the
permissible carrying capacity of the tires
is not exceeded. Otherwise, overheating and
inner damage to the tires may result. The ulti-
mate result can assume the form of a sudden air
loss.<
Determining the maximum load
1.Locate the following statement on your
vehicle's placard
*:
The combined weight of occupants
and cargo should never exceed
XXX kg or YYY lbs. Otherwise, overloading
can result in damage to the vehicle and
unstable driving conditions.<
2.Determine the combined weight of the
driver and passenger that will be riding in
your vehicle.
3.Subtract the combined weight of the driver
and passenger from XXX kilograms or
YYY pounds.
4.The resulting figure equals the available
amount of cargo and luggage load capacity.
For example, if the YYY amount equals
551 lbs and there will be two 150 lbs occu-
pants in your vehicle, the amount of avail-
able cargo and luggage load capacity is
251 lbs.
551 lbs minus 300 lbs = 251 lbs
5.Determine the combined weight of luggage
and cargo being loaded on the vehicle. That
weight may not safely exceed the available
cargo and luggage load capacity calculated
in step 4.
Page 75 of 128

Reference
At a glance
Controls
Driving tips
Mobility
73
Load
The permissible load is the sum of the occu-
pants' weights and the weight of the cargo. The
greater the weight of the occupants, the less
cargo can be transported.
Stowing cargo
>Load heavy cargo as far forward as possi-
ble, directly behind the cargo bay partition,
and as low as possible.
>Cover sharp edges and corners.
To avoid damaging the rear of the back-
rests or the rear interior trim panel, do not
stow heavy cargo or cargo with sharp edges
and corners behind the seats.
In addition, large and bulky cargo stowed
behind a seat may prevent the backrest from
engaging properly. Therefore, check the back-
rest to see if it is properly engaged, and move
the seat forward if necessary; refer to page31.
Always position and secure the load as
described above. If you do not, it can endanger
the occupants during braking or evasive
maneuvers.
Never exceed either the approved gross vehicle
weight or either of the approved axle loads, refer
to page109, as excessive loads can pose a
safety hazard, and may also place you in viola-tion of traffic safety laws.
Heavy or hard objects should not be carried
loose inside the car, since they could be thrown
around, for example as a result of heavy braking,
sudden swerves, etc., and endanger the occu-
pants.<
Roadster: convertible top
compartment
The cargo bay can be enlarged when the
convertible top is closed, refer to page23.
I t i s r e c o m m e n d ed t h a t y o u a lw a y s f o l d t h e c o n -
vertible top compartment panel down as soon
as you have taken your cargo out of the cargo
bay. This way, you can be sure that you can
always operate the convertible top at any time.
When the convertible top is closed, fold the
convertible top compartment panel up before
stowing your cargo in the cargo bay, to avoid
any damage to the convertible top compart-
ment or your load.
Do not stow any items on the convertible top
compartment panel, otherwise the convertible
top could be damaged while it is opening.<
If you stow cargo behind the seats of your
BMW:
>Only stow light objects such as clothing,
etc.
>Do not pile objects higher than the top edge
of the backrests.
Roadster: hardtop
preparation*
Pull covers off, see arrow1.
The brackets for attaching the hardtop
are located underneath the covers; see arrow2.
Page 76 of 128
Special operating instructions
74 For instructions on how to install the
hardtop, please read the accompanying
assembly information.
The hardtop is available from your BMW Center
as an optional extra.<
Page 77 of 128
Reference
At a glance
Controls
Driving tips
Mobility
75
Page 78 of 128
Page 79 of 128
Mobility
This section helps you maintain your car's
mobility by supplying important information
on vital topics including fuels and lubricants,
wheels and tires, service, maintenance and
breakdown assistance.
Mobility
Page 80 of 128

Refueling
78
Refueling
Always switch off the engine before refu-
eling. Otherwise the tank cannot be
refilled. The Service Engine Soon warning lamp
will come on.<
Take all precautionary measures and
observe all applicable regulations when
handling fuel. Do not carry any spare fuel con-
tainers in your vehicle. They can develop a leak
and cause an explosion or cause a fire in the
event of an accident.<
Gas cap
Opening
1.Open the fuel filler door, arrow 1.
2.Turn the gas cap counterclockwise.
3.Place the gas cap in the bracket attached to
the fuel filler door, arrow 2.
Closing
Fit the gas cap and turn it clockwise until you
clearly hear a click.
Do not jam the strap between the gas cap
and the vehicle.<
Warning lamp
* lights up.
The gas cap is not properly closed or is
missing. Check if the gas cap is prop-
erly closed.
Manually releasing the fuel filler door
In the event of a malfunction, you can release
the fuel filler door manually:1.Remove the cover for the right-hand rear
lamps in the cargo bay by turning the lock,
see arrow.
2.Pull the cargo bay trim panel slightly toward
the interior. The green button with the fuel
pump symbol becomes visible.
3.Undo the adhesive strip and pull off.
4.Pull the button. The fuel filler door is
released.
Pull on the button slowly and care-
fully; otherwise it could be torn off.<
Observe the following when refueling
When handling fuels, comply with all of
the applicable safety precautions posted
at the service station.<
When refueling, insert the filler nozzle com-
pletely into the filler pipe. Avoid lifting the filler
nozzle while filling the tank, as it could other-
wise lead to:
>Premature pump shutoff
>A reduced efficiency of the fuel-vapor
recovery system.
 1
1 2
2 3
3 4
4 5
5 6
6 7
7 8
8 9
9 10
10 11
11 12
12 13
13 14
14 15
15 16
16 17
17 18
18 19
19 20
20 21
21 22
22 23
23 24
24 25
25 26
26 27
27 28
28 29
29 30
30 31
31 32
32 33
33 34
34 35
35 36
36 37
37 38
38 39
39 40
40 41
41 42
42 43
43 44
44 45
45 46
46 47
47 48
48 49
49 50
50 51
51 52
52 53
53 54
54 55
55 56
56 57
57 58
58 59
59 60
60 61
61 62
62 63
63 64
64 65
65 66
66 67
67 68
68 69
69 70
70 71
71 72
72 73
73 74
74 75
75 76
76 77
77 78
78 79
79 80
80 81
81 82
82 83
83 84
84 85
85 86
86 87
87 88
88 89
89 90
90 91
91 92
92 93
93 94
94 95
95 96
96 97
97 98
98 99
99 100
100 101
101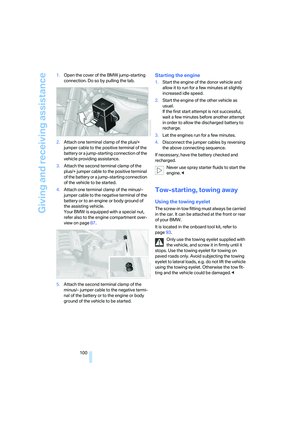 102
102 103
103 104
104 105
105 106
106 107
107 108
108 109
109 110
110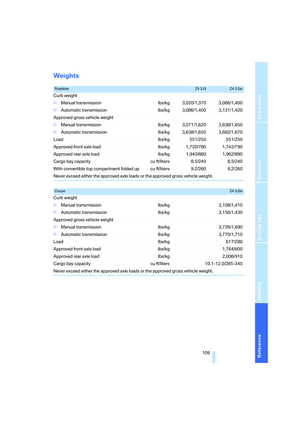 111
111 112
112 113
113 114
114 115
115 116
116 117
117 118
118 119
119 120
120 121
121 122
122 123
123 124
124 125
125 126
126 127
127


