Page 91 of 163
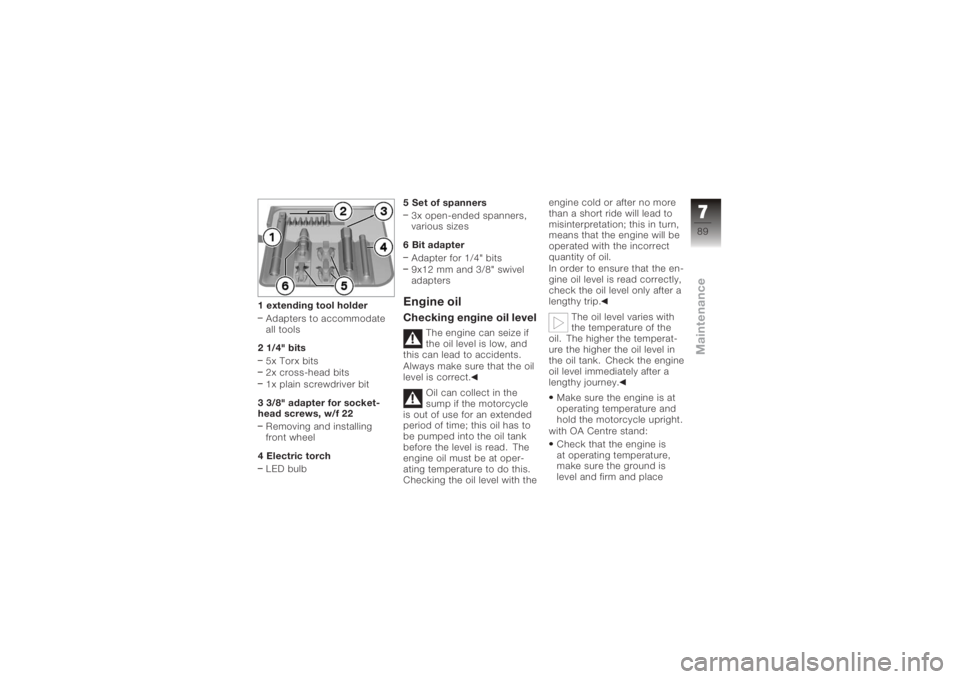
1 extending tool holderAdapters to accommodate
all tools
2 1/4" bits 5x Torx bits
2x cross-head bits
1x plain screwdriver bit
3 3/8" adapter for socket-
head screws, w/f 22 Removing and installing
front wheel
4 Electric torch LED bulb 5 Set of spanners
3x open-ended spanners,
various sizes
6 Bit adapter Adapter for 1/4" bits
9x12 mm and 3/8" swivel
adapters
Engine oilChecking engine oil level
The engine can seize if
the oil level is low, and
this can lead to accidents.
Always make sure that the oil
level is correct.
Oil can collect in the
sump if the motorcycle
is out of use for an extended
period of time; this oil has to
be pumped into the oil tank
before the level is read. The
engine oil must be at oper-
ating temperature to do this.
Checking the oil level with the engine cold or after no more
than a short ride will lead to
misinterpretation; this in turn,
means that the engine will be
operated with the incorrect
quantity of oil.
In order to ensure that the en-
gine oil level is read correctly,
check the oil level only after a
lengthy trip.
The oil level varies with
the temperature of the
oil. The higher the temperat-
ure the higher the oil level in
the oil tank. Check the engine
oil level immediately after a
lengthy journey.
Make sure the engine is at
operating temperature and
hold the motorcycle upright.
with OA Centre stand:
Check that the engine is
at operating temperature,
make sure the ground is
level and firm and place
789zMaintenance
Page 92 of 163
the motorcycle on its centre
stand.
Allow the engine to idle for
one minute.
Switch off the ignition.
Check the oil level in oil-
level indicator1. Engine oil, specified
level
Between MIN and MAX
marks
If the oil level is below the
MIN mark: Top up the engine oil.
If the oil level is above the
MAX mark: Drain off the engine oil.
Top up the engine oilMake sure the ground is
level and firm and place the
motorcycle on its stand.
Removing the seat ( 53)
Damage to the engine
can result if it is oper-
ated without enough oil, but
the same also applies if the oil
level is too high.
Always make sure that the oil
level is correct.
Wipe the area around the
filler neck clean.
790zMaintenance
Page 93 of 163
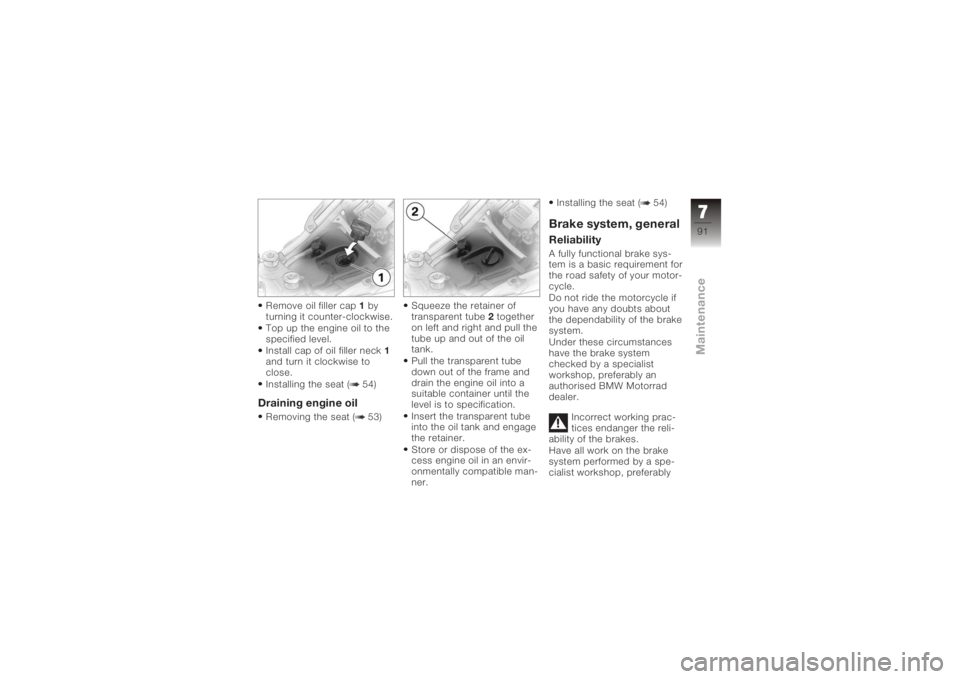
Remove oil filler cap1by
turning it counter-clockwise.
Top up the engine oil to the
specified level.
Install cap of oil filler neck 1
and turn it clockwise to
close.
Installing the seat ( 54)Draining engine oilRemoving the seat ( 53) Squeeze the retainer of
transparent tube
2together
on left and right and pull the
tube up and out of the oil
tank.
Pull the transparent tube
down out of the frame and
drain the engine oil into a
suitable container until the
level is to specification.
Insert the transparent tube
into the oil tank and engage
the retainer.
Store or dispose of the ex-
cess engine oil in an envir-
onmentally compatible man-
ner. Installing the seat ( 54)
Brake system, generalReliabilityA fully functional brake sys-
tem is a basic requirement for
the road safety of your motor-
cycle.
Do not ride the motorcycle if
you have any doubts about
the dependability of the brake
system.
Under these circumstances
have the brake system
checked by a specialist
workshop, preferably an
authorised BMW Motorrad
dealer.
Incorrect working prac-
tices endanger the reli-
ability of the brakes.
Have all work on the brake
system performed by a spe-
cialist workshop, preferably
791zMaintenance
Page 111 of 163
this substitute rear light, the
indicators in the display tell
you that a bulb defect has oc-
curred.A defective bulb places
your safety at risk be-
cause it is easier for other
users to oversee you and
your motorcycle.
Replace defective bulbs as
soon as possible; always
carry a complete set of spare
bulbs if possible.
The bulb is pressurised
and can cause injury if
damaged.
Wear protective goggles
and gloves when changing
bulbs.
The types of bulb fitted
to your motorcycle are
listed in the section entitled
"Technical data". Do not touch the glass
of new bulbs with your
fingers. Use a clean, dry cloth
to hold the bulbs when hand-
ling them. Dirt deposits, in
particular oil and grease, in-
terfere with heat radiation
from the bulb. This leads to
overheating and shortens the
bulb's operating life.
Replacing low-beam
headlight bulb
If it is not standing firmly,
the motorcycle could
topple in the course of the
operations described below.
Always make sure that the
motorcycle is stable and
firmly supported.
Turn the handlebars
to the left to facilitate
access. Make sure the ground is
level and firm and place the
motorcycle on its stand.
Switch off the ignition.
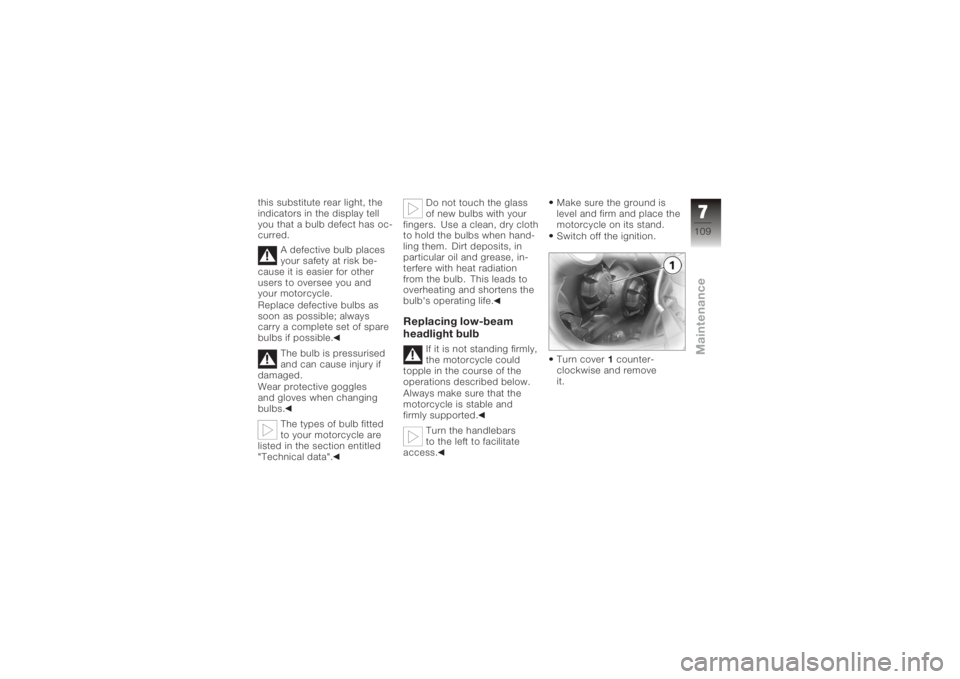
Turn cover
1counter-
clockwise and remove
it.
7109zMaintenance
Page 158 of 163
A
Abbreviations and symbols, 6
Anti-theft alarm, 17
B
BatteryCharging battery when
connected, 120
Charging battery when
disconnected, 121
Installation, 121, 122
Removal, 121, 122
Technical data, 141
Warning, battery charge
current, 26
Brake fluid Checking level, front, 94
Checking level, rear, 95
Brake pads Checking front, 92
Checking rear, 93
Brakes Technical data, 140
Breakdown assistance kit, 85 Bulbs
General instructions, 108
Replacing brake-light
bulbs, 113
Replacing front turn
indicator bulbs, 115
Replacing high-beam
headlight bulb, 111
Replacing low-beam
headlight bulb, 109
Replacing parking-light
bulb, 113
Replacing rear light
bulbs, 113
Replacing rear turn indicator
bulbs, 117
Technical data, 142
Warning, bulb failure, 27
C
Case Adapting, 84
Adjusting, 82
Closing, 82
Installing, 84 Opening, 82
Removing, 83
Checklist, 66
Clock, 20 Adjusting, 42
Clutch Fluid reservoir, 11, 13
Technical data, 137
Confirmation of maintenance work, 149
E
Electrics Technical data, 141
Emergency off switch (kill switch), 16, 48
Engine Technical data, 134
Temperature gauge, 20, 21
Warning, engine electron-
ics, 25
Engine oil Checking level, 89
Draining, 91
Technical data, 136
11156zIndex
Page 159 of 163
Topping up, 90
Warning, engine oil level, 26
Warning, engine oil pres-
sure, 25
ESA, 59 Adjust spring preload, 60
Adjust suspension damp-
ing, 59
Call up settings, 59
EWS Warning, 24
F
Final drive Technical data, 139
Frame Technical data, 143
Front-wheel stand Installing, 106
Fuel Quantity reading, 20
Refuelling, 71
Technical data, 135
Warning, fuel down to
reserve, 24
Fuses, 141 G
Gear indicator, 20
Grip heating, 16, 48
H
Handlebar fittings
General view, left side, 15
General view, right side, 16
Hazard warning flashers, 15, 16
Switching off, 41
Switching on, 40
Headlight Adjusting headlight beam
throw, 51
High-beam headlight, 18
Low-beam headlight, 18
Side lights, 18
Headlight flasher, 15
High-beam headlight, 15
Horn, 15
I
Ignition Switching off, 38
Switching on, 38 Immobiliser
Warning, 24
Instrument cluster Overview, 17
Sensor for lighting, 17
J
Jump start, 118
L
Laying up, 128
Lights Switch on the high-beam
headlight, 50
Switching off parking
lights, 51
Switching on parking
lights, 51
Switching on the low-beam
headlight, 50
Switching on the side
lights, 50
11157zIndex
Page 160 of 163
M
MaintenanceGeneral instructions, 88
Intervals, 147
Multifunction display, 17, 20
O
Odometer and tripmeters, 20 Operation, 41
Pushbutton, 15
Resetting tripmeter, 42
Selecting readings, 41
On-board computer Ambient temperature, 45
Average consumption, 46
Average speed, 45
Oil level, 47
Pushbutton, 15
Range, 47
Reset average consump-
tion, 46
Resetting average
speed, 46
Selecting readings, 44 P
Power socket, 11, 13
Pre-ride check, 67
R
Rear-wheel stand
Installing, 107
Refuelling, 71
Reserve Warning, 24
Residual range, 42
Restoring to use, 129
Rev. counter, 17
Rims Test, 97
Running gear
Technical data, 139
S
Seat Installation, 54
Lock, 11, 13
Removal, 53
Service, 146
Service Card, 147 Side stand
Starting the engine, 66
Spark plugs, 142
Speedometer, 17
Spring preload, rear Adjusting, 11, 13, 57
Starter, 16
Steering lock, 39
Suspension damping, rear Adjusting, 11, 13, 58
T
Technical data Battery, 141
Brakes, 140
Bulbs, 142
Clutch, 137
Electrics, 141
Engine, 134
Engine oil, 136
Final drive, 139
Frame, 143
Fuel, 135
Running gear, 139
Spark plugs, 142
11158zIndex