2006 BMW M6 COUPE buttons
[x] Cancel search: buttonsPage 92 of 227

Practical interior accessories
90
Practical interior accessories
Integrated universal remote
control*
The concept
The integrated universal remote control
replaces up to three different hand-held trans-
mitters for various items of radio-controlled
equipment such as door openers and house
alarm systems. The integrated universal remote
control registers and stores signals from the
original hand-held transmitters.
The signal of an original hand-held transmitter
can be programmed on one of the three mem-
ory buttons1. Then with the ignition switched
on, this programmed memory button 1 can be
used to operate the respective feature. The
LED2 flashes to confirm transmission of the
signal.
If you sell your vehicle one day, delete the saved
programs beforehand for your own security,
refer to page91.
To prevent possible damage or injury,
before programming or using the inte-
grated universal remote control, always inspect
the immediate area to make certain that no peo-
ple, animals or objects are within the travel
range of the device. Also, comply with the
safety precautions of the original hand-held
transmitter.<
Checking compatibility
If you see this symbol on the packaging
or in the manual supplied with the orig-
inal hand-held transmitter, it is safe to
assume that it is compatible with the integrated
universal remote control.
If you have additional questions, please
contact your BMW center or call:
1-800-355-3515.
Information is also provided on the Internet at:
www.bmwusa.com or
www.homelink.com.HomeLink is a registered trademark of
Johnson Controls, Inc.<
Programming
1Memory buttons
2LED
Fixed-code hand-held transmitters
1.Switch on ignition, refer to page50.
2.When using for the first time: press both
outer memory buttons1 for approx. 20 sec-
onds until the LED2 flashes. all stored pro-
grams are deleted.
3.Hold the original hand-held transmitter at a
distance of approx. 2 in/5 cm to 8 in/20 cm
from the memory buttons1.
The required distance between the
hand-held transmitter and the mem-
ory buttons1 depends on the particular
system of the original hand-held transmitter
used.<
4.Simultaneously press the transmit key on
the original hand-held transmitter and the
desired memory button 1 on the integrated
universal remote control. The LED2 flashes
slowly at first. As soon as the LED2 flashes
rapidly, release both buttons. If the LED2
does not flash rapidly after approx. 15 sec-
onds, alter the distance.
5.To program other original hand-held trans-
mitters, repeat steps 3 and 4.
Page 93 of 227

Controls
91Reference
At a glance
Driving tips
Communications
Navigation
Entertainment
Mobility
The corresponding memory button 1 is now
programmed with the signal of the original
hand-held transmitter.
You can operate the system when the engine is
running or when the ignition is switched on.
If the device can not be used after
repeated programming, check whether
the original hand-held transmitter uses an alter-
nating-code system. To do so, either read the
instructions for the original hand-held transmit-
ter or hold down the programmed memory
button1 of the integrated universal remote
control. If the LED2 on the integrated universal
remote control flashes rapidly for a short time
and then remains lit for approx. 2 seconds, this
indicates that the original hand-held transmitter
uses an alternating-code system. In the case of
an alternating-code system, program the mem-
ory buttons1 as described at Alternating-code
transmitters.<
Alternating-code hand-held
transmitters
To program the integrated universal remote
control, consult the operating instructions for
the equipment to be set. You will find informa-
tion there on the possibilities for synchroniza-
tion.
When programming hand-held transmitters
that employ an alternating code, please observe
the following supplementary instructions:
P r o g ra m m in g w i ll b e ea s i er w it h t h e a i d o f
a second person.<
1.Park your vehicle within the range of the
remote-controlled equipment.
2.Program the integrated universal remote
control as described above in Fixed-code
hand-held transmitters.
3.Locate the button on the receiver of the
device to be set, e.g. on the drive unit.
4.Press the button on the receiver of the
equipment to be set. After step 4, you have
approx. 30 seconds for step 5.
5.Press the programmed memory button1
of the integrated universal remote control
three times.The corresponding memory button 1 is now
programmed with the signal of the original
hand-held transmitter.
If you have any additional questions,
please contact your BMW center.<
Deleting stored programs
Press both outer buttons 1 for approx. 20 sec-
onds, maintaining pressure until the LED2
starts to flash: all stored programs are deleted.
Programs cannot be deleted individually.
Glove compartment
Opening
Press the button. The glove compartment
opens automatically and the lamps come on.
To prevent injury in the event of an acci-
dent while the vehicle is being driven,
close the glove compartment immediately after
use.<
Closing
Fold the cover up.
Rechargeable flashlight*
The flashlight is located on the left side of the
glove compartment.
The flashlight can remain there continuously.
Page 128 of 227

On/off and tone
126
On/off and tone
The following audio sources have shared con-
trols and setting options:
>Professional
* radio or
Business radio
>CD player
>CD changer
*
Controls
The audio sources can be operated using:
>Buttons near CD player
>iDrive
>Buttons on steering wheel, refer to page11
Buttons near CD player
The layout of the buttons can vary depending
on your vehicle's equipment.
Single drive:
Two drives:1Entertainment sound output on/off, volume
>Press: switch on/off.
When you switch on, the last set radio
station or CD track is played.
>Turn: adjust volume.
2Drive for audio CDs
3 Eject CD
4 Station scan/track search
>Change radio station.
>Select track for CD player and
CD changer.
5Drive for navigation DVDs
Operation via iDrive
iDrive, for explanation of principle, refer to
page16.
1.Press the button.
This opens the start menu.
2.Move the controller backwards to call up
"Entertainment".
You have the following choices:
>"FM" and "AM": radio reception
>"WB": Weather Band station
>"SAT": satellite radio
>"CD": CD player or CD changer
>"Set": depending on the audio source,
other adjustments can be made, e.g. with
the radio: update station with strongest
reception, store station, tone control, sam-
ple stations.
Page 129 of 227

Navigation
Entertainment
Driving tips
127Reference
At a glance
Controls
Communications
Mobility
From another menu, you can switch
directly to the screen last displayed,
refer to Comfort opening of menu items
page18.<
The selected audio source is stored for the
remote control currently in use.
Switching on/off
To switch the Entertainment sound output on/
off:
Press knob1 next to the CD player.
This symbol on the Control Display indi-
cates that sound output is switched off.
For a single drive, the sound output is available
for approx. 20 minutes with the ignition
switched off.
To do so, switch the sound output on again.
Adjusting volume
Turn knob1 next to the CD player until the
desired volume is set.
You can also adjust the volume with buttons on
the steering wheel, refer to page11.
The setting is stored for the remote control cur-
rently in use.
Tone control
You can alter various tone settings, e. g. treble
and bass, or the speed-dependent volume
increase.
The sound settings are globally adjusted for all
audio sources.
The settings are stored for the remote control
currently in use.
Changing tone settings
1.Press the button.
This opens the start menu.
2.Press the controller to open the menu.
3.Select "Entertainment settings" and press
the controller.
4.Select "Audio" and press the controller.
The tone settings can also be selected when
you have opened "Entertainment" in the start
menu:
Select "Set" and then "Tone", and press the
controller.
Treble and bass
1.Select "Treble / Bass" and press the con-
troller.
Page 133 of 227

Navigation
Entertainment
Driving tips
131Reference
At a glance
Controls
Communications
Mobility
Changing selection criteria
1.Change into the second field from the top.
2.Turn the controller until the desired selec-
tion criterion is selected and press the con-
troller.
Buttons next to CD player
Press the button for the corresponding
direction.
The system switches to the next displayed sta-
tion.
You can also change stations with buttons on
the steering wheel, refer to page11.
Sampling stations, scan
The system automatically plays a brief sample
from each of the stations on the current wave-
band.
1.Select "FM" or "AM" and press the control-
ler.
"Set" is selected.
2.Press the controller.
Other menu items are displayed.
3.Select "Scan" and press the controller.
The stations are sampled.To end sampling:
1.Press the controller.
2.Select "Scan" and press the controller.
This cancels sampling of the stations, and the
radio remains on the current station.
Buttons next to CD player
To sample the stations, press and hold
the button for the corresponding direction.
To stop scanning, press the button again.
Selecting frequency manually
With "Manual" you can select stations that are
received in addition to those displayed.
1.Select "FM" or "AM" and press the control-
ler.
2.Change into the second field from the top.
3.Select "Manual" and press the controller.
4.Turn the controller to set a certain fre-
quency.
Updating stations with best reception
For Professional radio with "AM" and with Busi-
ness radio:
If you are on a longer journey and leave the
transmission range of the stations originally set,
you can update the list of stations with the best
reception.
1.Select "FM" or "AM" and press the control-
ler.
2.Change into the second field from the top.
Page 140 of 227

Radio
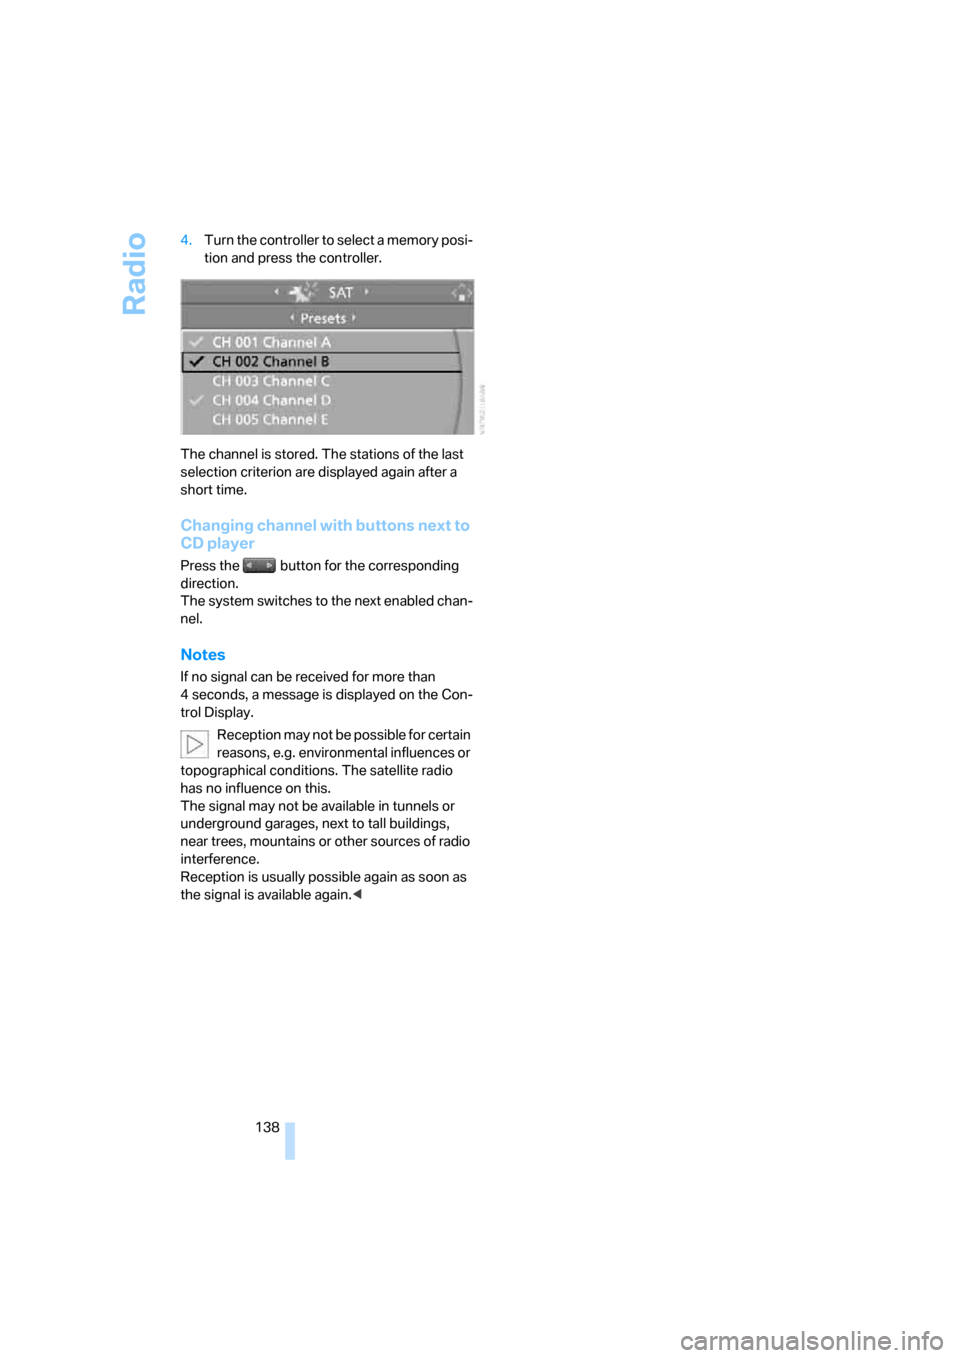
138 4.Turn the controller to select a memory posi-
tion and press the controller.
The channel is stored. The stations of the last
selection criterion are displayed again after a
short time.
Changing channel with buttons next to
CD player
Press the button for the corresponding
direction.
The system switches to the next enabled chan-
nel.
Notes
If no signal can be received for more than
4 seconds, a message is displayed on the Con-
trol Display.
Reception may not be possible for certain
reasons, e.g. environmental influences or
topographical conditions. The satellite radio
has no influence on this.
The signal may not be available in tunnels or
underground garages, next to tall buildings,
near trees, mountains or other sources of radio
interference.
Reception is usually possible again as soon as
the signal is available again.<
Page 142 of 227

CD player and CD changer
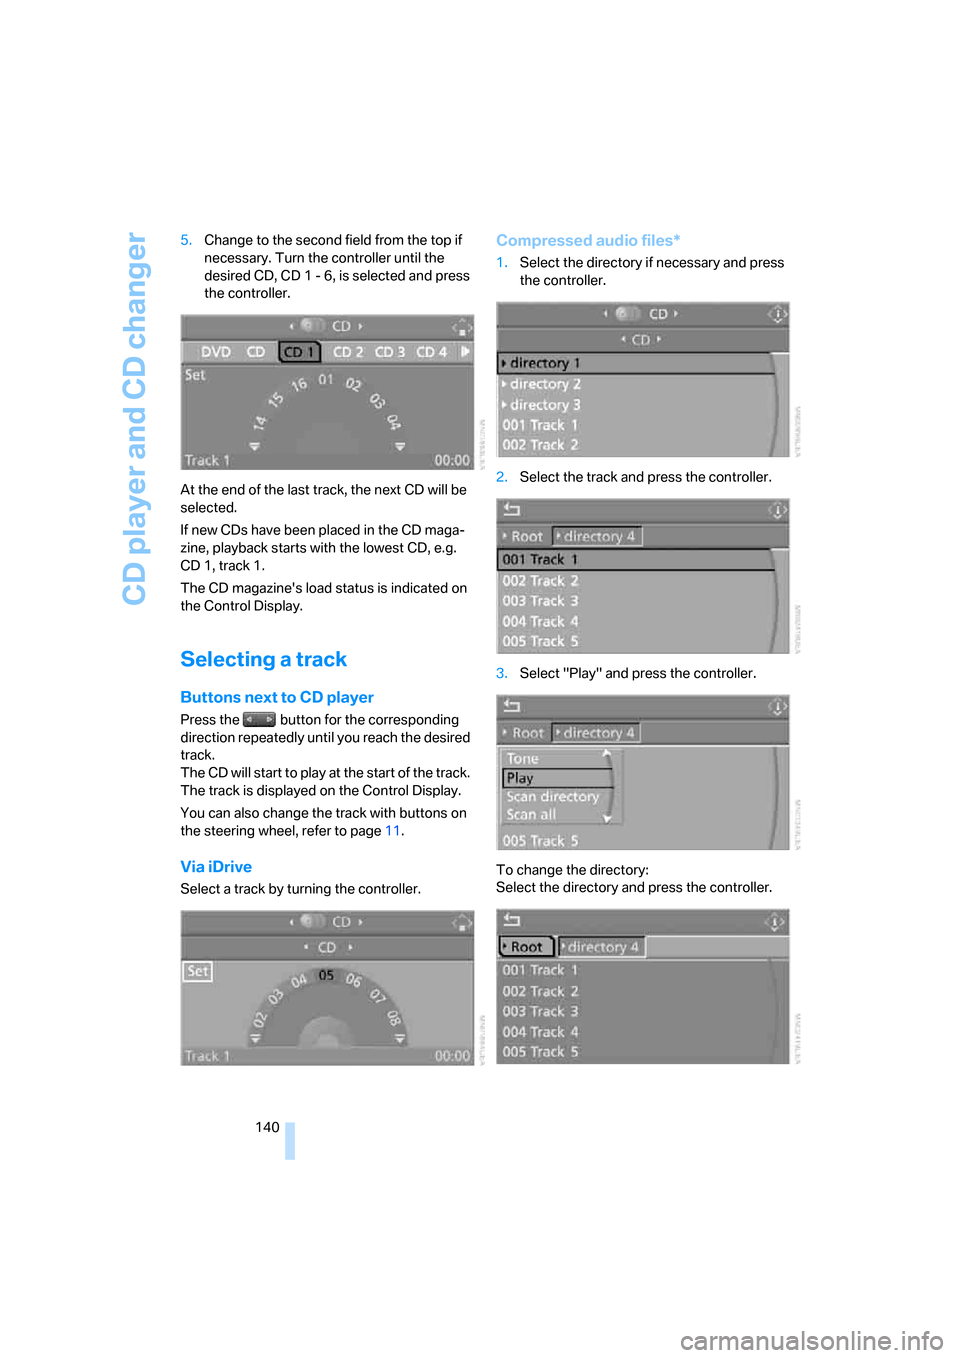
140 5.Change to the second field from the top if
necessary. Turn the controller until the
desired CD, CD 1 - 6, is selected and press
the controller.
At the end of the last track, the next CD will be
selected.
If new CDs have been placed in the CD maga-
zine, playback starts with the lowest CD, e.g.
CD 1, track 1.
The CD magazine's load status is indicated on
the Control Display.
Selecting a track
Buttons next to CD player
Press the button for the corresponding
direction repeatedly until you reach the desired
track.
The CD will start to play at the start of the track.
The track is displayed on the Control Display.
You can also change the track with buttons on
the steering wheel, refer to page11.
Via iDrive
Select a track by turning the controller.
Compressed audio files*
1.Select the directory if necessary and press
the controller.
2.Select the track and press the controller.
3.Select "Play" and press the controller.
To change the directory:
Select the directory and press the controller.
Page 145 of 227

Navigation
Entertainment
Driving tips
143Reference
At a glance
Controls
Communications
Mobility
Fast forward/reverse
Buttons next to CD player:
Press and hold the button for the corre-
sponding direction.
CD magazine
The BMW CD changer for six CDs is installed in
the glove compartment.
Removing CD magazine
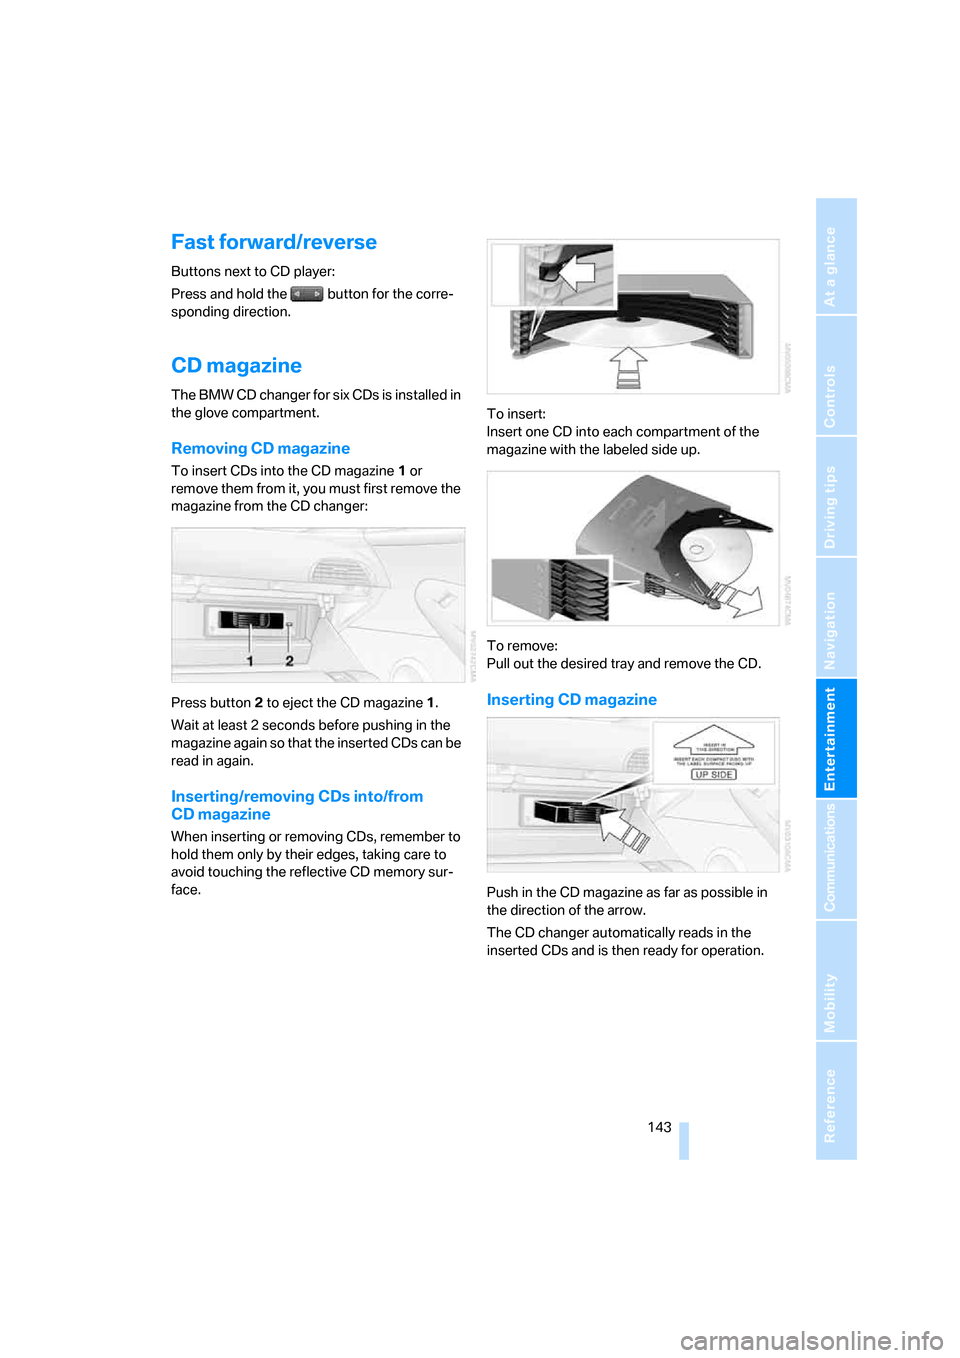
To insert CDs into the CD magazine 1 or
remove them from it, you must first remove the
magazine from the CD changer:
Press button2 to eject the CD magazine1.
Wait at least 2 seconds before pushing in the
magazine again so that the inserted CDs can be
read in again.
Inserting/removing CDs into/from
CD magazine
When inserting or removing CDs, remember to
hold them only by their edges, taking care to
avoid touching the reflective CD memory sur-
face.To insert:
Insert one CD into each compartment of the
magazine with the labeled side up.
To remove:
Pull out the desired tray and remove the CD.
Inserting CD magazine
Push in the CD magazine as far as possible in
the direction of the arrow.
The CD changer automatically reads in the
inserted CDs and is then ready for operation.