2006 BMW M5 tow
[x] Cancel search: towPage 130 of 231

Destination guidance
128 1.Repeat the last voice instruction, if neces-
sary.
2.Turn the button during the voice instruction
to select the desired volume.
This volume is independent of the volume of the
audio sources.
The setting is stored for the remote control cur-
rently in use.
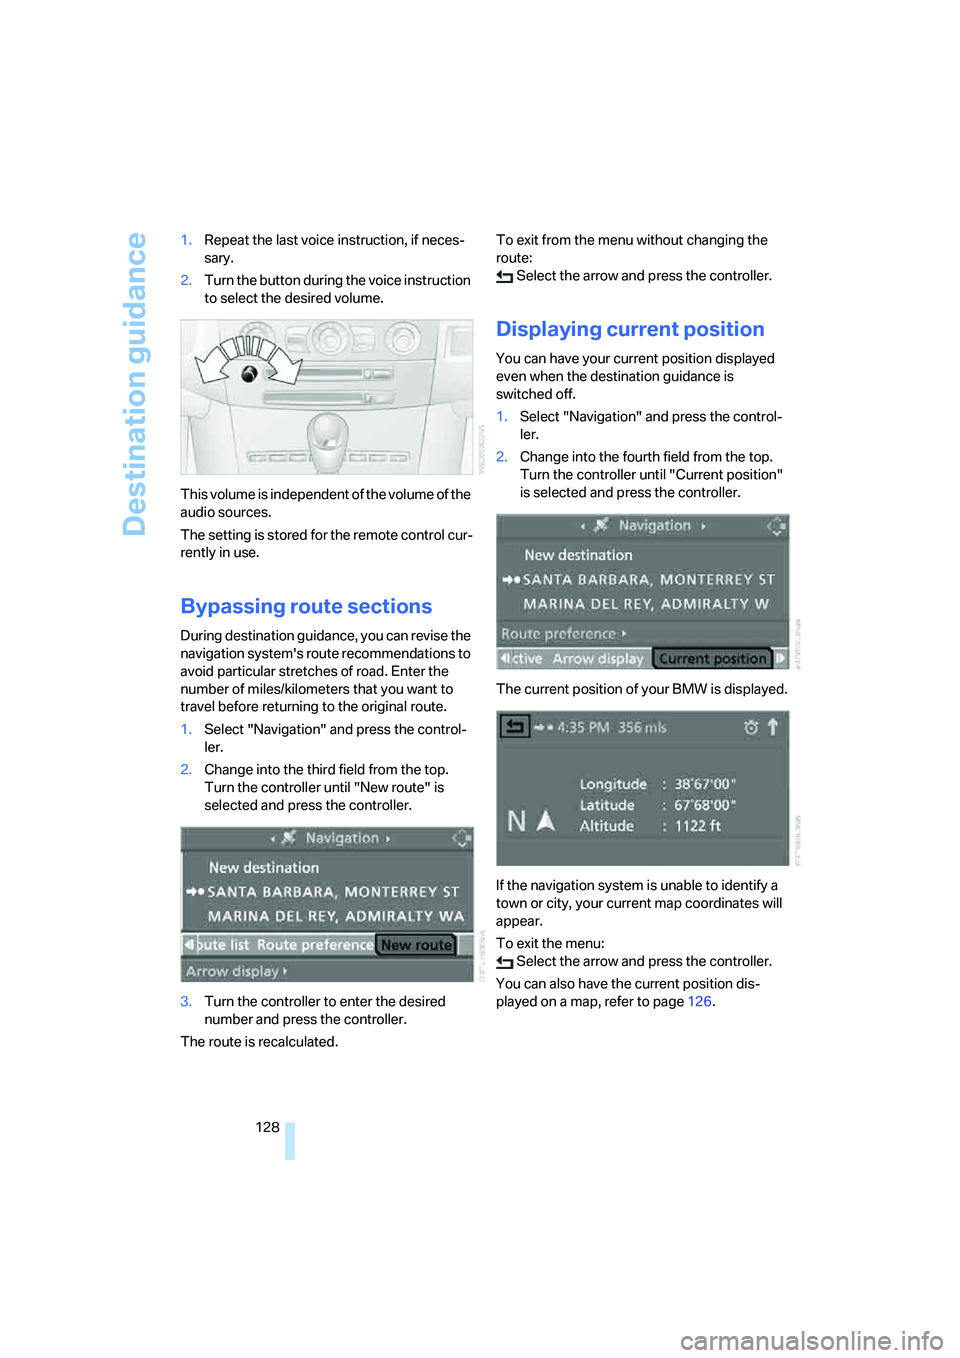
Bypassing route sections
During destination guidance, you can revise the
navigation system's route recommendations to
avoid particular stretches of road. Enter the
number of miles/kilometers that you want to
travel before returning to the original route.
1.Select "Navigation" and press the control-
ler.
2.Change into the third field from the top.
Turn the controller until "New route" is
selected and press the controller.
3.Turn the controller to enter the desired
number and press the controller.
The route is recalculated.To exit from the menu without changing the
route:
Select the arrow and press the controller.
Displaying current position
You can have your current position displayed
even when the destination guidance is
switched off.
1.Select "Navigation" and press the control-
ler.
2.Change into the fourth field from the top.
Turn the controller until "Current position"
is selected and press the controller.
The current position of your BMW is displayed.
If the navigation system is unable to identify a
town or city, your current map coordinates will
appear.
To exit the menu:
Select the arrow and press the controller.
You can also have the current position dis-
played on a map, refer to page126.
Page 131 of 231

Navigation
Driving tips
129Reference
At a glance
Controls
Communications
Entertainment
Mobility
What to do if …
What to do if …
>a navigation DVD is inserted, but an instruc-
tion to insert the DVD appears on the Con-
trol Display?
The navigation DVD may not be the correct
DVD for the navigation system. This infor-
mation is indicated on the DVD label.
>you request the current position of your
vehicle, but do not receive a precise dis-
play?
The system is unable to receive enough
GPS signals at your current position due to
obstructions, your position is not yet avail-
able on your navigation DVD, or the system
is in the process of calculating your posi-
tion. Reception is best when you have an
unobstructed view to the sky.
>the destination guidance does not accept a
destination?
The data of the destination is not stored on
the navigation DVD that is loaded. Select a
destination that is as close as possible to
the original.
>the destination guidance does not accept
an address without the street name?
On the navigation DVD, no downtown area
can be determined for the city or town
entered. Enter any street, or a destination
such as the railway station in the selected
town, and then start the destination guid-
ance.
>you want to enter a destination for the des-
tination guidance, but it is not possible to
select the letters for your desired entry?
The data of the destination is not stored on
the navigation DVD that is loaded. In this
case, the system will not offer you any let-
ters to choose from. Select a destination
that is as close as possible to the original.>the system stops furnishing directions on
which way to turn as you approach intersec-
tions?
You are driving in an area that has not yet
been completely recorded on the naviga-
tion DVD. Instead of an arrow indicating a
turn, you will see an arrow which indicates
the general direction of your planned route.
Or you have left the recommended route
and the system requires a few seconds to
calculate a new recommended route.
>the navigation system does not react to
entries?
If the battery was disconnected, it takes
about 10 minutes before the system is once
again operational.
Page 161 of 231

159
Entertainment
Reference
At a glance
Controls
Driving tips Communications
Navigation
Mobility
ber has been transmitted, the name of the entry
is displayed.
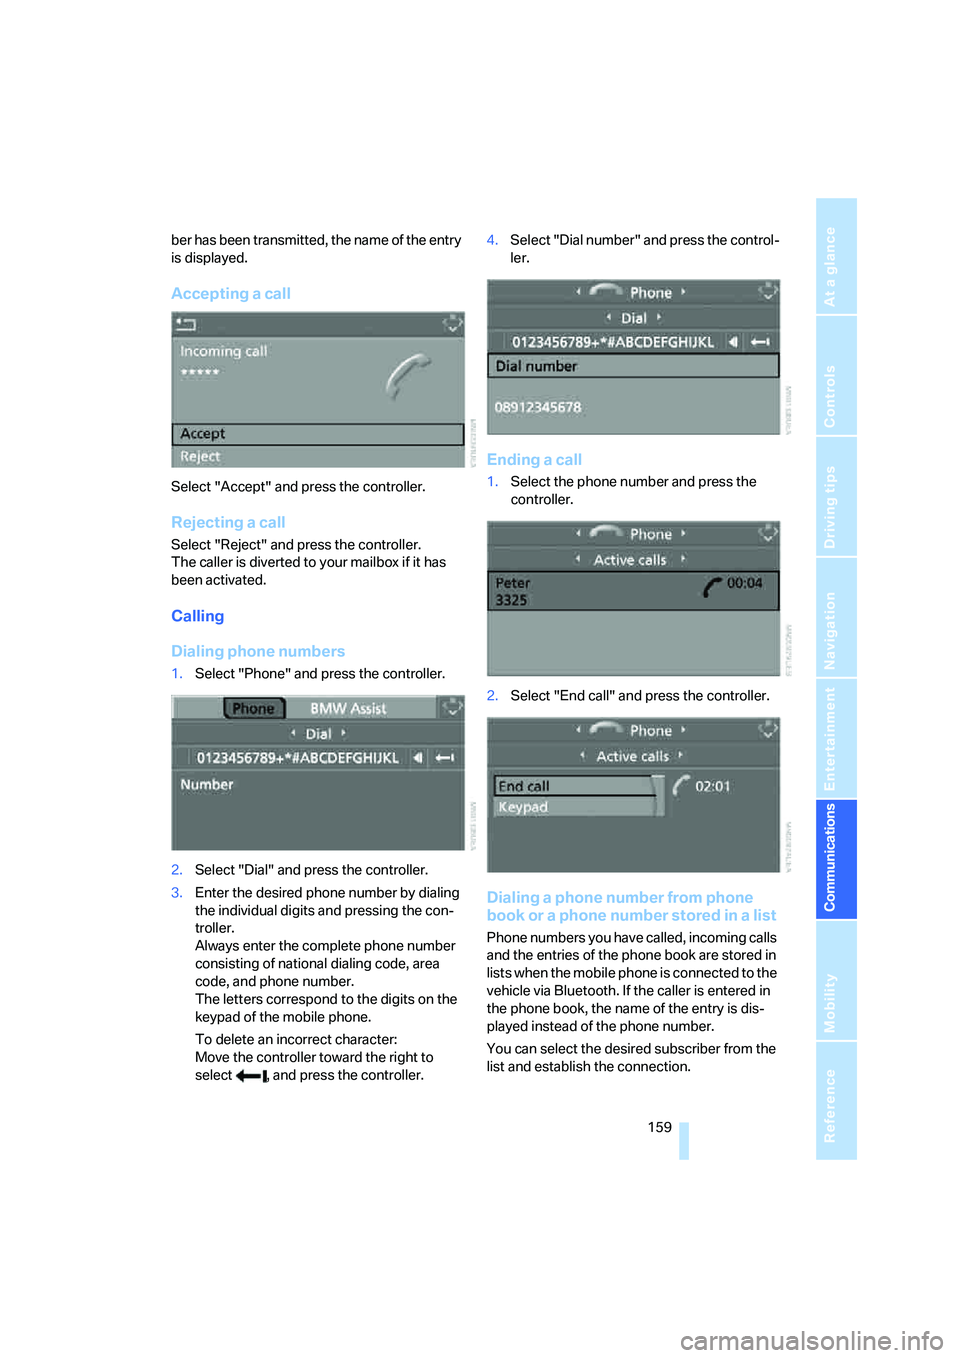
Accepting a call
Select "Accept" and press the controller.
Rejecting a call
Select "Reject" and press the controller.
The caller is diverted to your mailbox if it has
been activated.
Calling
Dialing phone numbers
1.Select "Phone" and press the controller.
2.Select "Dial" and press the controller.
3.Enter the desired phone number by dialing
the individual digits and pressing the con-
troller.
Always enter the complete phone number
consisting of national dialing code, area
code, and phone number.
The letters correspond to the digits on the
keypad of the mobile phone.
To delete an incorrect character:
Move the controller toward the right to
select , and press the controller.4.Select "Dial number" and press the control-
ler.
Ending a call
1.Select the phone number and press the
controller.
2.Select "End call" and press the controller.
Dialing a phone number from phone
book or a phone number stored in a list
Phone numbers you have called, incoming calls
and the entries of the phone book are stored in
lists when the mobile phone is connected to the
vehicle via Bluetooth. If the caller is entered in
the phone book, the name of the entry is dis-
played instead of the phone number.
You can select the desired subscriber from the
list and establish the connection.
Page 168 of 231

Telephoning
166
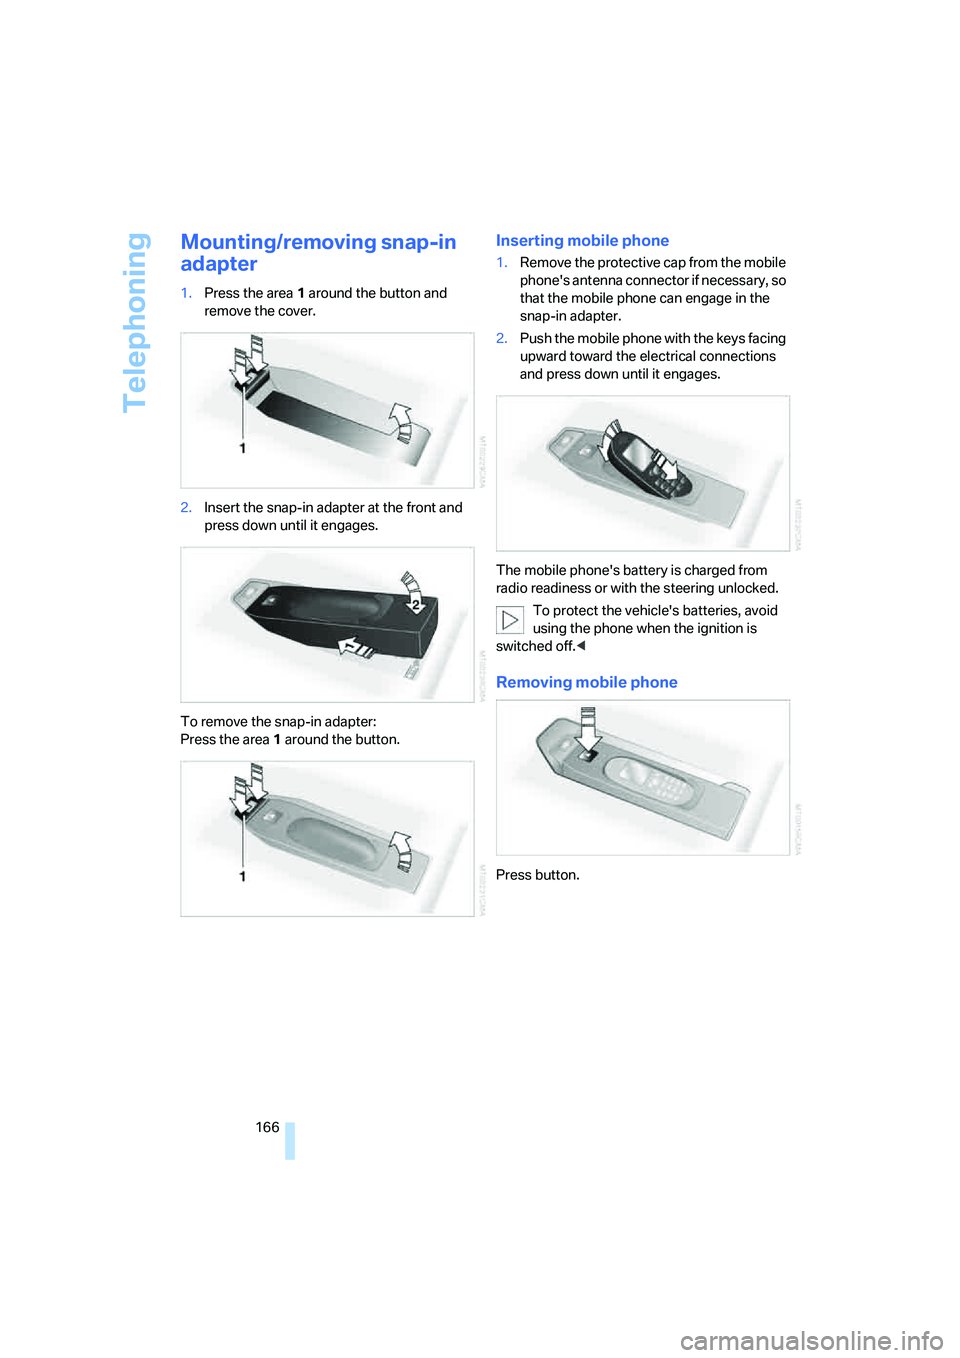
Mounting/removing snap-in
adapter
1.Press the area 1 around the button and
remove the cover.
2.Insert the snap-in adapter at the front and
press down until it engages.
To remove the snap-in adapter:
Press the area 1 around the button.
Inserting mobile phone
1.Remove the protective cap from the mobile
phone's antenna connector if necessary, so
that the mobile phone can engage in the
snap-in adapter.
2.Push the mobile phone with the keys facing
upward toward the electrical connections
and press down until it engages.
The mobile phone's battery is charged from
radio readiness or with the steering unlocked.
To protect the vehicle's batteries, avoid
using the phone when the ignition is
switched off.<
Removing mobile phone
Press button.
Page 181 of 231

Mobility
179Reference
At a glance
Controls
Driving tips
Communications
Navigation
Entertainment
Wear indicators at the tread-groove base, refer
to arrow, are distributed over the tire's circum-
ference and are marked on the side of the tire
with TWI – Tread Wear Indicator. If the tire tread
has been driven down to the wear indicators, a
tread depth of 0.063 in/1.6 mm has been
reached.
Wheel/tire damage
Please note that low-profile tires cause wheels,
tires and suspension parts to be more suscep-
tible to road hazards and consequential dam-
ages.
Unusual vibrations encountered during normal
vehicle operation can indicate tire failure or
some other vehicle defect. This can, for exam-
ple, be caused by driving over curbs. These
kinds of problems may also be signaled by other
changes in vehicle response, such as a strong
tendency to pull to the left or right.
In these cases, reduce speed immedi-
ately and have wheels and tires thor-
oughly checked. To do so, drive carefully to the
nearest BMW center or tire shop that works
according to BMW repair procedures with cor-
respondingly trained personnel. If necessary,
have the vehicle towed there. Tire damage can
be extremely dangerous for vehicle occupants
and other road users.<
New wheels and tires
Have new wheels and tires installed only
by your BMW center or tire shop that
works according to BMW repair procedures
with correspondingly trained personnel. If this
work is not carried out properly, there is a dan-
ger of subsequent damage and related safety
hazards. Make sure that the new wheels are bal-
anced.<
Retreaded tires
BMW does not recommend that you use
retreaded tires, as driving safety may be
impaired. The causes for this include the possi-
bly different tire casing structures and the often
wide variations in their age, which can result in a
limited service life.<
The right wheels and tires
BMW recommends that you use only
wheel and tire combinations that BMW
has tested and approved for your particular
vehicle. Variations in factors such as manufac-
turing tolerances mean that even wheels and
tires with identical official size ratings could
actually have different dimensions than the
approved units – these differences could lead to
body contact, and with it the risk of severe acci-
dents. When selecting the tires, also ensure
that they have a sufficient load-carrying capac-
ity. If non-approved wheels and tires are used,
BMW cannot evaluate their suitability, and
therefore cannot be held liable for driving
safety.<
You can inquire about the right wheel/tire com-
bination at your BMW center.
The correct wheel/tire combination also affects
various systems whose function would other-
wise be impaired, e.g. ABS or DSC.
To maintain good handling and vehicle
response, use only tires of a single tread config-
uration from a single manufacturer. Following
tire damage, have the original wheel and tire
combination remounted on the vehicle as soon
as possible.
Page 190 of 231

Replacing components
188
Replacing components
Onboard toolkit
The onboard toolkit is located in the luggage
compartment lid.
Loosen the wing nut to open.
Wiper blade replacement
1.Fold the wiper arm out and grasp firmly.
2.Press the safety tabs together while sliding
the wiper blade toward the front to disen-
gage it.
3.Mount the new wiper blade and slide in until
it is heard to engage.
Lamps and bulbs
Lamps and bulbs make an essential contribu-
tion to vehicle safety. You must be duly diligent
in replacing them. BMW recommends having
your BMW center perform any work that you do
not feel competent to perform yourself or that is
not described here.Never touch the glass of new bulbs with
your bare fingers, as even minute
amounts of contamination will burn into the
bulb's surface and reduce its service life. Use a
clean cloth, napkin, etc., or hold the bulb by its
metal socket.<
A selection of replacement bulbs is available at
your BMW center.
Whenever you perform any work on the
electrical system, turn off the consumers
involved to prevent short circuits from occur-
ring. To avoid possible injury or equipment
damage when replacing bulbs, observe any
instructions provided by the bulb manufac-
turer.<
For care and maintenance of the headlamps,
please follow the instructions in the separate
Caring for your vehicle brochure.
For bulbs for which changing is not
described, and for checking and adjusting
headlamp aim, please contact your BMW cen-
ter.<
Light-emitting diodes LEDs
Light-emitting diodes installed behind translu-
cent lenses serve as the light source for many of
the controls and displays in your vehicle. These
light-emitting diodes, which operate using a
concept similar to that applied in conventional
lasers, are officially designated as Class 1 light-
emitting diodes.
Do not remove the covers, and never
stare into the unfiltered light for several
hours, as irritation of the retina could result.<
Xenon lamps
The service life of these bulbs is very long and
the probability of a failure is very low, provided
that they are not switched on and off an unusual
number of times.
Have work on the Xenon lighting system
performed only by your BMW center or a
workshop that works according to BMW repair
Page 194 of 231

Replacing components
192 4.Screw dust cap off valve of defective wheel
and screw filling hose2 of sealant bottle
onto valve.
5.Insert sealant bottle on compressor hous-
ing so that it is positioned upright.
6.Make sure that device is switched off, posi-
tion 0.
7.Insert connector3 into lighter socket in
vehicle interior, refer to page97.
8.With the ignition switched on:
Switch on the device and allow to run for
approx. 3 minutes to fill wheel with sealant.
It is not important what inflation pressure
the tire has after filling.
9.Switch off device.
10.Remove connecting hose from connection
of sealant bottle and tire valve.
Stow the M Mobility System in the vehicle
again.
Distributing sealant
Immediately drive approx. 2 miles/3 km so that
sealant is evenly distributed in tire.
Do not exceed a maximum speed of
35 mph/60 km/h. Do not drop below
12 mph/20 km/h if possible.<
Producing tire inflation pressure
1.After approx. 2 miles/3 km, stop at suitable
location.
2.Screw compressor hose9 directly onto tire
valve.
3.Insert connector 3 in lighter socket in vehi-
cle interior.4.Correct tire inflation pressure to 29 psi/
200 kPa. With the ignition switched on:
>Increase inflation pressure: switch on
compressor, position I. To check cur-
rently set inflation pressure, briefly
switch off device.
Do not allow compressor to run
longer than 10 minutes, otherwise
the device will overheat and may be dam-
aged.<
>Reduce inflation pressure: press
button8 or turn screw8 on pressure
gauge.
If the inflation pressure is not held, drive
the vehicle again, refer to Distributing
sealant. Then repeat steps 1 to 4 once.
Using the M Mobility System can be ineffective
with tire damage from a size of approx. 0.16 in/
4 mm. Please contact the nearest BMW center,
refer to page197, or a workshop that works
according to BMW repair procedures with cor-
respondingly trained personnel if the tire can-
not be made ready for driving with the
M Mobility System.<
The tire inflation pressure must be at least
29 psi/200 kPa. Otherwise do not con-
tinue driving.<
Continue driving
Do not exceed the permissible maximum
speed of 50 mph/80 km/h, otherwise
accidents can occur.<
Reinitialize the Flat Tire Monitor.
For details, refer to page77.
Have the defective tire and the sealant bottle of
the M Mobility System replaced as soon as
possible.<
Changing wheels
Safety precautions in the event of a flat
tire or wheel change: park the vehicle as
far as possible from passing traffic and on solid
ground. Switch on the hazard warning flashers.
Lock the steering wheel in straight-ahead set-
ting of the wheels. Set the handbrake and
Page 196 of 231

Replacing components
194 2.Guide the jack head into the rectangular
recess of the jacking point when cranking
up, refer to illustration detail.
3.Jack the vehicle up until the wheel you are
changing is raised from the ground.
Mounting a wheel
1.Unscrew the lug bolts and remove the
wheel.
2.Remove accumulations of mud or dirt from
the mounting surfaces of the wheel and
hub. Also clean the lug bolts.
3.Position the new wheel or spare wheel.
Secure the wheel by screwing at least two
lug bolts into opposite bolt holes.
When you mount wheels other than Genu-
ine BMW light-alloy wheels, different lug
bolts may also be required.
4.Screw in the remaining lug bolts. Tighten all
the bolts securely in a diagonal pattern.
5.Lower the vehicle and remove the jack from
beneath the vehicle.
After mounting
1.Tighten the lug bolts in a diagonal pattern.
To ensure safety, always have the
lug bolts checked with a calibrated
torque wrench as soon as possible to
ensure that they are tightened to the speci-
fied torque. The tightening torque is
88.5 lb ft/120 Nm.<
2.Check and correct the tire inflation pressure
at the earliest opportunity.
Protect valve stems and valve stem
seal caps against dirt and contamina-tion. Dirt in valve stems is a frequent source
of gradual air loss.<
3.Initialize the Flat Tire Monitor, refer to
page77, and the Sequential Manual Trans-
mission, refer to After changing wheels/
tires on page180.
4.Replace the damaged tire as soon as possi-
ble and have the new wheel/tire balanced.
Stowing wheel and tools
1.Lay the wheel in the tool mounting.
2.Lay the cover on the mounting.
3.Center the wheel and cover relative to the
lashing eyes5.
4.Hook the belt into the lashing eyes.
5.Completely open the tensioning lock.
6.Thread the belt3 through the axis6 of the
tensioning lock without twisting it and ten-
sion it by hand.
7.Tighten the belt firmly with the tensioning
lock by opening and closing the lock several
times.
8.Fold the tensioning lock closed and stow
the protruding belt end.
Driving with spare wheel
With certain wheel-and-tire combinations
the size of the spare wheel differs from
that of the other wheels. The spare wheel is
equivalent to them in all load and speed ranges.
However, to restore the original state, the nor-
mal wheel should be remounted as soon as
possible.<