2006 BMW 760Li lock
[x] Cancel search: lockPage 191 of 247

189
Entertainment
Reference
At a glance
Controls
Driving tips Communications
Navigation
Mobility
1.Press the button to open the start
menu.
2.Move the controller toward "BMW Assist".
3.Select "Status" and press the controller.
4.Select "BMW Assist" and press the control-
ler.
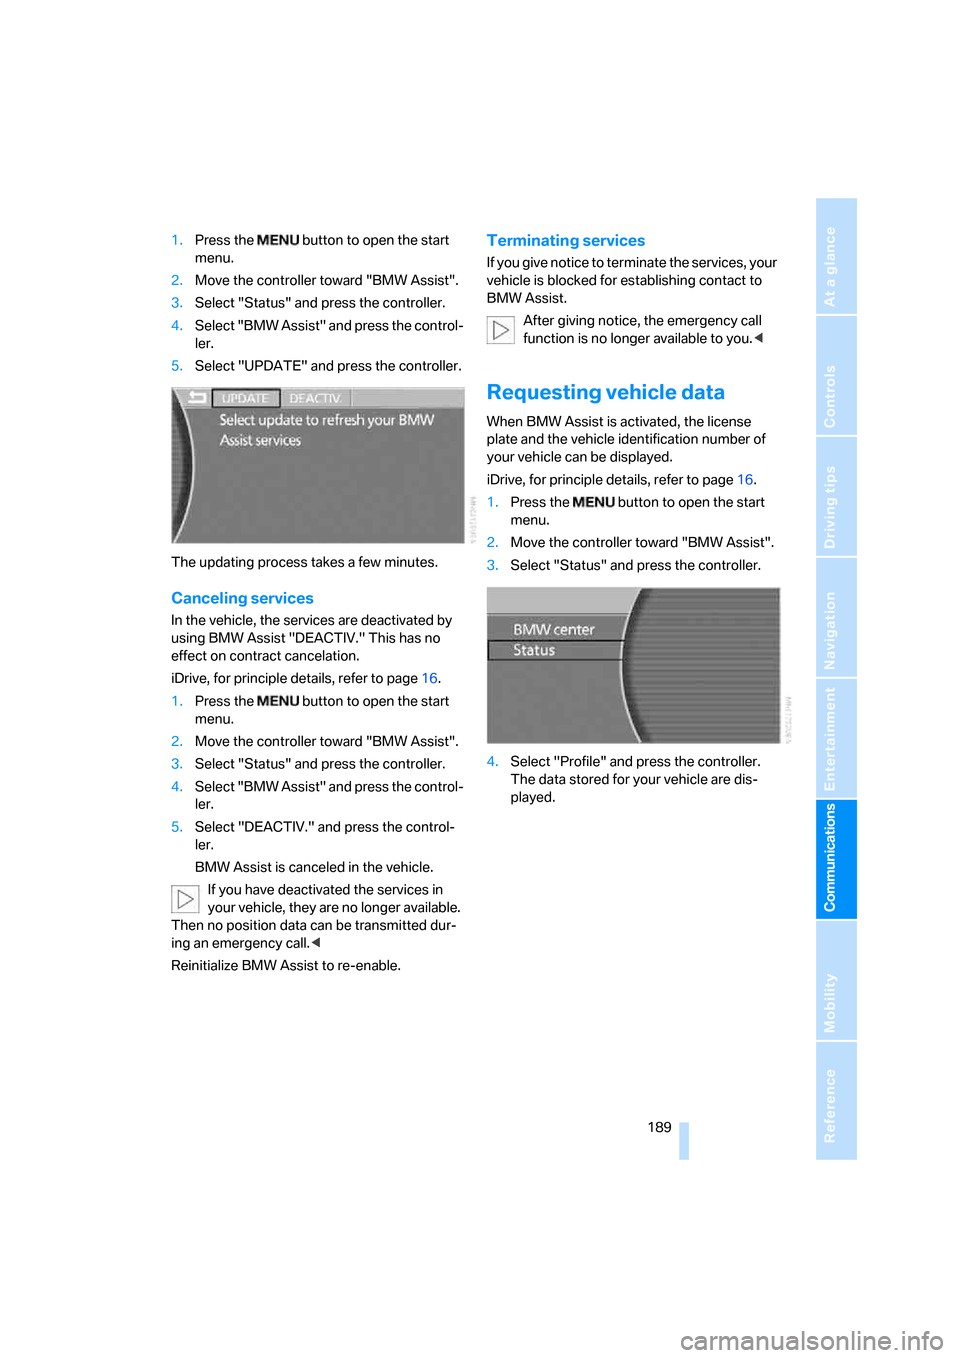
5.Select "UPDATE" and press the controller.
The updating process takes a few minutes.
Canceling services
In the vehicle, the services are deactivated by
using BMW Assist "DEACTIV." This has no
effect on contract cancelation.
iDrive, for principle details, refer to page16.
1.Press the button to open the start
menu.
2.Move the controller toward "BMW Assist".
3.Select "Status" and press the controller.
4.Select "BMW Assist" and press the control-
ler.
5.Select "DEACTIV." and press the control-
ler.
BMW Assist is canceled in the vehicle.
If you have deactivated the services in
your vehicle, they are no longer available.
Then no position data can be transmitted dur-
ing an emergency call.<
Reinitialize BMW Assist to re-enable.
Terminating services
If you give notice to terminate the services, your
vehicle is blocked for establishing contact to
BMW Assist.
After giving notice, the emergency call
function is no longer available to you.<
Requesting vehicle data
When BMW Assist is activated, the license
plate and the vehicle identification number of
your vehicle can be displayed.
iDrive, for principle details, refer to page16.
1.Press the button to open the start
menu.
2.Move the controller toward "BMW Assist".
3.Select "Status" and press the controller.
4.Select "Profile" and press the controller.
The data stored for your vehicle are dis-
played.
Page 194 of 247

Refueling
192
Refueling
Fuel filler door
Always switch off the engine before refu-
eling; otherwise, no fuel can be filled into
the tank and a message is displayed.<
To open and close: briefly press the rear edge of
the fuel filler door.
Manual release
In the event of an electrical malfunction in the
system, you can release the fuel filler door man-
ually:
1.Lift the handle to remove the cover panel on
the right side of the luggage compartment.
2.Take the knob with the fuel pump symbol
from the bracket and pull it to unlock the
fuel filler door.
When handling fuel, always observe all
applicable precautionary measures and
regulations. Never transport reserve fuel con-
tainers in the vehicle. These can leak and cause
an explosion or a fire in an accident.<
Simple and environmentally friendly
When handling fuels, always follow any
safety guidelines posted at the gas sta-
tion.<
Put the filler cap in the bracket attached to the
fuel filler door.
When refueling, insert the filler nozzle com-
pletely into the filler pipe. Avoid raising the filler
nozzle during refueling; otherwise, this
>results in premature pump shutoff
>can lead to reduced efficiency in the fuel-
vapor recovery system
The fuel tank is full when the filler nozzle clicks
off the first time.
Fuel tank capacity
Approx. 23.2 US gallons/88 liters, including a
reserve of:
>750i/Li: approx. 2.6 gallons/10 liters.
>760i/Li: approx. 3.1 gallons/12 liters.
Refuel as soon as possible once your
cruising range falls below 30 miles/
50 km; otherwise, engine functions are not
ensured and damage can occur.<
Closing fuel filler cap
Fit the cap and turn it clockwise until you clearly
hear a click.
Do not crush the cap leash between the
fuel filler cap and the vehicle. A message
*
is displayed if the cap is loose or missing.<
Page 203 of 247

Mobility
201Reference
At a glance
Controls
Driving tips
Communications
Navigation
Entertainment
Under the hood
Never attempt to perform any service or
repair operations on your vehicle without
the required, professional technical training.
If you are unfamiliar with the regulations to be
observed, only have work on your vehicle car-
ried out by a BMW center or a repair shop that
works in accordance with BMW guidelines and
uses appropriately trained personnel. If this
work is not carried out properly, there is a dan-
ger of subsequent damage and related safety
hazards.<
Hood
Unlocking
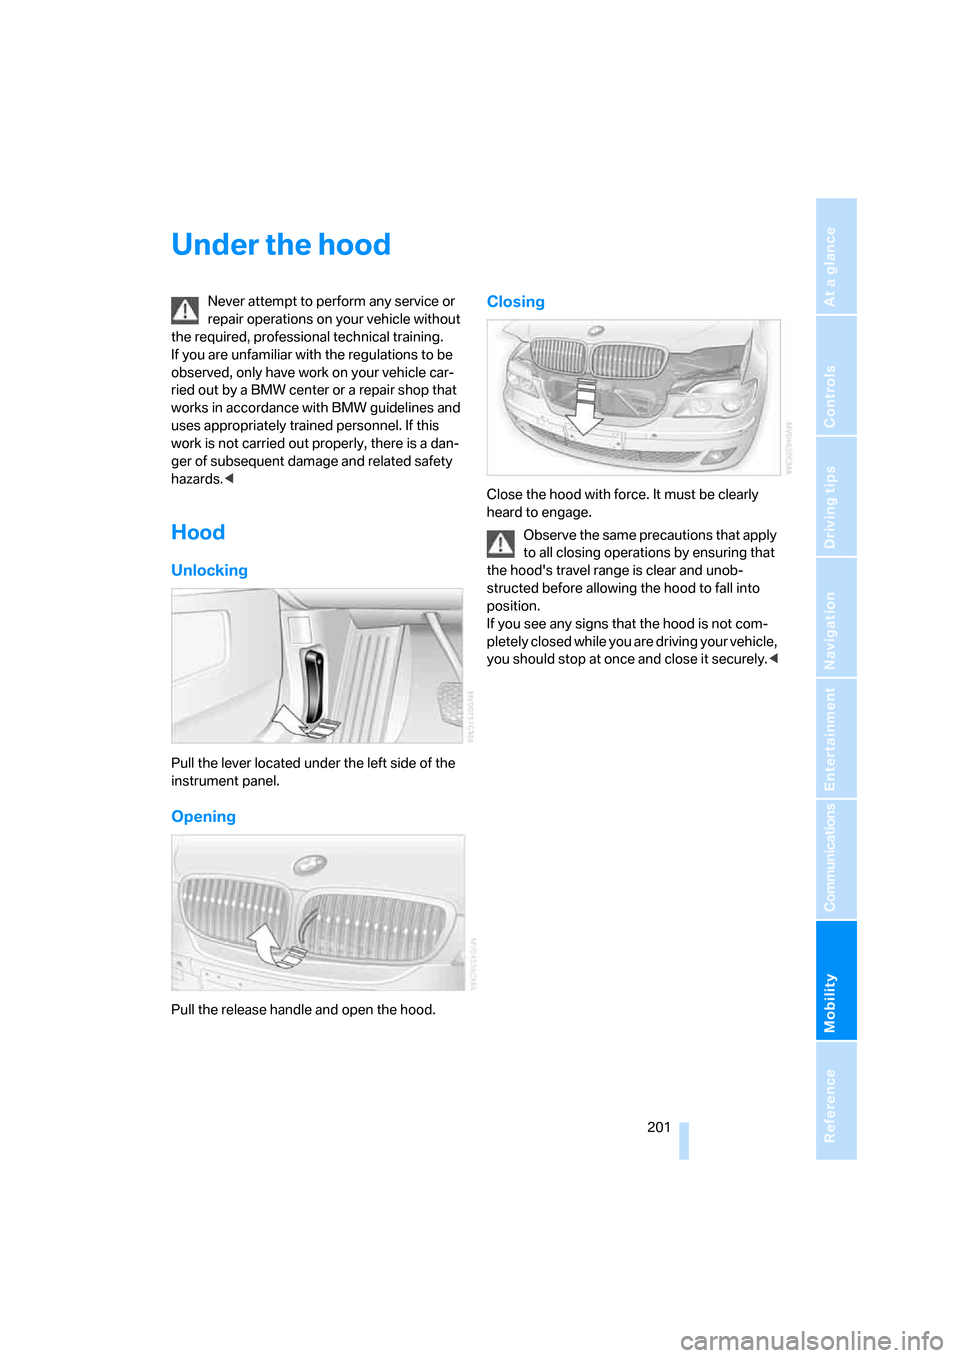
Pull the lever located under the left side of the
instrument panel.
Opening
Pull the release handle and open the hood.
Closing
Close the hood with force. It must be clearly
heard to engage.
Observe the same precautions that apply
to all closing operations by ensuring that
the hood's travel range is clear and unob-
structed before allowing the hood to fall into
position.
If you see any signs that the hood is not com-
pletely closed while you are driving your vehicle,
you should stop at once and close it securely.<
Page 206 of 247

Under the hood
204 Always observe all applicable environ-
mental laws and regulations when dis-
posing of used coolant additives.<
Checking coolant level
1.The engine must be at ambient tempera-
ture.
2.Turn the cap of the expansion tank counter-
clockwise to allow any accumulated pres-
sure to escape, then continue turning to
open.
3.The coolant level is correct when the cool-
ant extends to between the MIN and MAX
marks on the filler neck, refer to the diagram
adjacent to the filler neck.
4.If the coolant is low, slowly add coolant up to
the specified level – do not overfill.
5.Twist closed the cap and tighten firmly.
6.Have the reason for the coolant loss elimi-
nated as soon as possible.
Brake system
Malfunction
Brake fluid
The warning lamp lights up and a mes-
sage is shown on the Info Display: stop
immediately.
The brake fluid in the reservoir has fallen to
below the minimum level. At the same time, a
considerably longer brake pedal travel may be
noticeable. Have the system checked immedi-
ately.Warning lamp on Canadian models
During continued driving increased brake
pedal travel may be necessary, and con-
siderably longer braking distances may result.
Please adapt your driving style accordingly.<
Brake pads
For messages and indicator lamps on the Info
Display, refer to page80.
For your own safety: use only brake pads
that BMW has approved for your particu-
lar vehicle model. As BMW cannot assess the
suitability of other brake pads for use on your
vehicle, we are unable to assume continued
responsibility for the vehicle's operating safety
if non-approved pads are installed.<
Page 211 of 247

Mobility
209Reference
At a glance
Controls
Driving tips
Communications
Navigation
Entertainment
Lamps in luggage compartment lid
1Backup lamps
The illustration shows the left luggage com-
partment lid cutout.
Remove the trim panel from the luggage com-
partment lid.
Backup lamp
Backup lamp:
Bulb 16 watts, W 16 W
1.Pull the bulb holder out.
2.Extract the bulb for replacement.
Changing wheels
Safety precautions to observe in the
event of a flat and during all tire changes:
Park the vehicle as far as possible from passing
traffic. Park on a firm, flat, surface. Switch on the
hazard warning flashers.
Engage the parking brake and shift the trans-
mission selector lever into P.
Have all vehicle occupants get out of the vehicle
and ensure that they remain outside the imme-
diate area in a safe place, such as behind a
guardrail.
If a warning triangle or portable hazard warning
lamp is required, set it up on the roadside at an
appropriate distance from the rear of the vehi-
cle. Comply with all safety guidelines and regu-
lations.
Change the wheel only on a level, firm surface
which is not slippery. The vehicle or the jack
could slip to the side if you attempt to raise the
vehicle on a soft or slippery surface such as
snow, ice, tile, etc.
Position the jack on a firm support surface. Do not use a wooden block or similar object as a
support base for the jack, as this would prevent
it from extending to its full support height and
reduce its load-carrying capacity.
To avoid serious or fatal injury, never lie under
the vehicle and never start the engine while it is
supported by the jack.<
What you will need
To avoid rattling noises, note the positions of
the tools before removing them, then return
them to their initial positions after completing
work.
>Lug wrench
Located beside the spare wheel.
>Wheel chock
Located next to the spare wheel, or behind
the trim panel on the left side of the luggage
compartment on vehicles equipped with a
trailer coupling.
Remove the floor mat and the cover above
the spare tire.
Unscrew the wingnut and remove the wheel
chock.
Page 216 of 247

Giving and receiving assistance
214 4.Attach one negative/– clamp of the jumper
cable to the negative battery terminal or to
an engine or body ground of the assisting
vehicle.
Your BMW has a special nut that serves as a
body ground or negative terminal, refer to
arrow2.
5.Attach the second negative/– clamp of the
jumper cable to the negative battery termi-
nal or to an engine or body ground on the
vehicle to be started.
Starting engine
1.Start the engine of the assisting vehicle and
allow it to run for several minutes at a fast
idle.
2.Start the engine on the other vehicle in the
usual way.
If the first start attempt is not successful,
wait a few minutes before another attempt
in order to allow the discharged battery to
recharge.
3.Allow the engines to run for several min-
utes.
4.Disconnect the jumper cables again in the
reverse sequence.
If need be, have the battery checked and
recharged.
Never use spray fluids to start the
engine.<
Towing and tow starting
Observe applicable laws and regulations
for tow-starting and towing.<
Do not transport any passengers other
than the driver in a vehicle that is being
towed.<
Using tow fitting
The threaded tow fitting is stored in the
onboard tool kit and must always remain in the
vehicle. It can be screwed in at the front or rear
of the BMW.
Only use the tow fitting that comes with
the vehicle and screw it in as far as it will
go. Use the tow fitting for towing only on roads.
Avoid lateral loading of the tow fitting, e.g. do
not lift the vehicle by the tow fitting. Otherwise,
damage to the tow fitting and the vehicle can
occur.<
Access to screw thread
Press the arrow symbol to push out the cover.
Being towed
Do not tow the vehicle by the rear axle;
because there is no steering lock, the
wheels could turn to an extreme angle during
towing. There is no power assist with the
engine stopped. This then requires increased
effort for braking and steering.<
Switch on the hazard warning flashers depend-
ing on the local regulations. If the electrical sys-
tem fails, mark the vehicle to be towed, e.g. with
a sign or warning triangle in the rear window.
Page 217 of 247

Mobility
215Reference
At a glance
Controls
Driving tips
Communications
Navigation
Entertainment
Selector lever in position N. Releasing
shiftlock manually, refer to page64. To
avoid damaging the automatic transmission, do
not exceed a towing speed of 45 mph/70 km/h
and a towing distance of 95 miles/150 km.<
Towing methods
In some countries, towing with tow bars or
ropes in public traffic is not permitted.
Familiarize yourself with the regulations on tow-
ing in the respective country.
With tow bar
The towing vehicle must not be lighter
than the vehicle to be towed; otherwise,
it will no longer be possible to control vehicle
response.<
The tow fittings used should be on the same
side on both vehicles. Should it prove impossi-
ble to avoid mounting the tow bar at an offset
angle, please observe the following:
>Clearance and maneuvering capability will
be strictly limited in corners.
>When mounted at an angle, the tow bar will
exert lateral forces, tending to push the
vehicle sideways.
Only secure the tow bar on the tow fitting;
otherwise, damage can occur when it is
secured on other parts of the vehicle.<
With tow rope
When starting off in the towing vehicle, make
sure that the towrope is taut.
To avoid jerking and the associated
stresses on vehicle components when
towing, always use nylon ropes or nylon straps.
Only secure the tow rope on the tow fitting; oth-
erwise, damage can occur when it is secured on
other parts of the vehicle.<
With tow truck
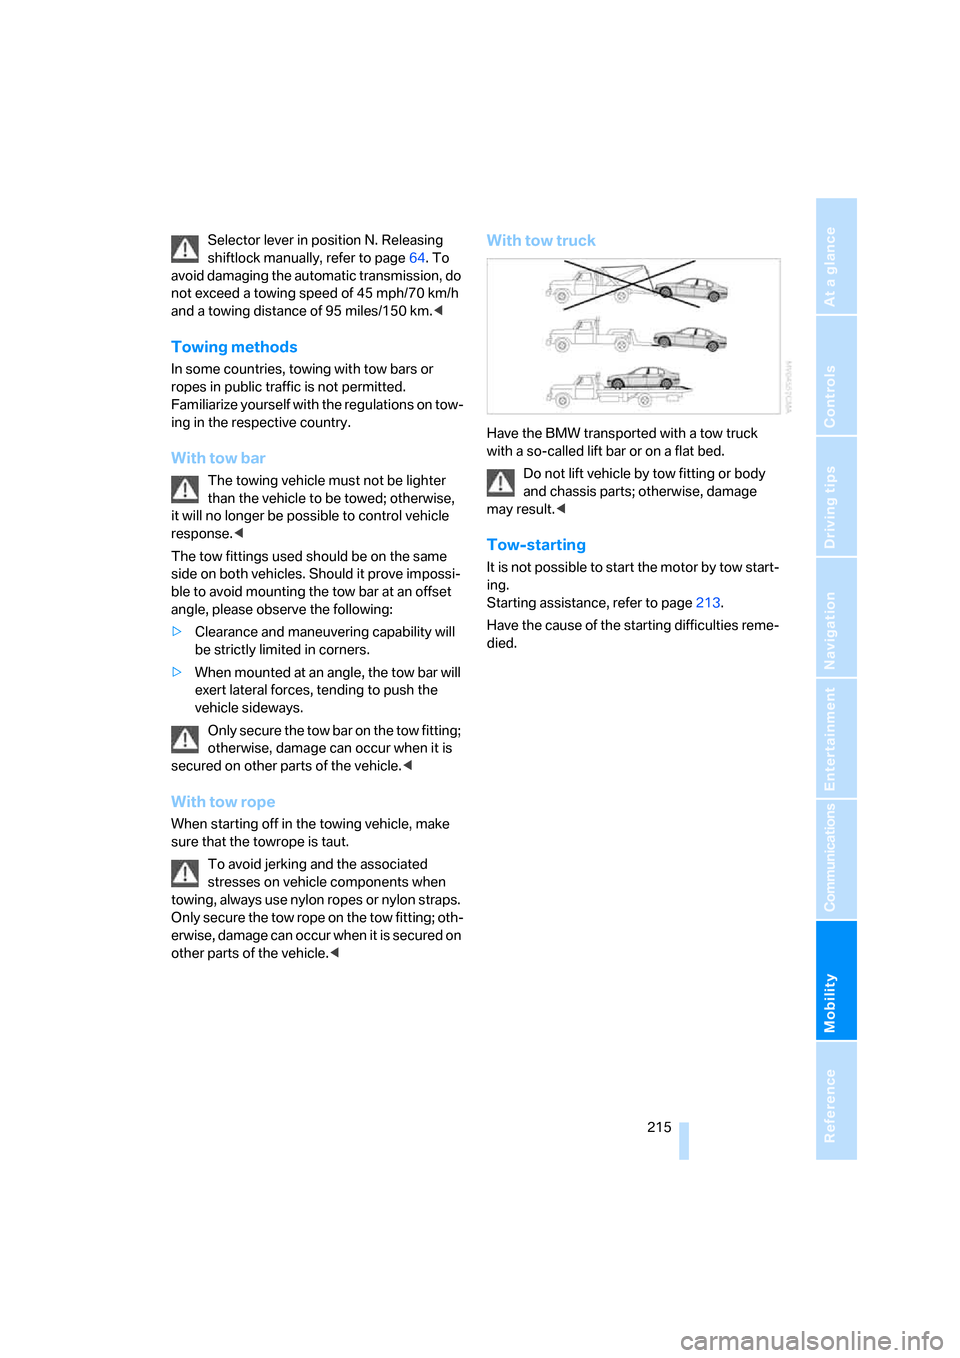
Have the BMW transported with a tow truck
with a so-called lift bar or on a flat bed.
Do not lift vehicle by tow fitting or body
and chassis parts; otherwise, damage
may result.<
Tow-starting
It is not possible to start the motor by tow start-
ing.
Starting assistance, refer to page213.
Have the cause of the starting difficulties reme-
died.
Page 226 of 247

Everything from A to Z
224
Everything from A to Z
Index
A
"ABC...", navigation131
ABS Antilock Brake
System87
ACC, refer to Active cruise
control69
"ACCEPT",
navigation140,147
Accepting call, automatic177
Accessories, refer to Your
individual vehicle5
Accident, refer to
– Initiating an emergency
call178
– Roadside Assistance187
Activated-charcoal filter107
Activating High Definition
Radio161
Active cruise control69
– indicator lamp72
– malfunction72
– radar sensor72
– sensor, refer to
Malfunction72
Active head restraints,
front47
Active seat50
Active seat ventilation50
Adapter for spare key31
Adaptive Drive
– refer to Dynamic Drive89
– refer to EDC Electronic
Damper Control89
Adaptive Head Light100
Address
– deleting140
– displaying141
– storing139
– storing current position146
"Address book",
navigation138Adjusting cooling effect of
rear air conditioner108
Adjusting interior
temperature105
Adjusting sound in audio
mode, refer to Tone
control153
Adjusting volume153
– ring tone of telephone177
– voice command system25
– voice instructions145
Air, drying, refer to Air condi-
tioner mode107
Airbags94
– safe sitting position43
Air conditioner in the rear108
Air conditioning103
– in rear108
– while parked109
Air-conditioning front
windshield126
Air distribution
– automatic104
– manual106
Airing, refer to Ventilation107
Air jets, refer to
Ventilation107
Air pressure, refer to Tire
inflation pressure194
Air recirculation, refer to
Recirculated air105
Air vents, refer to
Ventilation107
Air volume
– automatic climate
control106
– rear air conditioner108
AKI, refer to Fuel
specifications193
Alarm system37
– avoiding unintentional
alarms38All-season tires, refer to
Winter tires200
Altering route, refer to
Changing route145
Alternate route, refer to
Changing route145
"AM", radio155
AM waveband155
– High Definition Radio161
"ANGLE", DVD changer171
Antifreeze
– coolant203
– washer fluid66
Antilock Brake System
ABS87
Anti-theft alarm system, refer
to Alarm system37
Anti-theft system, refer to
Central locking system32
Approved engine oils203
Armrest, refer to Center
armrest
– front113
– rear114
"Arrow display",
navigation144
"AS ADDRESS",
navigation139,146
Ashtray115
– front115
– rear116
Assist, refer to
BMW Assist186
Assistance getting in and
out52
– backrest width44
Assistance system, refer to
DSC Dynamic Stability
Control87
Assistance window20
AUC Automatic recirculated-
air control105