2006 BMW 760i navigation
[x] Cancel search: navigationPage 80 of 247
Everything under control
78
Resetting values
You can reset values for the average speed and
average fuel consumption:
1.Activate the relevant menu item and press
the controller.
2.To reset the values, press the controller
again.
Entering a distance manually
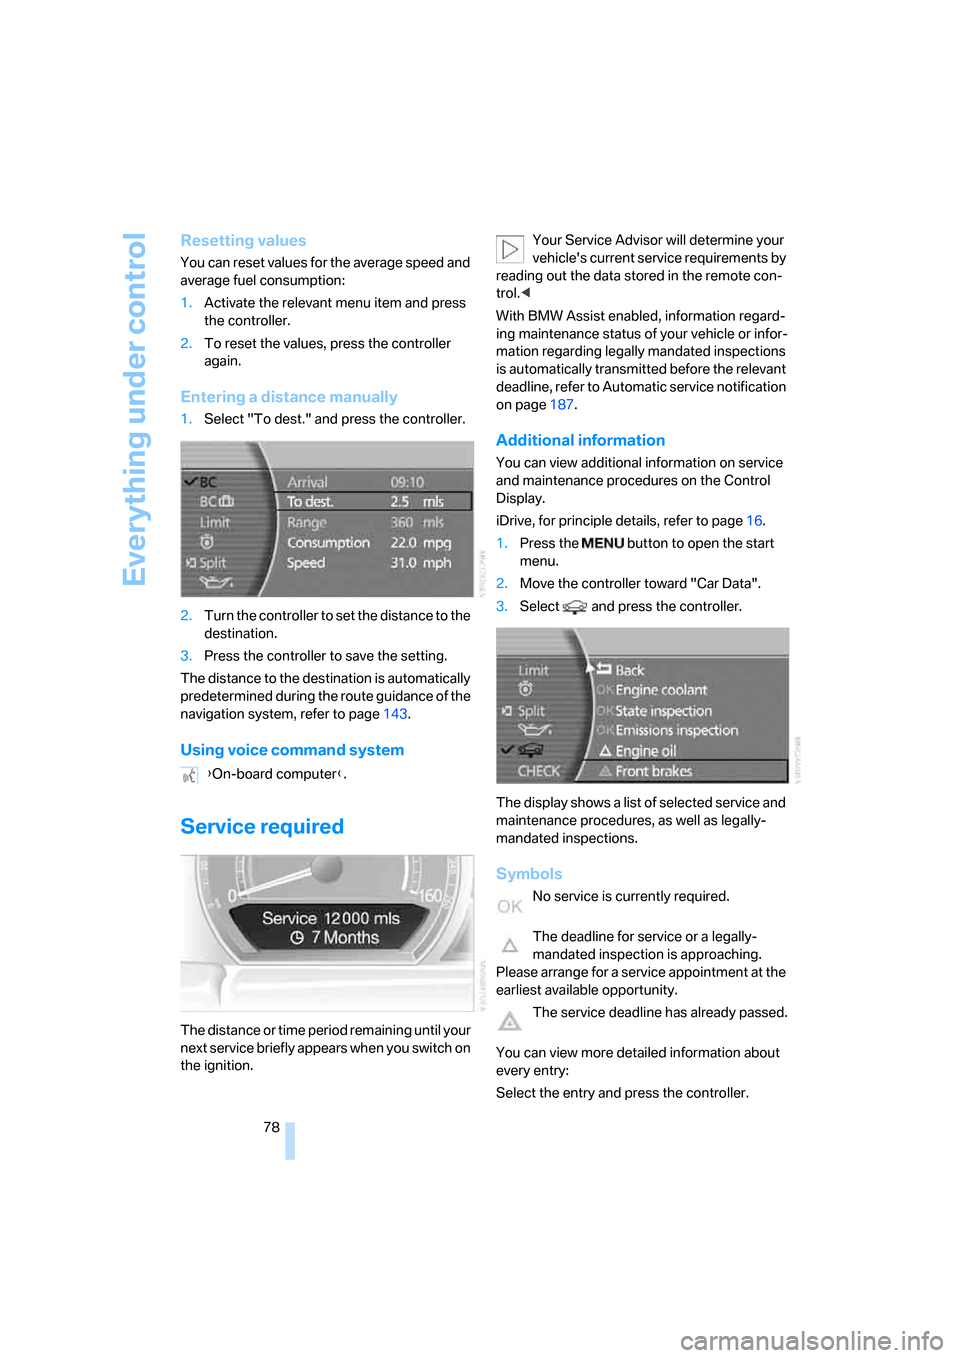
1.Select "To dest." and press the controller.
2.Turn the controller to set the distance to the
destination.
3.Press the controller to save the setting.
The distance to the destination is automatically
predetermined during the route guidance of the
navigation system, refer to page143.
Using voice command system
Service required
The distance or time period remaining until your
next service briefly appears when you switch on
the ignition.Your Service Advisor will determine your
vehicle's current service requirements by
reading out the data stored in the remote con-
trol.<
With BMW Assist enabled, information regard-
ing maintenance status of your vehicle or infor-
mation regarding legally mandated inspections
is automatically transmitted before the relevant
deadline, refer to Automatic service notification
on page187.
Additional information
You can view additional information on service
and maintenance procedures on the Control
Display.
iDrive, for principle details, refer to page16.
1.Press the button to open the start
menu.
2.Move the controller toward "Car Data".
3.Select and press the controller.
The display shows a list of selected service and
maintenance procedures, as well as legally-
mandated inspections.
Symbols
No service is currently required.
The deadline for service or a legally-
mandated inspection is approaching.
Please arrange for a service appointment at the
earliest available opportunity.
The service deadline has already passed.
You can view more detailed information about
every entry:
Select the entry and press the controller. {On-board computer}.
Page 81 of 247

Controls
79Reference
At a glance
Driving tips
Communications
Navigation
Entertainment
Mobility
To exit the menu:
The arrow is selected. Press the controller.
Condition Based Service does not con-
tinue counting down to the next service
during periods when the vehicle is stored with
the battery disconnected or the battery switch
in the OFF position.
Therefore, make sure to have the brake fluid
changed at least every 2 years, regardless of
w h a t i s s h o w n o n t h e d is p la y, r e f e r t o p a g e204.
The same is true for other time-dependent ser-
vice requirements.<
Displaying and entering dates for
legally-mandated emissions and
vehicle inspections
Make sure the date and time are always set cor-
rectly via iDrive, refer to page84; otherwise,
CBS Condition Based Service cannot function
correctly.
iDrive, for principle details, refer to page16.
1.Press the button to open the start
menu.
2.Move the controller toward "Car Data".
3.Select and press the controller.
4.Select "Emissions inspection" or "State
inspection" and press the controller.5.Turn the controller to select appointment
input.
6.Press the controller. The month is high-
lighted.
7.Turn the controller to adjust the setting.
8.Press the controller to save the setting.
The year is highlighted.
9.Turn the controller to adjust the setting.
10.Press the controller to save the setting.
11."STORE DATE" is selected. Press the con-
troller to save the setting. The date entry is
saved.
The list of entries is resorted by date.Display on Info Display
If the deadline for your next emissions or state
vehicle inspection is approaching, the remain-
ing distance and time will appear briefly when
you switch on the ignition.
Your Service Advisor will determine your
vehicle's current service requirements by
reading out the data stored in the remote con-
trol.<
Page 83 of 247
Controls
81Reference
At a glance
Driving tips
Communications
Navigation
Entertainment
Mobility
occur simultaneously, then the Check Control
messages are displayed in sequence.
Other Check Control messages are hidden after
roughly 20 seconds, but remain stored in mem-
ory.
Viewing stored Check Control
messages
Using CHECK button
1.Press and hold:
The first stored message is displayed.
2.Briefly press the button:
A new message appears each time you
press the button.
Viewing additional information
iDrive, for principle details, refer to page16.
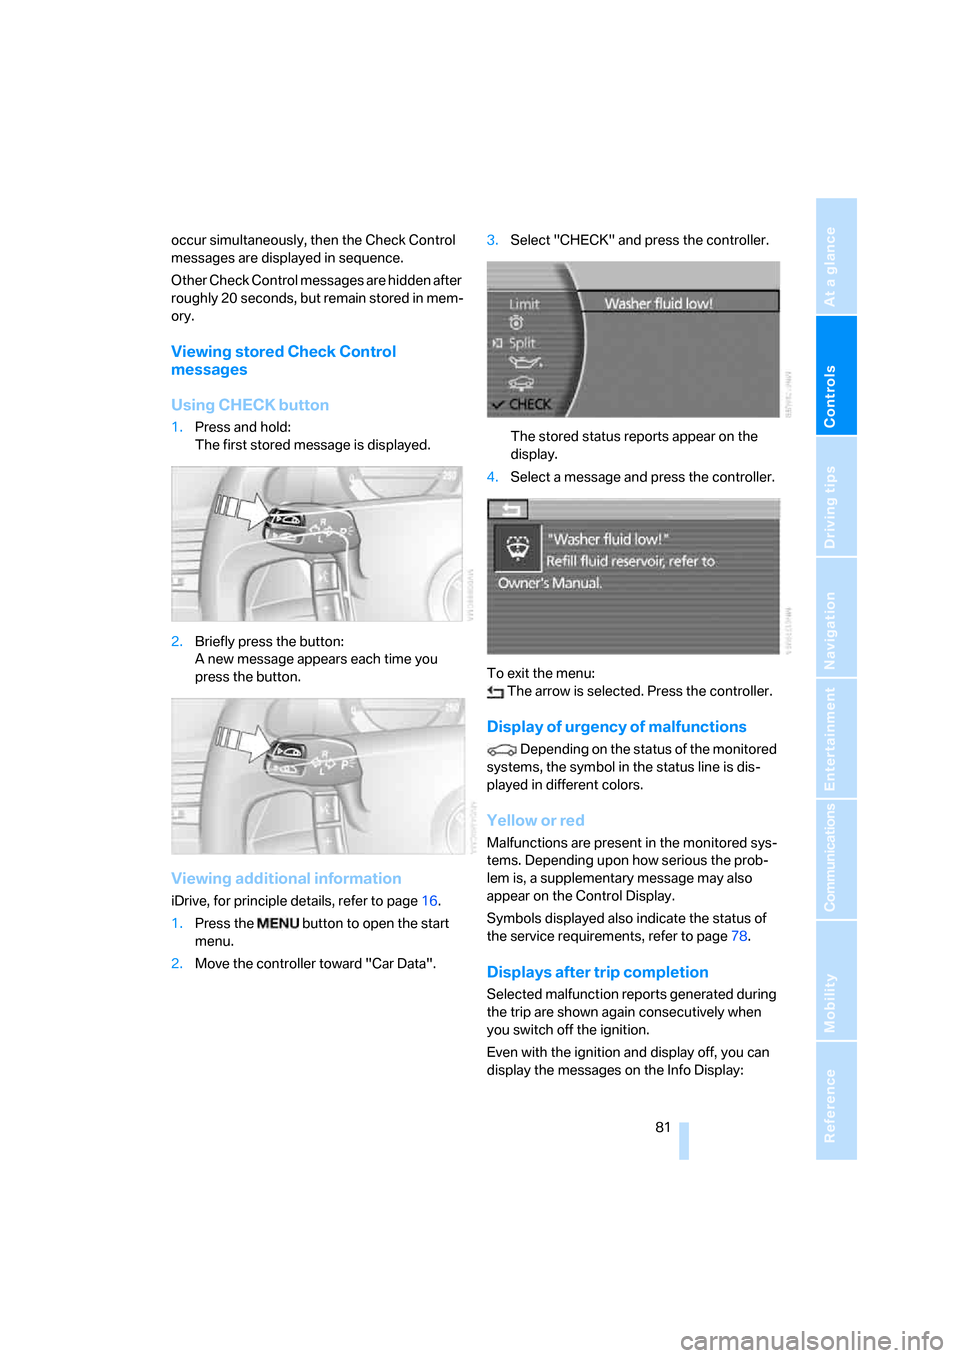
1.Press the button to open the start
menu.
2.Move the controller toward "Car Data".3.Select "CHECK" and press the controller.
The stored status reports appear on the
display.
4.Select a message and press the controller.
To exit the menu:
The arrow is selected. Press the controller.
Display of urgency of malfunctions
Depending on the status of the monitored
systems, the symbol in the status line is dis-
played in different colors.
Yellow or red
Malfunctions are present in the monitored sys-
tems. Depending upon how serious the prob-
lem is, a supplementary message may also
appear on the Control Display.
Symbols displayed also indicate the status of
the service requirements, refer to page78.
Displays after trip completion
Selected malfunction reports generated during
the trip are shown again consecutively when
you switch off the ignition.
Even with the ignition and display off, you can
display the messages on the Info Display:
Page 85 of 247

Controls
83Reference
At a glance
Driving tips
Communications
Navigation
Entertainment
Mobility
Limit on Info Display
If, for instance, the warning sector in the
tachometer is visible, refer to page75, the
speed limit will be indicated by a warning sector
in the speedometer, refer to arrow.
Stopwatch
Starting and stopping
iDrive, for principle details, refer to page16.
1.Press the button to open the start
menu.
2.Move the controller toward "Car Data".
3.Select and press the controller.
4.Select and press the controller. The stop-
watch is reset to 0 and starts.
5.Select and press the controller.
This stops the timer.
Press the controller again to reset the stop-
watch to zero.
All of the remaining functions remain
available at all times while the stopwatch
is running. The stopwatch continues to run in
the background.<
Taking an intermediate time reading
Select "INTERM. TIME" and press the control-
ler. This intermediate time appears below the
ongoing primary stopwatch count.
Assistance window for
onboard data
You can select any of the following computer
functions for display in the assistance window:
>Computer
>Trip computer
>Speed limit
>Stopwatch
Applying display
iDrive, for principle details, refer to page16.
1.Press the button to open the start
menu.
2.Move the controller toward "Car Data".
3.Select "BC" and press the controller.
4.Select " Split" and press the controller.
The function appears in the assistance win-
dow.
You can also choose to view brief help texts
explaining selected menu items, refer to
page20, or the travel route with a navigation
system, refer to page130.
Page 87 of 247
Controls
85Reference
At a glance
Driving tips
Communications
Navigation
Entertainment
Mobility
Hour signal activation
You will hear four tones just before the top of
each hour.
Select "Memo" and press the controller.
The symbol indicates the menu that is cur-
rently activated.
Setting date
1.Select "Date" and press the controller.
The first date display setting is activated.
2.Turn to change the setting.
3.Press the controller to adopt the setting.
The next setting is selected.
4.Make the remaining settings. After the last
adjustment, the date is stored.
The setting is stored for the remote control cur-
rently in use.
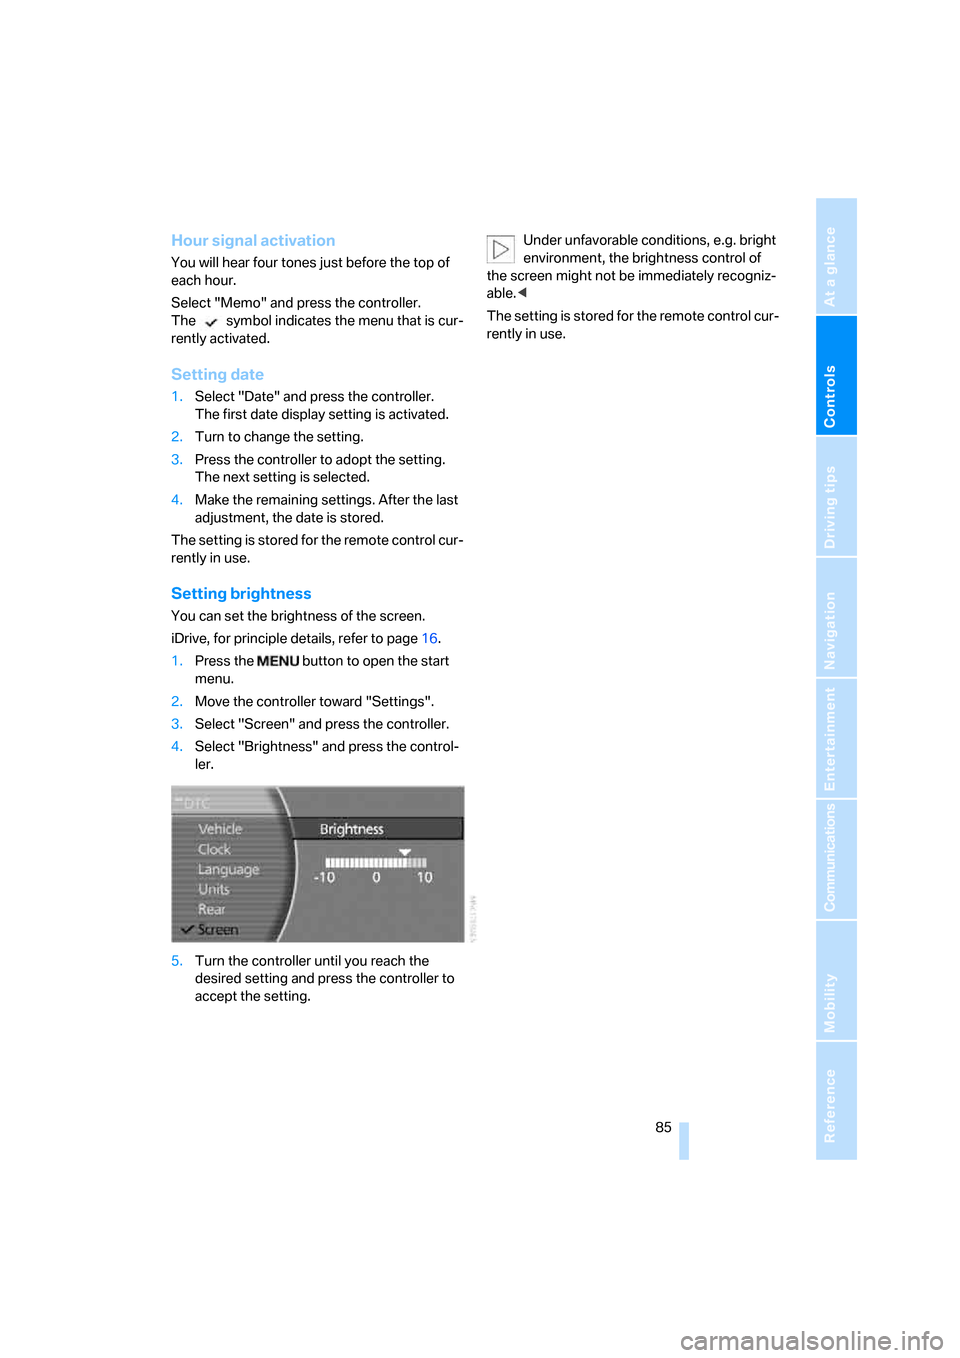
Setting brightness
You can set the brightness of the screen.
iDrive, for principle details, refer to page16.
1.Press the button to open the start
menu.
2.Move the controller toward "Settings".
3.Select "Screen" and press the controller.
4.Select "Brightness" and press the control-
ler.
5.Turn the controller until you reach the
desired setting and press the controller to
accept the setting.Under unfavorable conditions, e.g. bright
environment, the brightness control of
the screen might not be immediately recogniz-
able.<
The setting is stored for the remote control cur-
rently in use.
Page 89 of 247
Controls
87Reference
At a glance
Driving tips
Communications
Navigation
Entertainment
Mobility
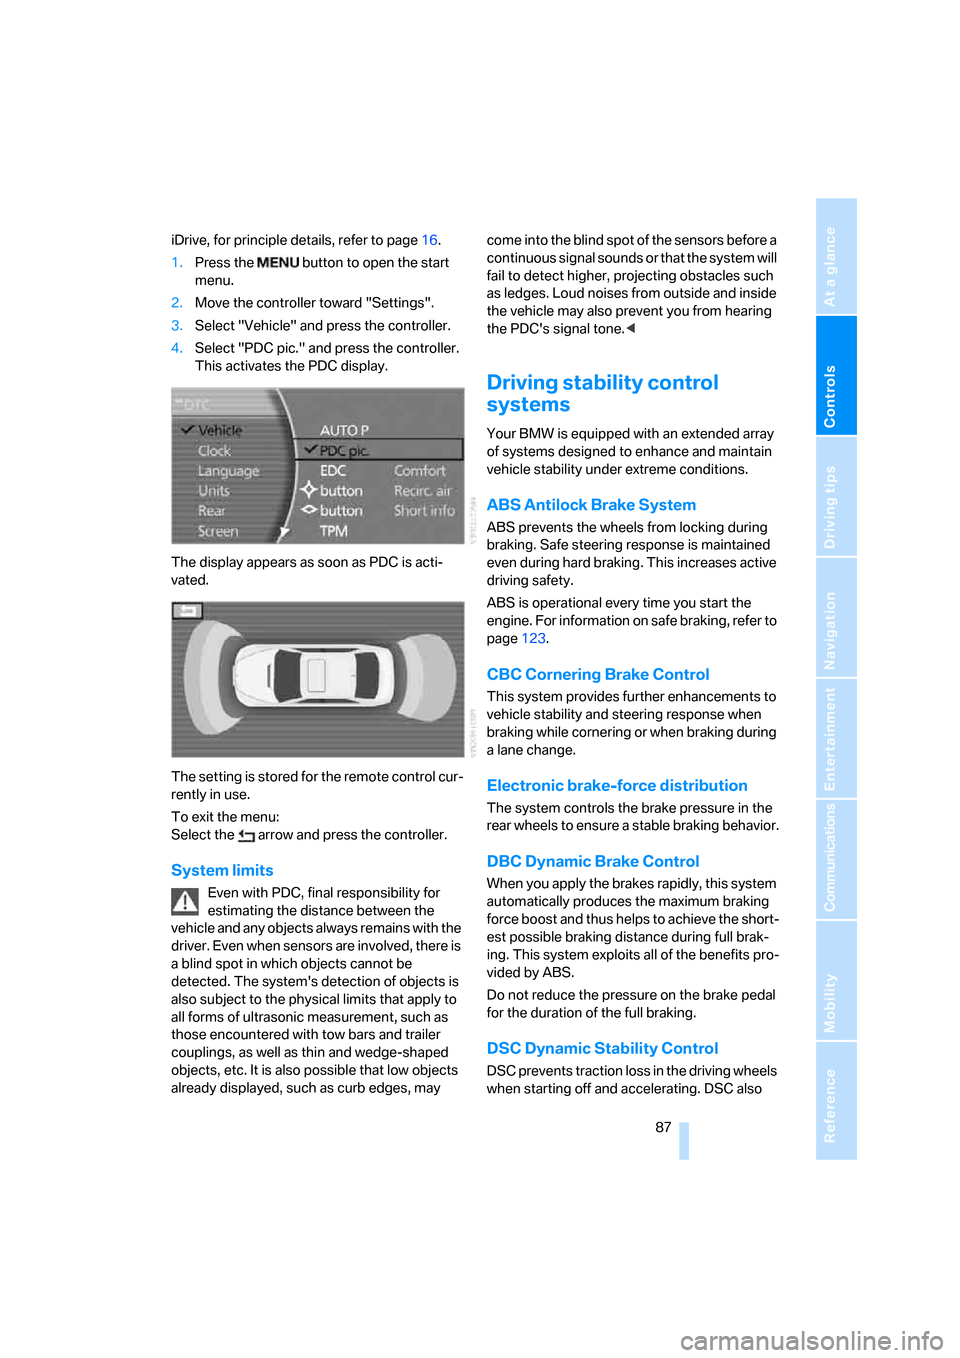
iDrive, for principle details, refer to page16.
1.Press the button to open the start
menu.
2.Move the controller toward "Settings".
3.Select "Vehicle" and press the controller.
4.Select "PDC pic." and press the controller.
This activates the PDC display.
The display appears as soon as PDC is acti-
vated.
The setting is stored for the remote control cur-
rently in use.
To exit the menu:
Select the arrow and press the controller.
System limits
Even with PDC, final responsibility for
estimating the distance between the
vehicle and any objects always remains with the
driver. Even when sensors are involved, there is
a blind spot in which objects cannot be
detected. The system's detection of objects is
also subject to the physical limits that apply to
all forms of ultrasonic measurement, such as
those encountered with tow bars and trailer
couplings, as well as thin and wedge-shaped
objects, etc. It is also possible that low objects
already displayed, such as curb edges, may come into the blind spot of the sensors before a
continuous signal sounds or that the system will
fail to detect higher, projecting obstacles such
as ledges. Loud noises from outside and inside
the vehicle may also prevent you from hearing
the PDC's signal tone.<
Driving stability control
systems
Your BMW is equipped with an extended array
of systems designed to enhance and maintain
vehicle stability under extreme conditions.
ABS Antilock Brake System
ABS prevents the wheels from locking during
braking. Safe steering response is maintained
even during hard braking. This increases active
driving safety.
ABS is operational every time you start the
engine. For information on safe braking, refer to
page123.
CBC Cornering Brake Control
This system provides further enhancements to
vehicle stability and steering response when
braking while cornering or when braking during
a lane change.
Electronic brake-force distribution
The system controls the brake pressure in the
rear wheels to ensure a stable braking behavior.
DBC Dynamic Brake Control
When you apply the brakes rapidly, this system
automatically produces the maximum braking
force boost and thus helps to achieve the short-
est possible braking distance during full brak-
ing. This system exploits all of the benefits pro-
vided by ABS.
Do not reduce the pressure on the brake pedal
for the duration of the full braking.
DSC Dynamic Stability Control
DSC prevents traction loss in the driving wheels
when starting off and accelerating. DSC also
Page 91 of 247

Controls
89Reference
At a glance
Driving tips
Communications
Navigation
Entertainment
Mobility
Deactivating DTC
Select "DTC" again and press the controller.
The LED on the Control Display and the DTC
indicator lamp on the Info Display go out.
Dynamic Drive
The concept
Dynamic Drive minimizes body roll and opti-
mizes vehicle stability during cornering and
evasive maneuvers.
Active stabilizers at the front and rear axles form
the basis for Dynamic Drive. Suspension com-
pliance adapts to suit driving conditions, vary-
ing from performance-oriented during corner-
ing to smooth and comfort-oriented when the
vehicle is traveling in a straight line. During vehi-
cle operation, the system continuously runs
through closed-loop control cycles lasting only
fractions of a second.
The system assumes operational status each
time you start the engine.
Malfunction
The warning lamp lights up yellow and
a message is shown on the Info Display.
A malfunction has occurred in the
Dynamic Drive system. Have the system
checked as soon as possible.
If a malfunction occurs, please remember
to adapt your speed accordingly, espe-
cially in curves.
The suspension will be noticeably softer and
the vehicle will display a greater tendency to tilt
during cornering and in crosswinds.
If a Check Control message stating that you
should stop is displayed, stop at a suitable loca-
tion and switch off the engine as soon as possi-
ble. In this case, the oil level in the reservoir may
have dropped below the minimum, possibly
owing to a leak in the hydraulic system.
Do not continue driving, but instead contact
your BMW center.<
Self-leveling suspension*
Malfunction
The warning lamp for self-leveling sus-
pension lights up yellow and a message
is shown on the Info Display.
A malfunction has occurred in the level control
system.
Stop driving and check the vehicle:
>The vehicle is considerably lower at the rear
than at the front, possibly also on one side,
at the rear left compared to the rear right.
>The ground clearance is reduced or the
driving comfort is noticeably reduced.
>The position of the vehicle is normal, but a
malfunction is indicated.
Drive to the nearest BMW center or a workshop
that works in accordance with BMW guidelines
and uses appropriately trained personnel. Drive
with appropriate caution in the meantime.
EDC Electronic Damping
Control*
If the influencing variables such as road surface
quality or operating conditions such as steer-
ing, braking etc. change, the damping automat-
ically adjusts to the new conditions.
iDrive, for principle details, refer to page16.
1.Press the button to open the start
menu.
2.Move the controller toward "Settings".
3.Select "Vehicle" and press the controller.
4.Select "EDC" and press the controller.
Page 93 of 247
Controls
91Reference
At a glance
Driving tips
Communications
Navigation
Entertainment
Mobility
Indication of a flat tire
The warning lamp lights up red and a
message is shown on the Info Display.
In addition, a signal sounds. A flat tire or
a major air loss has occurred.
1.Reduce speed and stop the vehicle care-
fully. Avoid sudden braking and steering
maneuvers.
2.Identify the damaged tire.
If identification is not possible, con-
tact your BMW center.<
3.Replace the damaged tire, refer to Chang-
ing wheels on page209.
Run-flat tires*
1.Cautiously reduce the vehicle speed to
below 50 mph/80 km/h. Avoid sudden brak-
ing and steering maneuvers. Do not exceed
a vehicle speed of 50 mph/80 km/h.
If the vehicle is not equipped with run-
flat tires, refer to page199, do not
continue to drive. Continued driving after a
flat tire can result in serious accidents.<
2.Check the air pressure in all four tires at the
next opportunity.
If the tire inflation pressure in all four
tires is correct, the Flat Tire Monitor
may not have been initialized. The system
must then be initialized.<
3.In the event of a total loss of inflation pres-
sure, 0 psi/kPa, or obvious tire damage, you
can estimate the possible distance for con-
tinued driving on the basis of the following
guide values:
>With low load:
1 to 2 persons without luggage:
approx. 155 miles/250 km.
>With medium load:
2 persons, luggage compartment full, or
4 persons without luggage:
approx. 95 miles/150 km.
>With full load:
More than 4 persons, luggage compart-
ment full:
approx. 30 miles/50 km.Drive reservedly and do not exceed a
speed of 50 mph/80 km/h. In the event of
pressure loss, vehicle handling changes. This
includes reduced tracking stability in braking,
extended braking distances, and altered natural
steering characteristics.
If unusual vibrations or loud noises occur while
the vehicle is being driven, this can indicate final
failure of the damaged tire. Reduce speed and
stop at a suitable location as soon as possible;
otherwise, pieces of the tire could come off and
cause an accident. Do not continue driving,
contact your BMW center.<
Malfunction
The warning lamp lights up yellow and
a message is shown on the Info Display.
The Flat Tire Monitor has failed. Have
the system checked as soon as possible.
TPM Tire Pressure Monitor*
The concept
TPM checks the tire inflation pressure in the
four mounted tires. The system indicates if the
tire inflation pressure has dropped considerably
in one or several tires.
Functional requirement
In order to assure the reliable reporting of a flat
tire, the system must have been reset with the
correct tire inflation pressure.
Always use wheels with TPM electronics; oth-
erwise, fault-free operation of the system is not
ensured.
Reset the system again after each correc-
tion of the tire inflation pressure and after
every tire or wheel change.<
System limits
TPM cannot warn you of sudden serious
tire damage caused by external influ-
ences.<
The system does not function properly if it has
not been reset, e.g. a flat tire is reported despite
correct tire inflation pressures.