2006 BMW 760i navigation
[x] Cancel search: navigationPage 138 of 247
Destination input
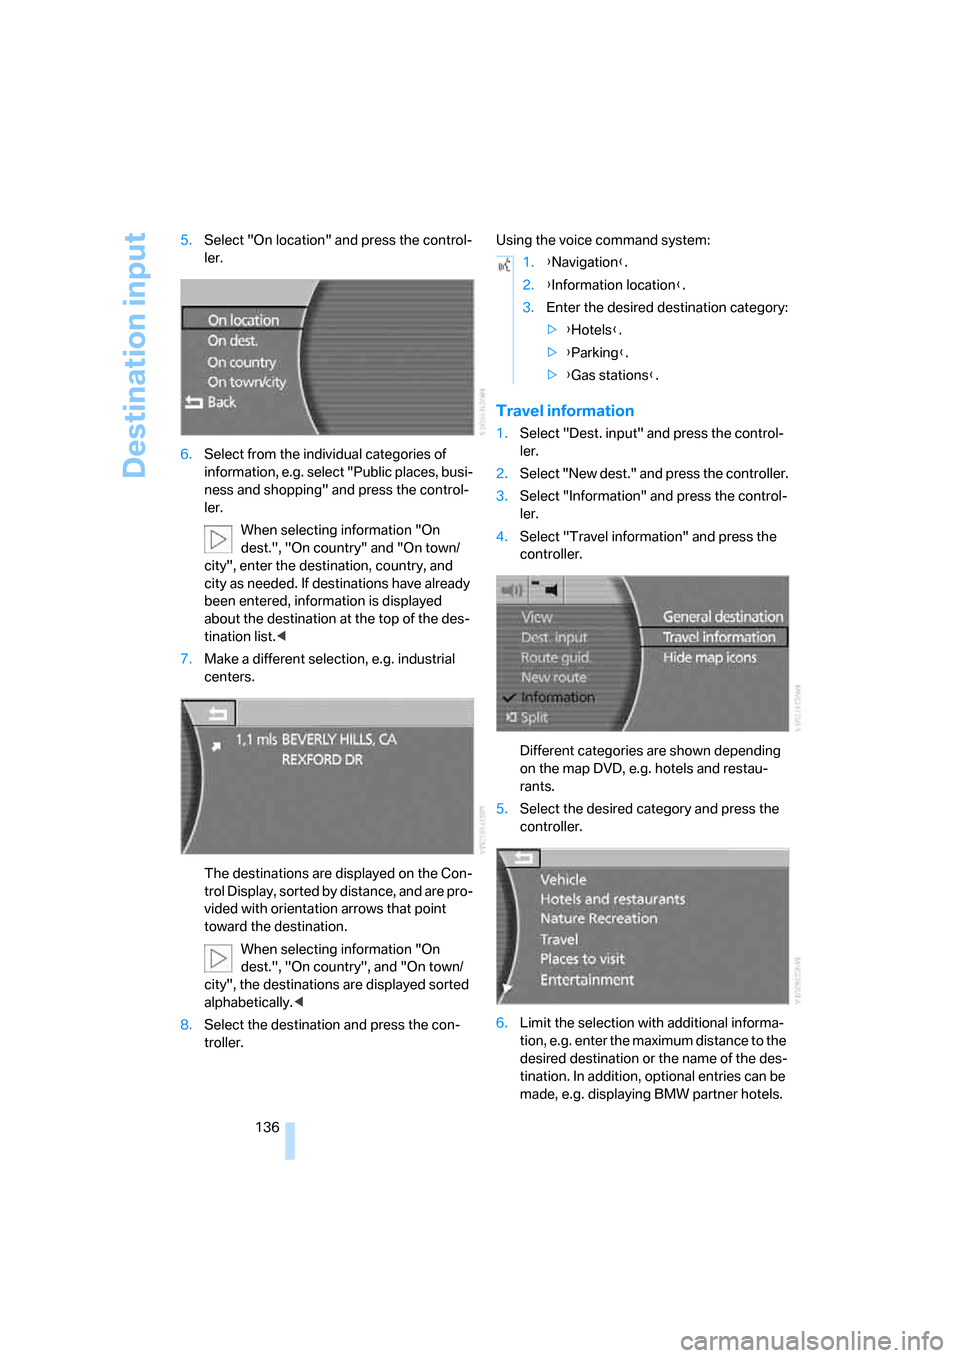
136 5.Select "On location" and press the control-
ler.
6.Select from the individual categories of
information, e.g. select "Public places, busi-
ness and shopping" and press the control-
ler.
When selecting information "On
dest.", "On country" and "On town/
city", enter the destination, country, and
city as needed. If destinations have already
been entered, information is displayed
about the destination at the top of the des-
tination list.<
7.Make a different selection, e.g. industrial
centers.
The destinations are displayed on the Con-
trol Display, sorted by distance, and are pro-
vided with orientation arrows that point
toward the destination.
When selecting information "On
dest.", "On country", and "On town/
city", the destinations are displayed sorted
alphabetically.<
8.Select the destination and press the con-
troller.Using the voice command system:
Travel information
1.Select "Dest. input" and press the control-
ler.
2.Select "New dest." and press the controller.
3.Select "Information" and press the control-
ler.
4.Select "Travel information" and press the
controller.
Different categories are shown depending
on the map DVD, e.g. hotels and restau-
rants.
5.Select the desired category and press the
controller.
6.Limit the selection with additional informa-
tion, e.g. enter the maximum distance to the
desired destination or the name of the des-
tination. In addition, optional entries can be
made, e.g. displaying BMW partner hotels.
1.{Navigation}.
2.{Information location}.
3.Enter the desired destination category:
>{Hotels}.
>{Parking}.
>{Gas stations}.
Page 139 of 247
Navigation
Driving tips
137Reference
At a glance
Controls
Communications
Entertainment
Mobility
The destinations in the surrounding area
are displayed, sorted by distance to the
destination and the other information.
7.Select the destination and press the con-
troller.
To exit the menu:
Select the arrow and press the controller.
Hiding icons in the map view
In the map view, the destinations of the
selected category are displayed in the form of
icons as a function of the map scale and cate-
gory. You can hide them.
Select "Hide map icons" and press the control-
ler.
To display the icons, select a category again
under "General destination" or "Travel informa-
tion".
Recent destinations
The system stores the last ten destinations
entered. You can import these destinations into
the route guidance and edit the entries and the
list.
Importing destination into route
guidance
1.Select "Dest. input" and press the control-
ler.
2.Select "New dest." and press the controller.
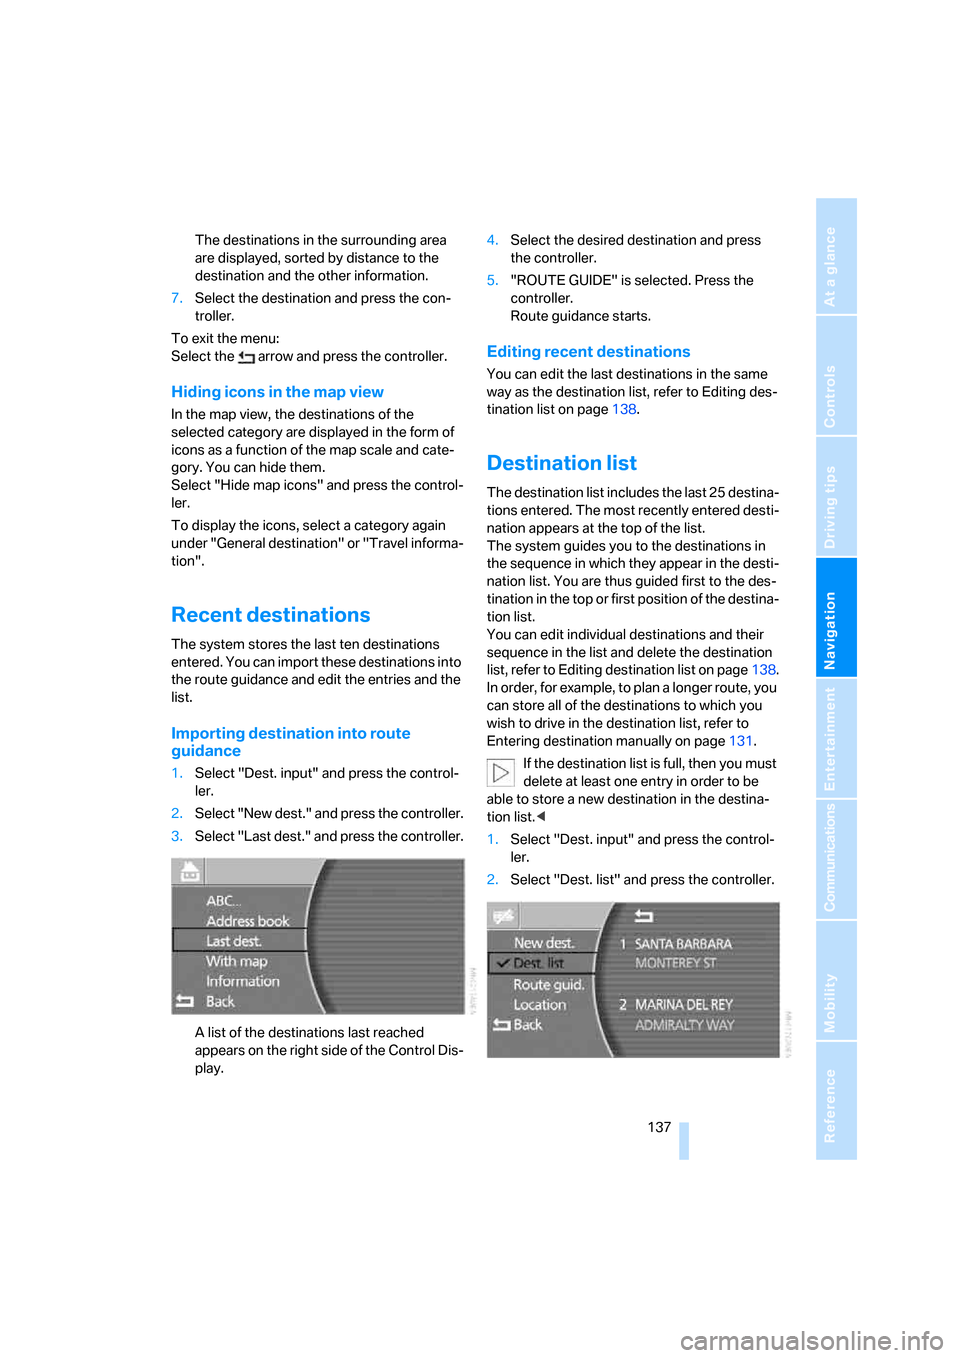
3.Select "Last dest." and press the controller.
A list of the destinations last reached
appears on the right side of the Control Dis-
play.4.Select the desired destination and press
the controller.
5."ROUTE GUIDE" is selected. Press the
controller.
Route guidance starts.
Editing recent destinations
You can edit the last destinations in the same
way as the destination list, refer to Editing des-
tination list on page138.
Destination list
The destination list includes the last 25 destina-
tions entered. The most recently entered desti-
nation appears at the top of the list.
The system guides you to the destinations in
the sequence in which they appear in the desti-
nation list. You are thus guided first to the des-
tination in the top or first position of the destina-
tion list.
You can edit individual destinations and their
sequence in the list and delete the destination
list, refer to Editing destination list on page138.
In order, for example, to plan a longer route, you
can store all of the destinations to which you
wish to drive in the destination list, refer to
Entering destination manually on page131.
If the destination list is full, then you must
delete at least one entry in order to be
able to store a new destination in the destina-
tion list.<
1.Select "Dest. input" and press the control-
ler.
2.Select "Dest. list" and press the controller.
Page 140 of 247
Destination input
138
Importing destination into route
guidance
1.Select desired destination from destination
list and move to top or first position of des-
tination list, refer to Editing destination list.
2.Select "Route guid." and press the control-
ler.
Route guidance starts.
Using the voice command system:
Editing destination list
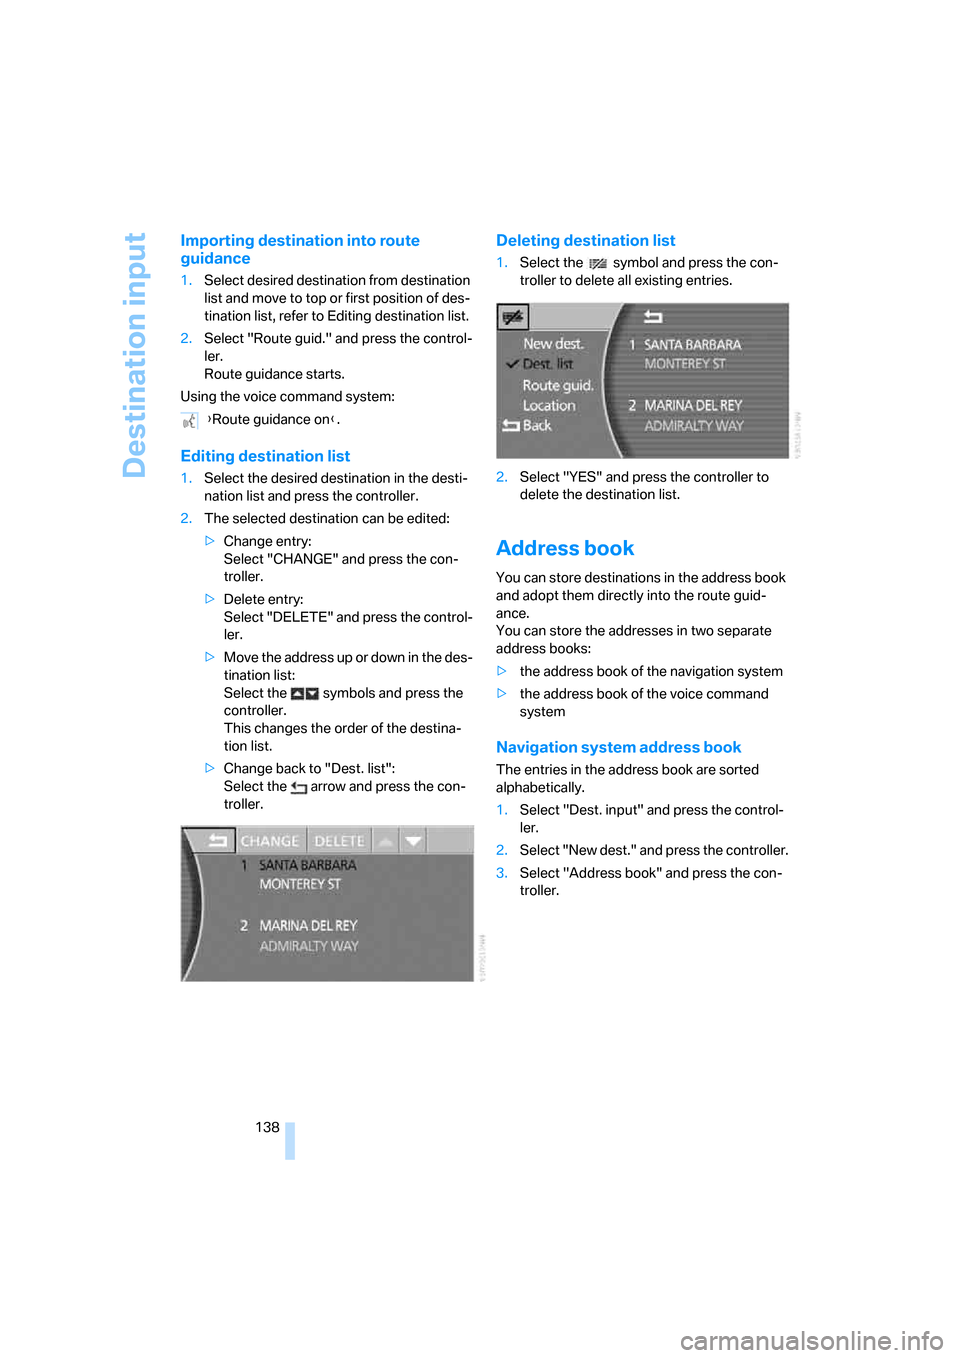
1.Select the desired destination in the desti-
nation list and press the controller.
2.The selected destination can be edited:
>Change entry:
Select "CHANGE" and press the con-
troller.
>Delete entry:
Select "DELETE" and press the control-
ler.
>Move the address up or down in the des-
tination list:
Select the symbols and press the
controller.
This changes the order of the destina-
tion list.
>Change back to "Dest. list":
Select the arrow and press the con-
troller.
Deleting destination list
1.Select the symbol and press the con-
troller to delete all existing entries.
2.Select "YES" and press the controller to
delete the destination list.
Address book
You can store destinations in the address book
and adopt them directly into the route guid-
ance.
You can store the addresses in two separate
address books:
>the address book of the navigation system
>the address book of the voice command
system
Navigation system address book
The entries in the address book are sorted
alphabetically.
1.Select "Dest. input" and press the control-
ler.
2.Select "New dest." and press the controller.
3.Select "Address book" and press the con-
troller. {Route guidance on}.
Page 141 of 247
Navigation
Driving tips
139Reference
At a glance
Controls
Communications
Entertainment
Mobility
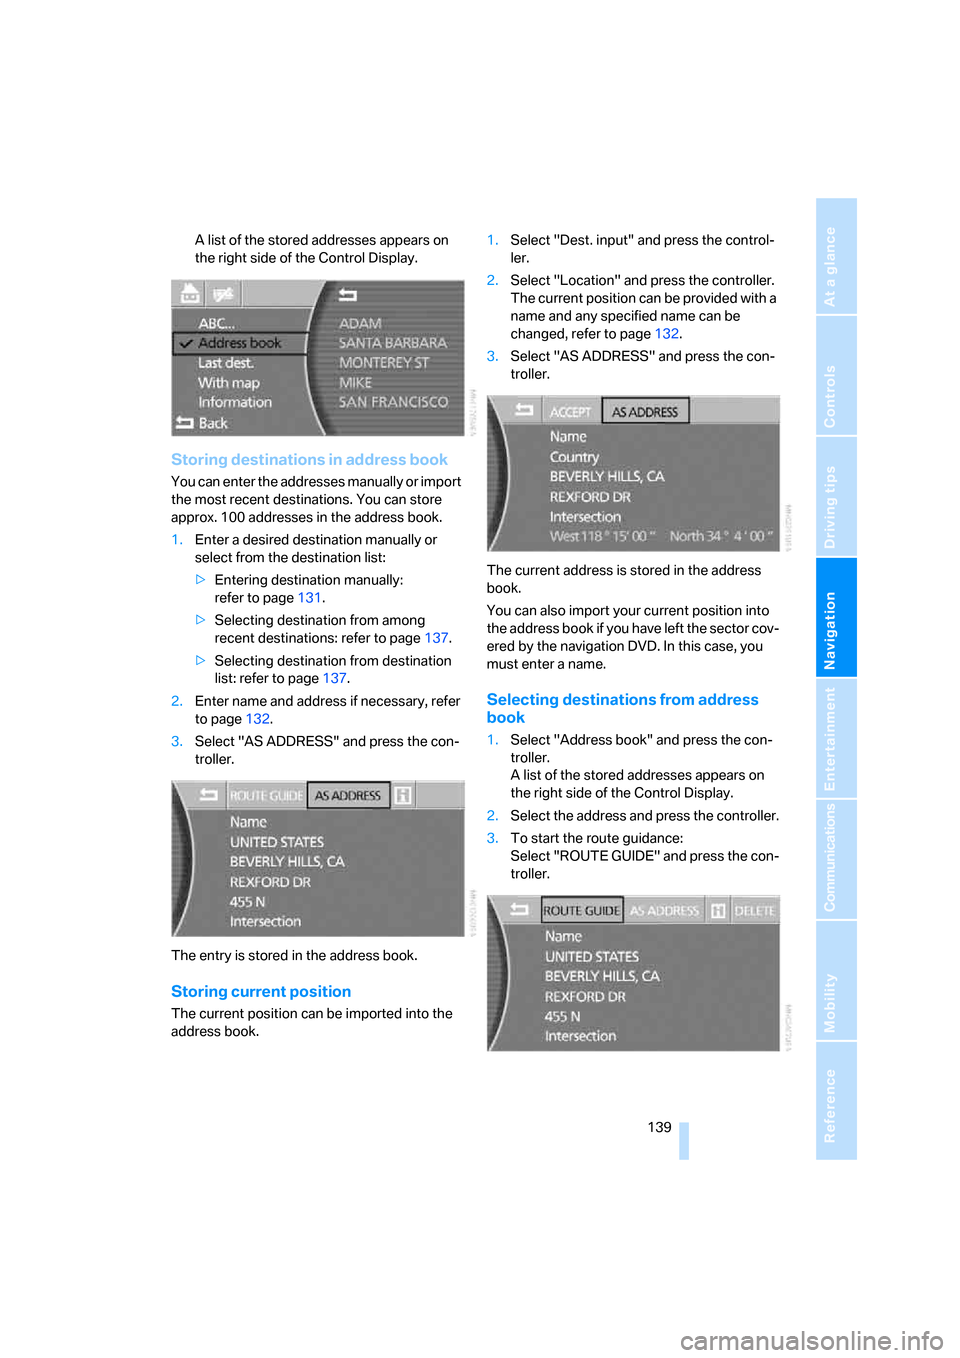
A list of the stored addresses appears on
the right side of the Control Display.
Storing destinations in address book
You can enter the addresses manually or import
the most recent destinations. You can store
approx. 100 addresses in the address book.
1.Enter a desired destination manually or
select from the destination list:
>Entering destination manually:
refer to page131.
>Selecting destination from among
recent destinations: refer to page137.
>Selecting destination from destination
list: refer to page137.
2.Enter name and address if necessary, refer
to page132.
3.Select "AS ADDRESS" and press the con-
troller.
The entry is stored in the address book.
Storing current position
The current position can be imported into the
address book.1.Select "Dest. input" and press the control-
ler.
2.Select "Location" and press the controller.
The current position can be provided with a
name and any specified name can be
changed, refer to page132.
3.Select "AS ADDRESS" and press the con-
troller.
The current address is stored in the address
book.
You can also import your current position into
the address book if you have left the sector cov-
ered by the navigation DVD. In this case, you
must enter a name.
Selecting destinations from address
book
1.Select "Address book" and press the con-
troller.
A list of the stored addresses appears on
the right side of the Control Display.
2.Select the address and press the controller.
3.To start the route guidance:
Select "ROUTE GUIDE" and press the con-
troller.
Page 143 of 247
Navigation
Driving tips
141Reference
At a glance
Controls
Communications
Entertainment
Mobility
Using the voice command system:
Voice command system address book
It is only possible to save the first entry in the
destination list. To save other addresses,
change the destination list accordingly, refer to
page137.
Storing destinations in address book
The destination to be stored in the voice com-
mand address book must be the first destina-
tion in the destination list.
The house number is not stored in the
address book of the voice command sys-
tem.<
Using the voice command system:
Selecting destinations from address
bookDeleting destinations from address
book
To delete individual destinations:
To delete all existing entries:
Route selection
You can influence the calculated route by
choosing certain route criteria.
The route is planned according to fixed rules,
taking the road type into account, e.g. whether
the route involves highways or winding roads.
The road types are stored on the navigation
DVD. As a result, the routes recommended by
the navigation system may not always be the
same ones that you would choose based on
personal experience.
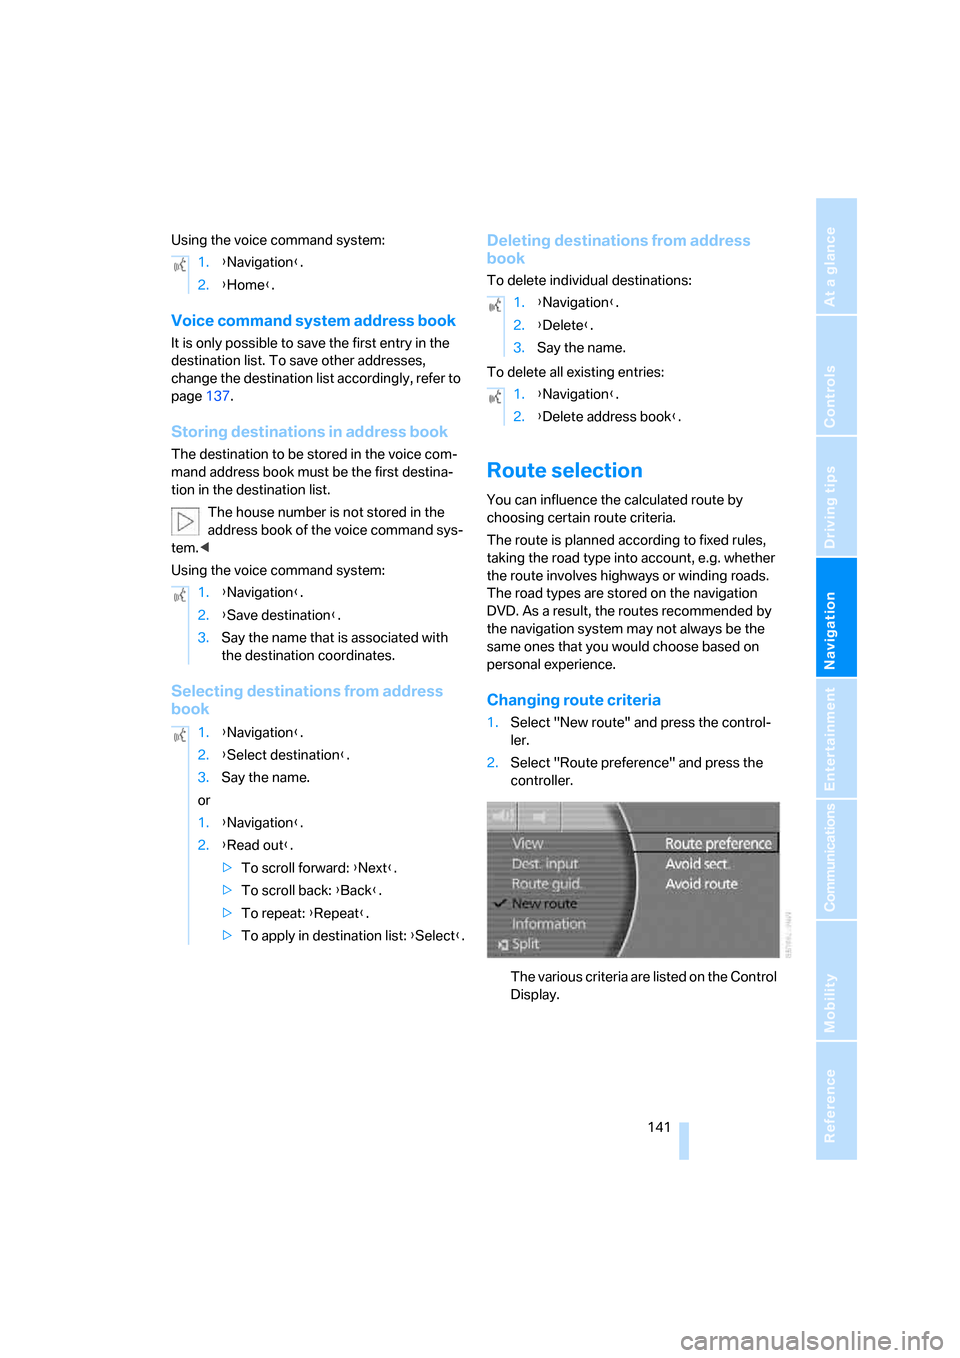
Changing route criteria
1.Select "New route" and press the control-
ler.
2.Select "Route preference" and press the
controller.
The various criteria are listed on the Control
Display. 1.{Navigation}.
2.{Home}.
1.{Navigation}.
2.{Save destination}.
3.Say the name that is associated with
the destination coordinates.
1.{Navigation}.
2.{Select destination}.
3.Say the name.
or
1.{Navigation}.
2.{Read out}.
>To scroll forward: {Next}.
>To scroll back: {Back}.
>To repeat: {Repeat}.
>To apply in destination list: {Select}.
1.{Navigation}.
2.{Delete}.
3.Say the name.
1.{Navigation}.
2.{Delete address book}.
Page 144 of 247
Destination input
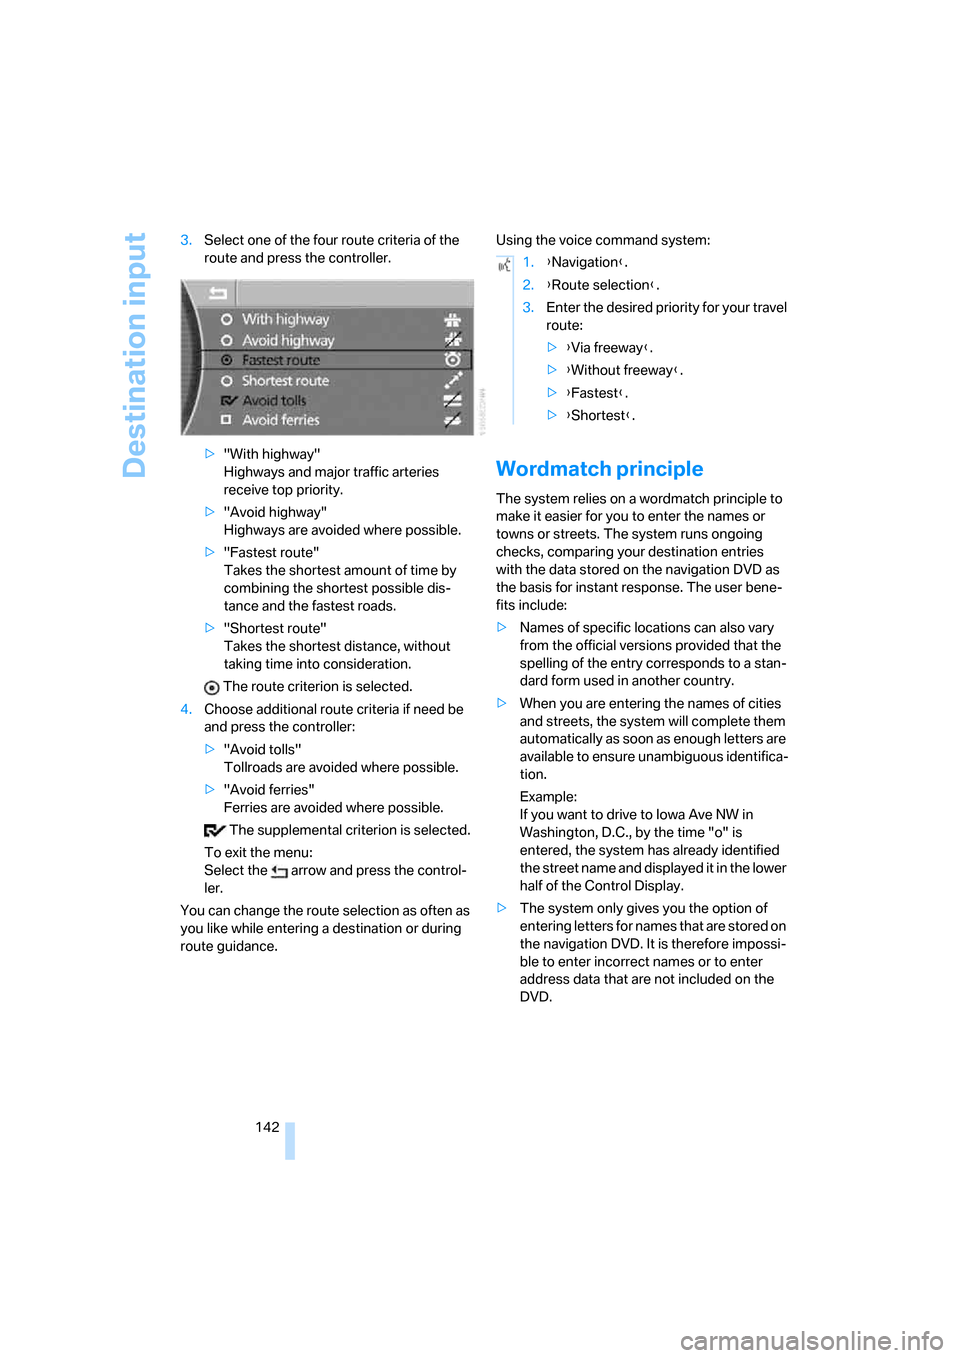
142 3.Select one of the four route criteria of the
route and press the controller.
>"With highway"
Highways and major traffic arteries
receive top priority.
>"Avoid highway"
Highways are avoided where possible.
>"Fastest route"
Takes the shortest amount of time by
combining the shortest possible dis-
tance and the fastest roads.
>"Shortest route"
Takes the shortest distance, without
taking time into consideration.
The route criterion is selected.
4.Choose additional route criteria if need be
and press the controller:
>"Avoid tolls"
Tollroads are avoided where possible.
>"Avoid ferries"
Ferries are avoided where possible.
The supplemental criterion is selected.
To exit the menu:
Select the arrow and press the control-
ler.
You can change the route selection as often as
you like while entering a destination or during
route guidance.Using the voice command system:
Wordmatch principle
The system relies on a wordmatch principle to
make it easier for you to enter the names or
towns or streets. The system runs ongoing
checks, comparing your destination entries
with the data stored on the navigation DVD as
the basis for instant response. The user bene-
fits include:
>Names of specific locations can also vary
from the official versions provided that the
spelling of the entry corresponds to a stan-
dard form used in another country.
>When you are entering the names of cities
and streets, the system will complete them
automatically as soon as enough letters are
available to ensure unambiguous identifica-
tion.
Example:
If you want to drive to Iowa Ave NW in
Washington, D.C., by the time "o" is
entered, the system has already identified
the street name and displayed it in the lower
half of the Control Display.
>The system only gives you the option of
entering letters for names that are stored on
the navigation DVD. It is therefore impossi-
ble to enter incorrect names or to enter
address data that are not included on the
DVD.
1.{Navigation}.
2.{Route selection}.
3.Enter the desired priority for your travel
route:
>{Via freeway}.
>{Without freeway}.
>{Fastest}.
>{Shortest}.
Page 145 of 247
Navigation
Driving tips
143Reference
At a glance
Controls
Communications
Entertainment
Mobility
Route guidance
Starting route guidance
The route guidance is started for the first desti-
nation in the destination list, refer to page137.
There must be at least one destination in the
destination list.
iDrive, for principle details, refer to page16.
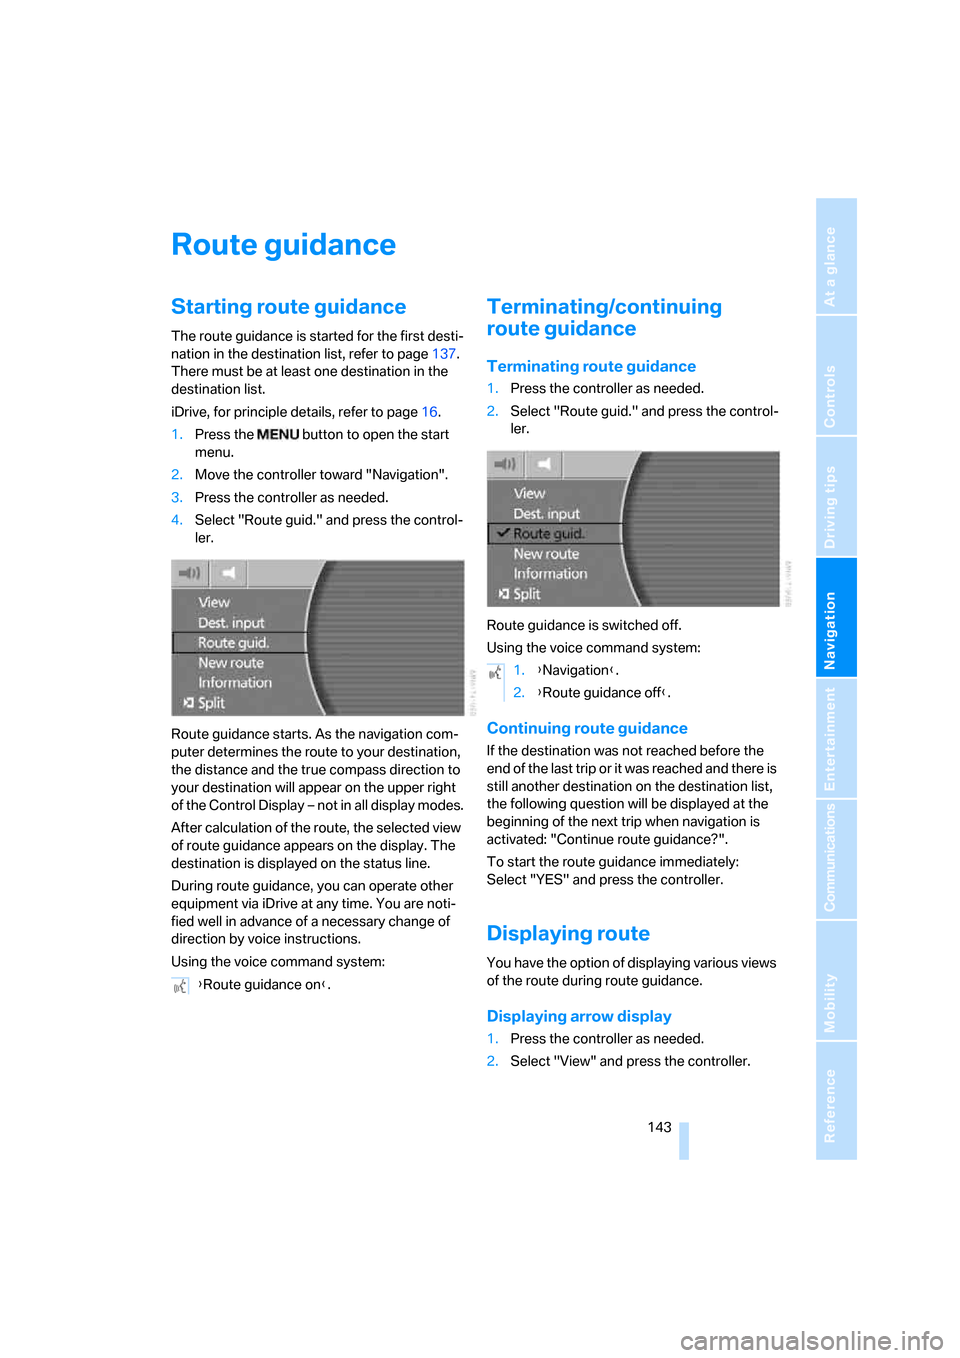
1.Press the button to open the start
menu.
2.Move the controller toward "Navigation".
3.Press the controller as needed.
4.Select "Route guid." and press the control-
ler.
Route guidance starts. As the navigation com-
puter determines the route to your destination,
the distance and the true compass direction to
your destination will appear on the upper right
of the Control Display – not in all display modes.
After calculation of the route, the selected view
of route guidance appears on the display. The
destination is displayed on the status line.
During route guidance, you can operate other
equipment via iDrive at any time. You are noti-
fied well in advance of a necessary change of
direction by voice instructions.
Using the voice command system:
Terminating/continuing
route guidance
Terminating route guidance
1.Press the controller as needed.
2.Select "Route guid." and press the control-
ler.
Route guidance is switched off.
Using the voice command system:
Continuing route guidance
If the destination was not reached before the
end of the last trip or it was reached and there is
still another destination on the destination list,
the following question will be displayed at the
beginning of the next trip when navigation is
activated: "Continue route guidance?".
To start the route guidance immediately:
Select "YES" and press the controller.
Displaying route
You have the option of displaying various views
of the route during route guidance.
Displaying arrow display
1.Press the controller as needed.
2.Select "View" and press the controller. {Route guidance on}.
1.{Navigation}.
2.{Route guidance off}.
Page 146 of 247
Route guidance
144 3.Select "Arrow display" and press the con-
troller.
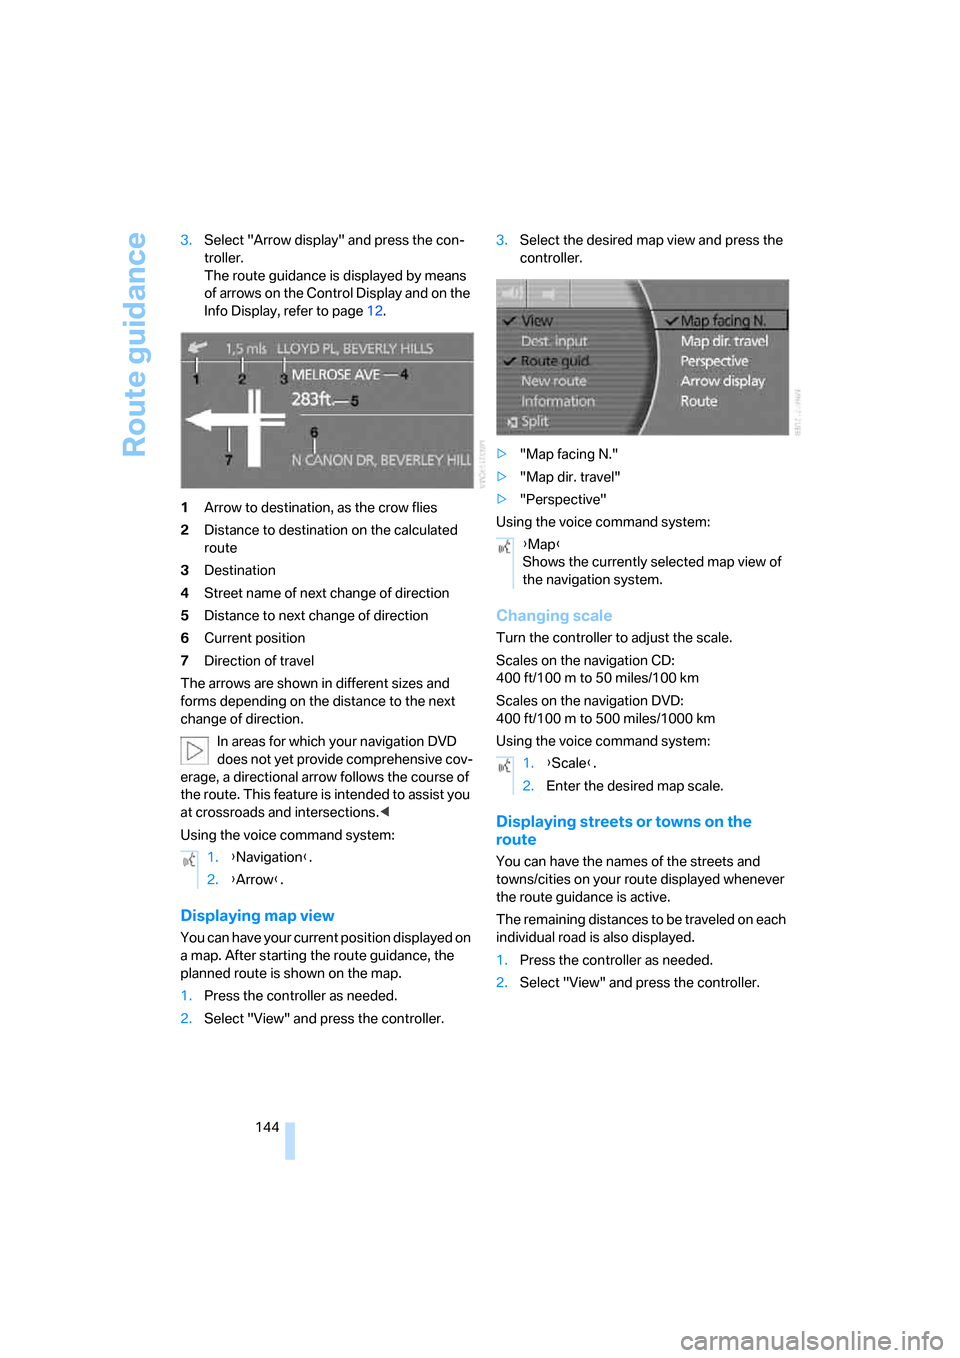
The route guidance is displayed by means
of arrows on the Control Display and on the
Info Display, refer to page12.
1Arrow to destination, as the crow flies
2Distance to destination on the calculated
route
3Destination
4Street name of next change of direction
5Distance to next change of direction
6Current position
7Direction of travel
The arrows are shown in different sizes and
forms depending on the distance to the next
change of direction.
In areas for which your navigation DVD
does not yet provide comprehensive cov-
erage, a directional arrow follows the course of
the route. This feature is intended to assist you
at crossroads and intersections.<
Using the voice command system:
Displaying map view
You can have your current position displayed on
a map. After starting the route guidance, the
planned route is shown on the map.
1.Press the controller as needed.
2.Select "View" and press the controller.3.Select the desired map view and press the
controller.
>"Map facing N."
>"Map dir. travel"
>"Perspective"
Using the voice command system:
Changing scale
Turn the controller to adjust the scale.
Scales on the navigation CD:
400 ft/100 m to 50 miles/100 km
Scales on the navigation DVD:
400ft/100m to 500miles/1000km
Using the voice command system:
Displaying streets or towns on the
route
You can have the names of the streets and
towns/cities on your route displayed whenever
the route guidance is active.
The remaining distances to be traveled on each
individual road is also displayed.
1.Press the controller as needed.
2.Select "View" and press the controller. 1.{Navigation}.
2.{Arrow}.
{Map}
Shows the currently selected map view of
the navigation system.
1.{Scale}.
2.Enter the desired map scale.