2006 BMW 750LI seats
[x] Cancel search: seatsPage 49 of 247
Controls
47Reference
At a glance
Driving tips
Communications
Navigation
Entertainment
Mobility
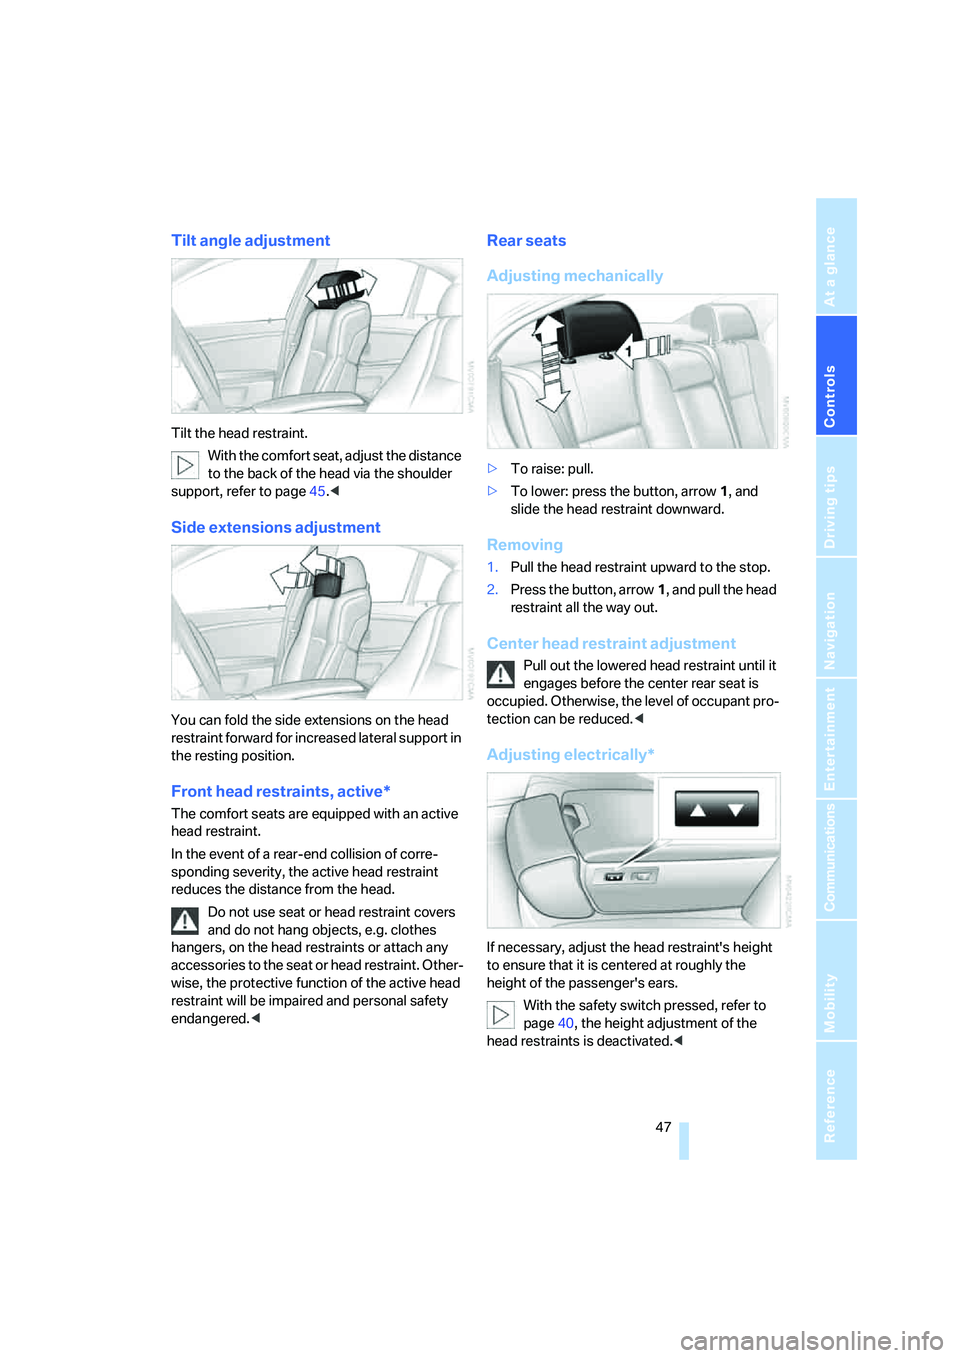
Tilt angle adjustment
Tilt the head restraint.
With the comfort seat, adjust the distance
to the back of the head via the shoulder
support, refer to page45.<
Side extensions adjustment
You can fold the side extensions on the head
restraint forward for increased lateral support in
the resting position.
Front head restraints, active*
The comfort seats are equipped with an active
head restraint.
In the event of a rear-end collision of corre-
sponding severity, the active head restraint
reduces the distance from the head.
Do not use seat or head restraint covers
and do not hang objects, e.g. clothes
hangers, on the head restraints or attach any
accessories to the seat or head restraint. Other-
wise, the protective function of the active head
restraint will be impaired and personal safety
endangered.<
Rear seats
Adjusting mechanically
>To raise: pull.
>To lower: press the button, arrow1, and
slide the head restraint downward.
Removing
1.Pull the head restraint upward to the stop.
2.Press the button, arrow1, and pull the head
restraint all the way out.
Center head restraint adjustment
Pull out the lowered head restraint until it
engages before the center rear seat is
occupied. Otherwise, the level of occupant pro-
tection can be reduced.<
Adjusting electrically*
If necessary, adjust the head restraint's height
to ensure that it is centered at roughly the
height of the passenger's ears.
With the safety switch pressed, refer to
page40, the height adjustment of the
head restraints is deactivated.<
Page 50 of 247
Adjusting
48 The head restraints at the outer sitting posi-
tions extend automatically whenever a passen-
ger in the rear seat fastens his safety belt. You
can also adjust the height of the head restraint
electrically.
To prevent possible personal injury and
property damage, always ensure that the
area above the head restraints is clear and
unobstructed before extending them upward.<
Rear comfort seat*
Height adjustment
If necessary, adjust the head restraint's height
to ensure that it is centered at roughly the
height of the passenger's ears.
With the safety switch pressed, refer to
page40, the height adjustment of the
head restraints is deactivated.<
The head restraints at the outer sitting posi-
tions extend automatically whenever a passen-
ger in the rear seat fastens his safety belt. You
can also adjust the height of the head restraint
electrically.
To prevent possible personal injury and
property damage, always ensure that the
area above the head restraints is clear and
unobstructed before extending them upward.<
Side extensions adjustment
You can fold the side extensions on the head
restraint forward for increased lateral support in
the resting position.
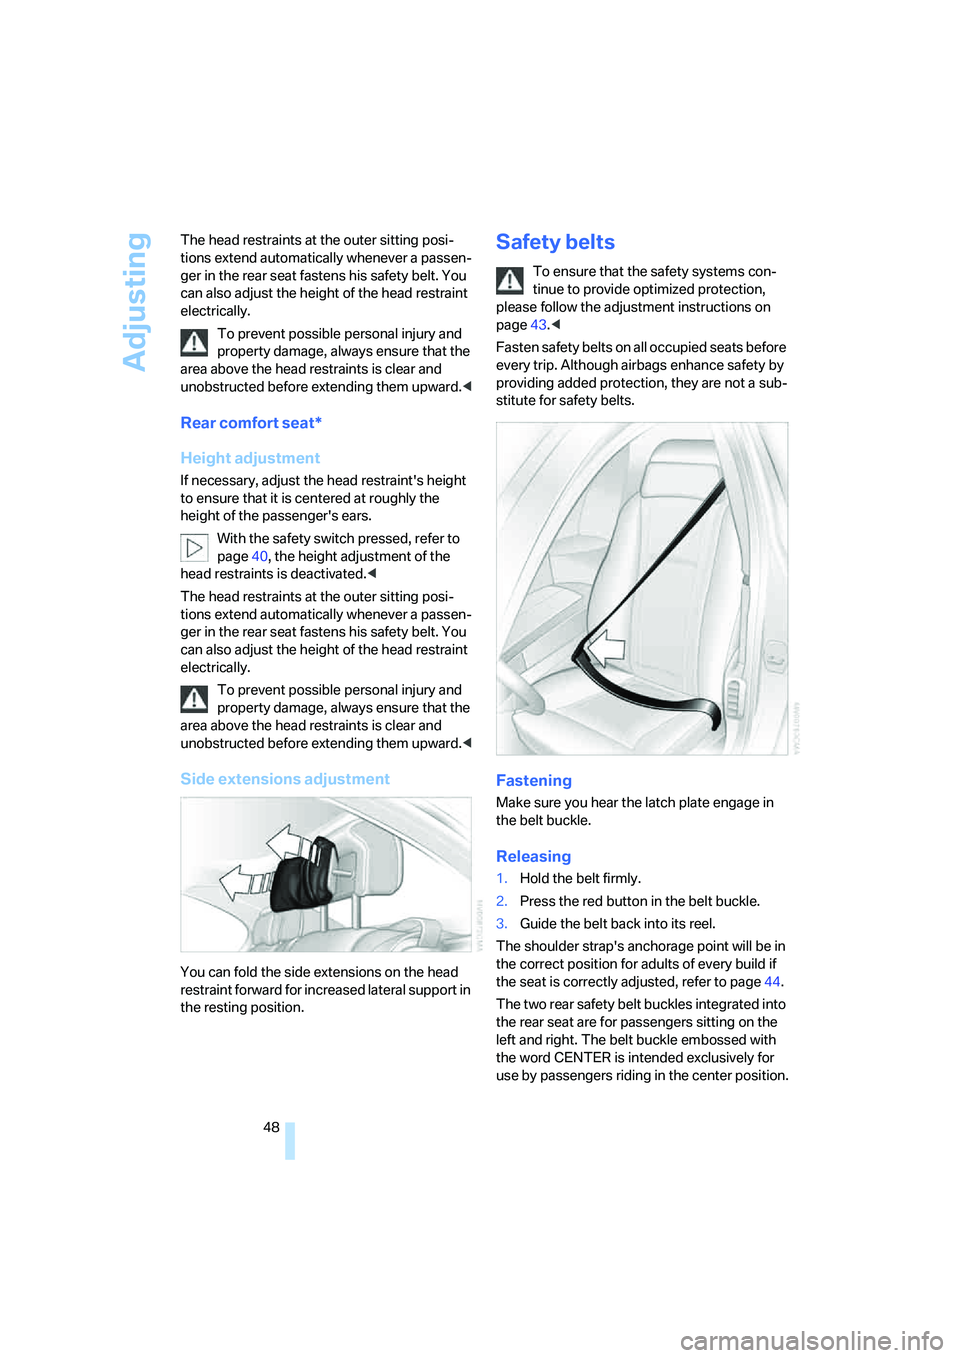
Safety belts
To ensure that the safety systems con-
tinue to provide optimized protection,
please follow the adjustment instructions on
page43.<
Fasten safety belts on all occupied seats before
every trip. Although airbags enhance safety by
providing added protection, they are not a sub-
stitute for safety belts.
Fastening
Make sure you hear the latch plate engage in
the belt buckle.
Releasing
1.Hold the belt firmly.
2.Press the red button in the belt buckle.
3.Guide the belt back into its reel.
The shoulder strap's anchorage point will be in
the correct position for adults of every build if
the seat is correctly adjusted, refer to page44.
The two rear safety belt buckles integrated into
the rear seat are for passengers sitting on the
left and right. The belt buckle embossed with
the word CENTER is intended exclusively for
use by passengers riding in the center position.
Page 51 of 247
Controls
49Reference
At a glance
Driving tips
Communications
Navigation
Entertainment
Mobility
Safety belt reminder for front seats
The indicator lamp flashes or lights up.
In addition, a signal sounds. Please
make sure that the safety belts are
positioned correctly.
The safety belt reminder is active at speeds
above approx. 5 mph/8 km/h. It can also be acti-
vated if objects are placed on the passenger's
seat.
Damage to safety belts
In case of strain due to an accident or
damage, replace the belt system includ-
ing the safety belt tensioners and have the belt
anchor points checked. Only have this work
carried out at a BMW center or at a workshop
that works according to BMW repair proce-
dures with correspondingly trained personnel.
Otherwise, correct operation of this safety
equipment is not guaranteed.<
Heated seats*
Front
The temperature setting progresses one step
through its control sequence each time you
press the button.
The maximum temperature is supplied when
three lights are lit.
To switch off:
Press and hold the button.
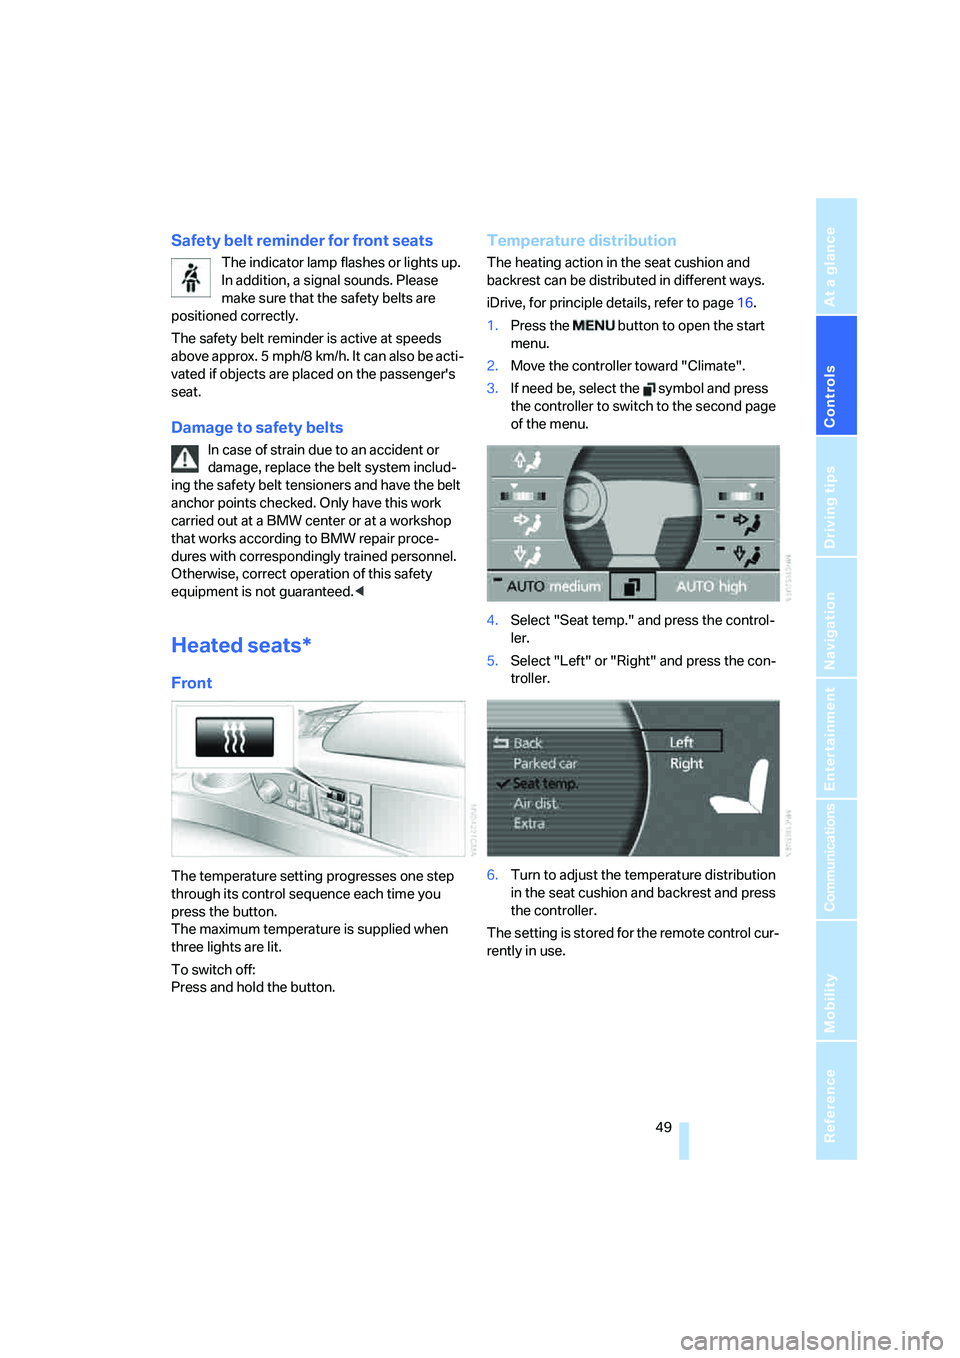
Temperature distribution
The heating action in the seat cushion and
backrest can be distributed in different ways.
iDrive, for principle details, refer to page16.
1.Press the button to open the start
menu.
2.Move the controller toward "Climate".
3.If need be, select the symbol and press
the controller to switch to the second page
of the menu.
4.Select "Seat temp." and press the control-
ler.
5.Select "Left" or "Right" and press the con-
troller.
6.Turn to adjust the temperature distribution
in the seat cushion and backrest and press
the controller.
The setting is stored for the remote control cur-
rently in use.
Page 56 of 247
Transporting children safely
54
Transporting children safely
The right place for children
Do not leave children unattended in the
vehicle; otherwise, they could endanger
themselves and other persons, e.g. by opening
the doors.<
Children always in the rear
Accident research shows that the safest place
for children is on the back seat.
Children younger than 13 years of age or
with a height under 5 ft/150 cm may only
be transported in the rear in child restraint sys-
tems which correspond to the age, weight and
height of the child. Otherwise, there is an
increased danger of injury in an accident.<
Children 13 years of age or older must wear a
safety belt as soon as a suitable child restraint
system can no longer be used due to their age,
weight and size.
With the exception of the driver's seat, all seats
in your BMW comply with the recommenda-
tions of the standard SAE J1819 for the safe
securing of child restraint systems in motor
vehicles.
Exception for front passenger seat
Should it be necessary to use a child
restraint system on the front passenger
seat, the front, knee and side airbag on the front
passenger side must be deactivated. Other-
wise, there is an increased risk of injury for the
child if the airbags are triggered, even with a
child restraint system. Your BMW center will be
glad to advise you.<
More information on Automatic deactivation of
front passenger airbags, refer to page95.
Installing child restraint
systems
In order to avoid reducing their protective
action, follow all instructions of the child
restraint system manufacturer for the selection,
installation, and use of child restraint sys-
tems.<
Backrest width* on front passenger's
seat
Before mounting a child restraint system
on the front passengers seat, the back-
rest width adjustment must be open com-
pletely. After installing the child's seat, no
memory position may be called up; otherwise,
the stability of the child's seat on the front pas-
senger seat is reduced.<
1.Open backrest width completely, refer to
Front comfort seat adjustment on page44.
2.Mount child's seat.
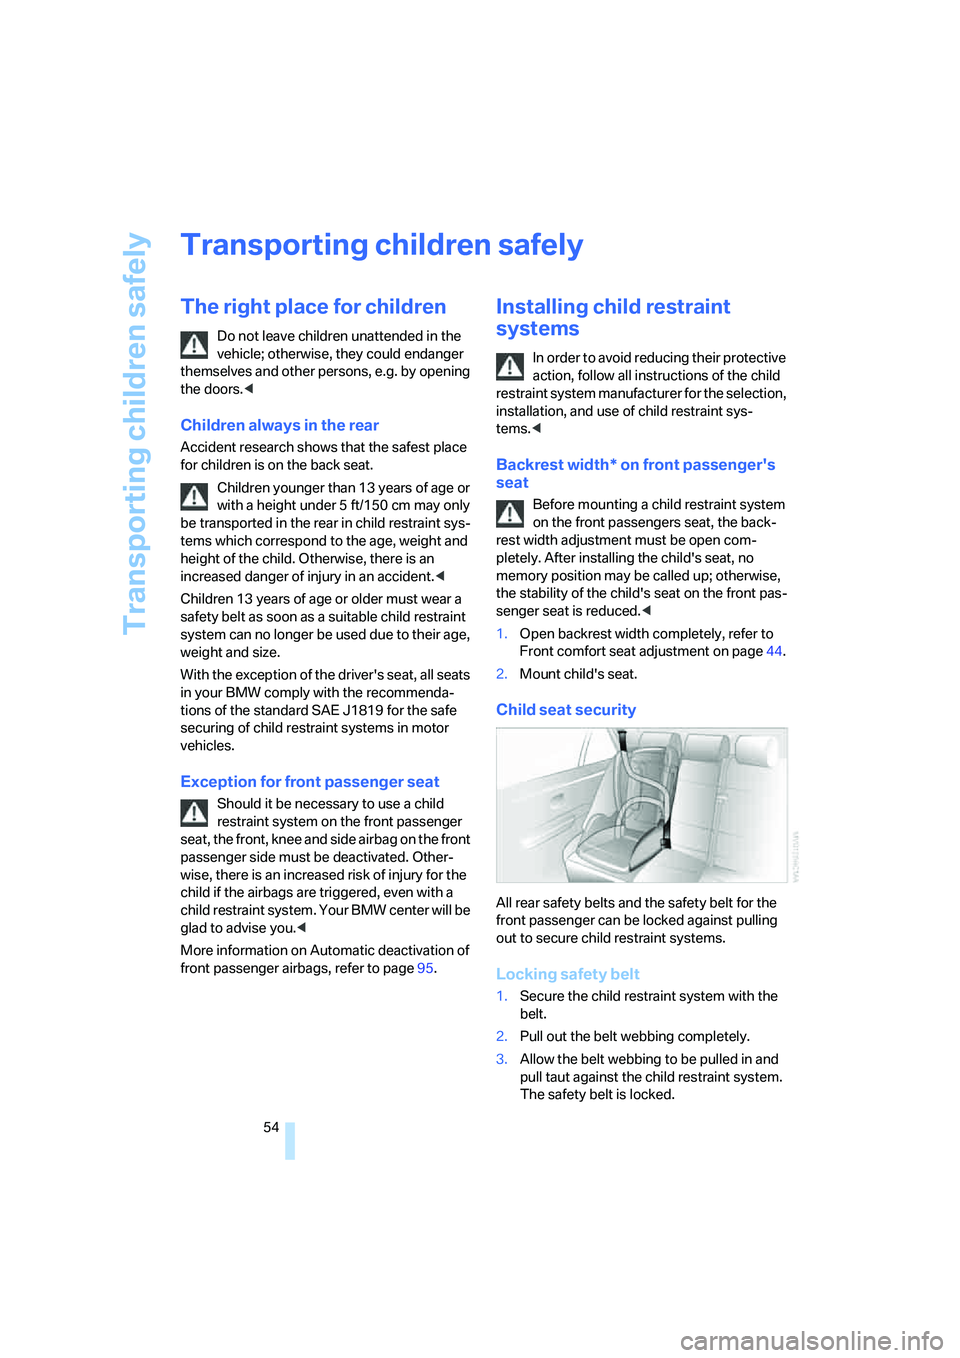
Child seat security
All rear safety belts and the safety belt for the
front passenger can be locked against pulling
out to secure child restraint systems.
Locking safety belt
1.Secure the child restraint system with the
belt.
2.Pull out the belt webbing completely.
3.Allow the belt webbing to be pulled in and
pull taut against the child restraint system.
The safety belt is locked.
Page 57 of 247
Controls
55Reference
At a glance
Driving tips
Communications
Navigation
Entertainment
Mobility
Unlocking safety belt
1.Open the belt buckle.
2.Remove the child restraint system.
3.Allow the belt webbing to be pulled in com-
pletely.
Child restraint system with tether strap
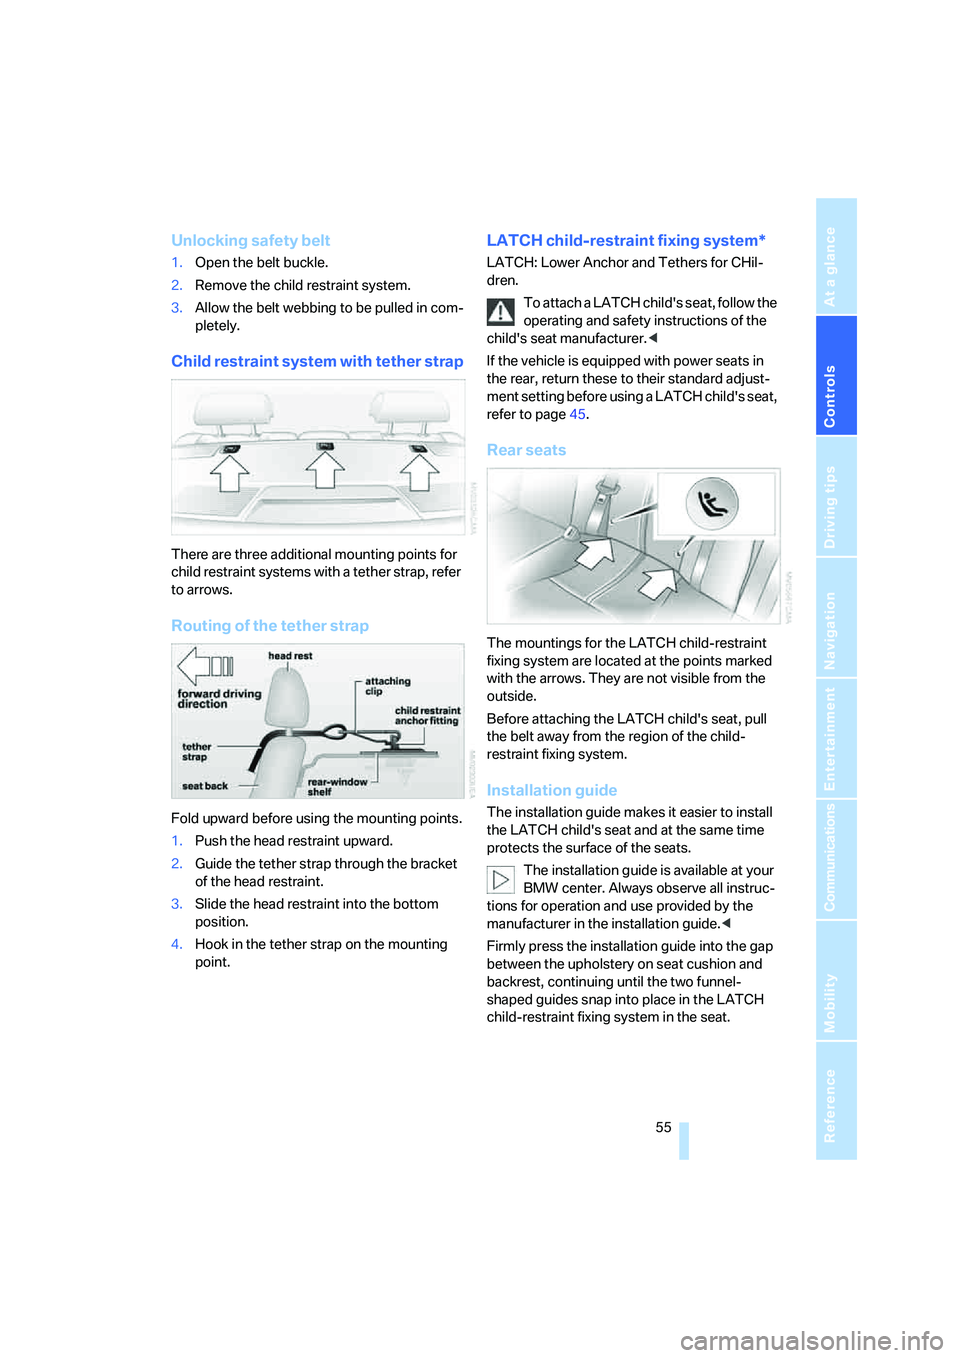
There are three additional mounting points for
child restraint systems with a tether strap, refer
to arrows.
Routing of the tether strap
Fold upward before using the mounting points.
1.Push the head restraint upward.
2.Guide the tether strap through the bracket
of the head restraint.
3.Slide the head restraint into the bottom
position.
4.Hook in the tether strap on the mounting
point.
LATCH child-restraint fixing system*
LATCH: Lower Anchor and Tethers for CHil-
dren.
To attach a LATCH child's seat, follow the
operating and safety instructions of the
child's seat manufacturer.<
If the vehicle is equipped with power seats in
the rear, return these to their standard adjust-
ment setting before using a LATCH child's seat,
refer to page45.
Rear seats
The mountings for the LATCH child-restraint
fixing system are located at the points marked
with the arrows. They are not visible from the
outside.
Before attaching the LATCH child's seat, pull
the belt away from the region of the child-
restraint fixing system.
Installation guide
The installation guide makes it easier to install
the LATCH child's seat and at the same time
protects the surface of the seats.
The installation guide is available at your
BMW center. Always observe all instruc-
tions for operation and use provided by the
manufacturer in the installation guide.<
Firmly press the installation guide into the gap
between the upholstery on seat cushion and
backrest, continuing until the two funnel-
shaped guides snap into place in the LATCH
child-restraint fixing system in the seat.
Page 58 of 247
Transporting children safely
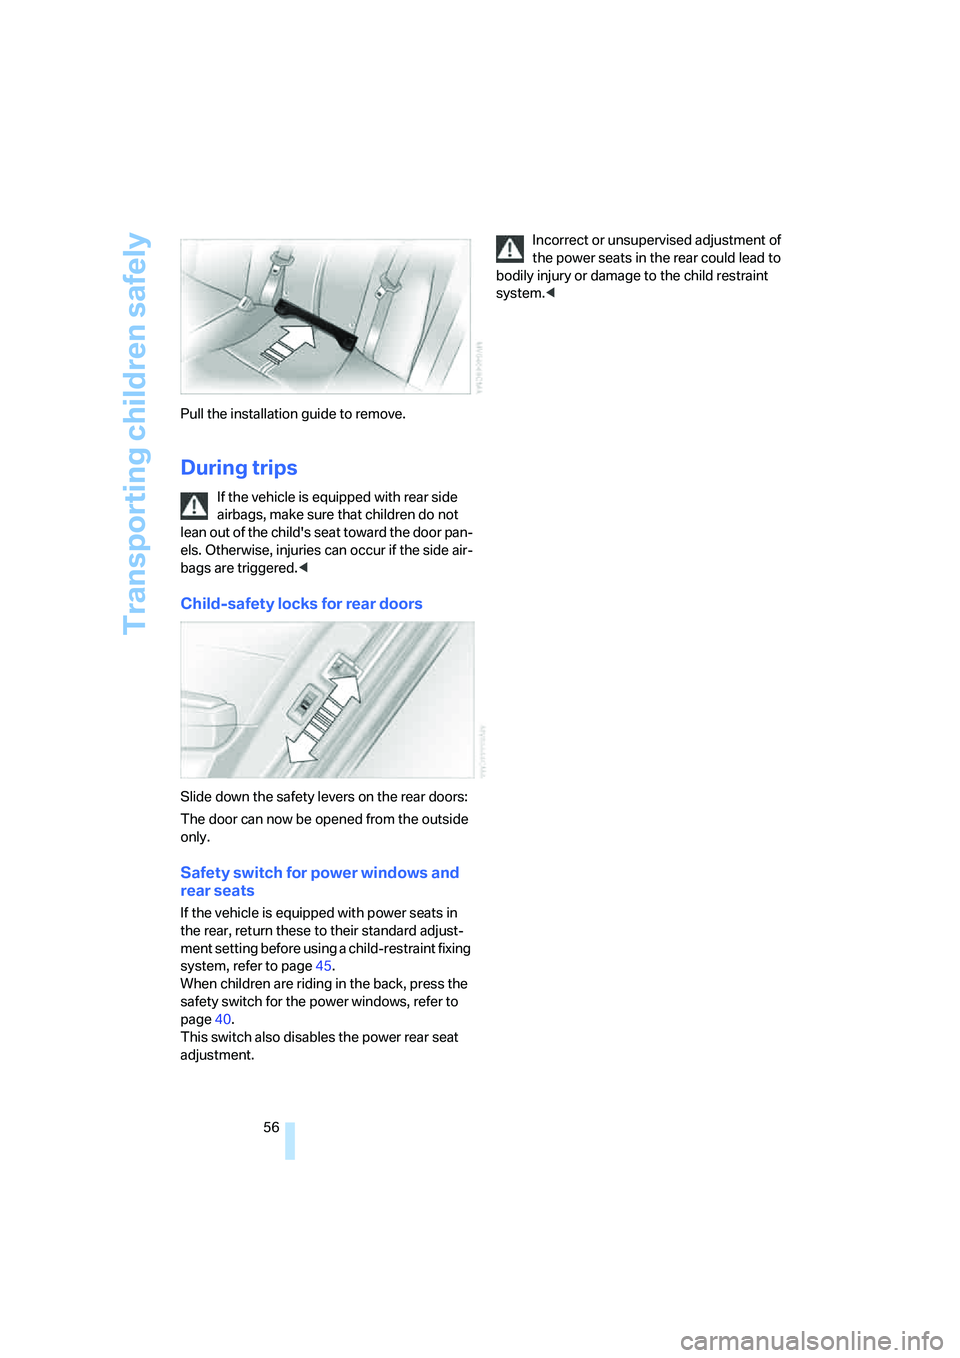
56 Pull the installation guide to remove.
During trips
If the vehicle is equipped with rear side
airbags, make sure that children do not
lean out of the child's seat toward the door pan-
els. Otherwise, injuries can occur if the side air-
bags are triggered.<
Child-safety locks for rear doors
Slide down the safety levers on the rear doors:
The door can now be opened from the outside
only.
Safety switch for power windows and
rear seats
If the vehicle is equipped with power seats in
the rear, return these to their standard adjust-
ment setting before using a child-restraint fixing
system, refer to page45.
When children are riding in the back, press the
safety switch for the power windows, refer to
page40.
This switch also disables the power rear seat
adjustment.Incorrect or unsupervised adjustment of
the power seats in the rear could lead to
bodily injury or damage to the child restraint
system.<
Page 115 of 247
Controls
113Reference
At a glance
Driving tips
Communications
Navigation
Entertainment
Mobility
To avoid injuries, make sure that the clos-
ing region of the roller blind is clear.
Press the safety switch on the driver's door,
refer to page40. The LED must light up. This
precaution prevents children from operating
the sun blinds using the rear switches, etc.
When leaving the vehicle parked, remove the
remote control from the ignition lock and close
the doors; this precaution prevents children
from operating the roller sun blinds and injuring
themselves.<
Automatically extending and retracting
sun blinds
You can run the sun blinds up and down
together when you press and hold the button3
longer.
Glove compartment
Opening
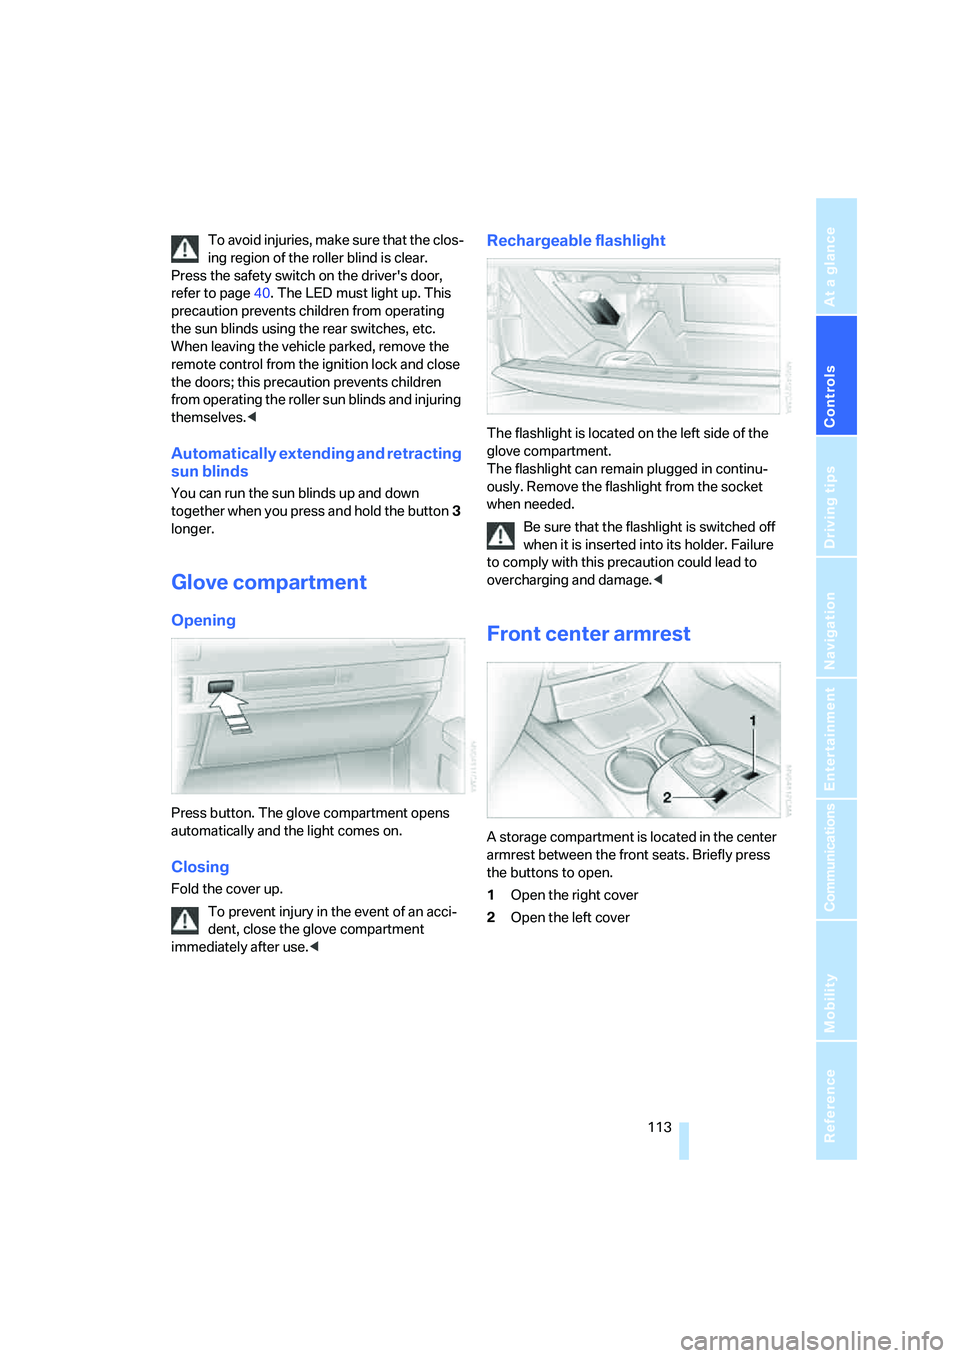
Press button. The glove compartment opens
automatically and the light comes on.
Closing
Fold the cover up.
To prevent injury in the event of an acci-
dent, close the glove compartment
immediately after use.<
Rechargeable flashlight
The flashlight is located on the left side of the
glove compartment.
The flashlight can remain plugged in continu-
ously. Remove the flashlight from the socket
when needed.
Be sure that the flashlight is switched off
when it is inserted into its holder. Failure
to comply with this precaution could lead to
overcharging and damage.<
Front center armrest
A storage compartment is located in the center
armrest between the front seats. Briefly press
the buttons to open.
1Open the right cover
2Open the left cover
Page 119 of 247
Controls
117Reference
At a glance
Driving tips
Communications
Navigation
Entertainment
Mobility
Cigarette lighter, rear
Refer to Cigarette lighter, front.
Rear refrigerator*
The rear refrigerator is located behind the rear
seats' center armrest.
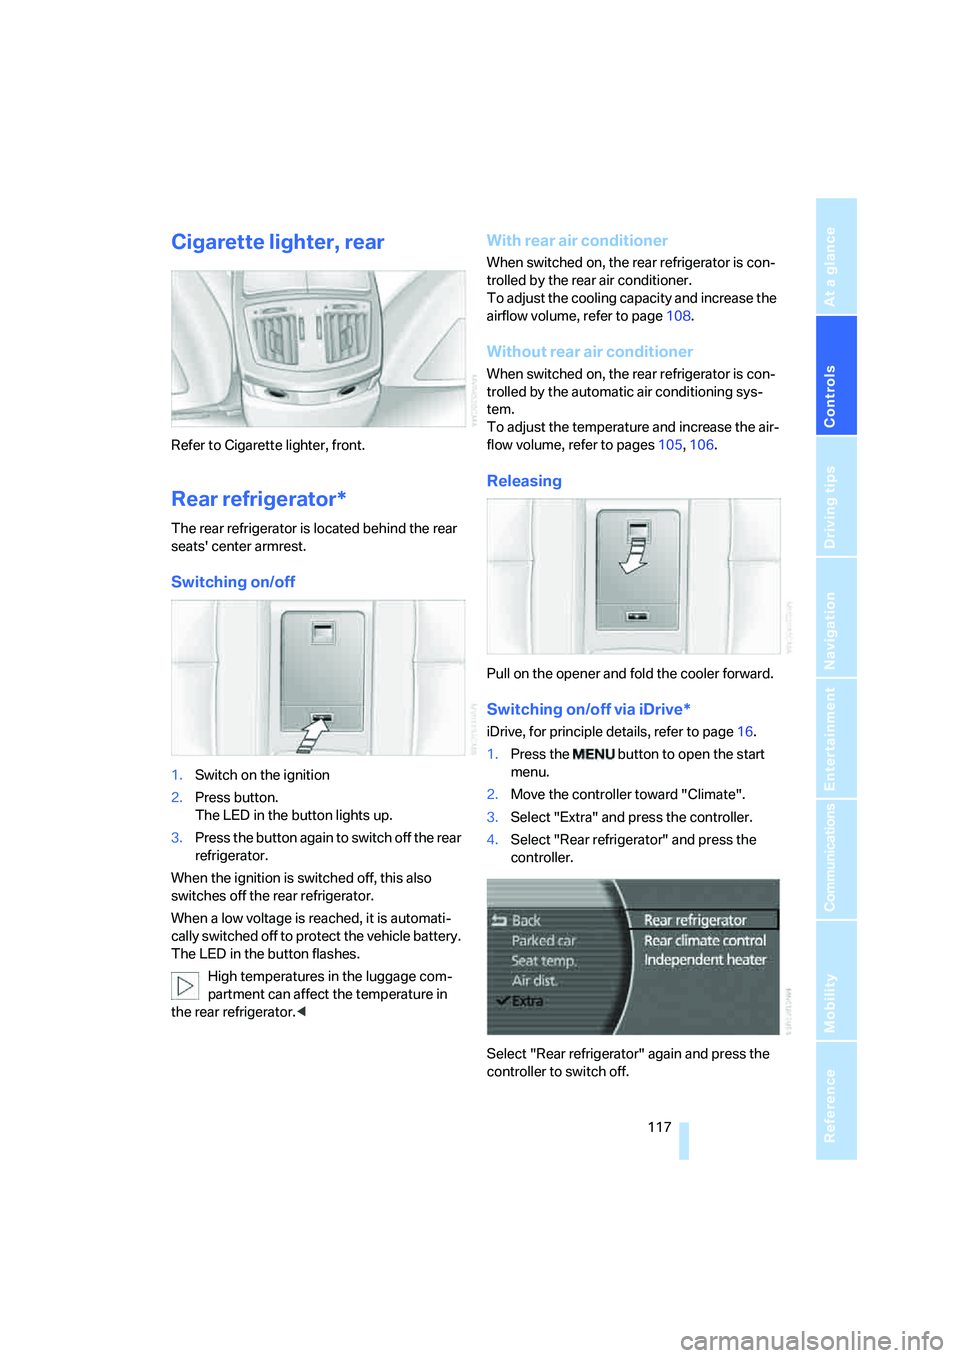
Switching on/off
1.Switch on the ignition
2.Press button.
The LED in the button lights up.
3.Press the button again to switch off the rear
refrigerator.
When the ignition is switched off, this also
switches off the rear refrigerator.
When a low voltage is reached, it is automati-
cally switched off to protect the vehicle battery.
The LED in the button flashes.
High temperatures in the luggage com-
partment can affect the temperature in
the rear refrigerator.<
With rear air conditioner
When switched on, the rear refrigerator is con-
trolled by the rear air conditioner.
To adjust the cooling capacity and increase the
airflow volume, refer to page108.
Without rear air conditioner
When switched on, the rear refrigerator is con-
trolled by the automatic air conditioning sys-
tem.
To adjust the temperature and increase the air-
flow volume, refer to pages105, 106.
Releasing
Pull on the opener and fold the cooler forward.
Switching on/off via iDrive*
iDrive, for principle details, refer to page16.
1.Press the button to open the start
menu.
2.Move the controller toward "Climate".
3.Select "Extra" and press the controller.
4.Select "Rear refrigerator" and press the
controller.
Select "Rear refrigerator" again and press the
controller to switch off.