2006 BMW 745Li steering wheel
[x] Cancel search: steering wheelPage 53 of 247
Controls
51Reference
At a glance
Driving tips
Communications
Navigation
Entertainment
Mobility
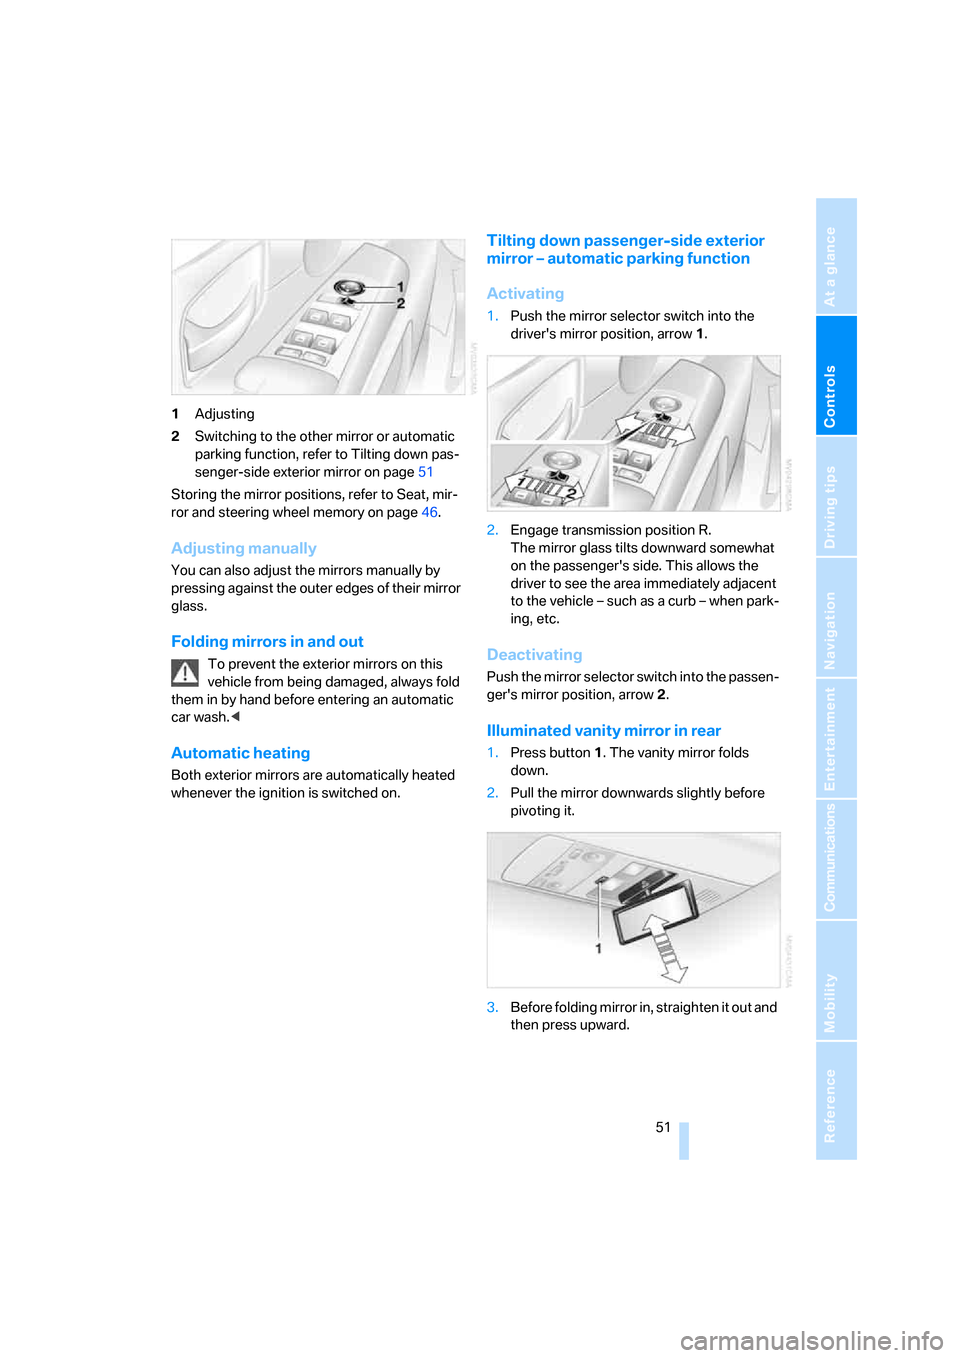
1Adjusting
2Switching to the other mirror or automatic
parking function, refer to Tilting down pas-
senger-side exterior mirror on page51
Storing the mirror positions, refer to Seat, mir-
ror and steering wheel memory on page46.
Adjusting manually
You can also adjust the mirrors manually by
pressing against the outer edges of their mirror
glass.
Folding mirrors in and out
To prevent the exterior mirrors on this
vehicle from being damaged, always fold
them in by hand before entering an automatic
car wash.<
Automatic heating
Both exterior mirrors are automatically heated
whenever the ignition is switched on.
Tilting down passenger-side exterior
mirror – automatic parking function
Activating
1.Push the mirror selector switch into the
driver's mirror position, arrow1.
2.Engage transmission position R.
The mirror glass tilts downward somewhat
on the passenger's side. This allows the
driver to see the area immediately adjacent
to the vehicle – such as a curb – when park-
ing, etc.
Deactivating
Push the mirror selector switch into the passen-
ger's mirror position, arrow2.
Illuminated vanity mirror in rear
1.Press button1. The vanity mirror folds
down.
2.Pull the mirror downwards slightly before
pivoting it.
3.Before folding mirror in, straighten it out and
then press upward.
Page 54 of 247

Adjusting
52
Steering wheel adjustment
In order to prevent the risk of accident
due to an unexpected movement, do not
adjust the steering wheel while the vehicle is
moving.<
The steering wheel can be adjusted in four
directions.
To save steering wheel positions, refer to Seat,
mirror and steering wheel memory on page46.
Assistance getting in and out
To make it easier to enter and exit the vehicle,
the steering wheel temporarily moves into the
top and front position.
This automatic feature is governed by the
driver's door and the ignition switch.
Steering wheel heater*
The steering wheel heater operates when the
ignition is on.
Press the button to activate or deactivate this
system.
When the steering wheel heater is operating,
the LED in the button lights up.
Programmable buttons
You can individually program the button on the
steering wheel and the button next to the con-
troller.
iDrive, for principle details, refer to page16.
1.Press the button to open the start
menu.
2.Move the controller toward "Settings".
3.Select "Vehicle" and press the controller.
4.Select " button" or " button". Con-
tinue to press the controller until the
desired function appears.
>"Recirc. air"
The supply of outside air is shut off contin-
uously, refer to Automatic recirculated air
control/recirculated air mode on page105.
>"Navi info"
To repeat the most recent navigation sys-
tem instruction, refer to Route guidance by
voice instructions on page145.
>"Short info"
Display of the help and supplementary texts
of the active menu for approx. 10 seconds,
refer to page20.
" button" can additionally be programmed
with the following function.
>"AUTO P"
Activation/deactivation, refer to page59.
Rear seat screen
*:
>"Mode"
You can choose between the output
sources radio, CD player, and CD changer.
It is necessary for one of these sources to
have been activated.
Page 55 of 247
Controls
53Reference
At a glance
Driving tips
Communications
Navigation
Entertainment
Mobility
>"FM" and "AM"
Switching between the FM and AM wave-
bands, also refer to page152.
Operating function
Press the button on the steering wheel or the
button next to the controller.
If you program the button on the steering
wheel with "AUTO P", you can conve-
niently activate and deactivate Automatic Hold
with the button, e.g. during parking. Details on
Automatic Hold are provided starting on
page59.<
The setting of the button on the steering wheel
is stored for the remote control currently in use.
Page 62 of 247

Driving
60 You can program the programmable but-
ton on the steering wheel with the Auto-
matic Hold function, refer to page52. This gives
you the option of being able to quickly activate
or deactivate Automatic Hold without distract-
ing your attention from the road.<
Driving
The parking brake engages automatically when
the vehicle comes to a stop.
The indicator lamp on Info Display lights up
green.
To start off again, simply press the accelerator
pedal. The parking brake is released automati-
cally; the indicator lamp goes out.
Do not drive through an automatic car
wash with the Automatic Hold on and the
engine running. Otherwise, the system will
engage the parking brake the moment the vehi-
cle comes to a stop.<
Parking
The parking brake engages automatically when
you stop the vehicle and switch off the engine.
The indicator lamp changes from green to
red.
You can also release the parking brake
manually after the engine is switched off,
as long as the remote control is in the ignition
lock, refer to page59. You can use this function,
for example, in a car wash.
Automatic Hold is deactivated.<
When leaving the vehicle, release the
remote control from the detent in the igni-
tion lock; this precaution prevents children from
disengaging the parking brake etc.<
For your safety
Automatic Hold is automatically deactivated
when:
>the engine is switched off
>the system detects that the driver's seat is
not occupied while the engine is running
>the hood is opened while the engine is run-
ning>the luggage compartment is opened with
the transmission in position R while the
engine is running
>and when the parking brake is used to brake
the vehicle to a stop during driving
The indicator lamp changes from green to
red, and the indication AUTO P on the Info Dis-
play disappears.
Before starting off again, briefly press the but-
ton to disengage the parking brake manually,
refer to page59, or reactivate Automatic Hold,
refer to page59.
Before leaving the vehicle with the engine
running, always move the automatic
transmission's selector lever to position P and
ensure that the parking brake is engaged. The
vehicle could start to roll if you fail to observe
these precautions.<
Automatic Hold is automatically deacti-
vated whenever the system detects any
tendency for the wheels to spin in response to
slippery road surfaces.
Observe the messages on the Info Display. For
additional information, refer to Check Control
on page80.<
Releasing parking brake manually
In the event of an electrical power loss or elec-
trical malfunction, you can release the parking
brake manually.
Before manually releasing the parking
brake and each time you park the vehicle
without engaging the parking brake, make sure
that the automatic transmission is in position P,
refer to page62. Be sure to pay attention to the
information on the Info Display.
If circumstances should force you to park on a
steeply inclined road surface, it is essential to
take additional precautions against inadvertent
rolling, e.g. by using the chock, refer to
page209. Otherwise, there is the danger of the
vehicle rolling, depending on the incline.<
If it becomes necessary to also unlock the
transmission lock of the automatic transmis-
sion, follow this sequence:
Page 64 of 247
Driving
62 The indicator lamp on Info Display lights
up green.
>Releasing: the parking brake is ready for
operation.
The indicator lamp on the Info Display
goes out.
Automatic transmission with
Steptronic
In addition to fully automatic operation, you can
also shift manually using the buttons on the
steering wheel, refer to page63.
Transmission range selection
P R N D
Displays on Info Display
P R N D S or M1 to M6
The transmission range is indicated, and in the
manual mode, the gear currently engaged.
Selecting transmission range
>Only engage transmission positions D, R,
or N when the engine is running: interlock.
>With the vehicle stationary, depress the
brake pedal before shifting out of P or N;
otherwise, the shift command will not be
executed: shiftlock.
To prevent the vehicle from creeping
after you select a driving position,
maintain pressure on the brake pedal until
you are ready to start off. Activate Auto-
matic Hold to suppress the tendency to
creep, refer to page59.
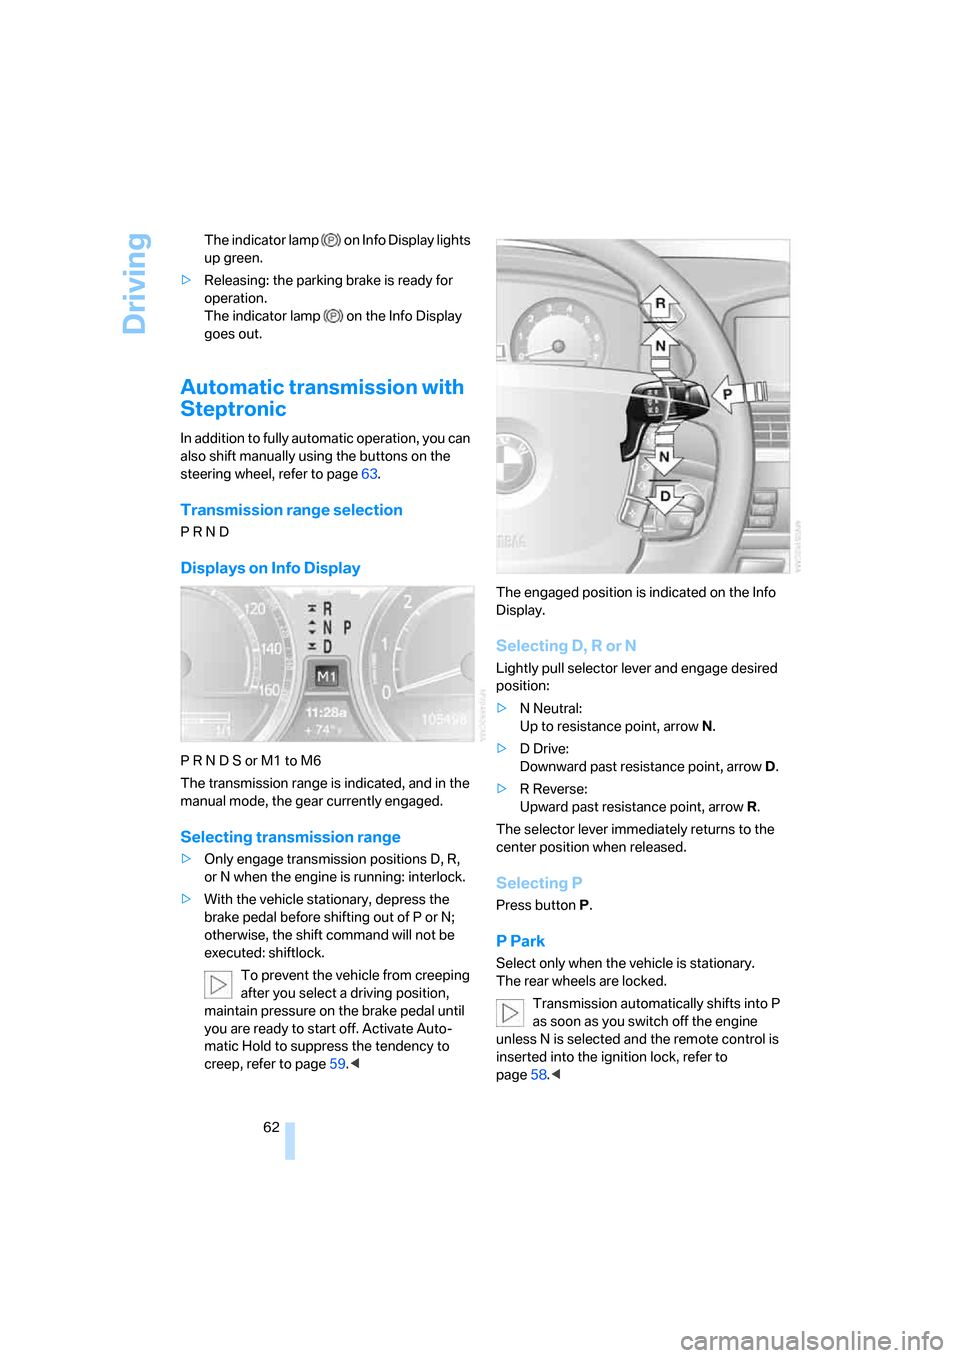
Selecting D, R or N
Lightly pull selector lever and engage desired
position:
>N Neutral:
Up to resistance point, arrowN.
>D Drive:
Downward past resistance point, arrowD.
>R Reverse:
Upward past resistance point, arrowR.
The selector lever immediately returns to the
center position when released.
Selecting P
Press button P.
P Park
Select only when the vehicle is stationary.
The rear wheels are locked.
Transmission automatically shifts into P
as soon as you switch off the engine
unless N is selected and the remote control is
inserted into the ignition lock, refer to
page58.<
Page 65 of 247

Controls
63Reference
At a glance
Driving tips
Communications
Navigation
Entertainment
Mobility
R Reverse
Select only when the vehicle is stationary.
N Neutral
You can select this position, for example, in car
washes. The vehicle can roll.
Transmission remains in N even after the
ignition is switched off whenever you
leave the remote control in the ignition lock.
This function is useful in automatic car washes,
etc.
After approx. 30 minutes the system automati-
cally shifts into position P. Observe the mes-
sages on the Info Display.
Switching off engine, refer to page58.<
D Drive, automatic position
This is the mode recommended for normal
vehicle operation. All forward gears are avail-
able.
Under normal operating conditions, the fuel
consumption is lowest when driving in posi-
tion D.
Kick-down
The kick-down mode provides maximum accel-
eration.
Press the accelerator pedal beyond the full-
throttle resistance point.
Sport program and manual operation
Press button1 on the steering wheel.
The sport program is activated and S appears
on the Info Display. This program is recom-
mended for a performance-oriented driving
style.
Press button1 again to switch into the manual
mode and then into the Automatic program
again.
In the manual mode, the Steptronic changes
gears when one of the buttons2 on the front or
back of the steering wheel is briefly pressed.
The Info Display shows the manual ranges M1
through M6.
Upshifts and downshifts are executed only
when they will result in a plausible combination
of engine and vehicle speed; thus, for example,
the system will not execute a downshift that
would cause the engine to overrev. The
requested gear appears briefly on the Info Dis-
play, followed by the current gear.
Press button1 again to switch into the Auto-
matic program again.
Page 89 of 247
Controls
87Reference
At a glance
Driving tips
Communications
Navigation
Entertainment
Mobility
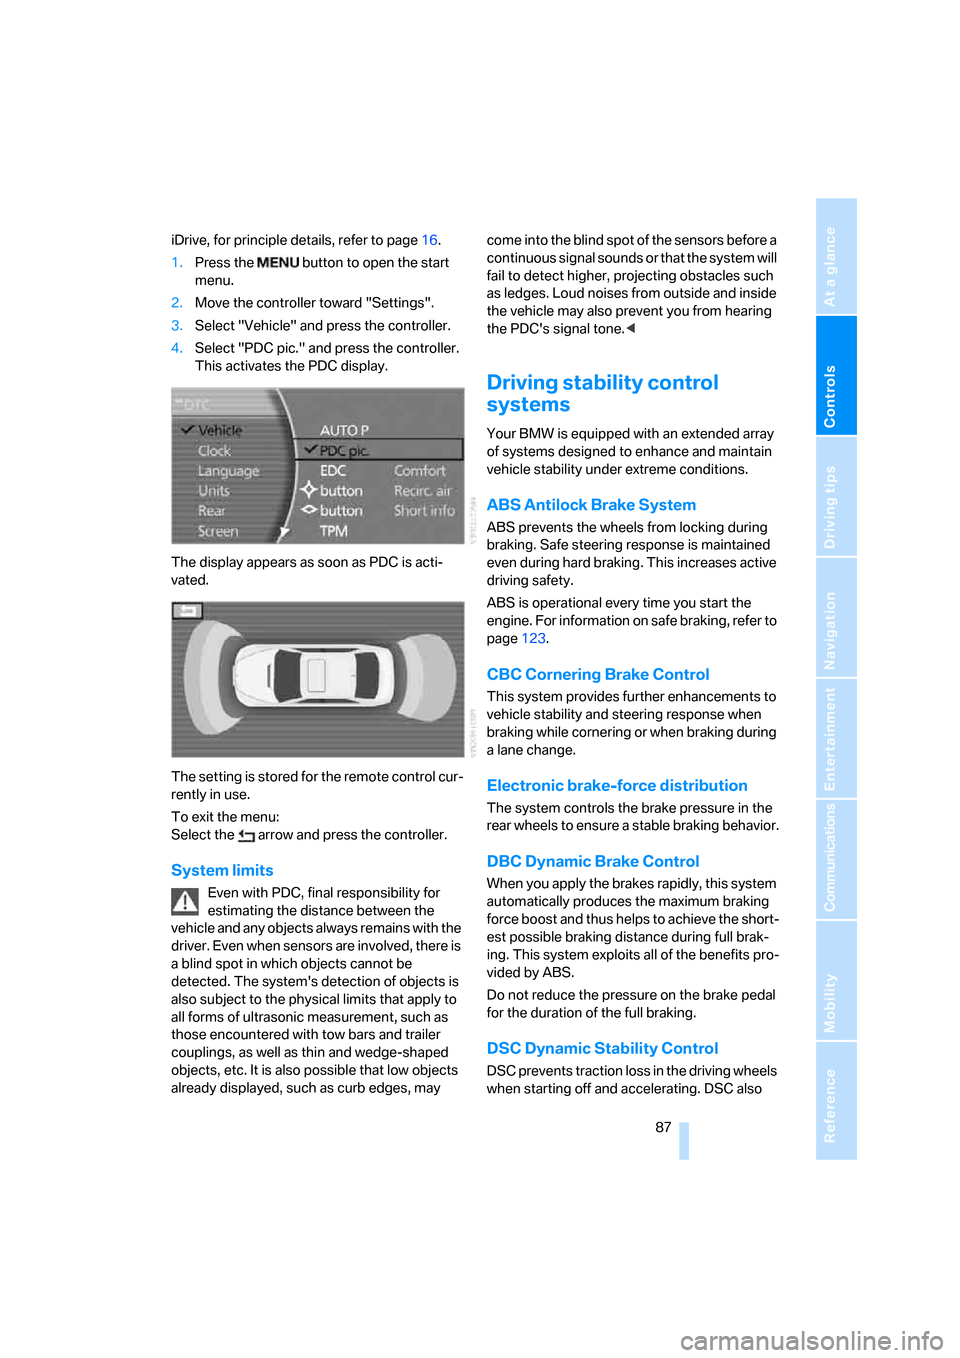
iDrive, for principle details, refer to page16.
1.Press the button to open the start
menu.
2.Move the controller toward "Settings".
3.Select "Vehicle" and press the controller.
4.Select "PDC pic." and press the controller.
This activates the PDC display.
The display appears as soon as PDC is acti-
vated.
The setting is stored for the remote control cur-
rently in use.
To exit the menu:
Select the arrow and press the controller.
System limits
Even with PDC, final responsibility for
estimating the distance between the
vehicle and any objects always remains with the
driver. Even when sensors are involved, there is
a blind spot in which objects cannot be
detected. The system's detection of objects is
also subject to the physical limits that apply to
all forms of ultrasonic measurement, such as
those encountered with tow bars and trailer
couplings, as well as thin and wedge-shaped
objects, etc. It is also possible that low objects
already displayed, such as curb edges, may come into the blind spot of the sensors before a
continuous signal sounds or that the system will
fail to detect higher, projecting obstacles such
as ledges. Loud noises from outside and inside
the vehicle may also prevent you from hearing
the PDC's signal tone.<
Driving stability control
systems
Your BMW is equipped with an extended array
of systems designed to enhance and maintain
vehicle stability under extreme conditions.
ABS Antilock Brake System
ABS prevents the wheels from locking during
braking. Safe steering response is maintained
even during hard braking. This increases active
driving safety.
ABS is operational every time you start the
engine. For information on safe braking, refer to
page123.
CBC Cornering Brake Control
This system provides further enhancements to
vehicle stability and steering response when
braking while cornering or when braking during
a lane change.
Electronic brake-force distribution
The system controls the brake pressure in the
rear wheels to ensure a stable braking behavior.
DBC Dynamic Brake Control
When you apply the brakes rapidly, this system
automatically produces the maximum braking
force boost and thus helps to achieve the short-
est possible braking distance during full brak-
ing. This system exploits all of the benefits pro-
vided by ABS.
Do not reduce the pressure on the brake pedal
for the duration of the full braking.
DSC Dynamic Stability Control
DSC prevents traction loss in the driving wheels
when starting off and accelerating. DSC also
Page 92 of 247
Technology for comfort, convenience and safety
90 There are two programs.
With each press of the controller, you can
switch back and forth between "Comfort" and
"Sport".
Comfort program
The Comfort program is suitable for use
throughout the vehicle's entire speed range and
regardless of load.
Sport program
You should select the Sport program for consis-
tently performance-oriented response from
shock absorbers and steering.
FTM Flat Tire Monitor*
The concept
The Flat Tire Monitor keeps track of the infla-
tion pressures in the four mounted tires as you
drive. The system triggers an alert whenever
the inflation pressure drops significantly in rela-
tion to the pressure in another tire.
When a loss of pressure occurs, the rolling
radius changes and with it, the rotational speed
of the wheels. This change is detected and sig-
naled as a flat tire.
Functional requirements
To ensure the reliable signaling of a flat tire, the
system must be initialized at the correct tire
inflation pressure.
The initialization must be repeated after
every correction of the tire inflation pres-
sure and after every tire or wheel change.<
System limits
The Flat Tire Monitor cannot indicate
sudden severe tire damage caused by
outside factors and does not detect a natural,
even pressure drop in all four tires.<
In the following situations, the system could be
delayed or malfunction:
>When the system has not been initialized.>When driving on snow-covered or slippery
road surfaces.
>Sporty driving style: slip in the drive wheels,
high lateral acceleration.
>When driving with snow chains
*.
Initializing system
The initialization is completed during driv-
ing, which can be interrupted at any time.
The initialization automatically continues when
driving resumes. Do not initialize the system
when driving with snow chains
*.<
iDrive, for principle details, refer to page16.
1.Select "Settings".
2.Select "Vehicle" and press the controller.
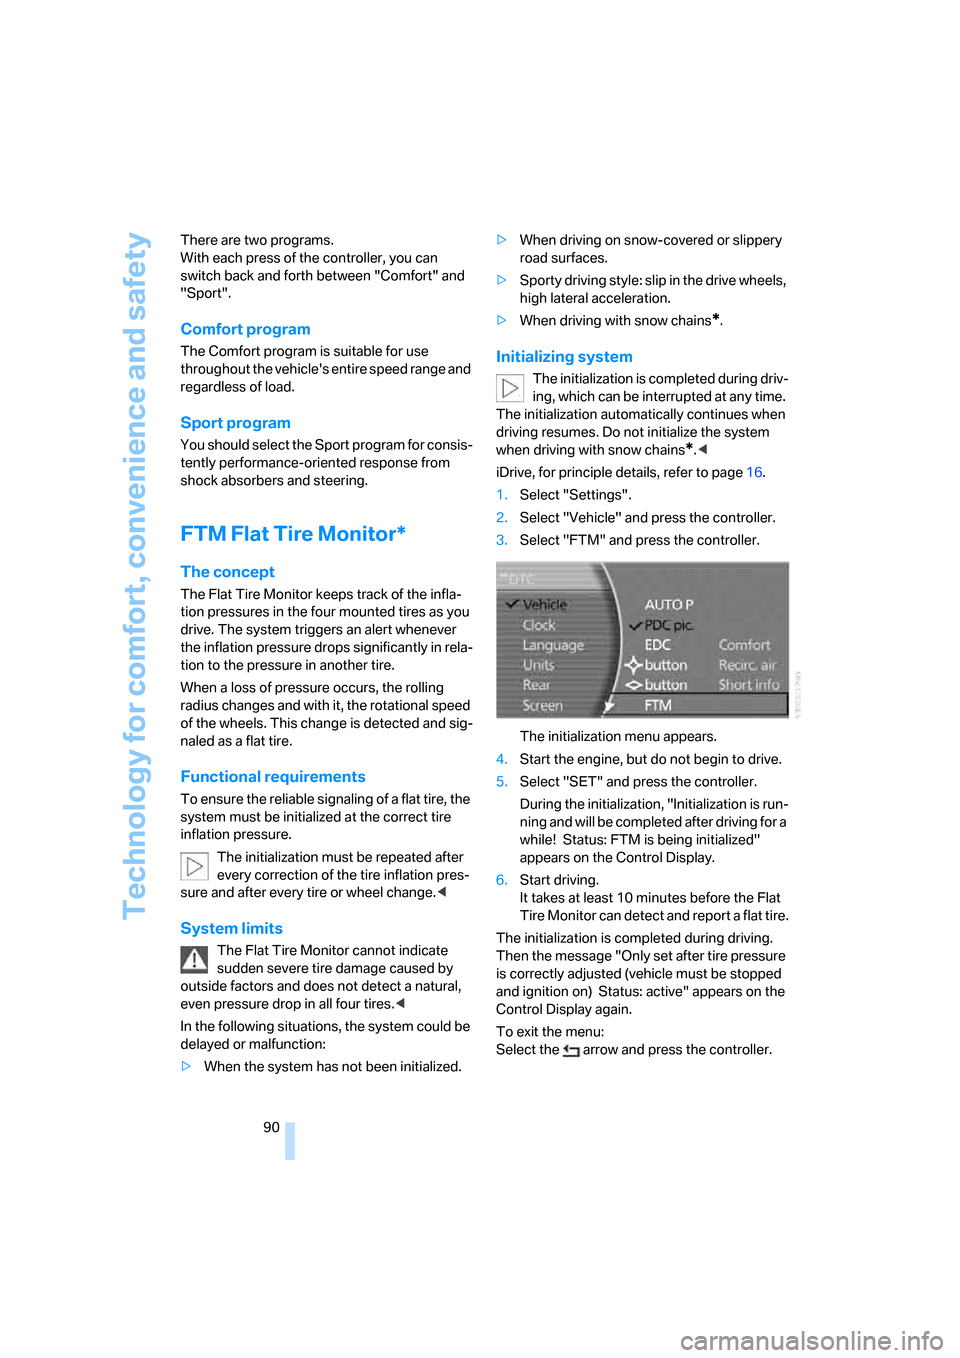
3.Select "FTM" and press the controller.
The initialization menu appears.
4.Start the engine, but do not begin to drive.
5.Select "SET" and press the controller.
During the initialization, "Initialization is run-
ning and will be completed after driving for a
while! Status: FTM is being initialized"
appears on the Control Display.
6.Start driving.
It takes at least 10 minutes before the Flat
Tire Monitor can detect and report a flat tire.
The initialization is completed during driving.
Then the message "Only set after tire pressure
is correctly adjusted (vehicle must be stopped
and ignition on) Status: active" appears on the
Control Display again.
To exit the menu:
Select the arrow and press the controller.