2006 BMW 745Li turn signal
[x] Cancel search: turn signalPage 13 of 247

At a glance
11Reference
Controls
Driving tips
Communications
Navigation
Entertainment
Mobility
9Steptronic: upshifting63
10Steptronic: downshifting63
12Buttons on steering wheel13Info Display12
14Automatic transmission62
15Ignition lock57
19Horn: the entire surface
23Fog lamps101
24Unlocking hood201 7Instrument lighting101
8BMW Night Vision
*96
11Turn signals65
High beams,
headlamp flasher100
High-beam assistant
*100
Roadside parking lamps100
Computer76
Check Control80
Computer76
Voice command system
*
activation/deactivation23
Volume
Mobile phone:
Press button.
Make call, accept call, or end call.
Press briefly to proceed through
a selection sequence consisting
of the automatic program, the
Sport program, and the manual
mode63
Selecting radio station
Selecting music track
Skipping chapter
*
Programmable button52
16Switching ignition on/off57
and Starting/stopping engine57
17Windshield wipers65
Rain sensor65
18PDC Park Distance Control
*86
20Steering wheel heater
*52
Steering wheel adjustment52
21Unlocking luggage compartment
lid36
22Programmable cruise control67
Active cruise control
*69
Front fog lamps
Page 15 of 247

At a glance
13Reference
Controls
Driving tips
Communications
Navigation
Entertainment
Mobility
When the engine is started or the ignition is
switched on, some lamps are checked for
proper operation and light up briefly in the pro-
cess.
Explanatory text messages
Text messages on Info Display explain the
meaning of the indicating and warning lamps
shown.
You can view additional information, e.g.
regarding the cause of a malfunction and the
corresponding action to take, in the Check Con-
trol, refer to page80.
When the situation is urgent, this information is
displayed immediately when the associated
lamps light up.
Indicator lamps without text messages
The following indicator lamps in the display
area1 indicate that certain functions are active:
Turn signals65
With parking brake released59
With parking brake set59
Warning lamp on Canadian models
Front fog lamps101
DTC Dynamic Traction Control88
High beams/headlamp flasher100
High-beam assistant
*
DSC Dynamic Stability Control,
flashes88
Page 51 of 247

Controls
49Reference
At a glance
Driving tips
Communications
Navigation
Entertainment
Mobility
Safety belt reminder for front seats
The indicator lamp flashes or lights up.
In addition, a signal sounds. Please
make sure that the safety belts are
positioned correctly.
The safety belt reminder is active at speeds
above approx. 5 mph/8 km/h. It can also be acti-
vated if objects are placed on the passenger's
seat.
Damage to safety belts
In case of strain due to an accident or
damage, replace the belt system includ-
ing the safety belt tensioners and have the belt
anchor points checked. Only have this work
carried out at a BMW center or at a workshop
that works according to BMW repair proce-
dures with correspondingly trained personnel.
Otherwise, correct operation of this safety
equipment is not guaranteed.<
Heated seats*
Front
The temperature setting progresses one step
through its control sequence each time you
press the button.
The maximum temperature is supplied when
three lights are lit.
To switch off:
Press and hold the button.
Temperature distribution
The heating action in the seat cushion and
backrest can be distributed in different ways.
iDrive, for principle details, refer to page16.
1.Press the button to open the start
menu.
2.Move the controller toward "Climate".
3.If need be, select the symbol and press
the controller to switch to the second page
of the menu.
4.Select "Seat temp." and press the control-
ler.
5.Select "Left" or "Right" and press the con-
troller.
6.Turn to adjust the temperature distribution
in the seat cushion and backrest and press
the controller.
The setting is stored for the remote control cur-
rently in use.
Page 67 of 247

Controls
65Reference
At a glance
Driving tips
Communications
Navigation
Entertainment
Mobility
Turn signals/
headlamp flasher
1High beams
2Headlamp flasher
3Turn signals
Using turn signals
Move the lever beyond the resistance point.
If you wish to manually control the shut-off of
the turn signal, then only push the lever to the
resistance point.
Atypically rapid flashing of the indicator
lamps signals the failure of a turn signal
lamp, possibly in the trailer when towing.<
Temporarily signaling
Push the lever to the resistance point and hold it
there for as long as you wish to signal.
Triple turn signal activation
Press the lever to the resistance point; the turn
signal flashes three times.
Wiper system
1Switching on wipers
2Switching off wipers or for brief wipe
3Activating/deactivating rain sensor
4Cleaning windshield, headlamps and
BMW Night Vision camera
*
5Adjusting rain sensor sensitivity level
Switching on wipers
The lever automatically returns to its initial posi-
tion when released.
Normal wiper speed
Press once.
The system reverts to operation in the intermit-
tent mode when the vehicle is stationary.
Fast wiper speed
Press twice or press beyond the resistance
point.
The system reverts to normal speed when the
vehicle is stationary.
Rain sensor
The rain sensor controls the wiper operation as
a function of the rain intensity. It is located on
the windshield, directly in front of the inside
rearview mirror.
Page 82 of 247

Everything under control
80
Check Control
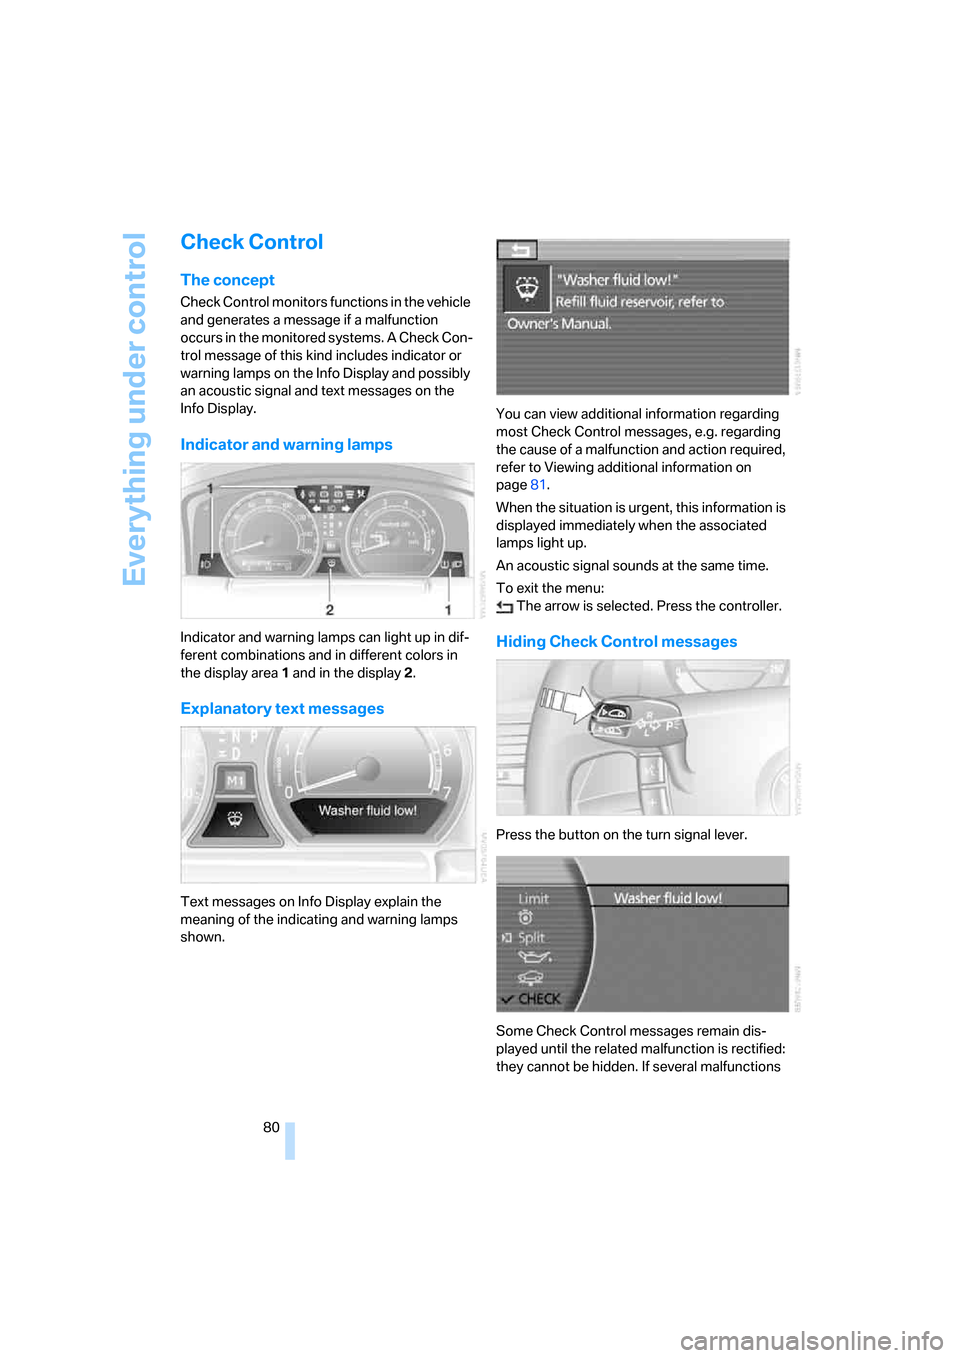
The concept
Check Control monitors functions in the vehicle
and generates a message if a malfunction
occurs in the monitored systems. A Check Con-
trol message of this kind includes indicator or
warning lamps on the Info Display and possibly
an acoustic signal and text messages on the
Info Display.
Indicator and warning lamps
Indicator and warning lamps can light up in dif-
ferent combinations and in different colors in
the display area1 and in the display2.
Explanatory text messages
Text messages on Info Display explain the
meaning of the indicating and warning lamps
shown.You can view additional information regarding
most Check Control messages, e.g. regarding
the cause of a malfunction and action required,
refer to Viewing additional information on
page81.
When the situation is urgent, this information is
displayed immediately when the associated
lamps light up.
An acoustic signal sounds at the same time.
To exit the menu:
The arrow is selected. Press the controller.
Hiding Check Control messages
Press the button on the turn signal lever.
Some Check Control messages remain dis-
played until the related malfunction is rectified:
they cannot be hidden. If several malfunctions
Page 87 of 247

Controls
85Reference
At a glance
Driving tips
Communications
Navigation
Entertainment
Mobility
Hour signal activation
You will hear four tones just before the top of
each hour.
Select "Memo" and press the controller.
The symbol indicates the menu that is cur-
rently activated.
Setting date
1.Select "Date" and press the controller.
The first date display setting is activated.
2.Turn to change the setting.
3.Press the controller to adopt the setting.
The next setting is selected.
4.Make the remaining settings. After the last
adjustment, the date is stored.
The setting is stored for the remote control cur-
rently in use.
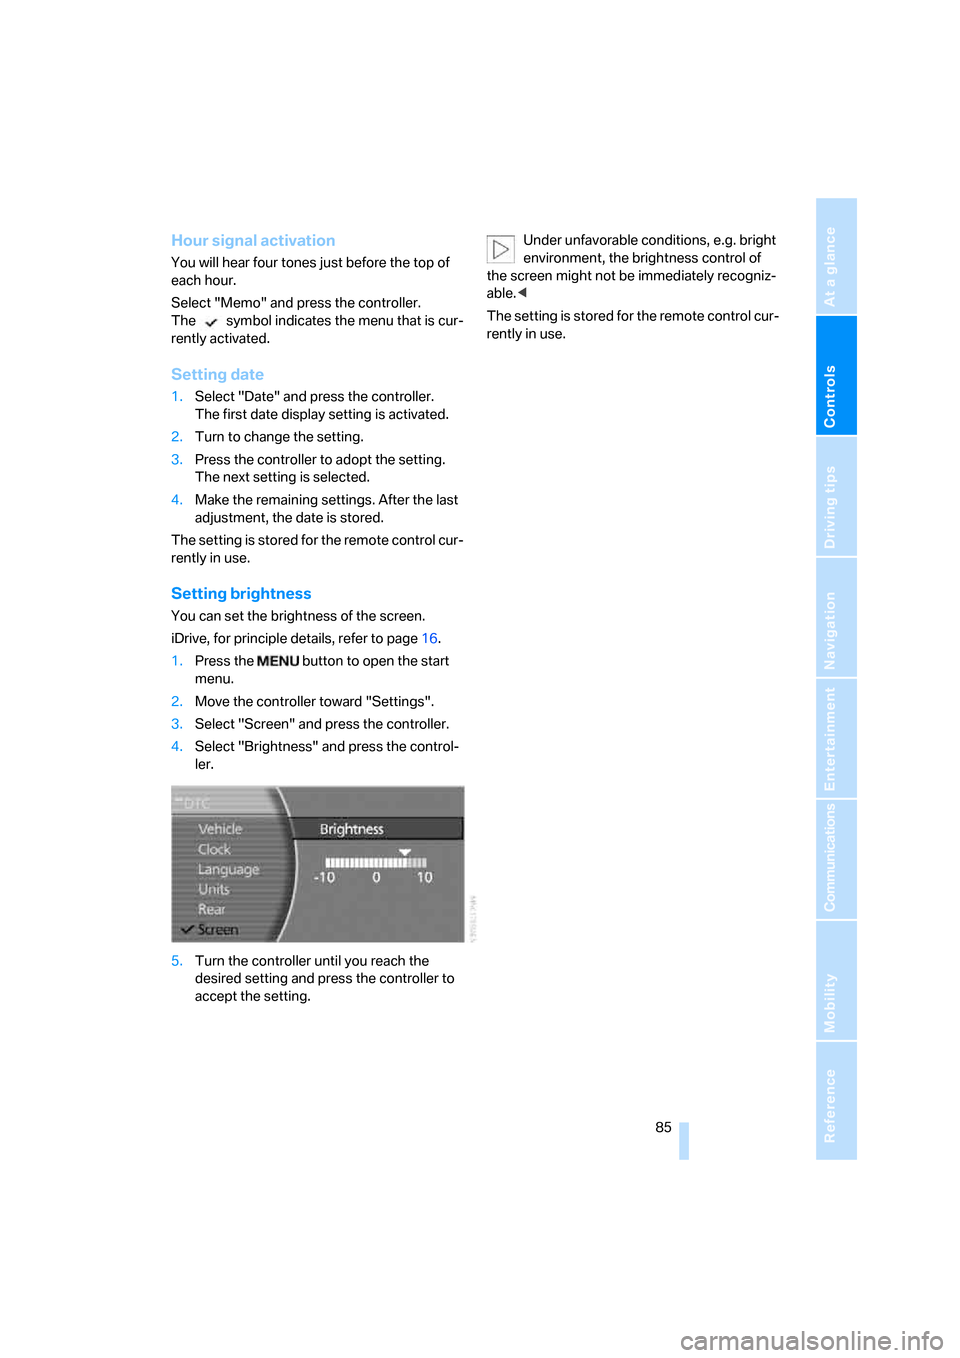
Setting brightness
You can set the brightness of the screen.
iDrive, for principle details, refer to page16.
1.Press the button to open the start
menu.
2.Move the controller toward "Settings".
3.Select "Screen" and press the controller.
4.Select "Brightness" and press the control-
ler.
5.Turn the controller until you reach the
desired setting and press the controller to
accept the setting.Under unfavorable conditions, e.g. bright
environment, the brightness control of
the screen might not be immediately recogniz-
able.<
The setting is stored for the remote control cur-
rently in use.
Page 102 of 247

Lamps
100
Adaptive Head Light*
The concept
Adaptive Head Light is a variable headlamp
control system that enables dynamic illumina-
tion of the road surface. Depending on the
steering angle and other parameters, the light
from the headlamp follows the course of the
road.
Activating Adaptive Head Light
In switch position3, the Adaptive Head Light is
activated and Automatic headlamp control is
switched on.
In order not to blind oncoming traffic, the Adap-
tive Head Light is not active when driving in
reverse and only points toward the passenger
side when the vehicle is stationary.
Malfunction
The LED above the symbol for automatic head-
lamp control flashes. Adaptive Head Light is
malfunctioning or has failed. Have the system
checked as soon as possible.
High beams/
roadside parking lamps
1High beams
2Headlamp flasher
3Roadside parking lamps
Roadside parking lamps, left and right*
You also enjoy the option of lighting up just one
side of your vehicle when parking:After parking the vehicle, press the lever in the
desired direction3, past the resistance point.
The roadside parking lamps drain the bat-
tery. Do not leave them switched on for
long periods of time; otherwise, it may no longer
be possible to start the engine.<
High-beam assistant*
The concept
This system automatically switches the high
beams on and off again. A sensor on the front of
the inside rearview mirror controls this process.
The assistant ensures that the high beams are
switched on whenever the traffic situation
allows. This reduces the strain on you while at
the same time providing you with the best pos-
sible visibility. Of course, you can intervene at
any time and switch the high beams on and off
in the accustomed manner.
Activating high-beam assistant
1.Turn the light switch to switch position3,
refer to page99.
2.Press the turn signal lever in the high beam
direction with the low beams switched on.
The indicator lamp in the instrument
cluster lights up when the high-beam
assistant is activated. The assistant
automatically switches between high and low
beams, whereby the system reacts to oncom-
ing traffic and traffic ahead, as well as to suffi-
cient lighting, e.g. towns/cities.
Page 103 of 247

Controls
101Reference
At a glance
Driving tips
Communications
Navigation
Entertainment
Mobility
Manually switching between high and
low beams
You can intervene at any time you wish or the
situation requires.
>If the high-beam assistant has switched on
the high beams, but you want to use the low
beams, simply switch to the low beams with
the turn signal lever. The high-beam assis-
tant is deactivated in the process.
To reactivate the system, briefly press the
turn signal lever in the high beam direction
again.
>If the high-beam assistant has switched on
the low beams, but you want to use the high
beams, switch to the high beams in the
accustomed manner. The system is deacti-
vated in the process and you must switch to
the low beams manually.
To reactivate the system, briefly press the
turn signal lever in the high beam direction
again.
>You use the headlamp flasher as usual with
low beams.
System limits
The high-beam assistant cannot replace
personal decisions on the benefits of
using the high beams. In situations which
require this, you should therefore switch to the
low beams manually to avoid a safety risk.<
In the following example situations, the system
either does not operate or only operates to a
limited degree and a personal reaction may be
required:
>Under extremely unfavorable weather con-
ditions, such as heavy fog or precipitation.
>For perceiving road users with poor lighting
of their own, e.g. pedestrians, cyclists, peo-
ple on horseback, horse-drawn vehicles,
with train or ship traffic close to the road and
wild animals crossing the road.
>In tight curves, on steep crowns or depres-
sions, with cross traffic or partially con-
cealed oncoming traffic on the freeway.
>In poorly lit places and with highly reflective
signs.>In the low speed range.
>When the windshield is dirty or covered with
stickers, decals etc. in the area of the inside
rearview mirror.
>When the sensor is dirty. Clean the sensor
on the front side of the inside rearview mir-
ror with a cloth moistened with a small
amount of glass cleaner.
Fog lamps
Briefly press the button to switch on/off.
Front fog lamps
The parking lamps or low beams must be
switched on for the fog lamps to operate. The
green indicator lamp on the Info Display lights
up whenever the fog lamps are on.
If the automatic headlamp control is acti-
vated, the low beams will come on auto-
matically when you switch on the fog lamps.<
Instrument lighting
You can adjust the lighting intensity with the
knurled wheel.