2006 BMW 745i climate control
[x] Cancel search: climate controlPage 108 of 247

Climate
106 5.Turn the controller to adjust the tempera-
ture:
>Turn toward the left, toward blue: colder
>Turn toward the right, toward red:
warmer
6.Press the controller to save the setting.
Maximum cooling
Maximally cooled air is obtained as
quickly as possible from an outside
temperature above 327/06 and
with the engine running.
The automatic climate control
changes over to the lowest temperature and
switches into the recirculated-air mode. The
maximum air quantity only flows out of the vents
for the upper body, so open these vents for
maximum cooling.
Air volume
You can vary the air volume by
turning. You can reactivate the
automatic air supply mode by
pressing the AUTO button.
Manual air distribution
You can adapt the air distribution to your own
personal preferences:
1.Open the start menu.
2.Open "Climate".
3.Turn the controller to select driver's side or
passenger side.4.Select the desired field and press the con-
troller.
1Airflow directed toward the windshield and
side windows
2Air to the upper body
3Air to footwell
You can only use the condensation sensor in
the AUTO program. Press the AUTO button
when you notice condensation on windows and
want to use the advantages of the condensation
sensor.
Defrosting windows and removing
condensation
Quickly remove ice and condensa-
tion from the windshield and front
side windows.
Residual heat
The system uses the warmth
stored in the engine to heat the
interior when the ignition is off, e.g.
while the vehicle is stopped at a
railroad crossing.
The function can be switched on when the fol-
lowing conditions are met:
>up to 15 minutes after switching off the
engine
>with the engine at operating temperature
>with sufficient battery voltage
>at an outside temperature below 777/
256
The LED lights up when the function is
switched on.
Page 110 of 247
Climate
108
Rear air conditioner*
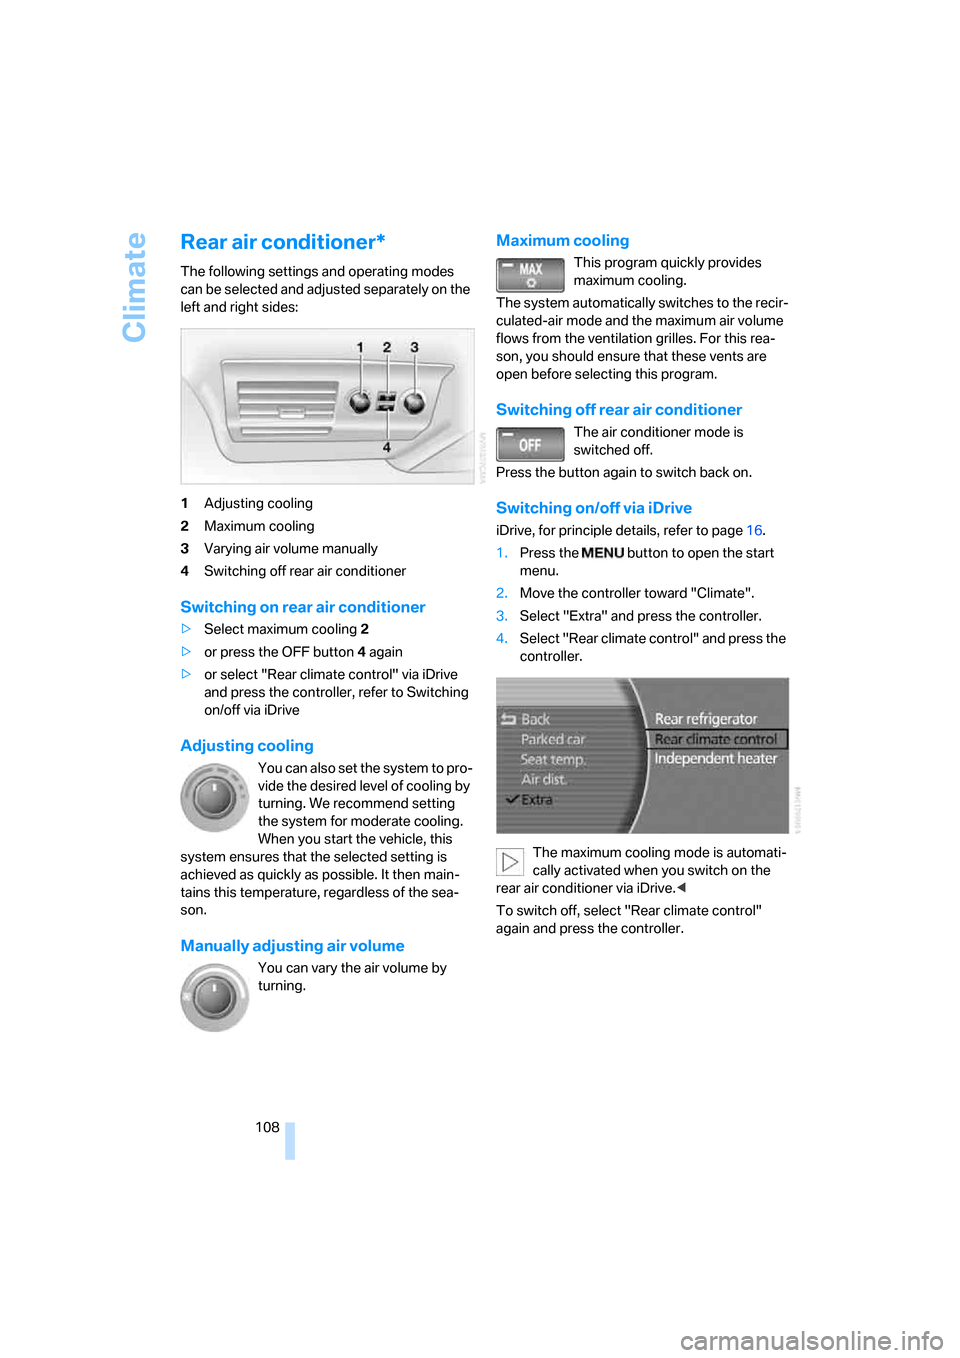
The following settings and operating modes
can be selected and adjusted separately on the
left and right sides:
1Adjusting cooling
2Maximum cooling
3Varying air volume manually
4Switching off rear air conditioner
Switching on rear air conditioner
>Select maximum cooling2
>or press the OFF button4 again
>or select "Rear climate control" via iDrive
and press the controller, refer to Switching
on/off via iDrive
Adjusting cooling
You can also set the system to pro-
vide the desired level of cooling by
turning. We recommend setting
the system for moderate cooling.
When you start the vehicle, this
system ensures that the selected setting is
achieved as quickly as possible. It then main-
tains this temperature, regardless of the sea-
son.
Manually adjusting air volume
You can vary the air volume by
turning.
Maximum cooling
This program quickly provides
maximum cooling.
The system automatically switches to the recir-
culated-air mode and the maximum air volume
flows from the ventilation grilles. For this rea-
son, you should ensure that these vents are
open before selecting this program.
Switching off rear air conditioner
The air conditioner mode is
switched off.
Press the button again to switch back on.
Switching on/off via iDrive
iDrive, for principle details, refer to page16.
1.Press the button to open the start
menu.
2.Move the controller toward "Climate".
3.Select "Extra" and press the controller.
4.Select "Rear climate control" and press the
controller.
The maximum cooling mode is automati-
cally activated when you switch on the
rear air conditioner via iDrive.<
To switch off, select "Rear climate control"
again and press the controller.
Page 111 of 247
Controls
109Reference
At a glance
Driving tips
Communications
Navigation
Entertainment
Mobility
Ventilation in rear
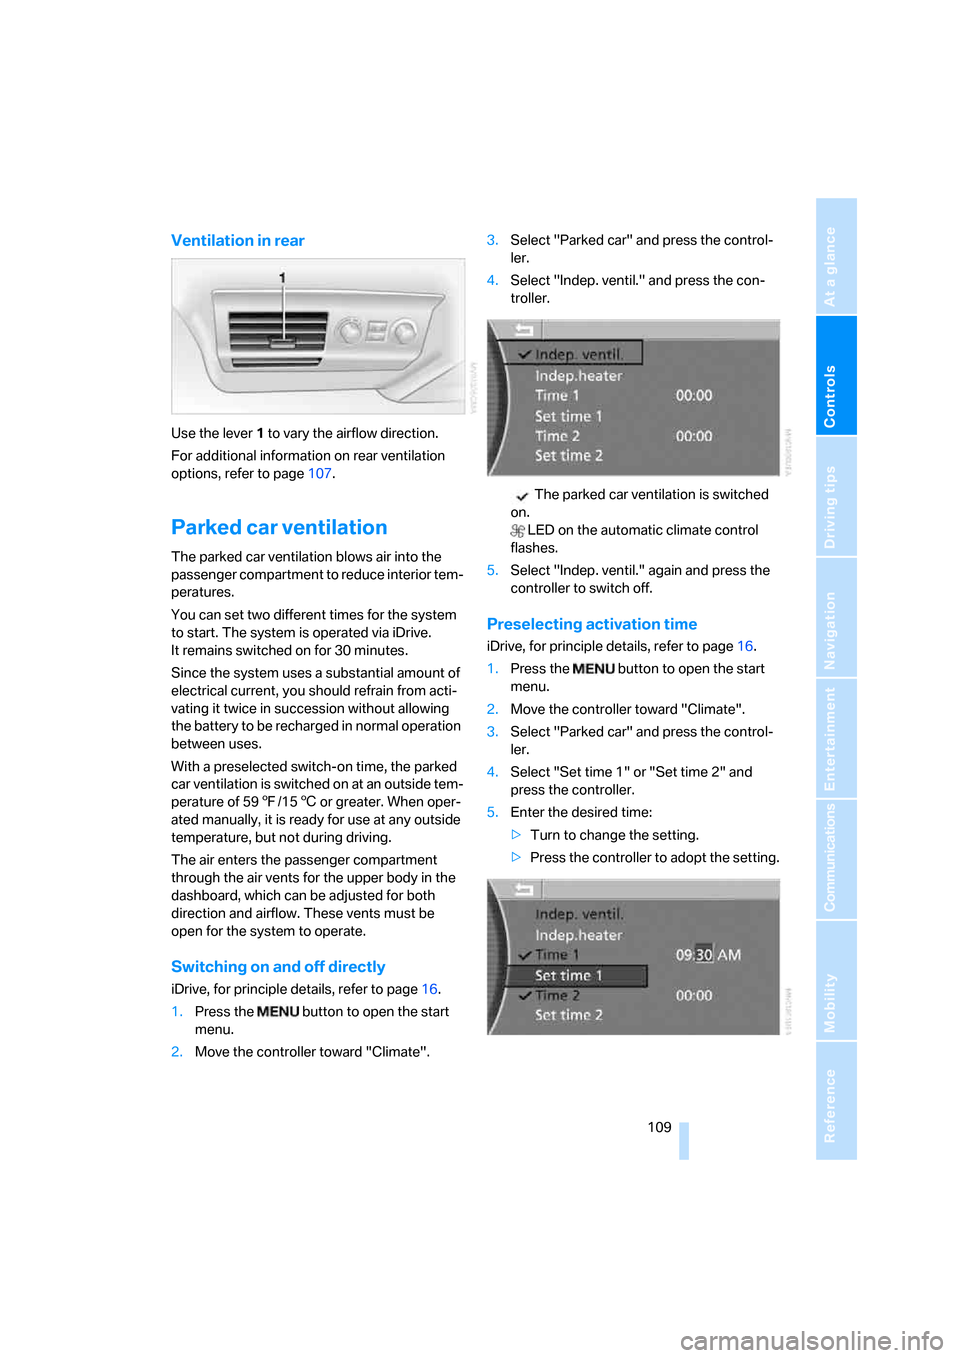
Use the lever1 to vary the airflow direction.
For additional information on rear ventilation
options, refer to page107.
Parked car ventilation
The parked car ventilation blows air into the
passenger compartment to reduce interior tem-
peratures.
You can set two different times for the system
to start. The system is operated via iDrive.
It remains switched on for 30 minutes.
Since the system uses a substantial amount of
electrical current, you should refrain from acti-
vating it twice in succession without allowing
the battery to be recharged in normal operation
between uses.
With a preselected switch-on time, the parked
car ventilation is switched on at an outside tem-
perature of 597/156 or greater. When oper-
ated manually, it is ready for use at any outside
temperature, but not during driving.
The air enters the passenger compartment
through the air vents for the upper body in the
dashboard, which can be adjusted for both
direction and airflow. These vents must be
open for the system to operate.
Switching on and off directly
iDrive, for principle details, refer to page16.
1.Press the button to open the start
menu.
2.Move the controller toward "Climate".3.Select "Parked car" and press the control-
ler.
4.Select "Indep. ventil." and press the con-
troller.
The parked car ventilation is switched
on.
LED on the automatic climate control
flashes.
5.Select "Indep. ventil." again and press the
controller to switch off.
Preselecting activation time
iDrive, for principle details, refer to page16.
1.Press the button to open the start
menu.
2.Move the controller toward "Climate".
3.Select "Parked car" and press the control-
ler.
4.Select "Set time 1" or "Set time 2" and
press the controller.
5.Enter the desired time:
>Turn to change the setting.
>Press the controller to adopt the setting.
Page 112 of 247
Climate
110
Activating timer
iDrive, for principle details, refer to page16.
1.Press the button to open the start
menu.
2.Move the controller toward "Climate".
3.Select "Parked car" and press the control-
ler.
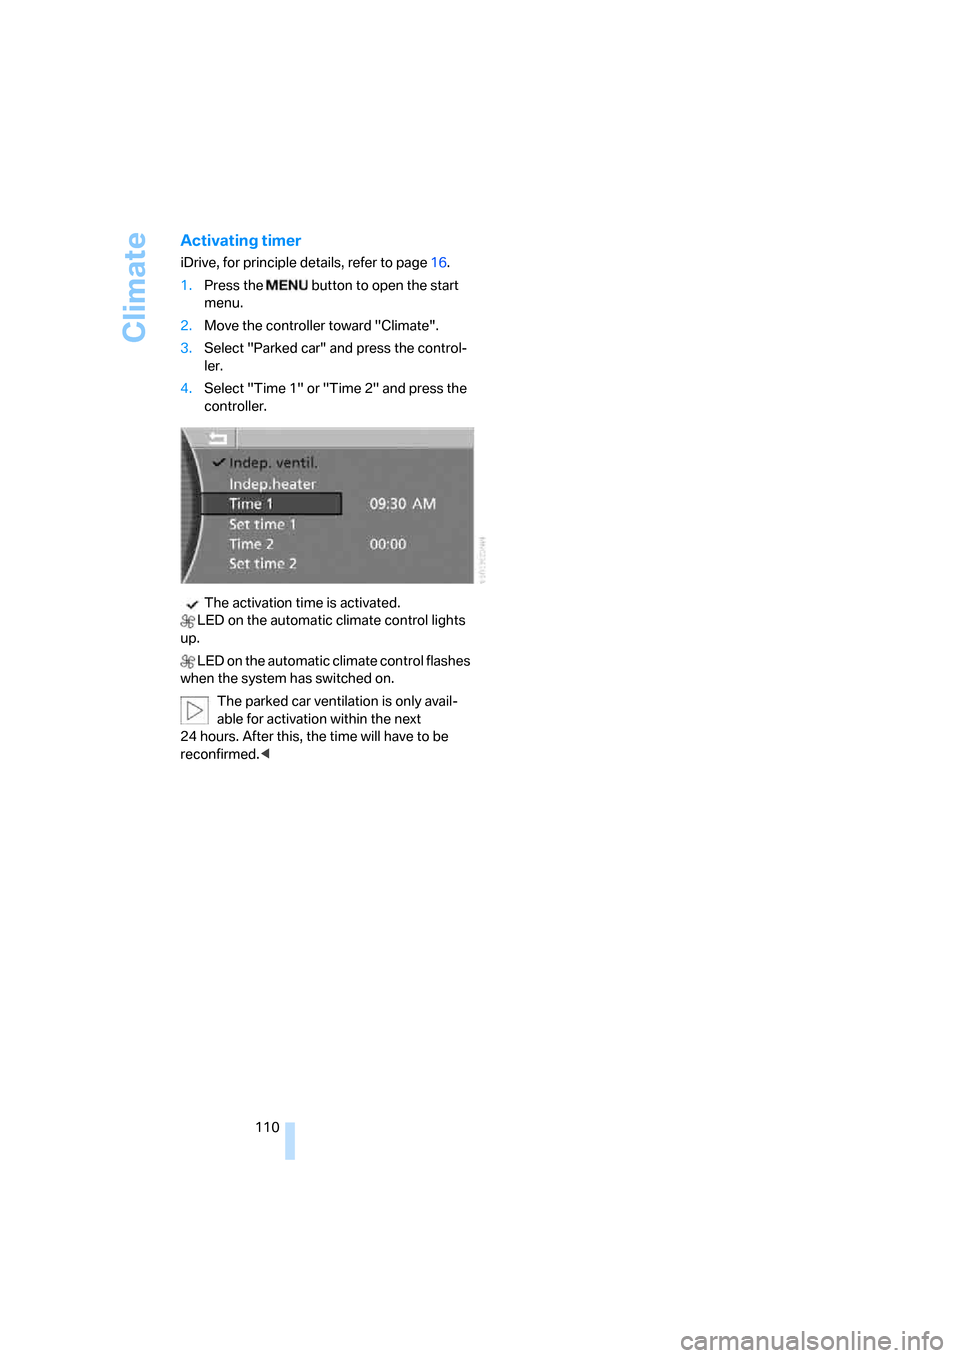
4.Select "Time 1" or "Time 2" and press the
controller.
The activation time is activated.
LED on the automatic climate control lights
up.
LED on the automatic climate control flashes
when the system has switched on.
The parked car ventilation is only avail-
able for activation within the next
24 hours. After this, the time will have to be
reconfirmed.<
Page 116 of 247
Practical interior accessories
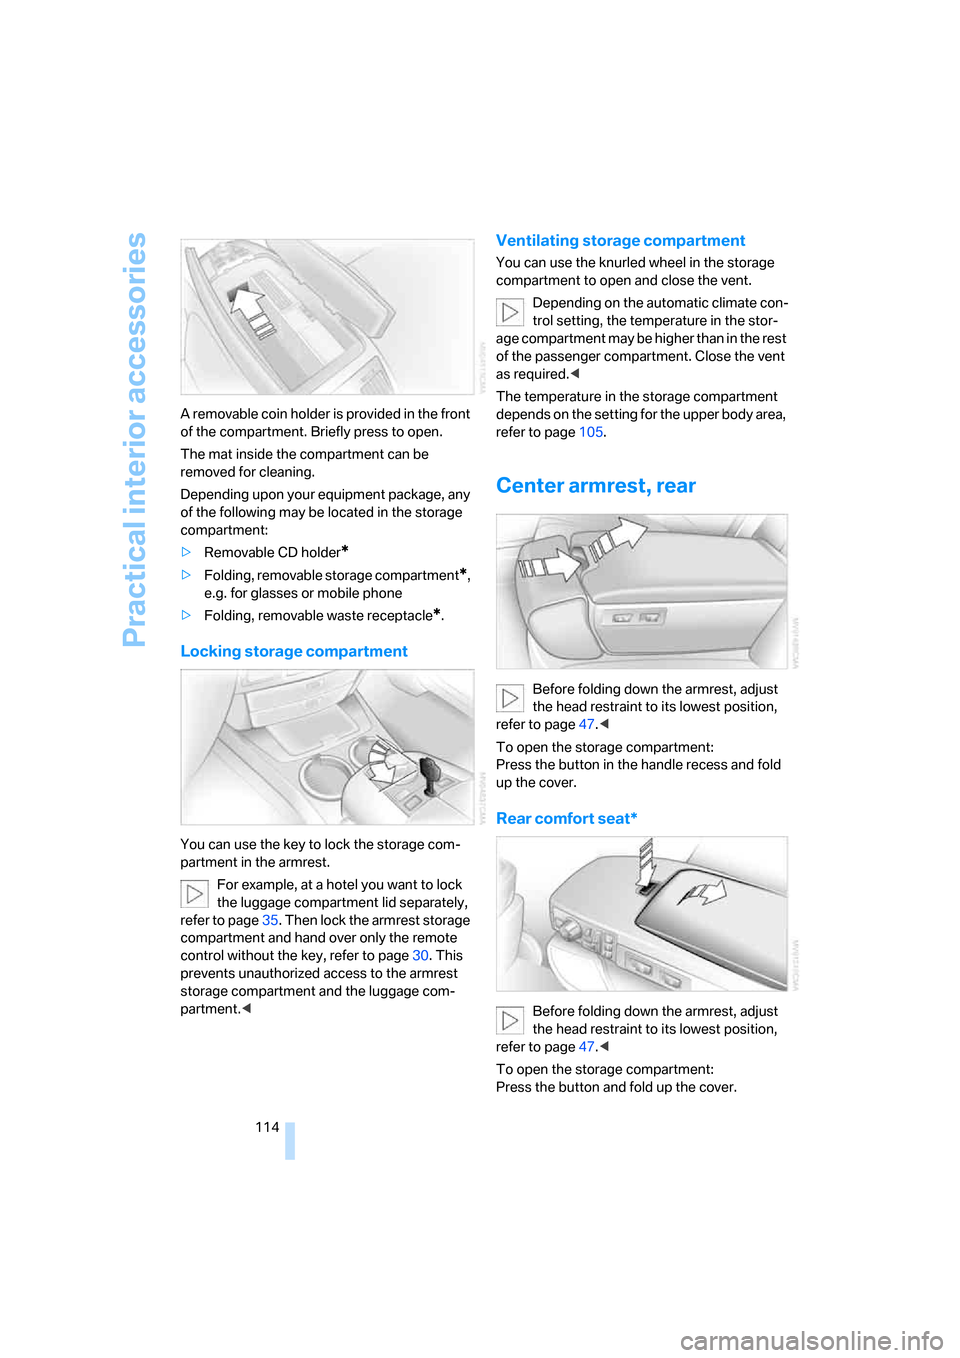
114 A removable coin holder is provided in the front
of the compartment. Briefly press to open.
The mat inside the compartment can be
removed for cleaning.
Depending upon your equipment package, any
of the following may be located in the storage
compartment:
>Removable CD holder
*
>Folding, removable storage compartment*,
e.g. for glasses or mobile phone
>Folding, removable waste receptacle
*.
Locking storage compartment
You can use the key to lock the storage com-
partment in the armrest.
For example, at a hotel you want to lock
the luggage compartment lid separately,
refer to page35. Then lock the armrest storage
compartment and hand over only the remote
control without the key, refer to page30. This
prevents unauthorized access to the armrest
storage compartment and the luggage com-
partment.<
Ventilating storage compartment
You can use the knurled wheel in the storage
compartment to open and close the vent.
Depending on the automatic climate con-
trol setting, the temperature in the stor-
age compartment may be higher than in the rest
of the passenger compartment. Close the vent
as required.<
The temperature in the storage compartment
depends on the setting for the upper body area,
refer to page105.
Center armrest, rear
Before folding down the armrest, adjust
the head restraint to its lowest position,
refer to page47.<
To open the storage compartment:
Press the button in the handle recess and fold
up the cover.
Rear comfort seat*
Before folding down the armrest, adjust
the head restraint to its lowest position,
refer to page47.<
To open the storage compartment:
Press the button and fold up the cover.
Page 119 of 247
Controls
117Reference
At a glance
Driving tips
Communications
Navigation
Entertainment
Mobility
Cigarette lighter, rear
Refer to Cigarette lighter, front.
Rear refrigerator*
The rear refrigerator is located behind the rear
seats' center armrest.
Switching on/off
1.Switch on the ignition
2.Press button.
The LED in the button lights up.
3.Press the button again to switch off the rear
refrigerator.
When the ignition is switched off, this also
switches off the rear refrigerator.
When a low voltage is reached, it is automati-
cally switched off to protect the vehicle battery.
The LED in the button flashes.
High temperatures in the luggage com-
partment can affect the temperature in
the rear refrigerator.<
With rear air conditioner
When switched on, the rear refrigerator is con-
trolled by the rear air conditioner.
To adjust the cooling capacity and increase the
airflow volume, refer to page108.
Without rear air conditioner
When switched on, the rear refrigerator is con-
trolled by the automatic air conditioning sys-
tem.
To adjust the temperature and increase the air-
flow volume, refer to pages105, 106.
Releasing
Pull on the opener and fold the cooler forward.
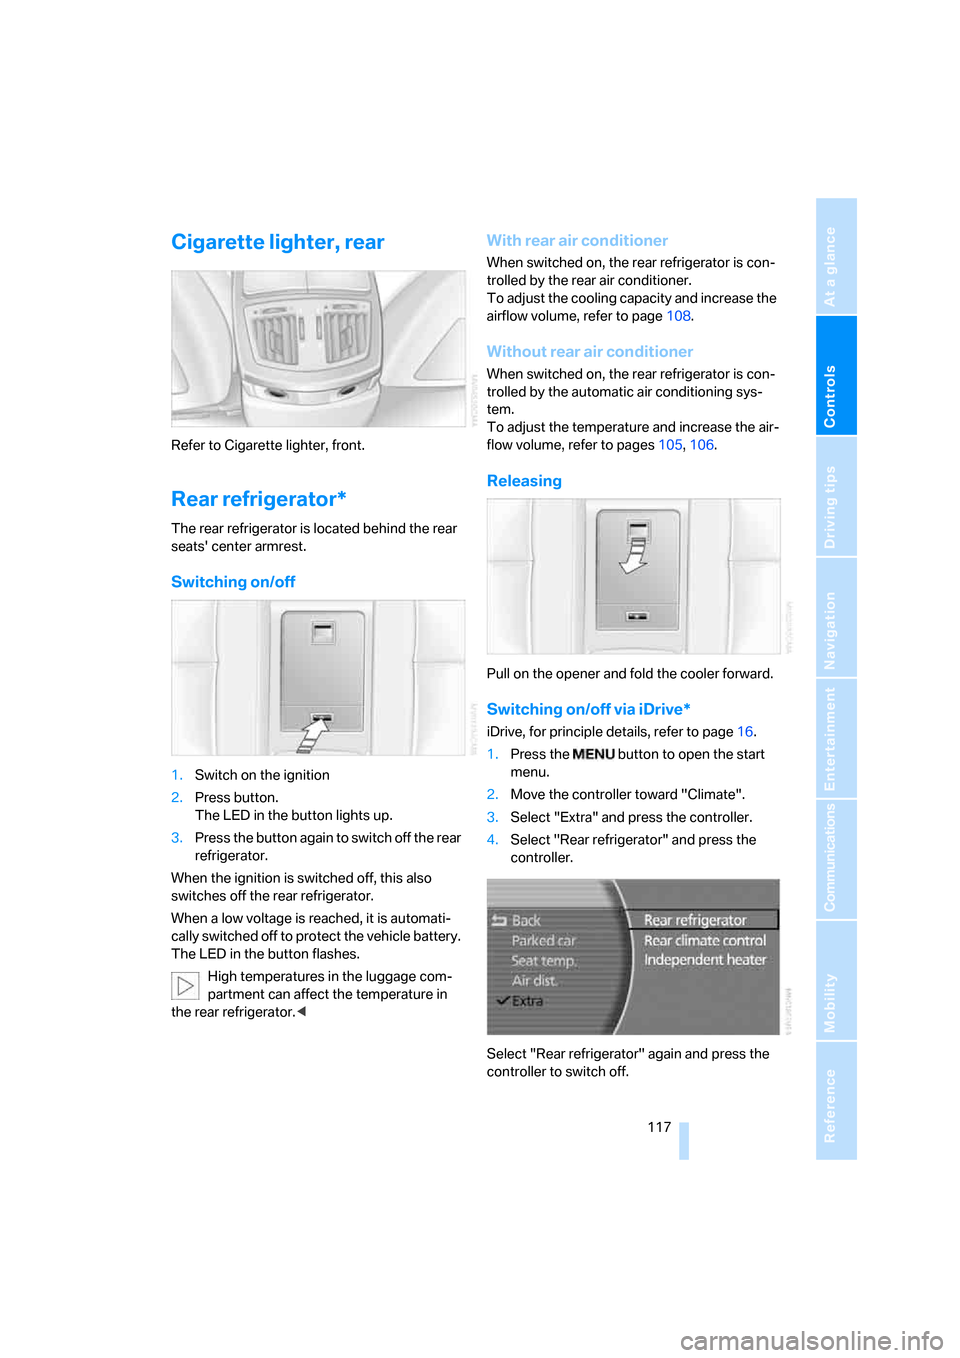
Switching on/off via iDrive*
iDrive, for principle details, refer to page16.
1.Press the button to open the start
menu.
2.Move the controller toward "Climate".
3.Select "Extra" and press the controller.
4.Select "Rear refrigerator" and press the
controller.
Select "Rear refrigerator" again and press the
controller to switch off.
Page 124 of 247

Things to remember when driving
122
Things to remember when driving
Breaking-in
Moving parts need time to adjust to one
another. To ensure that your vehicle continues
to furnish optimized economy of operation
throughout an extended service life, we request
that you devote careful attention to the follow-
ing information.
Engine and differential
Always obey all official speed limits.
Up to 1,200 miles/2,000 km
Drive with changing engine and vehicle speeds,
but do not exceed:
4500 rpm or 100 mph/160 km/h
Avoid full-throttle operation and use of the
transmission's kick-down mode during these
initial miles.
From 1,200 miles/2,000 km
The engine and vehicle speed can gradually be
increased.
Tires
Due to technical factors associated with their
manufacture, tires do not achieve their full trac-
tion potential until after an initial break-in
period. Therefore, drive reservedly during the
first 200 miles/300 km.
Brake system
Brakes require an initial break-in period of
approx. 300 miles/500 km to achieve optimized
contact and wear patterns between brake pads
and rotors.
Following component replacements
Follow the break-in sequence again if compo-
nents addressed above must be replaced again
during subsequent driving.
General driving notes
Closing luggage compartment lid
Operate the vehicle only when the lug-
gage compartment lid is completely
closed. Otherwise, exhaust fumes could pene-
trate into the passenger compartment.<
If special circumstances should make it abso-
lutely necessary to operate the vehicle with the
luggage compartment lid open:
1.Close all windows and the glass sunroof.
2.Adjust the automatic climate control's
blower to supply a high rate of airflow, refer
to page106.
Hot exhaust system
As in all vehicles, extremely high temper-
atures are generated on exhaust system.
Do not remove the heat shields installed adja-
cent to it, and never apply undercoating to
them. When driving, standing at idle, and park-
ing, take care to avoid possible contact
between the hot exhaust system and any highly
flammable materials such as hay, leaves, grass,
etc. Such contact could lead to a fire, accompa-
nied by the risk of serious property damage and
personal injury.<
Mobile communications devices in
vehicle
BMW does not recommend using mobile
communications devices, e.g. mobile
phones, inside the vehicle without a direct con-
nection to an outside antenna. Otherwise, the
vehicle electronics and mobile communications
device can affect each other. In addition, there
is no assurance that the radiation which results
during transmission will be discharged from the
vehicle interior.<
Page 126 of 247

Things to remember when driving
124 Should corrosion form on the brake rotors, the
brakes will tend to respond with a pulsating
effect that even extended application will fail to
cure.
When vehicle is parked
Condensation forms in the automatic climate
control during operation, and then exits under
the vehicle. Traces of condensed water under
the vehicle are therefore normal.
Before driving into a car wash
1.Fold in the exterior mirrors, refer to page50;
otherwise, they could be damaged due to
the width of the vehicle.
For the vehicle to be able to roll, follow the
instructions on page58.
2.Release the parking brake, especially when
you have activated Automatic Hold. Refer to
page59.
Cargo loading
To avoid loading the tires beyond their
approved carrying capacity, never over-
load the vehicle. Overloading can lead to over-
heating and increases the rate at which damage
develops inside the tires. The ultimate result
can come in the form of a sudden blow-out.<
Determining loading limit
1.Locate the following statement on your
vehicle's door pillar
*:
The combined weight of occupants
and cargo should never exceed
XXX lbs. or YYY kg; otherwise, the vehicle may be damaged and unstable driving con-
ditions may result.<
2.Determine the combined weight of the
driver and passengers that will be riding in
your vehicle.
3.Subtract the combined weight of the driver
and passenger from XXX lbs. or YYY kg.
4.The resulting figure equals the available
amount of cargo and luggage load capacity.
For example, if the XXX amount equals
1,400 lbs. and there will be five 150-lb. pas-
sengers in your vehicle, the amount of avail-
able cargo and luggage load capacity is
650 lbs.:
1400 lbs. minus 750 lbs. = 650 lbs.
5.Determine the combined weight of luggage
and cargo being loaded into the vehicle.
That weight may not safely exceed the
available cargo and luggage load capacity
calculated in step 4.
6.If your vehicle will be towing a trailer, part of
the load from your trailer will be transferred
to your vehicle. Consult the manual for
transporting a trailer to determine how this
may reduce the available cargo and luggage
load capacity of your vehicle.
Load
The permitted load is the total of the weight of
occupants and cargo/luggage. The greater the
weight of occupants, the less cargo/luggage
can be transported.