2006 BMW 650I COUPE heating
[x] Cancel search: heatingPage 60 of 236
Controls
59Reference
At a glance
Driving tips
Communications
Navigation
Entertainment
Mobility
Starting engine
Do not run the engine in closed rooms;
otherwise, the inhalation of toxic exhaust
gases can cause unconsciousness and death.
The exhaust gases contain carbon monoxide,
an odorless and colorless, but highly toxic gas.
Never leave an unattended vehicle with the
engine running, as such a vehicle represents a
potential safety hazard.
To prevent the vehicle from rolling, always
engage the handbrake and move the selector-
lever into position P or shift into neutral before
leaving the vehicle with the engine running.<
When starting the engine, do not press the
accelerator pedal.
Do not allow the engine to warm up by leaving it
running while the vehicle remains stationary.
Instead, begin to drive immediately at a moder-
ate engine speed.
Manual transmission
1.Apply the handbrake.
2.Depress the clutch pedal and select the
idling position.
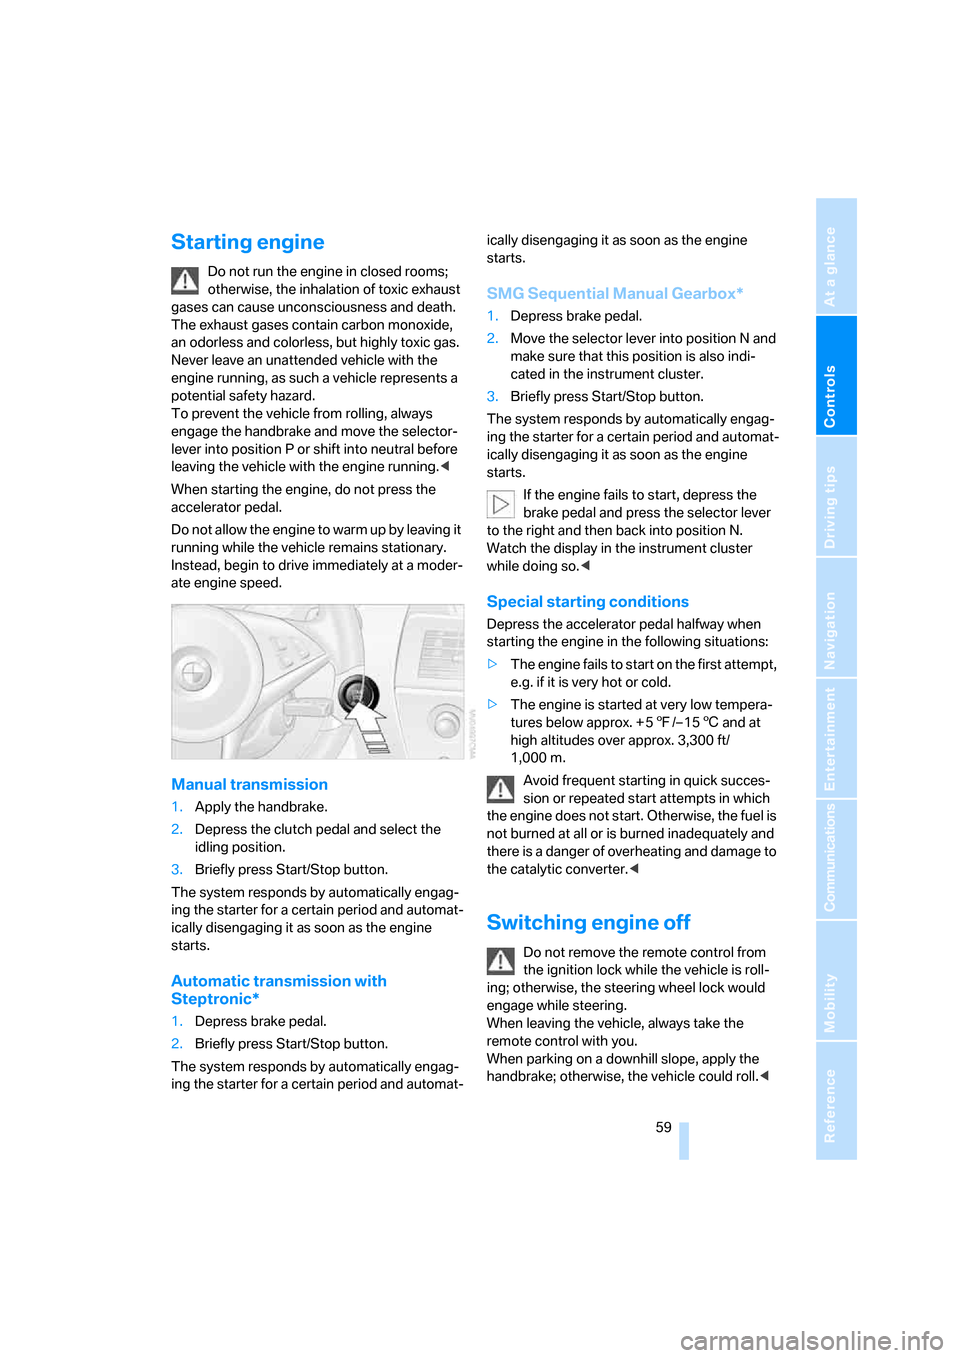
3.Briefly press Start/Stop button.
The system responds by automatically engag-
ing the starter for a certain period and automat-
ically disengaging it as soon as the engine
starts.
Automatic transmission with
Steptronic*
1.Depress brake pedal.
2.Briefly press Start/Stop button.
The system responds by automatically engag-
ing the starter for a certain period and automat-ically disengaging it as soon as the engine
starts.
SMG Sequential Manual Gearbox*
1.Depress brake pedal.
2.Move the selector lever into position N and
make sure that this position is also indi-
cated in the instrument cluster.
3.Briefly press Start/Stop button.
The system responds by automatically engag-
ing the starter for a certain period and automat-
ically disengaging it as soon as the engine
starts.
If the engine fails to start, depress the
brake pedal and press the selector lever
to the right and then back into position N.
Watch the display in the instrument cluster
while doing so.<
Special starting conditions
Depress the accelerator pedal halfway when
starting the engine in the following situations:
>The engine fails to start on the first attempt,
e.g. if it is very hot or cold.
>The engine is started at very low tempera-
tures below approx. + 57/– 156 and at
high altitudes over approx. 3,300 ft/
1,000 m.
Avoid frequent starting in quick succes-
sion or repeated start attempts in which
the engine does not start. Otherwise, the fuel is
not burned at all or is burned inadequately and
there is a danger of overheating and damage to
the catalytic converter.<
Switching engine off
Do not remove the remote control from
the ignition lock while the vehicle is roll-
ing; otherwise, the steering wheel lock would
engage while steering.
When leaving the vehicle, always take the
remote control with you.
When parking on a downhill slope, apply the
handbrake; otherwise, the vehicle could roll.<
Page 63 of 236
Driving
62 It is also possible to start off in second gear, e. g.
in slippery conditions.
In the following situations, SMG does the think-
ing for you:
>Upshifts and downshifts are executed only
when they will result in a plausible combina-
tion of engine and vehicle speed; thus, for
example, the system will not execute a
downshift that would cause the engine to
overrev.
>When the vehicle is stationary, the trans-
mission automatically downshifts into first
gear.
>Shortly before dropping below a gear-
dependent minimum speed, the transmis-
sion downshifts automatically even without
your intervention.
D Drive mode
In the Drive mode, all forward gears are shifted
automatically.
To switch from Sequential to Drive mode:
Briefly press the selector-lever to the right
toward D.
Kick-down: for rapid acceleration, e.g. passing,
press the accelerator pedal as far down as it will
go. You achieve maximum acceleration.
To switch back to the Sequential mode: press
selector-lever to the right again toward D or
shift using the shifting paddles or the selector-
lever.
Start off quickly on slopes. Do not hold
the vehicle on a hill by applying the throt-
tle, but engage the handbrake instead. Other-
wise, overheating can occur in the region of the
transmission.<
Gear changes
Using selector-lever
>To upshift, pull the selector-lever back.
>To downshift, push the selector-lever for-
ward.
Using shift paddles on steering wheel
>To shift up, pull one of the shift paddles.
>To shift down, press.
Automatic transmission with
Steptronic*
In addition to the fully automatic mode, you can
also shift manually with Steptronic, refer to
page63.
Selector-lever positions
P R N D M/S + –
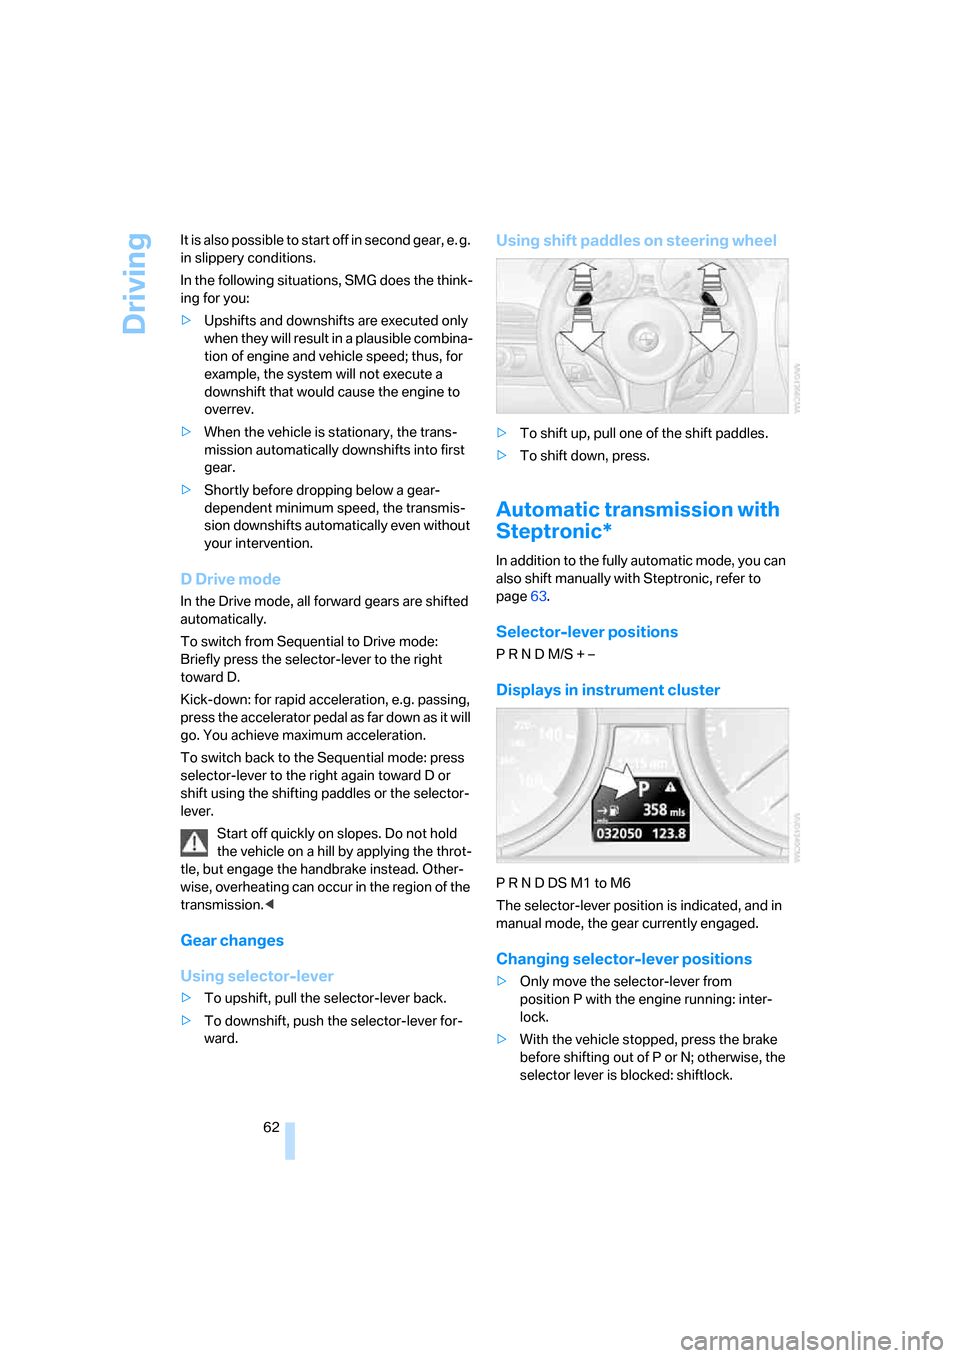
Displays in instrument cluster
P R N D DS M1 to M6
The selector-lever position is indicated, and in
manual mode, the gear currently engaged.
Changing selector-lever positions
>Only move the selector-lever from
position P with the engine running: inter-
lock.
>With the vehicle stopped, press the brake
before shifting out of P or N; otherwise, the
selector lever is blocked: shiftlock.
Page 102 of 236
Controls
101Reference
At a glance
Driving tips
Communications
Navigation
Entertainment
Mobility
The current setting for air distribution is dis-
played on the Control Display.
A congenial climate
The AUTO program offers the optimum air dis-
tribution and air volume for virtually all condi-
tions, refer to AUTO program below. Now you
only need to select an interior temperature that
you find pleasant.
The following sections contain more detailed
information on the available setting options.
Most settings are stored for the remote control
currently in use, also refer to Personal Profile
settings on page29.
AUTO program
The AUTO program handles the
adjustment of air distribution to the
windshield and side windows, in
the direction of the upper body, and in the foot-
well, as well as the adjustment of the air volume.
It also adapts your instructions for the tempera-
ture to outside influences throughout the year.
The cooling is switched on automatically with
the AUTO program. At the same time, a con-
densation sensor controls the program in such
a way that window condensation is prevented
as much as possible.
Intensity of the AUTO program
To meet your individual needs, you can
increase or decrease the intensity of the auto-
matic climate control.
iDrive, for principle details, refer to page16.
1.Press the button.
This opens the start menu.
2.Move the controller to the left to open
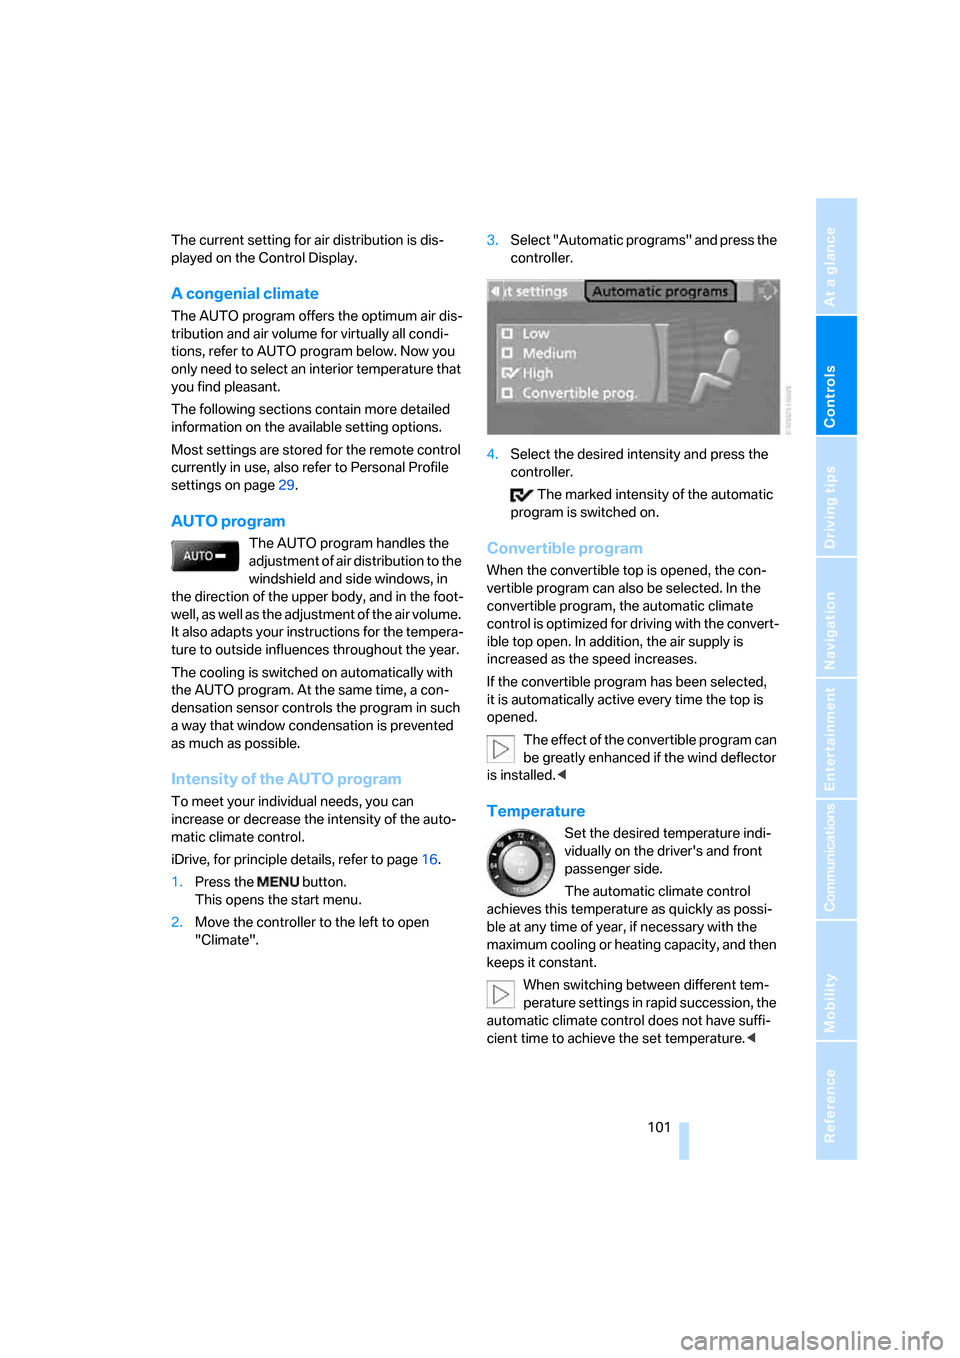
"Climate".3.Select "Automatic programs" and press the
controller.
4.Select the desired intensity and press the
controller.
The marked intensity of the automatic
program is switched on.
Convertible program
When the convertible top is opened, the con-
vertible program can also be selected. In the
convertible program, the automatic climate
control is optimized for driving with the convert-
ible top open. In addition, the air supply is
increased as the speed increases.
If the convertible program has been selected,
it is automatically active every time the top is
opened.
The effect of the convertible program can
be greatly enhanced if the wind deflector
is installed.<
Temperature
Set the desired temperature indi-
vidually on the driver's and front
passenger side.
The automatic climate control
achieves this temperature as quickly as possi-
ble at any time of year, if necessary with the
maximum cooling or heating capacity, and then
keeps it constant.
When switching between different tem-
perature settings in rapid succession, the
automatic climate control does not have suffi-
cient time to achieve the set temperature.<
Page 103 of 236
Climate
102
Adapting temperature in upper body
region
1.Open the start menu.
2.Open "Climate".
3.Select "Vent settings" and press the con-
troller.
4.Select the field by moving the controller and
adjust the air distribution by turning the
controller.
Defrosting windows and removing
condensation
Quickly remove ice and condensa-
tion from the windshield and front
side windows.
Rear window defroster
The rear window defroster
switches off automatically after a
certain amount of time.
Convertible: the rear window defroster is only
activated when the rear window is closed.
Air volume, manual
You can adjust the air volume by
turning. You can reactivate the
automatic mode for the air volume
with the AUTO button.
Manual air distribution
You can specify the air distribution.
1.Open the start menu.
2.Open "Climate".
3.Select "Vent settings" and press the con-
troller.
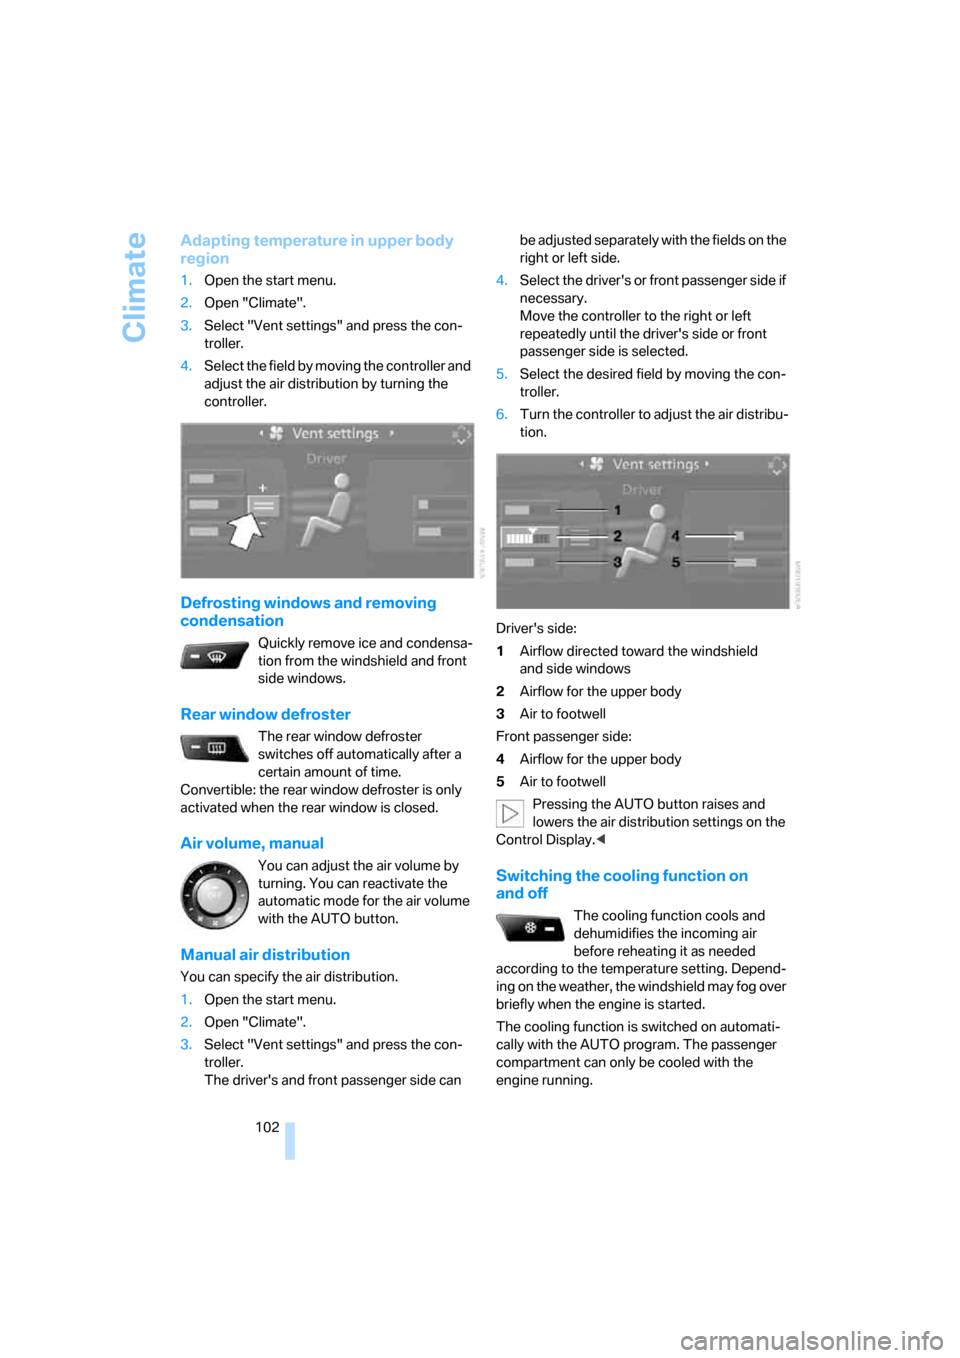
The driver's and front passenger side can be adjusted separately with the fields on the
right or left side.
4.Select the driver's or front passenger side if
necessary.
Move the controller to the right or left
repeatedly until the driver's side or front
passenger side is selected.
5.Select the desired field by moving the con-
troller.
6.Turn the controller to adjust the air distribu-
tion.
Driver's side:
1Airflow directed toward the windshield
and side windows
2Airflow for the upper body
3Air to footwell
Front passenger side:
4Airflow for the upper body
5Air to footwell
Pressing the AUTO button raises and
lowers the air distribution settings on the
Control Display.<
Switching the cooling function on
and off
The cooling function cools and
dehumidifies the incoming air
before reheating it as needed
according to the temperature setting. Depend-
ing on the weather, the windshield may fog over
briefly when the engine is started.
The cooling function is switched on automati-
cally with the AUTO program. The passenger
compartment can only be cooled with the
engine running.
Page 116 of 236
Driving tips
115Reference
At a glance
Controls
Communications
Navigation
Entertainment
Mobility
Mobile communications devices in
vehicle
BMW advises against using mobile com-
munications devices, e.g. mobile phones,
inside the vehicle without a direct connection
to an external antenna. Otherwise, the vehicle
electronics and mobile communications device
can interfere with one another. In addition, there
is no assurance that the radiation emitted dur-
ing transmission will be conveyed out of the
vehicle interior.<
Hydroplaning
When driving on wet or slushy roads,
reduce road speed. If you do not, a wedge
of water can form between tires and road sur-
face. This phenomenon is referred to as hydro-
planing, and is characterized by a partial or
complete loss of contact between the tires and
the road surface, ultimately undermining your
ability to steer and brake the vehicle.<
The risk of hydroplaning increases as the tread
depth of the tires decreases, also refer to Mini-
mum tire tread on page187.
Driving through water
Do not drive through water on the road if
it is deeper than 1 ft/30 cm, and then only
at walking speed at the most. Otherwise, the
vehicle's engine, electrical systems and trans-
mission may be damaged.<
Using handbrake on inclines
On inclines, do not hold the vehicle with
the clutch; use the handbrake. Otherwise
greater clutch wear will result.<
SMG Sequential Manual Gearbox
Start off quickly on slopes. Do not hold
the vehicle on a hill by applying the throt-
tle, but engage the handbrake instead. Other-
wise overheating can occur in the transmission
region.<
Starting assistant
The starting assistant enables you to start off
conveniently on slopes. The parking brake is
not required for this purpose.
1.Hold the vehicle with the footbrake.
2.Release the footbrake and immediately
drive off quickly.
The starting assistant holds the vehicle
for approx. 2 seconds after releasing the
footbrake. Depending on the load, the vehicle
may also roll back slightly during this time.
After releasing the footbrake, immediately start
quickly; otherwise, the starting assistant no
longer holds the vehicle after approx. 2 seconds
and it begins to roll back.<
Braking safely
Your BMW is equipped with ABS as a standard
feature. In situations that require it, it is best to
brake with full force. Since the vehicle maintains
steering responsiveness, you can still avoid
possible obstacles with a minimum of steering
effort.
Pulsation at the brake pedal combines with
sounds from the hydraulic circuits to indicate to
the driver that ABS is in its active mode.
Do not drive with your foot resting on the
brake pedal. Even light but consistent
pedal pressure can lead to high temperatures,
brake wear and possibly even brake failure.<
Driving in wet conditions
When driving on wet roads or in heavy rain, it is
a good idea to apply light pressure to the brake
pedal every few miles. Monitor traffic conditions
to ensure that this maneuver does not endan-
ger other road users. The heat generated in this
process helps dry the pads and rotors to ensure
that full braking efficiency will then be available
when you need it.
Hills
To prevent overheating and thus reduced
efficiency of the brake system, downshift
to a gear in which only minimal brake applica-
tions are needed when descending long or
Page 117 of 236
Things to remember when driving
116 steep downhill stretches. Even light but consis-
tent pedal pressure can lead to high tempera-
tures, brake wear and possibly even brake fail-
ure.<
The braking action of the engine can be further
increased by downshifting in the manual mode
of the automatic transmission, possibly as far as
first gear, refer to page63. This prevents an
excessive load on the brakes.
Do not drive with the clutch depressed, in
idle or with the engine switched off; other-
wise, there will be no engine braking action or
power-assisted braking and steering.
Never allow floor mats, carpets or any other
objects to protrude into the area of movement
of the pedals and impair their operation.<
Corrosion on brake rotors
When the vehicle is driven only occasionally,
during extended periods when the vehicle is not
used at all, and in operating conditions where
brake applications are less frequent, there is an
increased tendency for corrosion to form on
rotors, while contaminants accumulate on the
brake pads. This occurs because the minimum
pressure which must be exerted by the pads
during brake applications to clean the rotors is
not reached.
Should corrosion form on the brake rotors, the
brakes will tend to respond with a pulsating
effect that even extended application will fail to
cure.
When vehicle is parked
Condensation forms in the automatic climate
control during operation, and then exits under
the vehicle. Traces of condensed water under
the vehicle are therefore normal.
Before driving into a car wash
To prevent the exterior mirrors on this vehicle
from being damaged, always fold them in by
hand before entering an automatic car wash.
With comfort access and automatic
transmission
Insert the remote control into the ignition lock.
The engine can be switched off in the selector
lever position N. Also refer to page37.
Cargo loading
To avoid loading the tires beyond their
approved carrying capacity, never over-
load the vehicle. Overloading can lead to over-
heating and increases the rate at which damage
develops inside the tires. The ultimate result
can assume the form of a sudden blow-out.<
Determining loading limit
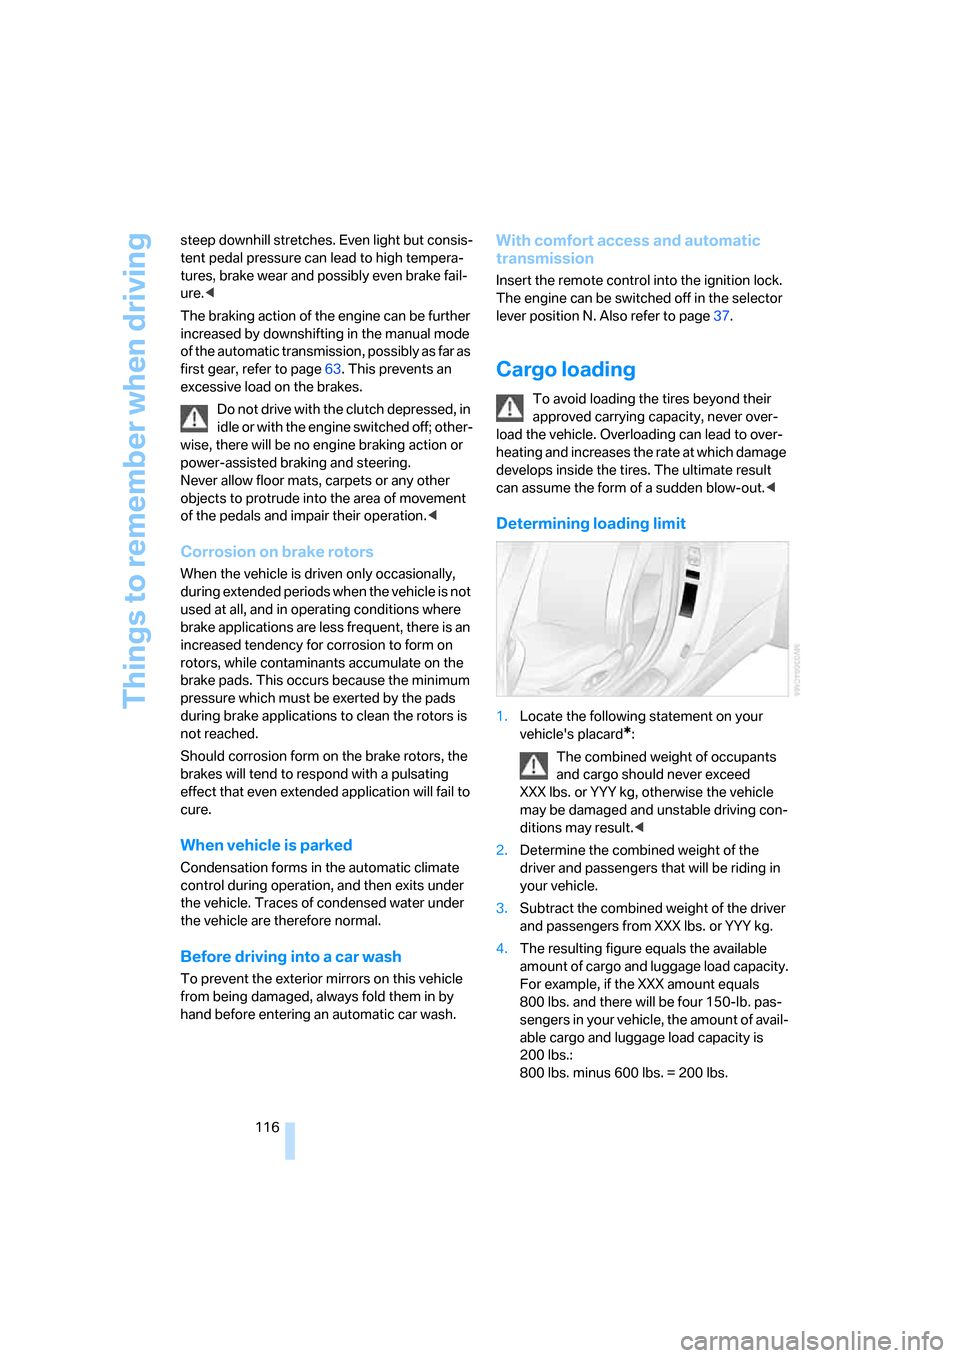
1.Locate the following statement on your
vehicle's placard
*:
The combined weight of occupants
and cargo should never exceed
XXX lbs. or YYY kg, otherwise the vehicle
may be damaged and unstable driving con-
ditions may result.<
2.Determine the combined weight of the
driver and passengers that will be riding in
your vehicle.
3.Subtract the combined weight of the driver
and passengers from XXX lbs. or YYY kg.
4.The resulting figure equals the available
amount of cargo and luggage load capacity.
For example, if the XXX amount equals
800 lbs. and there will be four 150-lb. pas-
sengers in your vehicle, the amount of avail-
able cargo and luggage load capacity is
200 lbs.:
800 lbs. minus 600 lbs. = 200 lbs.
Page 223 of 236
Everything from A to Z
222 Dynamic Brake Control
DBC86
Dynamic Drive88
Dynamic Driving Control64
Dynamic Stability Control
DSC86
Dynamic Traction Control
DTC87
E
Easy entry, refer to Getting in
back51
Easy entry/exit53
EBV, refer to Electronic brake-
force distribution86
Eject button, refer to Buttons
on CD player140
Electrical malfunction
– convertible top43
– door lock32
– driver's door32
– fuel filler door182
– glass sunroof41
– luggage compartment lid34
– storage compartment, hotel
function33
Electric steering wheel
adjustment53
Electronic brake-force
distribution86
Electronic oil level check191
Emergency assistance, refer
to Roadside Assistance203
Emergency call202
Emergency operation, refer to
Manual operation
– convertible top43
– door lock32
– driver's door32
– fuel filler door182
– glass sunroof41
– hotel function33
– luggage compartment lid34
– selector lever interlock,
automatic transmission63Emergency release for
luggage compartment lid in
luggage compartment34
Emergency services, refer to
Roadside Assistance203
"Emission inspect."78
"Enable services"175
"End call"167
Engine
– breaking-in114
– data210
– overheated, refer to Coolant
temperature74
– speed210
– starting59
– starting, comfort access36
– starting difficulties59
– switching off59
– switching off when equipped
with Automatic transmission
with comfort access37
Engine compartment191
Engine coolant193
Engine oil
– additives192
– approved oils192
– electronic oil level check191
– recommended oils192
– temperature75
– temperature gauge75
– topping off192
"Engine oil level"192
Engine output, refer to Engine
data210
Engine overheating, refer to
Coolant temperature74
Engine speed, refer to Engine
specifications210
Engine starting, refer to
Starting engine59
"Enter address"122,128
Entering address121,124
Entering destination via town/
city name122
Entering intersection123
Entering town/city for
navigation122Entering zip code for
navigation123
"Entertainment"140
"Entertainment
settings"141,148
Entertainment sound output
on/off141
Entry map for destination125
Equalizer, refer to Tone
control143
"Equalizer", tone control143
"ESN"150
ESP Electronic Stability
Program, refer to DSC
Dynamic Stability
Control86
Event Data Recorders196
Exhaust system, refer to Hot
exhaust system114
Exterior mirrors52
– automatic dimming
feature53
– automatic heating53
– folding in and out52
– tilting down passenger-side
mirror53
Eye for tow-starting and
towing, refer to Tow
fitting204
Eyes for lashing, refer to
Securing cargo117
F
"Fader", refer to Tone
control142
Fader, refer to Tone
control142
Failure messages, refer to
Check Control79
False alarms, refer to Avoiding
unintentional alarms36
Fastening safety belts, refer to
Safety belts51
Fastest route for
navigation130
Page 225 of 236
Everything from A to Z
224 Heated
– mirrors, refer to Automatic
functions53
– rear window102
– seats52
– steering wheel54
Heater101
Heating
– exterior mirrors53
– interior100
– rear window102
– residual heat103
– seats52
– steering wheel54
Heating with engine switched
off, refer to Residual
heat103
Heavy cargo, refer to Securing
cargo117
Height, refer to
Dimensions211
Height adjustment
– seats48
– steering wheel53
High-beam assistant97
High beams97
– headlamp flasher97
– indicator lamp13
– replacing bulbs198
High Definition Radio148
Highs, refer to Tone
control141
High water, refer to Driving
through water115
Hills115
Holder for cups109
"Home address" in
navigation130
Homepage4
Hood190
Horn10
Hotel function33
– unlocking manually33
Hot exhaust system114
"Hour memo"83
"House number" for desti-
nation entry124Hydraulic brake assistant,
refer to DBC Dynamic Brake
Control86
Hydroplaning115
– also refer to Minimum tread
depth187
I
IBOC, refer to High Definition
Radio148
Ice, refer to Outside temper-
ature warning74
ID3-Tag, refer to Information
about track155
iDrive16
– adjusting brightness83
– assistance window20
– changing date and time82
– changing language84
– changing menu page19
– changing settings82
– changing unit of measure
units and display form83
– controller16
– controls16
– displaying menus17
– selecting menu item19
– selecting or confirming
entry19
– start menu17
– status information20
– symbols18
Ignition58
– switched off58
– switched on58
Ignition key, refer to Keys/
remote control28
Ignition key position 1, refer to
Radio readiness58
Ignition key position 2, refer to
Ignition on58
Ignition lock58
– starting engine with comfort
access37Indicator/warning lamps
– active steering90
– airbags92
– DSC13,87
– DTC13,87
– Flat Tire Monitor89
– fog lamps13,98
– handbrake13,60
– overview13
– safety belt warning52
Individually programmable
buttons on steering
wheel54
Individual settings, refer to
Personal Profile29
Inflation pressure, refer to Tire
inflation pressure184
Inflation pressure monitoring,
refer to Flat Tire Monitor88
Information
– on another location126
– on country126
– on current position126
– on destination location126
"Information" for
navigation126
"Information on
destination"128
Initializing
– Flat Tire Monitor88
– radio, refer to Storing
stations146
– refer to Power failure201
– seat, mirror and steering
wheel memory49
– time and date82
"Input map"126
Installation location
– CD changer157
– navigation drive120
Instructions for navigation
system, refer to Voice
instructions135
Instrument cluster12
Instrument illumination, refer
to Instrument lighting99
Instrument lighting99