2006 BMW 650I COUPE high beam
[x] Cancel search: high beamPage 11 of 236
Cockpit
10
Cockpit
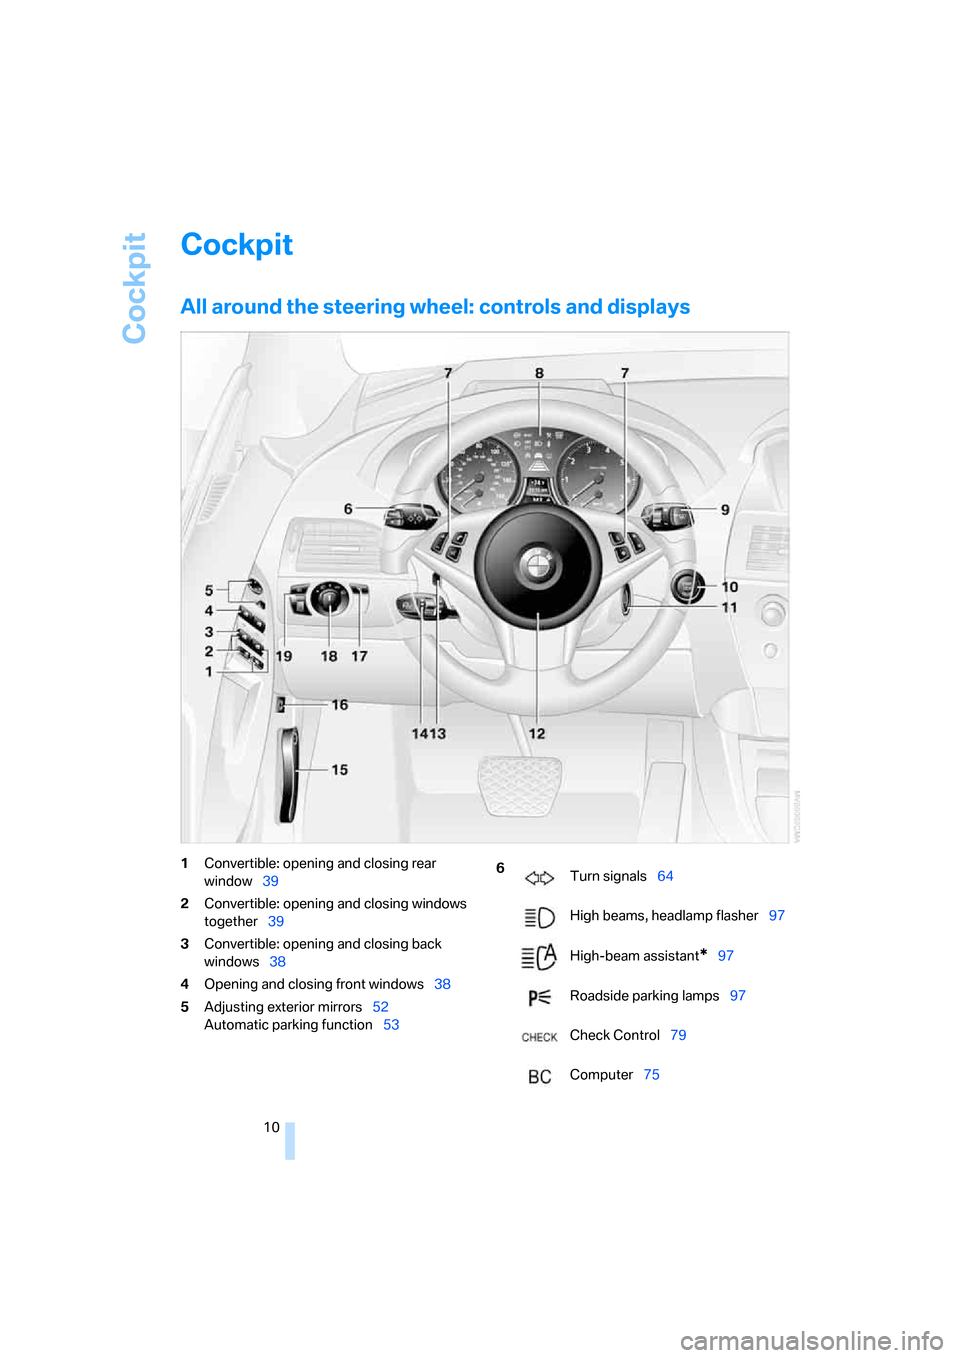
All around the steering wheel: controls and displays
1Convertible: opening and closing rear
window39
2Convertible: opening and closing windows
together39
3Convertible: opening and closing back
windows38
4Opening and closing front windows38
5Adjusting exterior mirrors52
Automatic parking function536
Turn signals64
High beams, headlamp flasher97
High-beam assistant
*97
Roadside parking lamps97
Check Control79
Computer75
Page 13 of 236
Cockpit
12
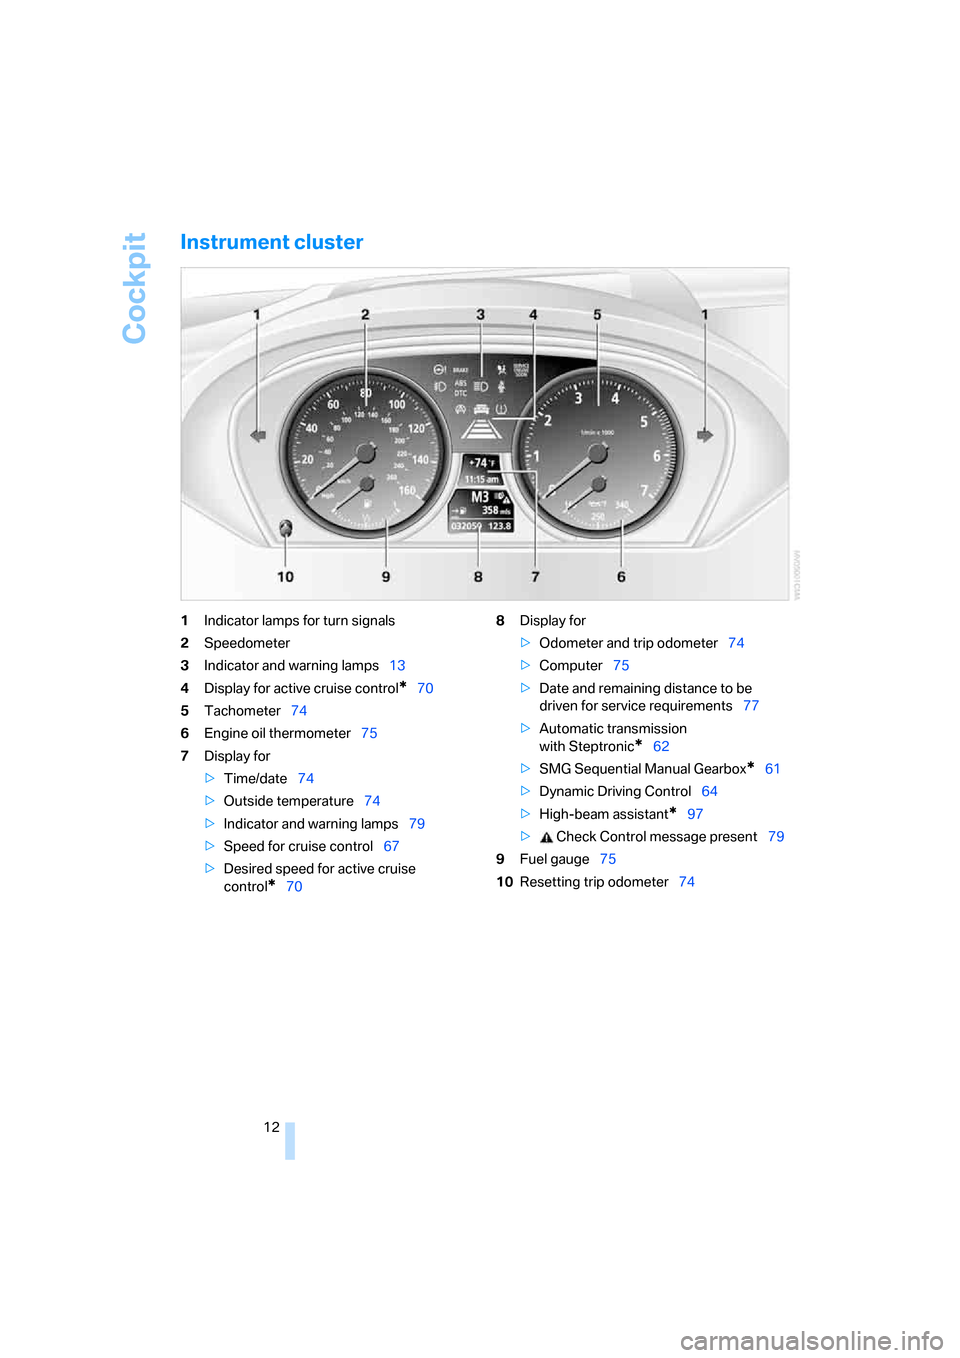
Instrument cluster
1Indicator lamps for turn signals
2Speedometer
3Indicator and warning lamps13
4Display for active cruise control
*70
5Tachometer74
6Engine oil thermometer75
7Display for
>Time/date74
>Outside temperature74
>Indicator and warning lamps79
>Speed for cruise control67
>Desired speed for active cruise
control
*708Display for
>Odometer and trip odometer74
>Computer75
>Date and remaining distance to be
driven for service requirements77
>Automatic transmission
with Steptronic
*62
>SMG Sequential Manual Gearbox
*61
>Dynamic Driving Control64
>High-beam assistant
*97
> Check Control message present79
9Fuel gauge75
10Resetting trip odometer74
Page 14 of 236
At a glance
13Reference
Controls
Driving tips
Communications
Navigation
Entertainment
Mobility
Indicator and warning lamps
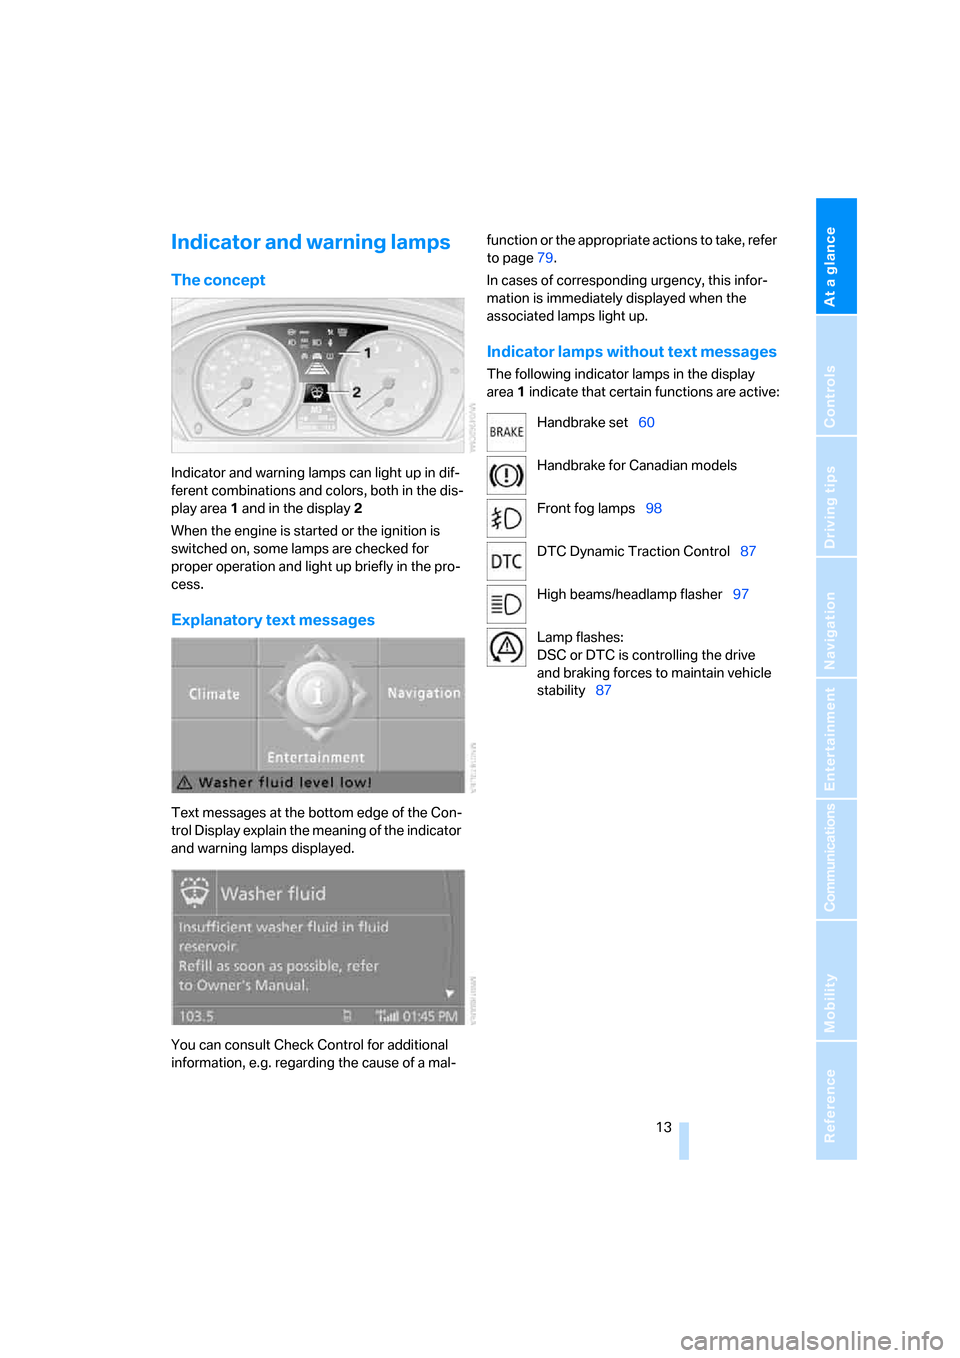
The concept
Indicator and warning lamps can light up in dif-
ferent combinations and colors, both in the dis-
play area1 and in the display2
When the engine is started or the ignition is
switched on, some lamps are checked for
proper operation and light up briefly in the pro-
cess.
Explanatory text messages
Text messages at the bottom edge of the Con-
trol Display explain the meaning of the indicator
and warning lamps displayed.
You can consult Check Control for additional
information, e.g. regarding the cause of a mal-function or the appropriate actions to take, refer
to page79.
In cases of corresponding urgency, this infor-
mation is immediately displayed when the
associated lamps light up.
Indicator lamps without text messages
The following indicator lamps in the display
area1 indicate that certain functions are active:
Handbrake set60
Handbrake for Canadian models
Front fog lamps98
DTC Dynamic Traction Control87
High beams/headlamp flasher97
Lamp flashes:
DSC or DTC is controlling the drive
and braking forces to maintain vehicle
stability87
Page 36 of 236
Controls
35Reference
At a glance
Driving tips
Communications
Navigation
Entertainment
Mobility
The handle recesses on the interior trim of the
luggage compartment lid make it easier to pull
down.
If special circumstances should make it abso-
lutely necessary to operate the vehicle with the
luggage compartment lid open:
1.Coupe: close both windows and the glass
sunroof
*.
Convertible: with the convertible top
closed, close all windows, including the rear
window.
2.Increase the air volume of the automatic
climate control to a high level, refer to
page102.
Luggage compartment
There are four lashing eyes on the inner corners
of the luggage compartment for securing lug-
gage nets
* or securing straps to fix luggage in
position.
Also refer to Securing cargo, page117.
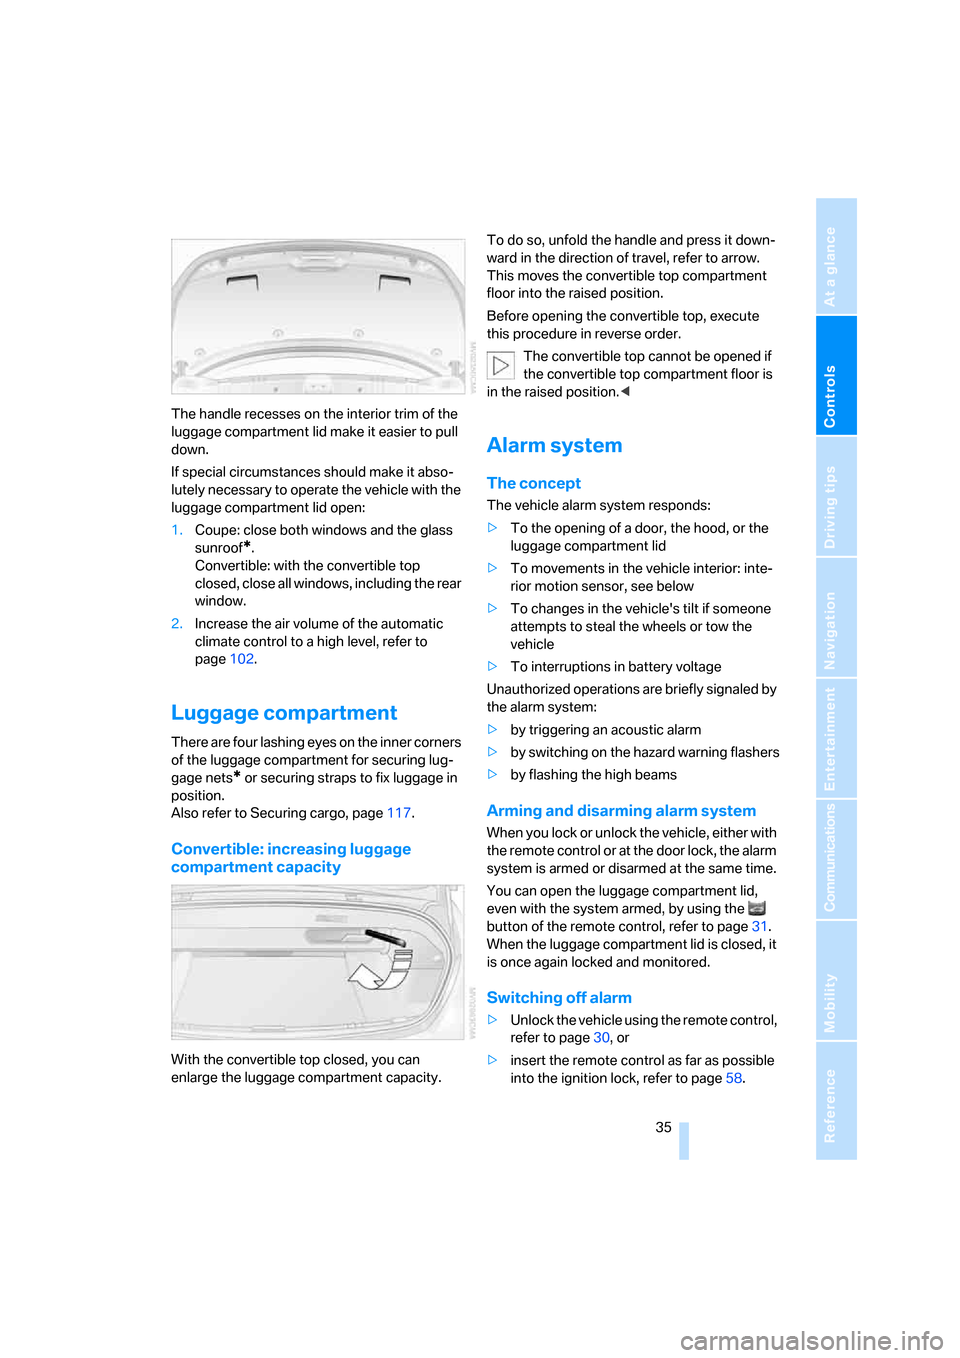
Convertible: increasing luggage
compartment capacity
With the convertible top closed, you can
enlarge the luggage compartment capacity.To do so, unfold the handle and press it down-
ward in the direction of travel, refer to arrow.
This moves the convertible top compartment
floor into the raised position.
Before opening the convertible top, execute
this procedure in reverse order.
The convertible top cannot be opened if
the convertible top compartment floor is
in the raised position.<
Alarm system
The concept
The vehicle alarm system responds:
>To the opening of a door, the hood, or the
luggage compartment lid
>To movements in the vehicle interior: inte-
rior motion sensor, see below
>To changes in the vehicle's tilt if someone
attempts to steal the wheels or tow the
vehicle
>To interruptions in battery voltage
Unauthorized operations are briefly signaled by
the alarm system:
>by triggering an acoustic alarm
>by switching on
the hazard warning flashers
>by flashing the high beams
Arming and disarming alarm system
When you lock or unlock the vehicle, either with
the remote control or at the door lock, the alarm
system is armed or disarmed at the same time.
You can open the luggage compartment lid,
even with the system armed, by using the
button of the remote control, refer to page31.
When the luggage compartment lid is closed, it
is once again locked and monitored.
Switching off alarm
>Unlock the vehicle using the remote control,
refer to page30, or
>insert the remote control as far as possible
into the ignition lock, refer to page58.
Page 65 of 236
Driving
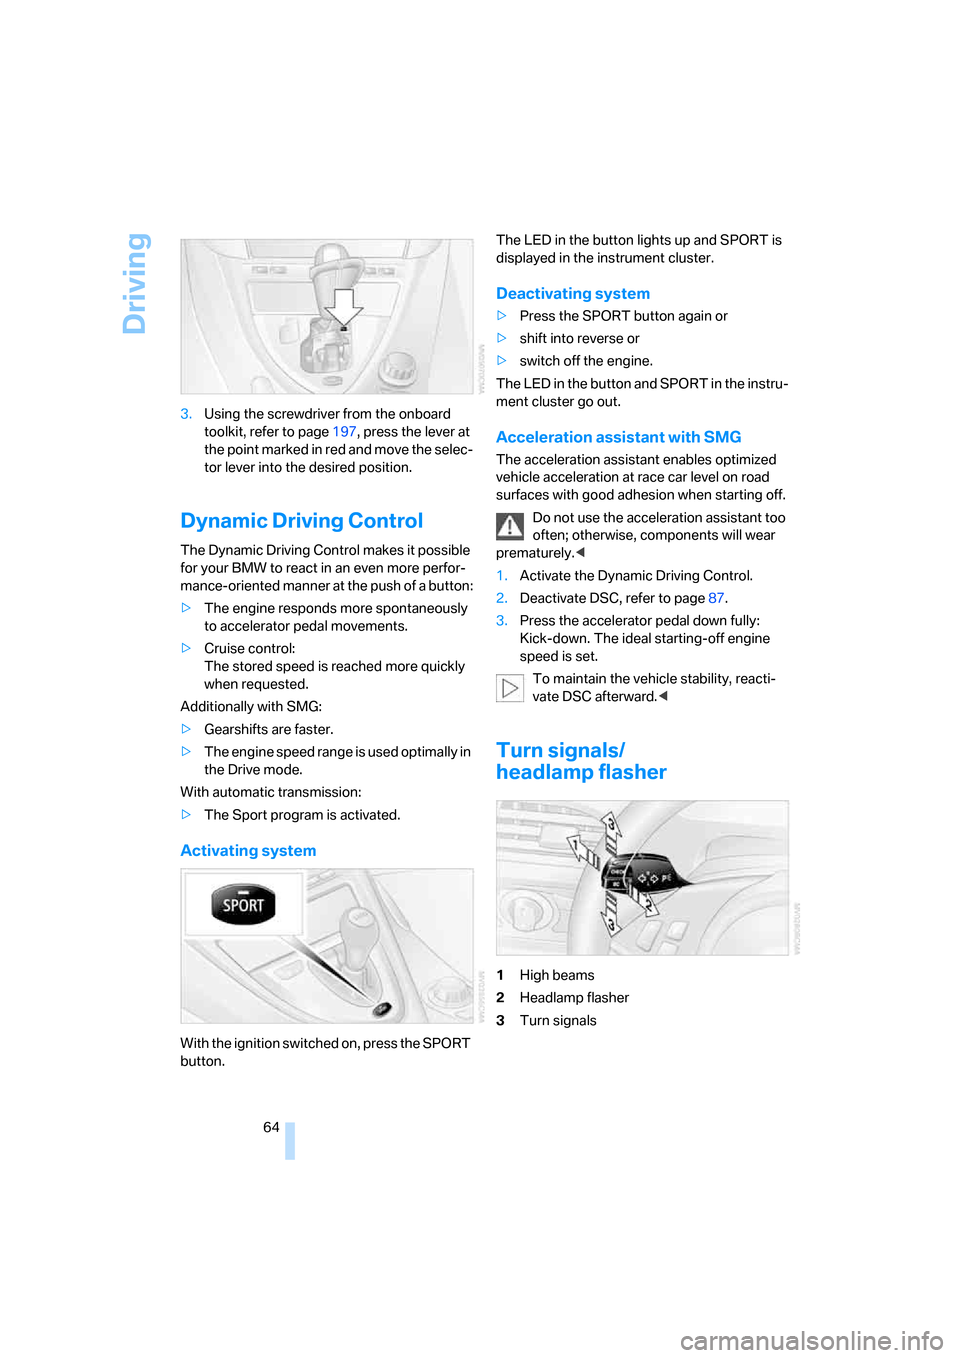
64 3.Using the screwdriver from the onboard
toolkit, refer to page197, press the lever at
the point marked in red and move the selec-
tor lever into the desired position.
Dynamic Driving Control
The Dynamic Driving Control makes it possible
for your BMW to react in an even more perfor-
mance-oriented manner at the push of a button:
>The engine responds more spontaneously
to accelerator pedal movements.
>Cruise control:
The stored speed is reached more quickly
when requested.
Additionally with SMG:
>Gearshifts are faster.
>The engine speed range is used optimally in
the Drive mode.
With automatic transmission:
>The Sport program is activated.
Activating system
With the ignition switched on, press the SPORT
button.The LED in the button lights up and SPORT is
displayed in the instrument cluster.
Deactivating system
>Press the SPORT button again or
>shift into reverse or
>switch off the engine.
The LED in the button and SPORT in the instru-
ment cluster go out.
Acceleration assistant with SMG
The acceleration assistant enables optimized
vehicle acceleration at race car level on road
surfaces with good adhesion when starting off.
Do not use the acceleration assistant too
often; otherwise, components will wear
prematurely.<
1.Activate the Dynamic Driving Control.
2.Deactivate DSC, refer to page87.
3.Press the accelerator pedal down fully:
Kick-down. The ideal starting-off engine
speed is set.
To maintain the vehicle stability, reacti-
vate DSC afterward.<
Turn signals/
headlamp flasher
1High beams
2Headlamp flasher
3Turn signals
Page 97 of 236
Lamps
96
Lamps
Parking lamps/low beams
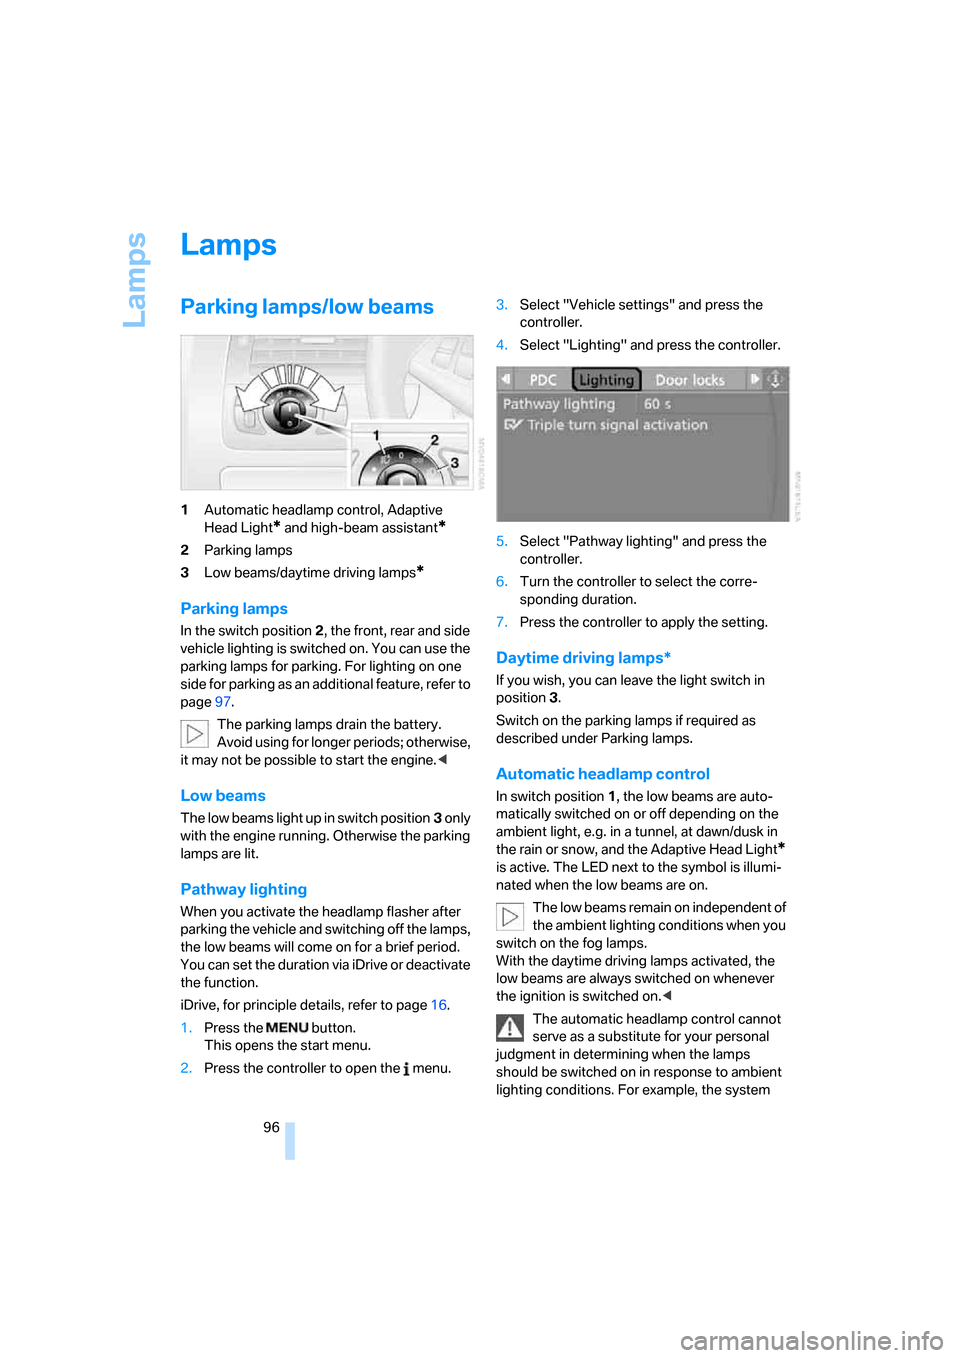
1Automatic headlamp control, Adaptive
Head Light
* and high-beam assistant*
2Parking lamps
3Low beams/daytime driving lamps
*
Parking lamps
In the switch position2, the front, rear and side
vehicle lighting is switched on. You can use the
parking lamps for parking. For lighting on one
side for parking as an additional feature, refer to
page97.
The parking lamps drain the battery.
Avoid using for longer periods; otherwise,
it may not be possible to start the engine.<
Low beams
The low beams light up in switch position3 only
with the engine running. Otherwise the parking
lamps are lit.
Pathway lighting
When you activate the headlamp flasher after
parking the vehicle and switching off the lamps,
the low beams will come on for a brief period.
You can set the duration via iDrive or deactivate
the function.
iDrive, for principle details, refer to page16.
1.Press the button.
This opens the start menu.
2.Press the controller to open the menu.3.Select "Vehicle settings" and press the
controller.
4.Select "Lighting" and press the controller.
5.Select "Pathway lighting" and press the
controller.
6.Turn the controller to select the corre-
sponding duration.
7.Press the controller to apply the setting.
Daytime driving lamps*
If you wish, you can leave the light switch in
position3.
Switch on the parking lamps if required as
described under Parking lamps.
Automatic headlamp control
In switch position1, the low beams are auto-
matically switched on or off depending on the
ambient light, e.g. in a tunnel, at dawn/dusk in
the rain or snow, and the Adaptive Head Light
*
is active. The LED next to the symbol is illumi-
nated when the low beams are on.
The low beams remain on independent of
the ambient lighting conditions when you
switch on the fog lamps.
With the daytime driving lamps activated, the
low beams are always switched on whenever
the ignition is switched on.<
The automatic headlamp control cannot
serve as a substitute for your personal
judgment in determining when the lamps
should be switched on in response to ambient
lighting conditions. For example, the system
Page 98 of 236
Controls
97Reference
At a glance
Driving tips
Communications
Navigation
Entertainment
Mobility
cannot detect fog. To avoid safety risks, you
should always switch on the lamps manually
under these conditions.<
Adaptive Head Light*
The concept
Adaptive Head Light is a variable headlamp
control system that enables better illumination
of the road surface. Depending on the steering
angle and other parameters, the light from the
headlamp follows the course of the road.
Activating Adaptive Head Light
In switch position1, the Adaptive Head Light is
active and the automatic headlamp control is
switched on.
To avoid blinding oncoming traffic, the Adaptive
Head Light is not active when driving in reverse
and points toward the passenger side when the
vehicle is stopped.
Malfunction
The LED next to the symbol for automatic head-
lamp control flashes. The Adaptive Head Light
is malfunctioning or has failed. Have the system
checked as soon as possible.
High beams/
roadside parking lamps
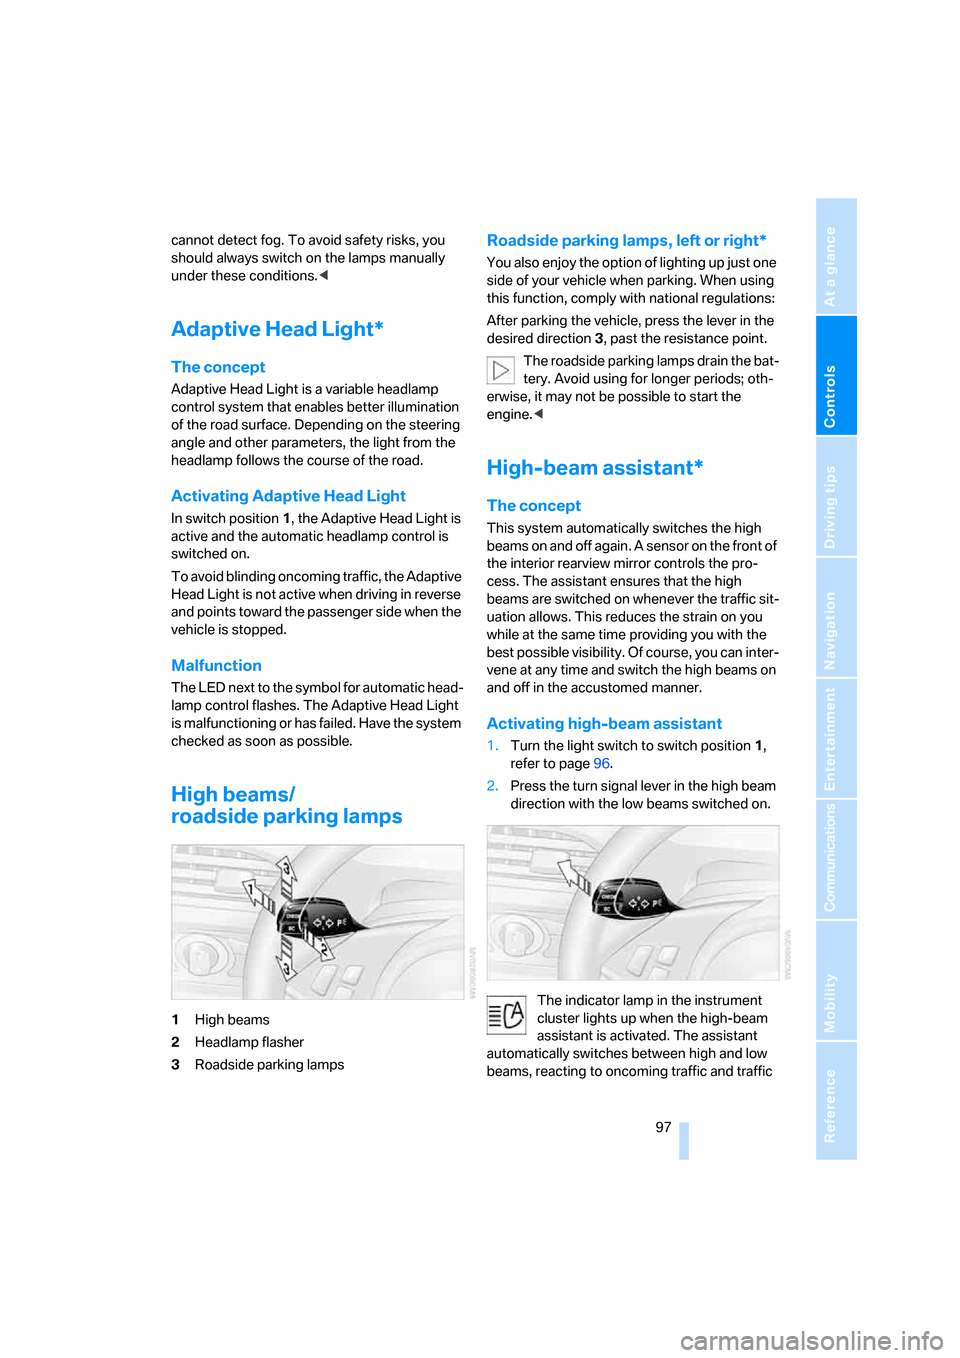
1High beams
2Headlamp flasher
3Roadside parking lamps
Roadside parking lamps, left or right*
You also enjoy the option of lighting up just one
side of your vehicle when parking. When using
this function, comply with national regulations:
After parking the vehicle, press the lever in the
desired direction3, past the resistance point.
The roadside parking lamps drain the bat-
tery. Avoid using for longer periods; oth-
erwise, it may not be possible to start the
engine.<
High-beam assistant*
The concept
This system automatically switches the high
beams on and off again. A sensor on the front of
the interior rearview mirror controls the pro-
cess. The assistant ensures that the high
beams are switched on whenever the traffic sit-
uation allows. This reduces the strain on you
while at the same time providing you with the
best possible visibility. Of course, you can inter-
vene at any time and switch the high beams on
and off in the accustomed manner.
Activating high-beam assistant
1.Turn the light switch to switch position1,
refer to page96.
2.Press the turn signal lever in the high beam
direction with the low beams switched on.
The indicator lamp in the instrument
cluster lights up when the high-beam
assistant is activated. The assistant
automatically switches between high and low
beams, reacting to oncoming traffic and traffic
Page 99 of 236
Lamps
98 ahead and to well-lit areas such as towns and
cities.
Manually switching between high and
low beams
You can intervene at any time if you wish or the
situation requires.
>If the high-beam assistant has switched on
the high beams, but you want to use the low
beams, simply switch to the low beams with
the turn signal lever. This also deactivates
the high-beam assistant.
To reactivate the system, briefly press the
turn signal lever in the high beam direction
again.
>If the high-beam assistant has switched on
the low beams, but you want to use the high
beams, switch to the high beams in the
accustomed manner. The system is deacti-
vated in the process and you must switch to
the low beams manually.
To reactivate the system, briefly press the
turn signal lever in the high beam direction
again.
>You use the headlamp flasher in the usual
way when the low beams are on.
System limits
The high-beam assistant cannot replace
personal decisions about the benefits of
using high beams. In situations that require
them, you should switch to the low beams man-
ually to avoid a safety risk.<
In the following sample situations, the system
either does not function or functions only in a
limited way and a personal reaction may be
required:
>Under extremely unfavorable weather con-
ditions, such as heavy fog or precipitation
>To make out poorly-lit road users such as
pedestrians, cyclists, people on horseback,
horse-drawn vehicles, train or ship traffic
close to the road and wild animals crossing
the road>In tight curves, on steep hilltops or in
depressions, with cross traffic or partially
concealed oncoming traffic on the freeway
>In poorly lit places and with highly reflective
signs
>In the low speed range
>When the windshield is fogged up, dirty or
covered with stickers, decals, etc. in the
area of the interior rearview mirror
>When the sensor is dirty. Clean the sensor
on the front side of the interior rearview mir-
ror with a cloth moistened with a small
amount of glass cleaner.
Front fog lamps
The parking lamps or low beams must
be switched on for the fog lamps to
operate. The green indicator lamp in
the instrument cluster lights up when the fog
lamps are switched on.
The fog lamps are switched off whenever the
high beams are switched on.
If the automatic headlamp control is acti-
vated, the low beams will come on auto-
matically when you switch on the fog lamps.<