2006 BMW 650I COUPE navigation system
[x] Cancel search: navigation systemPage 138 of 236
Navigation
Driving tips
137Reference
At a glance
Controls
Communications
Entertainment
Mobility
What to do if …
What to do if …
>a navigation DVD is inserted, but the
request to insert the DVD is displayed on
the Control Display?
The navigation DVD may not be the right
DVD for the navigation system. The DVD is
labeled accordingly.
>you request the current position of your
vehicle, but do not receive a precise dis-
play?
The system is unable to receive enough
GPS signals at your current position due to
obstructions, your current position is not
yet available on your navigation DVD, or the
system is in the process of calculating your
current position. As a rule, reception is
guaranteed in the open air.
>the destination guidance does not accept a
destination?
The data of the destination is not stored on
the navigation DVD that is loaded. Select a
destination that is as close as possible to
the original.
>the destination guidance does not accept a
destination without the street name?
On the navigation DVD, no downtown area
can be determined for the city or town
entered. Enter any street, or a destination
such as the railway station etc., then start
the destination guidance.
>you want to enter a destination for the des-
tination guidance, but it is not possible to
select the letters for your desired entry?
The data of the destination is not stored on
the navigation DVD that is loaded. In this
case, the system will not offer you any let-
ters to choose from. Select a destination
that is as close as possible to the original.>the system stops furnishing directions on
which way to turn as you approach intersec-
tions?
You are driving in an area that has not yet
been completely recorded on the naviga-
tion DVD. Instead of an arrow indicating a
turn, you will see an arrow which indicates
the general direction of your planned route.
Or you have left the recommended route
and the system requires a few seconds to
calculate a new recommended route.
>the navigation system does not react to
entries?
If the battery has just been reconnected
after having been disconnected, it then
takes up to 10 minutes before the system is
once again operational.
Page 146 of 236
Navigation
Entertainment
Driving tips
145Reference
At a glance
Controls
Communications
Mobility
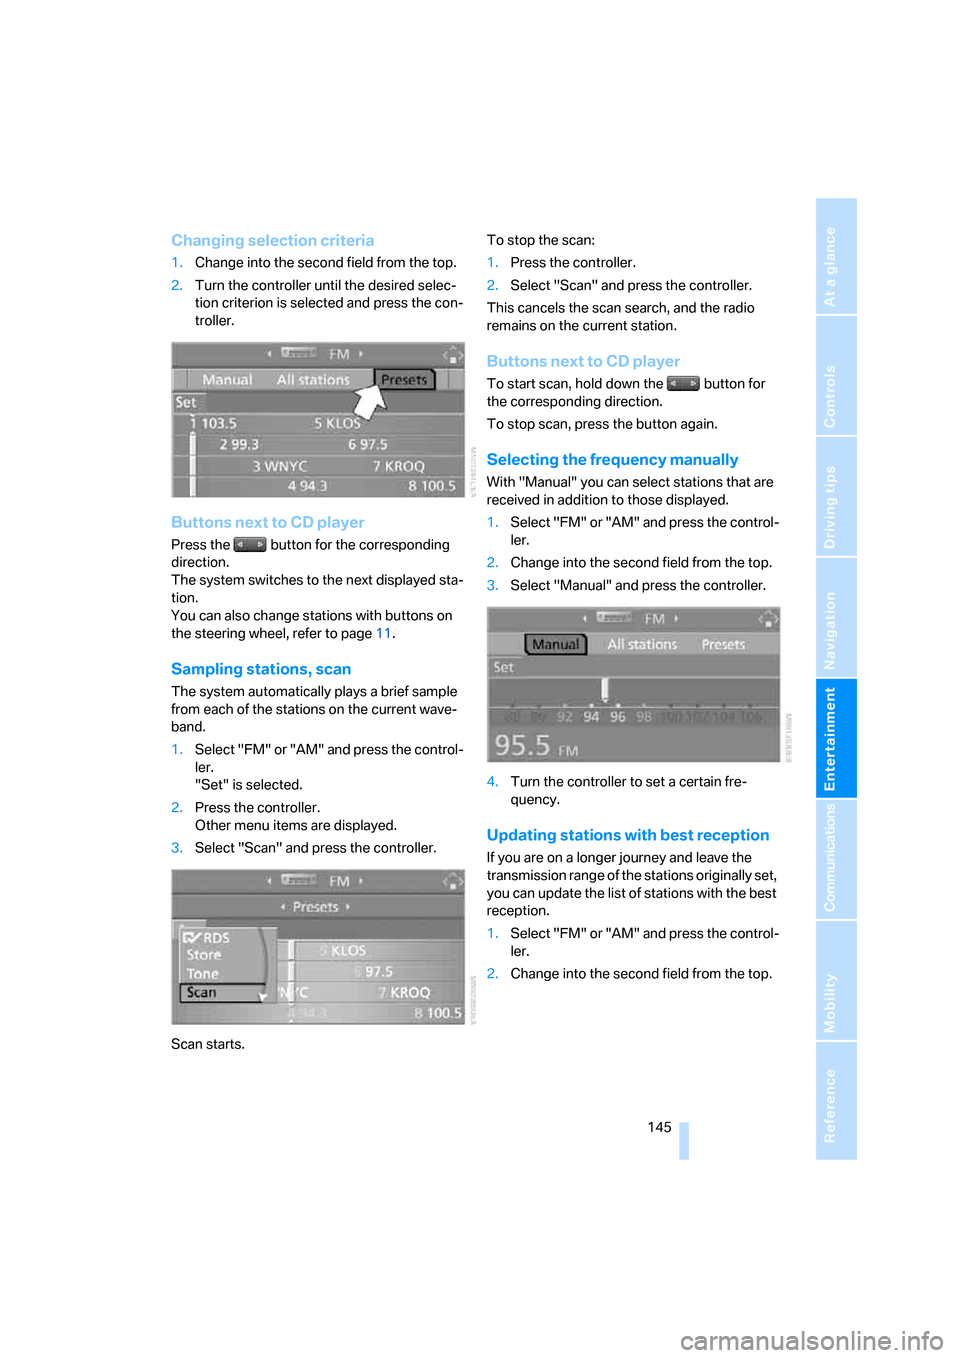
Changing selection criteria
1.Change into the second field from the top.
2.Turn the controller until the desired selec-
tion criterion is selected and press the con-
troller.
Buttons next to CD player
Press the button for the corresponding
direction.
The system switches to the next displayed sta-
tion.
You can also change stations with buttons on
the steering wheel, refer to page11.
Sampling stations, scan
The system automatically plays a brief sample
from each of the stations on the current wave-
band.
1.Select "FM" or "AM" and press the control-
ler.
"Set" is selected.
2.Press the controller.
Other menu items are displayed.
3.Select "Scan" and press the controller.
Scan starts.To stop the scan:
1.Press the controller.
2.Select "Scan" and press the controller.
This cancels the scan search, and the radio
remains on the current station.
Buttons next to CD player
To start scan, hold down the button for
the corresponding direction.
To stop scan, press the button again.
Selecting the frequency manually
With "Manual" you can select stations that are
received in addition to those displayed.
1.Select "FM" or "AM" and press the control-
ler.
2.Change into the second field from the top.
3.Select "Manual" and press the controller.
4.Turn the controller to set a certain fre-
quency.
Updating stations with best reception
If you are on a longer journey and leave the
transmission range of the stations originally set,
you can update the list of stations with the best
reception.
1.Select "FM" or "AM" and press the control-
ler.
2.Change into the second field from the top.
Page 148 of 236
Navigation
Entertainment
Driving tips
147Reference
At a glance
Controls
Communications
Mobility
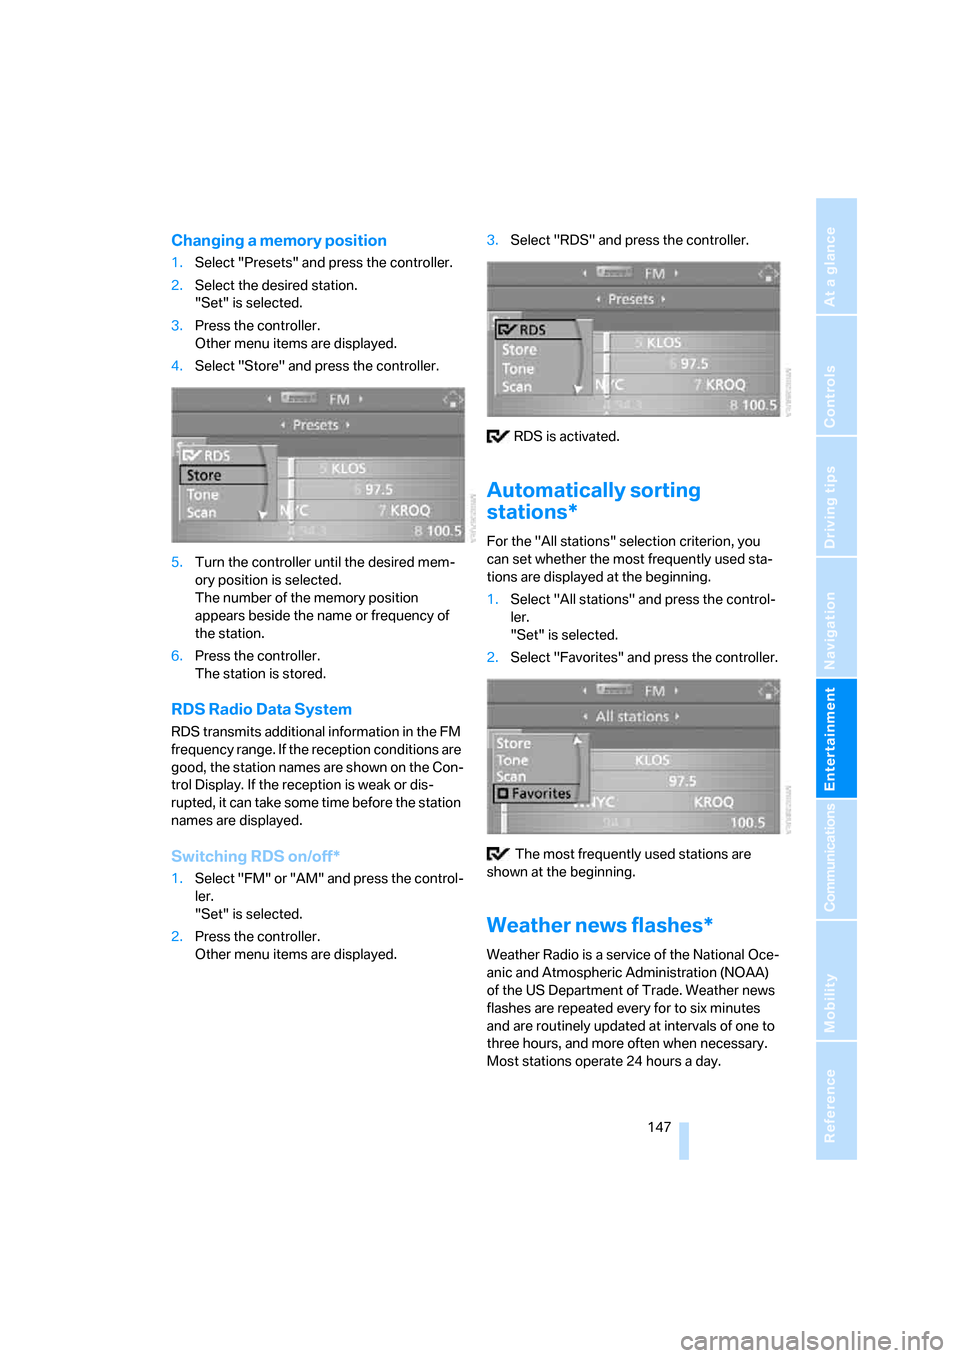
Changing a memory position
1.Select "Presets" and press the controller.
2.Select the desired station.
"Set" is selected.
3.Press the controller.
Other menu items are displayed.
4.Select "Store" and press the controller.
5.Turn the controller until the desired mem-
ory position is selected.
The number of the memory position
appears beside the name or frequency of
the station.
6.Press the controller.
The station is stored.
RDS Radio Data System
RDS transmits additional information in the FM
frequency range. If the reception conditions are
good, the station names are shown on the Con-
trol Display. If the reception is weak or dis-
rupted, it can take some time before the station
names are displayed.
Switching RDS on/off*
1.Select "FM" or "AM" and press the control-
ler.
"Set" is selected.
2.Press the controller.
Other menu items are displayed.3.Select "RDS" and press the controller.
RDS is activated.
Automatically sorting
stations*
For the "All stations" selection criterion, you
can set whether the most frequently used sta-
tions are displayed at the beginning.
1.Select "All stations" and press the control-
ler.
"Set" is selected.
2.Select "Favorites" and press the controller.
The most frequently used stations are
shown at the beginning.
Weather news flashes*
Weather Radio is a service of the National Oce-
anic and Atmospheric Administration (NOAA)
of the US Department of Trade. Weather news
flashes are repeated every for to six minutes
and are routinely updated at intervals of one to
three hours, and more often when necessary.
Most stations operate 24 hours a day.
Page 156 of 236
Navigation
Entertainment
Driving tips
155Reference
At a glance
Controls
Communications
Mobility
To exit from the menu:
Select the arrow and press the controller.
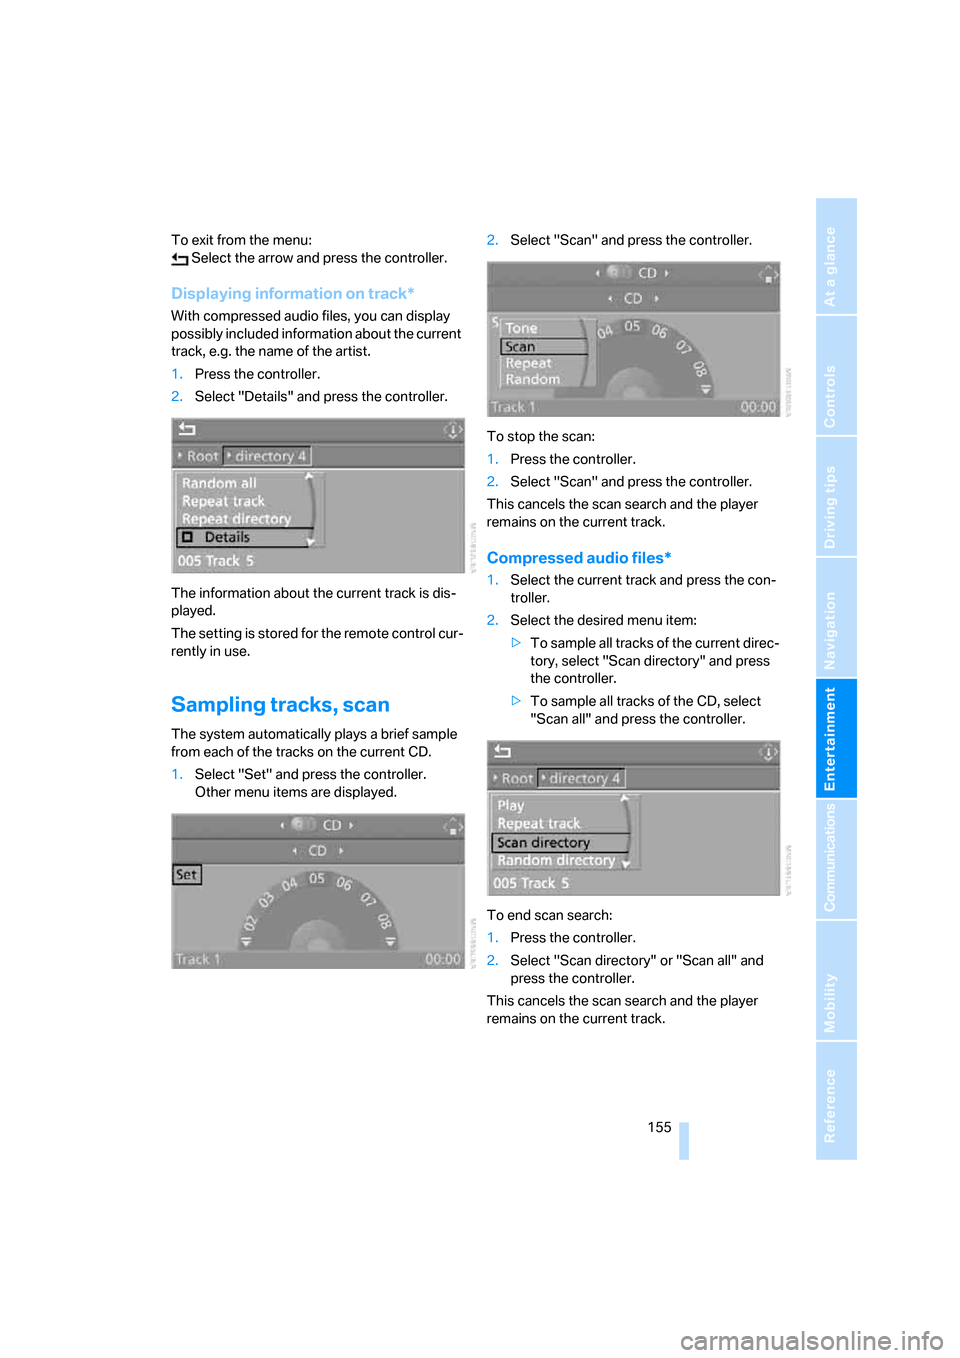
Displaying information on track*
With compressed audio files, you can display
possibly included information about the current
track, e.g. the name of the artist.
1.Press the controller.
2.Select "Details" and press the controller.
The information about the current track is dis-
played.
The setting is stored for the remote control cur-
rently in use.
Sampling tracks, scan
The system automatically plays a brief sample
from each of the tracks on the current CD.
1.Select "Set" and press the controller.
Other menu items are displayed.2.Select "Scan" and press the controller.
To stop the scan:
1.Press the controller.
2.Select "Scan" and press the controller.
This cancels the scan search and the player
remains on the current track.
Compressed audio files*
1.Select the current track and press the con-
troller.
2.Select the desired menu item:
>To sample all tracks of the current direc-
tory, select "Scan directory" and press
the controller.
>To sample all tracks of the CD, select
"Scan all" and press the controller.
To end scan search:
1.Press the controller.
2.Select "Scan directory" or "Scan all" and
press the controller.
This cancels the scan search and the player
remains on the current track.
Page 158 of 236
Navigation
Entertainment
Driving tips
157Reference
At a glance
Controls
Communications
Mobility
Fast forward/reverse
Buttons next to CD player:
Press and hold the button for the corre-
sponding direction.
CD magazine
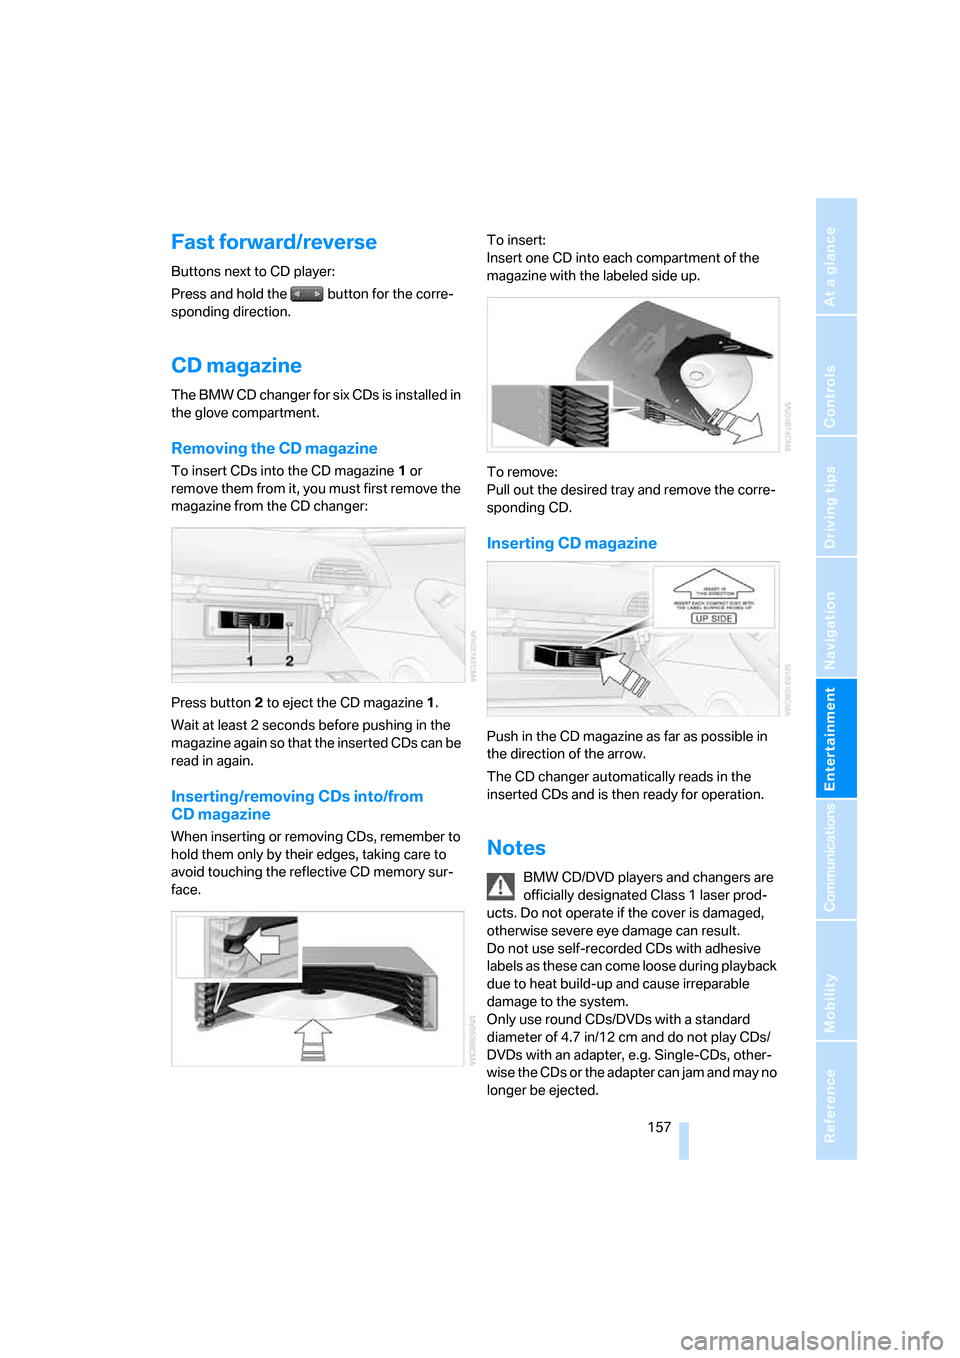
The BMW CD changer for six CDs is installed in
the glove compartment.
Removing the CD magazine
To insert CDs into the CD magazine 1 or
remove them from it, you must first remove the
magazine from the CD changer:
Press button2 to eject the CD magazine1.
Wait at least 2 seconds before pushing in the
magazine again so that the inserted CDs can be
read in again.
Inserting/removing CDs into/from
CD magazine
When inserting or removing CDs, remember to
hold them only by their edges, taking care to
avoid touching the reflective CD memory sur-
face.To insert:
Insert one CD into each compartment of the
magazine with the labeled side up.
To remove:
Pull out the desired tray and remove the corre-
sponding CD.
Inserting CD magazine
Push in the CD magazine as far as possible in
the direction of the arrow.
The CD changer automatically reads in the
inserted CDs and is then ready for operation.
Notes
BMW CD/DVD players and changers are
officially designated Class 1 laser prod-
ucts. Do not operate if the cover is damaged,
otherwise severe eye damage can result.
Do not use self-recorded CDs with adhesive
labels as these can come loose during playback
due to heat build-up and cause irreparable
damage to the system.
Only use round CDs/DVDs with a standard
diameter of 4.7 in/12 cm and do not play CDs/
DVDs with an adapter, e.g. Single-CDs, other-
wise the CDs or the adapter can jam and may no
longer be ejected.
Page 164 of 236

163
Entertainment
Reference
At a glance
Controls
Driving tips Communications
Navigation
Mobility
Making calls with car phone:
BMW Assist calls
You can use the car phone via the handsfree
system for BMW Assist calls.
When the status information "BMW Assist" or
"BMW Service" is displayed in "Communica-
tion", only BMW Assist calls are possible.
It may not be possible to establish a telephone
connection using the mobile phone while a con-
nection is being established to BMW Assist
or while a call to BMW Assist is already in
progress. If this happens, you must unpair the
mobile phone and the vehicle if you wish to
place a call with the mobile phone.
Initial operation
Logging on mobile phone on vehicle
The following prerequisites must be met:
>The mobile phone is ready to operate.
>The Bluetooth links of the vehicle, refer to
page165, and the mobile phone are active.
>Depending on the mobile phone, presets in
the mobile phone are required: e.g. acti-
vated via the menu item Bluetooth or the
menu item Connection not with confirma-
tion.
>To log on, specify any desired number as
the Bluetooth passkey, e.g. 1. This Blue-
tooth passkey is no longer required follow-
ing successful logon.
>The ignition is switched on.
Only log on the mobile phone with the
vehicle stopped; otherwise you may
become distracted and inadvertently endanger
your passengers and other road users.<
Switching on ignition
1.Insert the remote control as far as possible
into the ignition lock.
2.S w i t c h o n t h e s w i t c h o n i g n i t i o n b y p r e s s i n g
the Start/Stop button without depressing
the brake or clutch pedal.
Preparation with iDrive
iDrive, for principle details, refer to page16.
1.Press the button to open the start
menu.
2.Open the menu by pressing the controller.
3.Select "Communication settings" and
press the controller.
4.Select "Bluetooth" and press the controller.
5.Select "Phone" and press the controller.
Preparation with mobile phone
6.Additional operations must be carried out
on the mobile phone and differ depending
on the model, refer to the operating instruc-
tions of your mobile phone, e.g. find, con-
nect or link under Bluetooth device.
Page 170 of 236
169
Entertainment
Reference
At a glance
Controls
Driving tips Communications
Navigation
Mobility
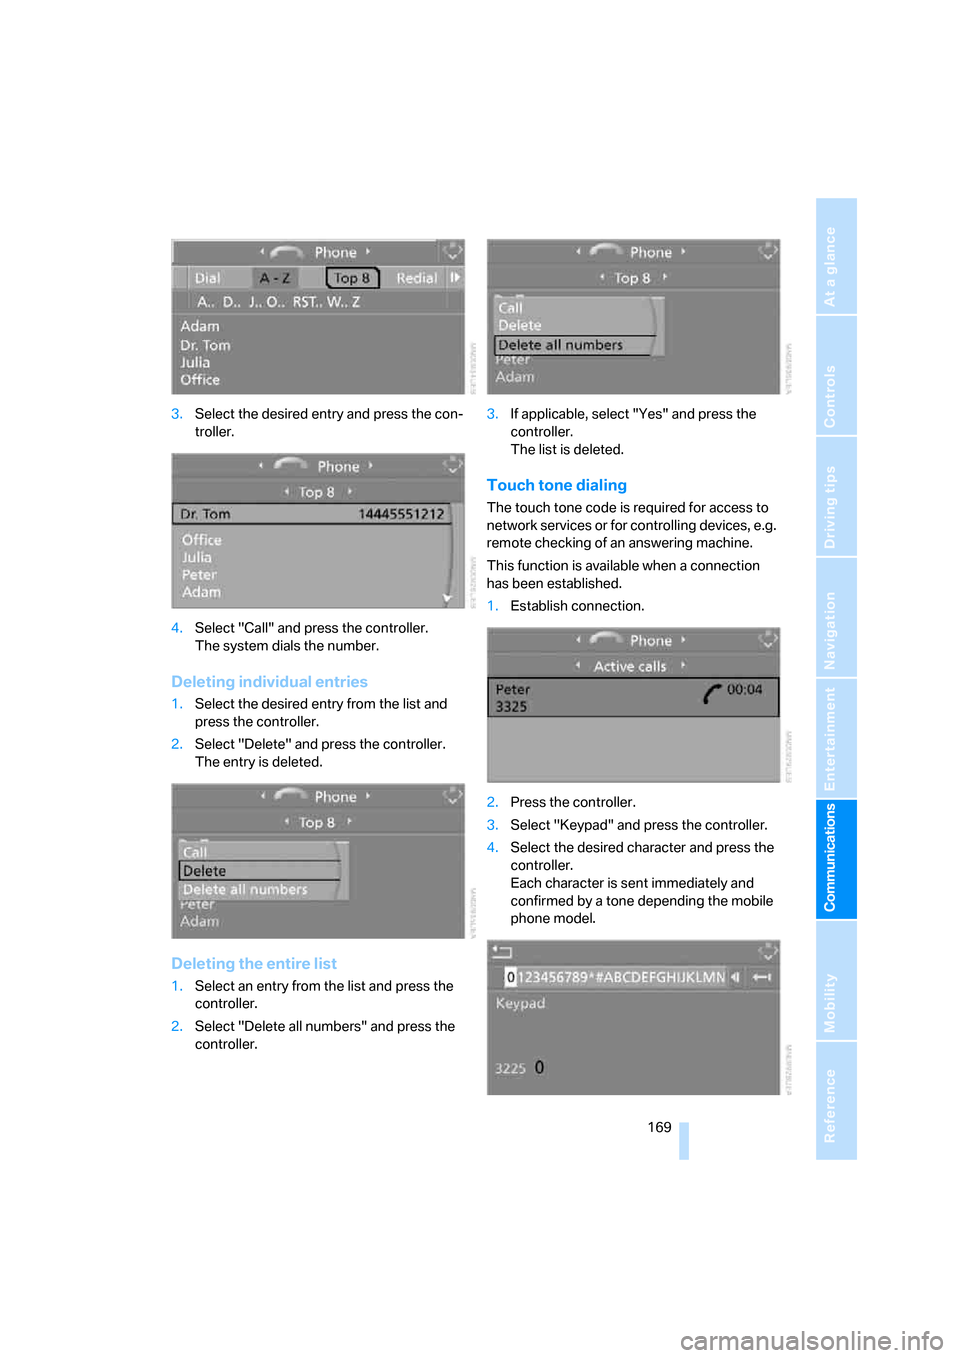
3.Select the desired entry and press the con-
troller.
4.Select "Call" and press the controller.
The system dials the number.
Deleting individual entries
1.Select the desired entry from the list and
press the controller.
2.Select "Delete" and press the controller.
The entry is deleted.
Deleting the entire list
1.Select an entry from the list and press the
controller.
2.Select "Delete all numbers" and press the
controller.3.If applicable, select "Yes" and press the
controller.
The list is deleted.
Touch tone dialing
The touch tone code is required for access to
network services or for controlling devices, e.g.
remote checking of an answering machine.
This function is available when a connection
has been established.
1.Establish connection.
2.Press the controller.
3.Select "Keypad" and press the controller.
4.Select the desired character
and press the
controller.
Each character is sent immediately and
confirmed by a tone depending the mobile
phone model.
Page 172 of 236
171
Entertainment
Reference
At a glance
Controls
Driving tips Communications
Navigation
Mobility
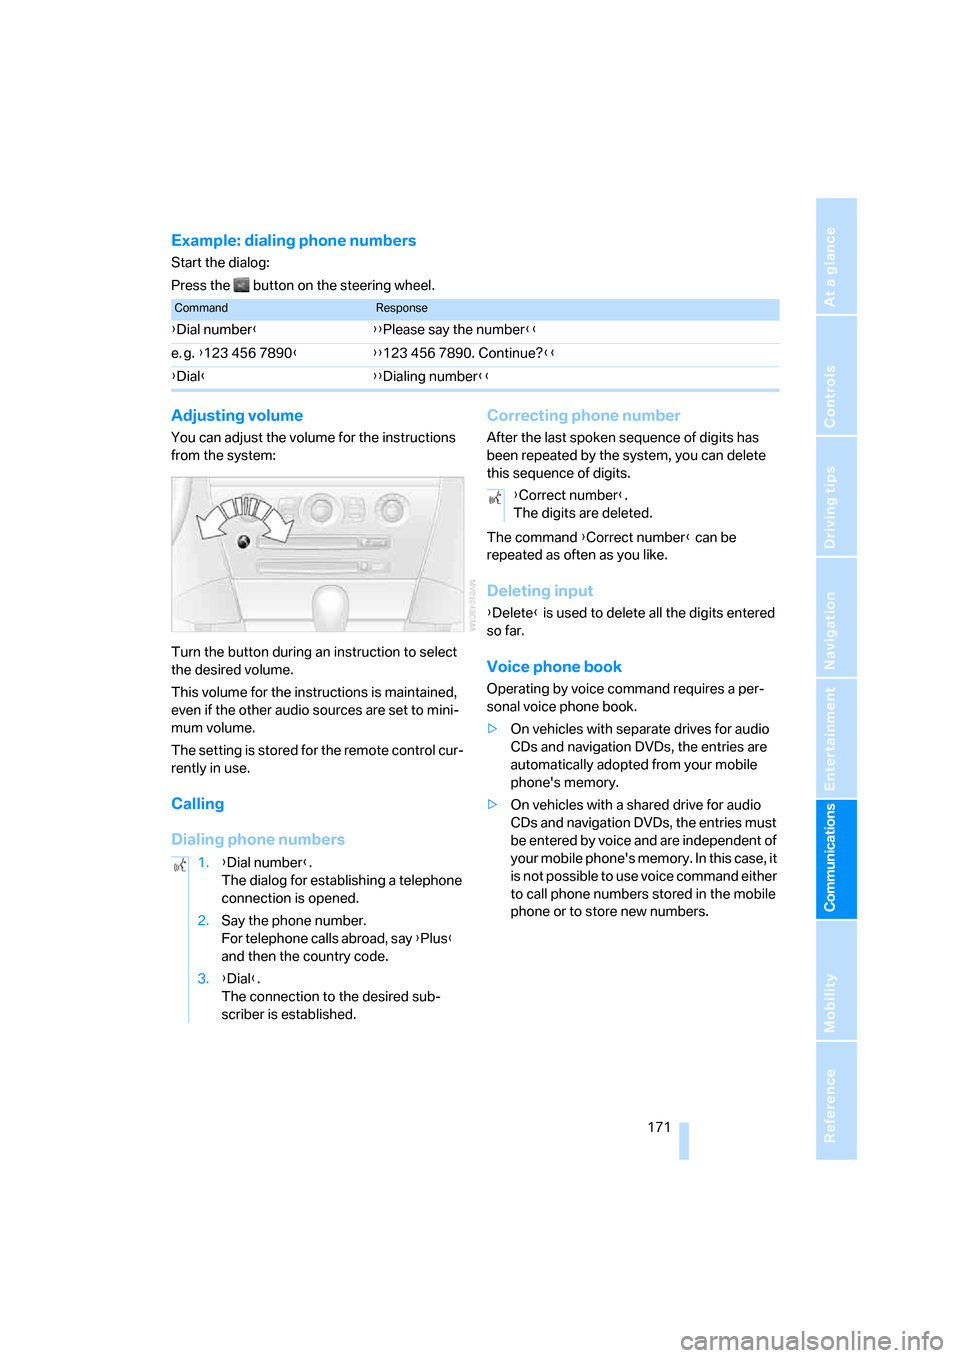
Example: dialing phone numbers
Start the dialog:
Press the button on the steering wheel.
Adjusting volume
You can adjust the volume for the instructions
from the system:
Turn the button during an instruction to select
the desired volume.
This volume for the instructions is maintained,
even if the other audio sources are set to mini-
mum volume.
The setting is stored for the remote control cur-
rently in use.
Calling
Dialing phone numbersCorrecting phone number
After the last spoken sequence of digits has
been repeated by the system, you can delete
this sequence of digits.
The command {Correct number} can be
repeated as often as you like.
Deleting input
{Delete} is used to delete all the digits entered
so far.
Voice phone book
Operating by voice command requires a per-
sonal voice phone book.
>On vehicles with separate drives for audio
CDs and navigation DVDs, the entries are
automatically adopted from your mobile
phone's memory.
>On vehicles with a shared drive for audio
CDs and navigation DVDs, the entries must
be entered by voice and are independent of
your mobile phone's memory. In this case, it
is not possible to use voice command either
to call phone numbers stored in the mobile
phone or to store new numbers.
CommandResponse
{Dial number}{{Please say the number}}
e. g. {123 456 7890}{{123 456 7890. Continue?}}
{Dial}{{Dialing number}}
1.{Dial number}.
The dialog for establishing a telephone
connection is opened.
2.Say the phone number.
For telephone calls abroad, say {Plus}
and then the country code.
3.{Dial}.
The connection to the desired sub-
scriber is established.
{Correct number}.
The digits are deleted.