2006 BMW 650I COUPE window
[x] Cancel search: windowPage 45 of 236
Opening and closing
44 tion indicated by the arrow until the rear
window is completely open.
Closing
Perform the following work steps with the
assistance of a second person and with
the doors open to prevent injury and damage to
the convertible top.<
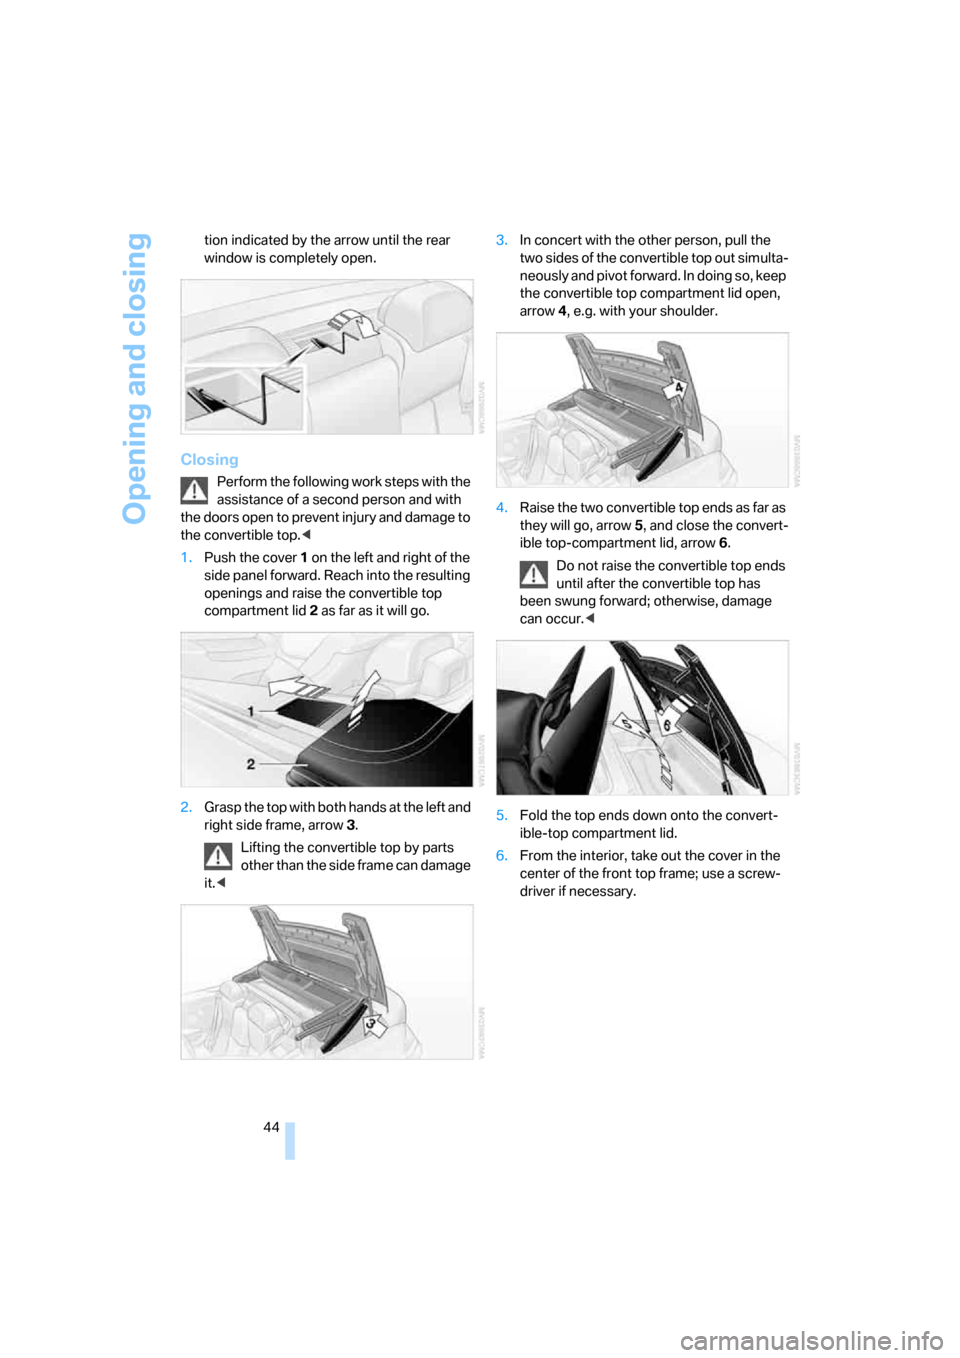
1.Push the cover 1 on the left and right of the
side panel forward. Reach into the resulting
openings and raise the convertible top
compartment lid2 as far as it will go.
2.Grasp the top with both hands at the left and
right side frame, arrow3.
Lifting the convertible top by parts
other than the side frame can damage
it.<3.In concert with the other person, pull the
two sides of the convertible top out simulta-
neously and pivot forward. In doing so, keep
the convertible top compartment lid open,
arrow4, e.g. with your shoulder.
4.Raise the two convertible top ends as far as
they will go, arrow5, and close the convert-
ible top-compartment lid, arrow6.
Do not raise the convertible top ends
until after the convertible top has
been swung forward; otherwise, damage
can occur.<
5.Fold the top ends down onto the convert-
ible-top compartment lid.
6.From the interior, take out the cover in the
center of the front top frame; use a screw-
driver if necessary.
Page 46 of 236
Controls
45Reference
At a glance
Driving tips
Communications
Navigation
Entertainment
Mobility
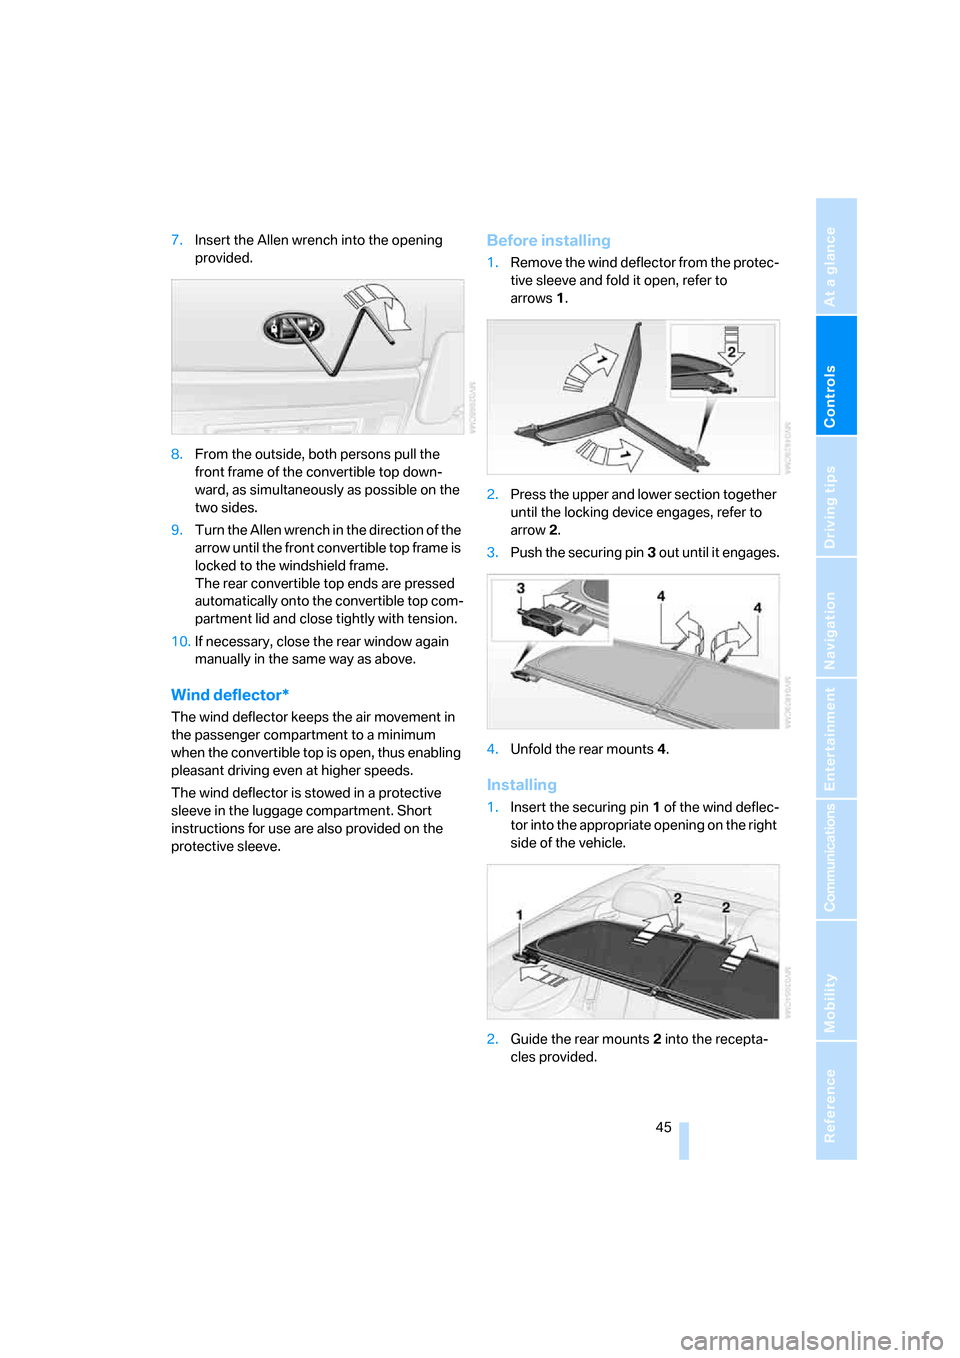
7.Insert the Allen wrench into the opening
provided.
8.From the outside, both persons pull the
front frame of the convertible top down-
ward, as simultaneously as possible on the
two sides.
9.Turn the Allen wrench in the direction of the
arrow until the front convertible top frame is
locked to the windshield frame.
The rear convertible top ends are pressed
automatically onto the convertible top com-
partment lid and close tightly with tension.
10.If necessary, close the rear window again
manually in the same way as above.
Wind deflector*
The wind deflector keeps the air movement in
the passenger compartment to a minimum
when the convertible top is open, thus enabling
pleasant driving even at higher speeds.
The wind deflector is stowed in a protective
sleeve in the luggage compartment. Short
instructions for use are also provided on the
protective sleeve.
Before installing
1.Remove the wind deflector from the protec-
tive sleeve and fold it open, refer to
arrows1.
2.Press the upper and lower section together
until the locking device engages, refer to
arrow2.
3.Push the securing pin3 out until it engages.
4.Unfold the rear mounts4.
Installing
1.Insert the securing pin 1 of the wind deflec-
tor into the appropriate opening on the right
side of the vehicle.
2.Guide the rear mounts2 into the recepta-
cles provided.
Page 78 of 236

Controls
77Reference
At a glance
Driving tips
Communications
Navigation
Entertainment
Mobility
4.Select "Trip computer" and press the con-
troller.
>Departure time
>Driving time
>Distance traveled
>Average speed
>Average fuel consumption
Switching trip computer on/off and resetting
all values:
1.Select "Set" and press the controller.
2.Select the desired menu item and press the
controller.
Display options
You can display the computer or the trip com-
puter in the assistance window.
1.Move the controller to the right to switch to
the assistance window and press the con-
troller.
2.Select a menu item:
>"Onboard info"
>"Trip computer".3.Press the controller.
Service requirements
The remaining driving distance and the date for
the next maintenance are displayed briefly with
the ignition switched on.
Your BMW Service Advisor can deter-
mine your vehicle's current service
requirements by reading out the data stored in
the remote control.<
Additional information
You can view more detailed information by
using the Control Display, principle details, refer
to page16.
1.Open start menu.
2.Press the controller to open the menu.
3.Select "Service" and press the controller.
Page 101 of 236
Climate
100
Climate
Automatic climate control
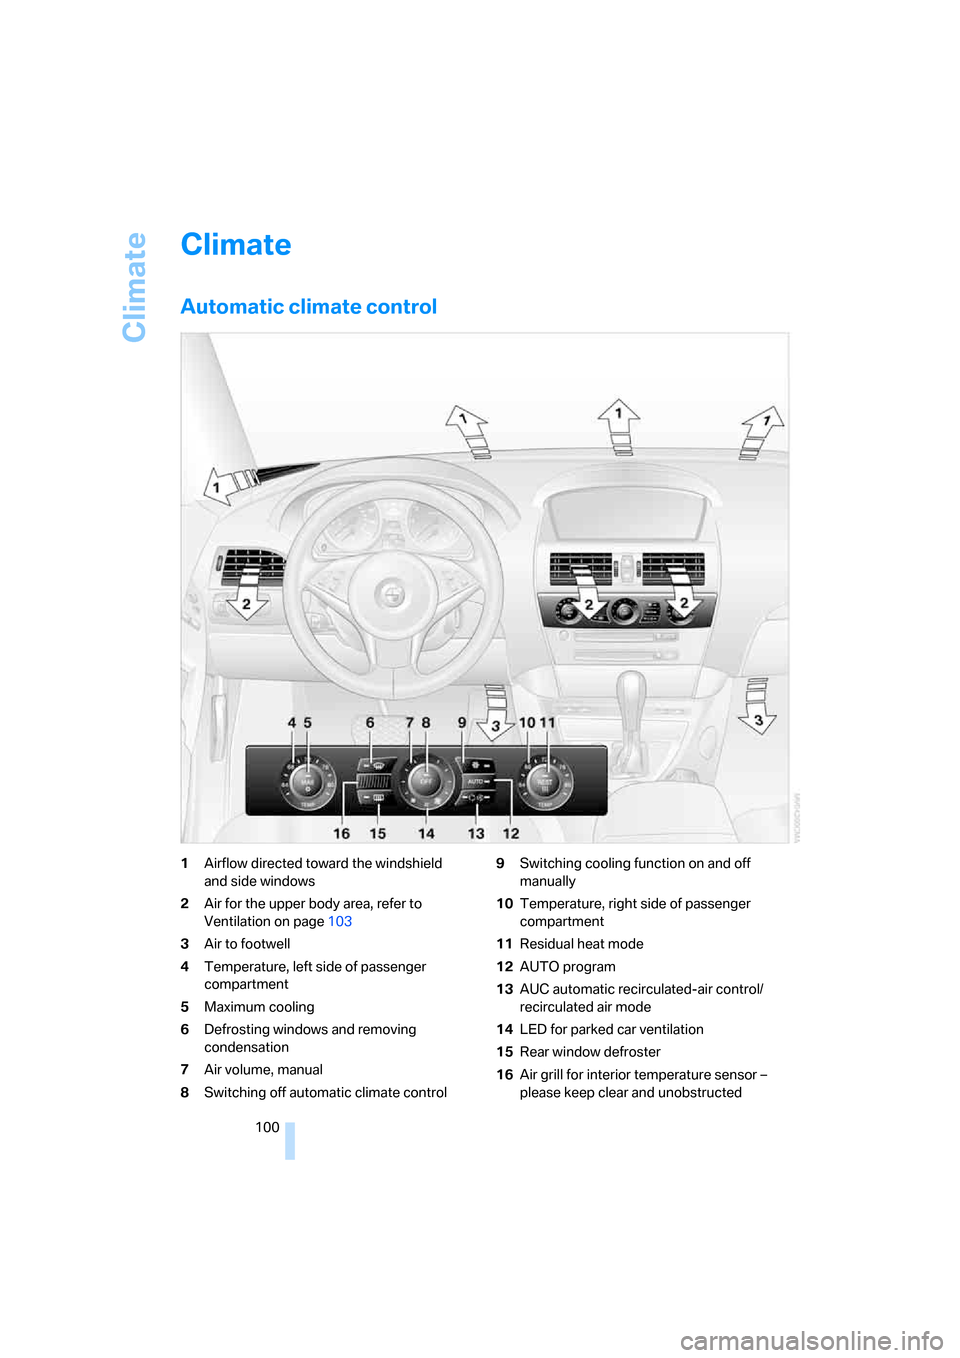
1Airflow directed toward the windshield
and side windows
2Air for the upper body area, refer to
Ventilation on page103
3Air to footwell
4Temperature, left side of passenger
compartment
5Maximum cooling
6Defrosting windows and removing
condensation
7Air volume, manual
8Switching off automatic climate control9Switching cooling function on and off
manually
10Temperature, right side of passenger
compartment
11Residual heat mode
12AUTO program
13AUC automatic recirculated-air control/
recirculated air mode
14LED for parked car ventilation
15Rear window defroster
16Air grill for interior temperature sensor –
please keep clear and unobstructed
Page 102 of 236
Controls
101Reference
At a glance
Driving tips
Communications
Navigation
Entertainment
Mobility
The current setting for air distribution is dis-
played on the Control Display.
A congenial climate
The AUTO program offers the optimum air dis-
tribution and air volume for virtually all condi-
tions, refer to AUTO program below. Now you
only need to select an interior temperature that
you find pleasant.
The following sections contain more detailed
information on the available setting options.
Most settings are stored for the remote control
currently in use, also refer to Personal Profile
settings on page29.
AUTO program
The AUTO program handles the
adjustment of air distribution to the
windshield and side windows, in
the direction of the upper body, and in the foot-
well, as well as the adjustment of the air volume.
It also adapts your instructions for the tempera-
ture to outside influences throughout the year.
The cooling is switched on automatically with
the AUTO program. At the same time, a con-
densation sensor controls the program in such
a way that window condensation is prevented
as much as possible.
Intensity of the AUTO program
To meet your individual needs, you can
increase or decrease the intensity of the auto-
matic climate control.
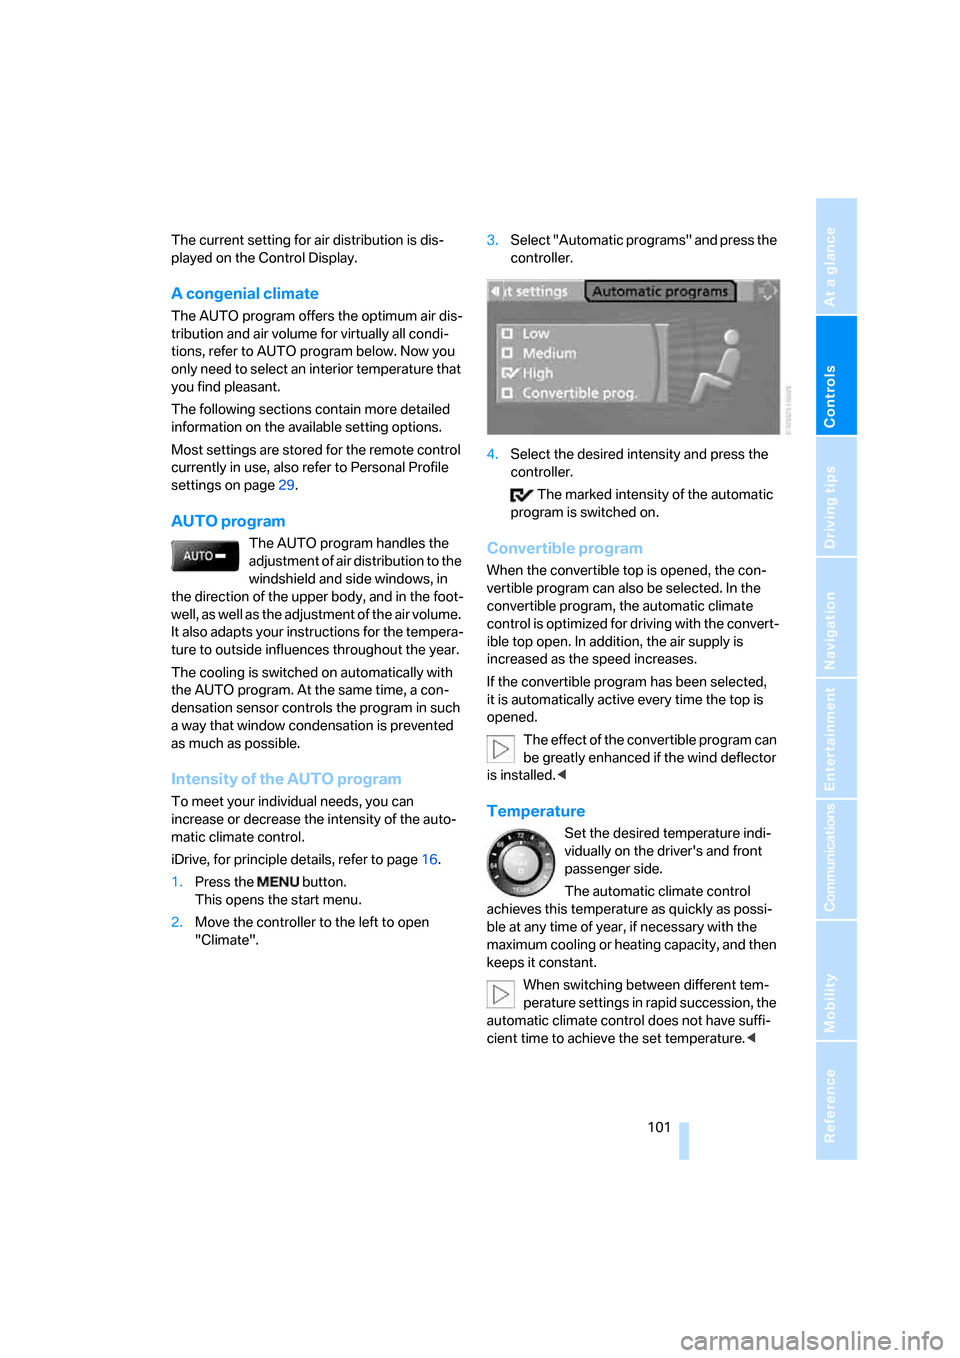
iDrive, for principle details, refer to page16.
1.Press the button.
This opens the start menu.
2.Move the controller to the left to open
"Climate".3.Select "Automatic programs" and press the
controller.
4.Select the desired intensity and press the
controller.
The marked intensity of the automatic
program is switched on.
Convertible program
When the convertible top is opened, the con-
vertible program can also be selected. In the
convertible program, the automatic climate
control is optimized for driving with the convert-
ible top open. In addition, the air supply is
increased as the speed increases.
If the convertible program has been selected,
it is automatically active every time the top is
opened.
The effect of the convertible program can
be greatly enhanced if the wind deflector
is installed.<
Temperature
Set the desired temperature indi-
vidually on the driver's and front
passenger side.
The automatic climate control
achieves this temperature as quickly as possi-
ble at any time of year, if necessary with the
maximum cooling or heating capacity, and then
keeps it constant.
When switching between different tem-
perature settings in rapid succession, the
automatic climate control does not have suffi-
cient time to achieve the set temperature.<
Page 103 of 236
Climate
102
Adapting temperature in upper body
region
1.Open the start menu.
2.Open "Climate".
3.Select "Vent settings" and press the con-
troller.
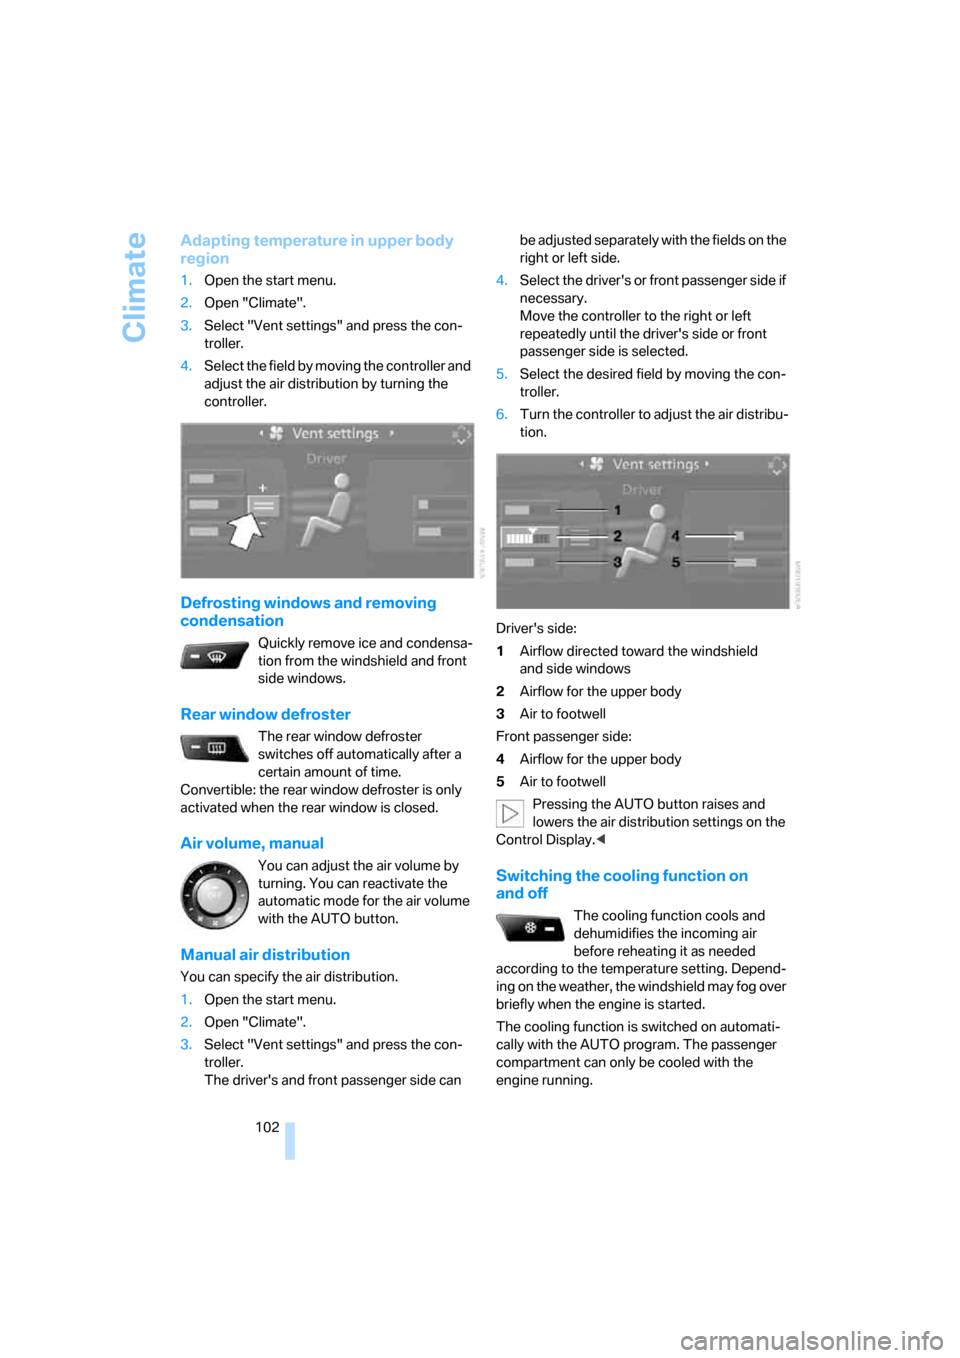
4.Select the field by moving the controller and
adjust the air distribution by turning the
controller.
Defrosting windows and removing
condensation
Quickly remove ice and condensa-
tion from the windshield and front
side windows.
Rear window defroster
The rear window defroster
switches off automatically after a
certain amount of time.
Convertible: the rear window defroster is only
activated when the rear window is closed.
Air volume, manual
You can adjust the air volume by
turning. You can reactivate the
automatic mode for the air volume
with the AUTO button.
Manual air distribution
You can specify the air distribution.
1.Open the start menu.
2.Open "Climate".
3.Select "Vent settings" and press the con-
troller.
The driver's and front passenger side can be adjusted separately with the fields on the
right or left side.
4.Select the driver's or front passenger side if
necessary.
Move the controller to the right or left
repeatedly until the driver's side or front
passenger side is selected.
5.Select the desired field by moving the con-
troller.
6.Turn the controller to adjust the air distribu-
tion.
Driver's side:
1Airflow directed toward the windshield
and side windows
2Airflow for the upper body
3Air to footwell
Front passenger side:
4Airflow for the upper body
5Air to footwell
Pressing the AUTO button raises and
lowers the air distribution settings on the
Control Display.<
Switching the cooling function on
and off
The cooling function cools and
dehumidifies the incoming air
before reheating it as needed
according to the temperature setting. Depend-
ing on the weather, the windshield may fog over
briefly when the engine is started.
The cooling function is switched on automati-
cally with the AUTO program. The passenger
compartment can only be cooled with the
engine running.
Page 104 of 236
Controls
103Reference
At a glance
Driving tips
Communications
Navigation
Entertainment
Mobility
Maximum cooling
Maximally cooled air is obtained as
quickly as possible from an outside
temperature above 327/06 and
with the engine running.
The automatic climate control changes over to
the lowest temperature and switches into the
recirculated-air mode. The maximum air quan-
tity only flows out of the vents for the upper
body. It is therefore necessary for these vents to
be open for maximum cooling.
AUC Automatic recirculated-air
control/recirculated-air mode
You can respond to unpleasant
odors or pollutants in the immedi-
ate environment by temporarily
suspending the supply of outside air. The sys-
tem then recirculates the air currently within the
vehicle. In AUC mode, a sensor detects pollut-
ants in the outside air and controls the shut-off
automatically.
Press the button repeatedly to run through the
following control sequence:
>LED off: outside air flows into the vehicle
continuously.
>Right LED on, AUC mode: the system
detects pollutants in the outside air and
responds by blocking the supply of outside
air when required.
>Left LED on, recirculated-air mode: the
supply of outside air into the vehicle is shut
off continuously.
If condensation starts to form on the
inside window surfaces during operation
in the recirculated-air mode, you should switch
it off while also increasing the air volume as
required.
The recirculated-air mode should not be used
over a longer period of time, as the air quality
inside the vehicle deteriorates continuously.<
Residual heat
The heat stored in the engine is
used to heat the passenger com-
partment, e.g. while stopped at a
school to pick up a child.
The function can be switched on when the fol-
lowing conditions are met:
>up to 15 minutes after switching off the
engine
>engine at operating temperature
>sufficient battery voltage
>outside temperature below 777/256
The LED lights up when the function is
switched on.
With the ignition switch at radio readiness or
higher the interior temperature, the air volume
and the air distribution can be set.
Switching off automatic climate control
The air volume, the heater and the
cooling function are all switched
off.
You can restart the automatic cli-
mate control by pressing any of its buttons
except the REST button.
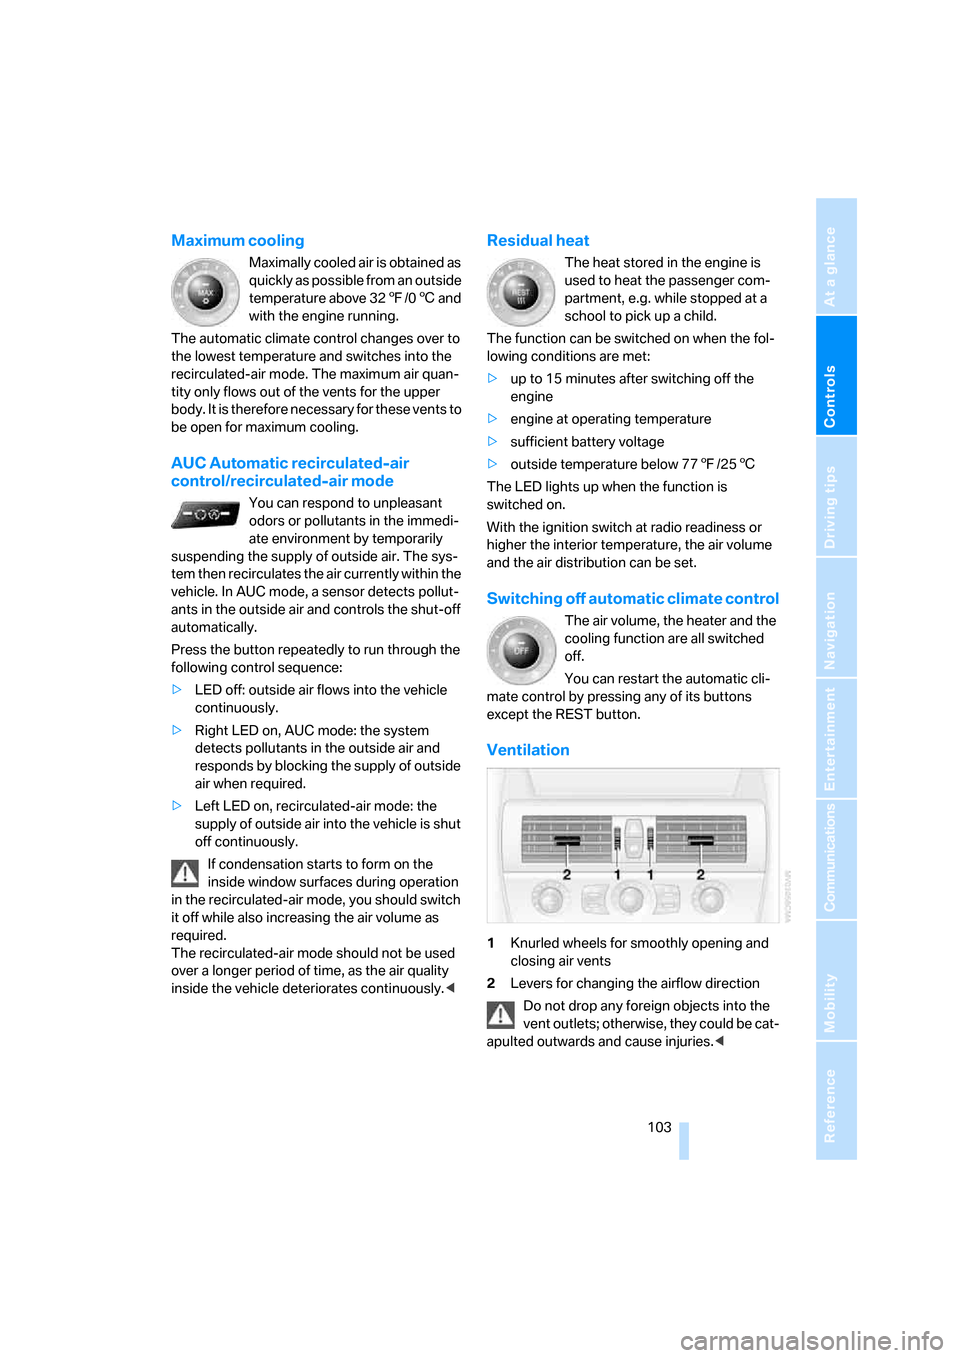
Ventilation
1Knurled wheels for smoothly opening and
closing air vents
2Levers for changing the airflow direction
Do not drop any foreign objects into the
vent outlets; otherwise, they could be cat-
apulted outwards and cause injuries.<
Page 115 of 236
Things to remember when driving
114
Things to remember when driving
Breaking-in
Moving parts need time to adjust to one
another. To ensure that your vehicle continues
to provide optimized economy of operation
throughout an extended service life, we request
that you devote careful attention to the follow-
ing section.
Engine and differential
Always obey all official speed limits.
Up to 1,200 miles/2,000 km
Drive at changing engine and driving speeds,
however do not exceed 4,500 rpm or 100 mph/
160 km/h.
Avoid full-throttle operation and use of the
transmission's kick-down mode during these
initial miles.
From 1,200 miles/2,000 km
The engine and vehicle speed can gradually be
increased.
SMG Sequential Manual Gearbox
Do not use the acceleration assistant during the
break-in period, refer to page64.
Tires
Due to technical factors associated with their
manufacture, tires do not achieve their full
traction potential until after an initial break-in
period. It is therefore important to drive reserv-
edly during the first 200 miles/300 km.
Brake system
Brakes require an initial break-in period of
approx. 300 miles/500 km to achieve optimized
contact and wear patterns between brake pads
and rotors. Drive in a reserved manner during
this break-in period.
Clutch
The function of the clutch is only at its opti-
mized level after a distance driven of approx.
300 miles/500 km. During this break-in period,
engage the clutch gently.
Following part replacement
Observe the break-in instructions again if com-
ponents mentioned above must be replaced
after subsequent driving operation.
General driving notes
Closing luggage compartment lid
Only drive with the luggage compartment
lid completely closed, otherwise exhaust
can penetrate into the passenger compart-
ment.<
If special circumstances should make it abso-
lutely necessary to operate the vehicle with the
luggage compartment lid open:
1.Coupe: close both windows and the glass
sunroof.
Convertible: with closed top, close all win-
dows.
2.Increase the air volume of the automatic
climate control to a high level, refer to
page102.
Hot exhaust system
As in all vehicles, extremely high temper-
atures are generated in the exhaust sys-
tem. Do not remove the heat shields installed
adjacent to it, and never apply undercoating to
them. When driving, standing at idle and while
parking, take care to avoid possible contact
between the hot exhaust system and any highly
flammable materials such as hay, leaves, grass,
etc. Such contact could lead to a fire, and with it
the risk of serious property damage as well as
personal injury.<