2006 BMW 650I COUPE&CONVERTIBLE navigation system
[x] Cancel search: navigation systemPage 58 of 242
Controls
57Reference
At a glance
Driving tips
Communications
Navigation
Entertainment
Mobility
Coupe: child restraint system with
tether strap
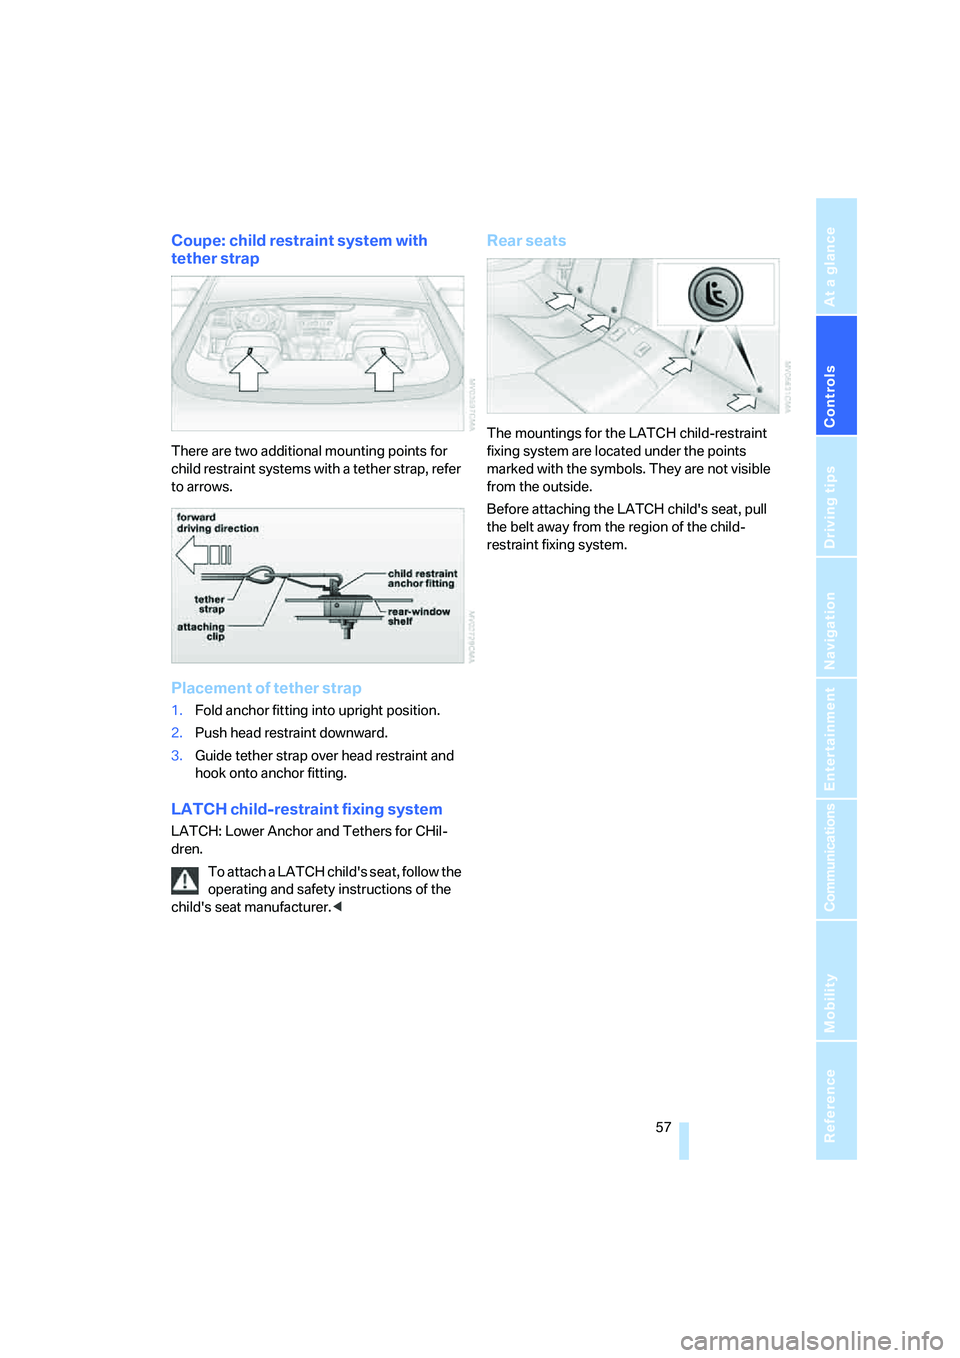
There are two additional mounting points for
child restraint systems with a tether strap, refer
to arrows.
Placement of tether strap
1.Fold anchor fitting into upright position.
2.Push head restraint downward.
3.Guide tether strap over head restraint and
hook onto anchor fitting.
LATCH child-restraint fixing system
LATCH: Lower Anchor and Tethers for CHil-
dren.
To attach a LATCH child's seat, follow the
operating and safety instructions of the
child's seat manufacturer.<
Rear seats
The mountings for the LATCH child-restraint
fixing system are located under the points
marked with the symbols. They are not visible
from the outside.
Before attaching the LATCH child's seat, pull
the belt away from the region of the child-
restraint fixing system.
Page 60 of 242
Controls
59Reference
At a glance
Driving tips
Communications
Navigation
Entertainment
Mobility
Starting engine
Do not run the engine in closed rooms,
otherwise the inhaling of toxic exhaust
gases can cause unconsciousness and death.
The exhaust gases contain carbon monoxide,
an odorless and colorless, but highly toxic gas.
Never leave an unattended vehicle with the
engine running, as such a vehicle represents a
potential safety hazard.
Before leaving the vehicle with the engine run-
ning, set the selector lever to the idling or the
P position and set the handbrake, otherwise the
vehicle can begin to roll.<
When starting the engine, do not press the
accelerator pedal.
Do not allow the engine to warm up by leaving it
running while the vehicle remains stationary.
Instead, begin to drive immediately at a moder-
ate engine speed.
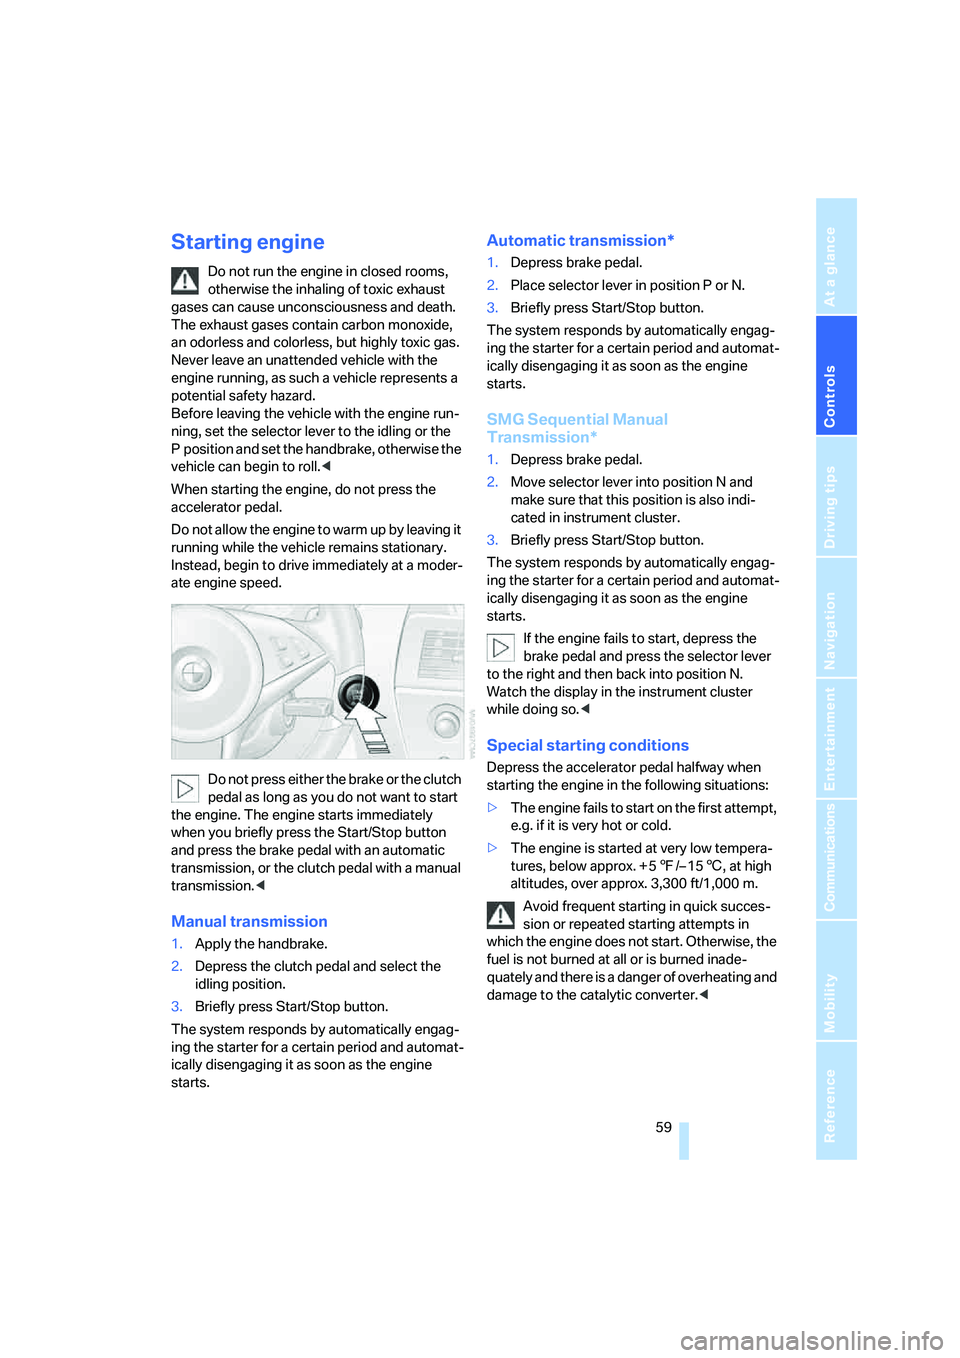
Do not press either the brake or the clutch
pedal as long as you do not want to start
the engine. The engine starts immediately
when you briefly press the Start/Stop button
and press the brake pedal with an automatic
transmission, or the clutch pedal with a manual
transmission.<
Manual transmission
1.Apply the handbrake.
2.Depress the clutch pedal and select the
idling position.
3.Briefly press Start/Stop button.
The system responds by automatically engag-
ing the starter for a certain period and automat-
ically disengaging it as soon as the engine
starts.
Automatic transmission*
1.Depress brake pedal.
2.Place selector lever in position P or N.
3.Briefly press Start/Stop button.
The system responds by automatically engag-
ing the starter for a certain period and automat-
ically disengaging it as soon as the engine
starts.
SMG Sequential Manual
Transmission*
1.Depress brake pedal.
2.Move selector lever into position N and
make sure that this position is also indi-
cated in instrument cluster.
3.Briefly press Start/Stop button.
The system responds by automatically engag-
ing the starter for a certain period and automat-
ically disengaging it as soon as the engine
starts.
If the engine fails to start, depress the
brake pedal and press the selector lever
to the right and then back into position N.
Watch the display in the instrument cluster
while doing so.<
Special starting conditions
Depress the accelerator pedal halfway when
starting the engine in the following situations:
>The engine fails to start on the first attempt,
e.g. if it is very hot or cold.
>The engine is started at very low tempera-
tures, below approx. + 57/– 156, at high
altitudes, over approx. 3,300 ft/1,000 m.
Avoid frequent starting in quick succes-
sion or repeated starting attempts in
which the engine does not start. Otherwise, the
fuel is not burned at all or is burned inade-
quately and there is a danger of overheating and
damage to the catalytic converter.<
Page 62 of 242
Controls
61Reference
At a glance
Driving tips
Communications
Navigation
Entertainment
Mobility
Reverse gear
Select only when the vehicle is stationary.
Press the gearshift lever to the left, overcoming
a slight resistance.
SMG Sequential Manual
Transmission*
The concept
The SMG Sequential Manual Transmission is
an automated manual transmission in which an
electrohydraulic system handles the clutching
and gear changes.
The SMG is operated with the selector lever
and two shift paddles on the steering wheel.
It offers the following functions:
>Choice of manual or automatic mode:
Sequential mode or Drive mode
>Choice of two drive programs: Normal or
Sport, refer to Dynamic Driving Control
page64
>Automatic downshifting and prevention of
incorrect shifting even in sequential opera-
tion
>Acceleration assistant, refer to page64
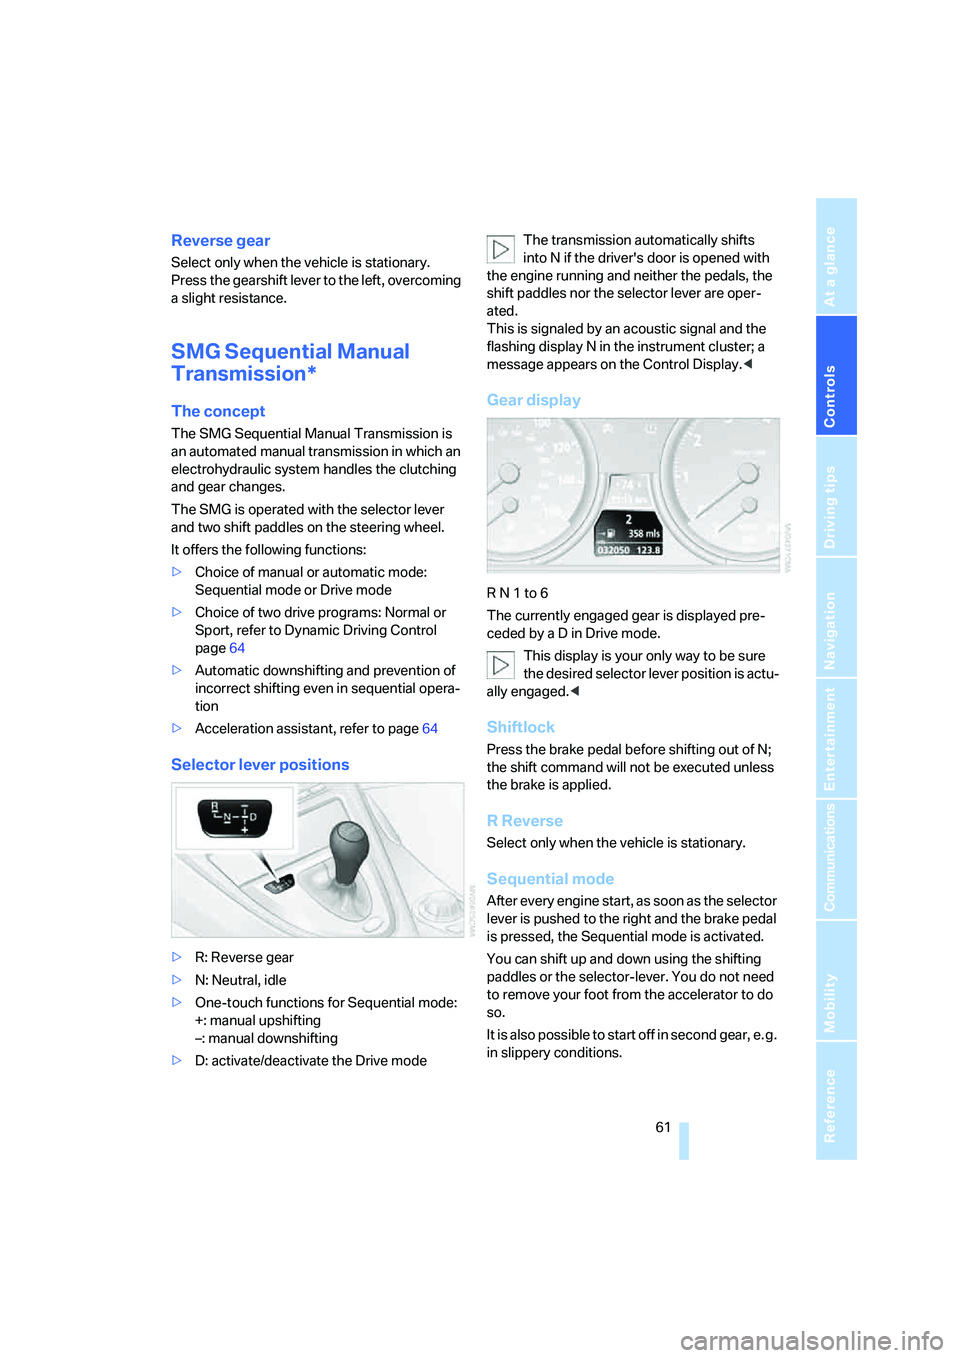
Selector lever positions
>R: Reverse gear
>N: Neutral, idle
>One-touch functions for Sequential mode:
+: manual upshifting
–: manual downshifting
>D: activate/deactivate the Drive modeThe transmission automatically shifts
into N if the driver's door is opened with
the engine running and neither the pedals, the
shift paddles nor the selector lever are oper-
ated.
This is signaled by an acoustic signal and the
flashing display N in the instrument cluster; a
message appears on the Control Display.<
Gear display
R N 1 to 6
The currently engaged gear is displayed pre-
ceded by a D in Drive mode.
This display is your only way to be sure
the desired selector lever position is actu-
ally engaged.<
Shiftlock
Press the brake pedal before shifting out of N;
the shift command will not be executed unless
the brake is applied.
R Reverse
Select only when the vehicle is stationary.
Sequential mode
After every engine start, as soon as the selector
lever is pushed to the right and the brake pedal
is pressed, the Sequential mode is activated.
You can shift up and down using the shifting
paddles or the selector-lever. You do not need
to remove your foot from the accelerator to do
so.
It is also possible to start off in second gear, e. g.
in slippery conditions.
Page 64 of 242
Controls
63Reference
At a glance
Driving tips
Communications
Navigation
Entertainment
Mobility
To prevent the vehicle from creeping
after you select a driving position,
maintain pressure on the brake pedal until
you are ready to start.<
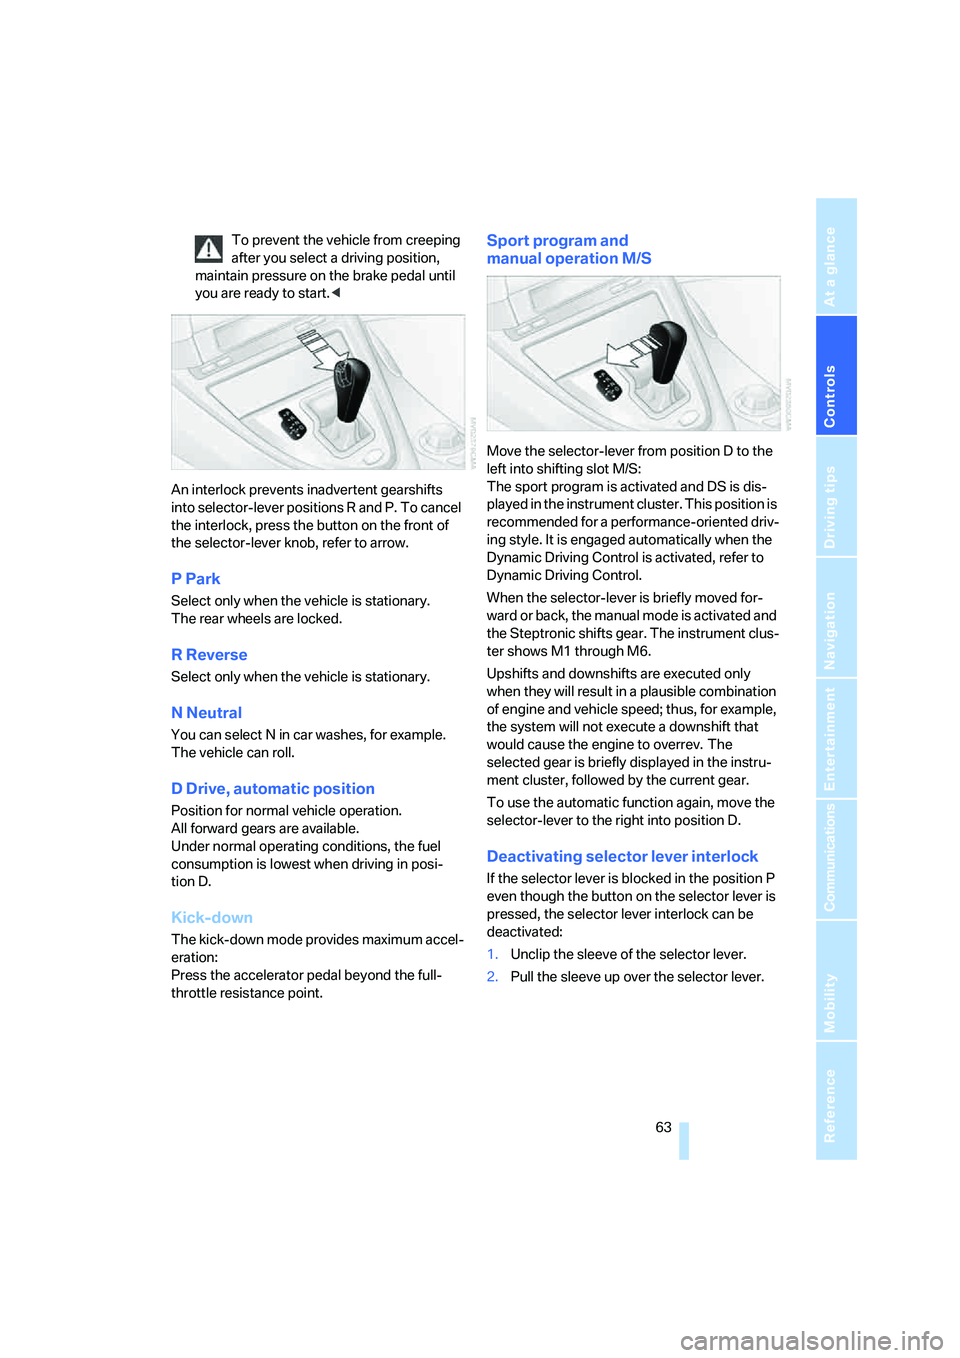
An interlock prevents inadvertent gearshifts
into selector-lever positions R and P. To cancel
the interlock, press the button on the front of
the selector-lever knob, refer to arrow.
P Park
Select only when the vehicle is stationary.
The rear wheels are locked.
R Reverse
Select only when the vehicle is stationary.
N Neutral
You can select N in car washes, for example.
The vehicle can roll.
D Drive, automatic position
Position for normal vehicle operation.
All forward gears are available.
Under normal operating conditions, the fuel
consumption is lowest when driving in posi-
tion D.
Kick-down
The kick-down mode provides maximum accel-
eration:
Press the accelerator pedal beyond the full-
throttle resistance point.
Sport program and
manual operation M/S
Move the selector-lever from position D to the
left into shifting slot M/S:
The sport program is activated and DS is dis-
played in the instrument cluster. This position is
recommended for a performance-oriented driv-
ing style. It is engaged automatically when the
Dynamic Driving Control is activated, refer to
Dynamic Driving Control.
When the selector-lever is briefly moved for-
ward or back, the manual mode is activated and
the Steptronic shifts gear. The instrument clus-
ter shows M1 through M6.
Upshifts and downshifts are executed only
when they will result in a plausible combination
of engine and vehicle speed; thus, for example,
the system will not execute a downshift that
would cause the engine to overrev. The
selected gear is briefly displayed in the instru-
ment cluster, followed by the current gear.
To use the automatic function again, move the
selector-lever to the right into position D.
Deactivating selector lever interlock
If the selector lever is blocked in the position P
even though the button on the selector lever is
pressed, the selector lever interlock can be
deactivated:
1.Unclip the sleeve of the selector lever.
2.Pull the sleeve up over the selector lever.
Page 66 of 242
Controls
65Reference
At a glance
Driving tips
Communications
Navigation
Entertainment
Mobility
Using turn signals
Move the lever beyond the resistance point.
To switch off manually, only press the lever as
far as the resistance point.
Atypically rapid flashing of the indicator
lamp indicates the failure of a turn signal
lamp.<
Signaling briefly
Press the lever to the resistance point and hold
it there as long as you wish to signal.
Triple turn signal activation
Press the lever to the resistance point; the turn
signals flash three times.
You can activate or deactivate this function.
iDrive, for explanation of principle, refer to
page16.
1.Open the start menu.
2.Press the controller to open the menu.
3.Select "Vehicle settings" and press the
controller.
4.Select "Lighting" and press the controller.
5.Select "Triple turn signal activation" and
press the controller.
Triple turn signal is activated.
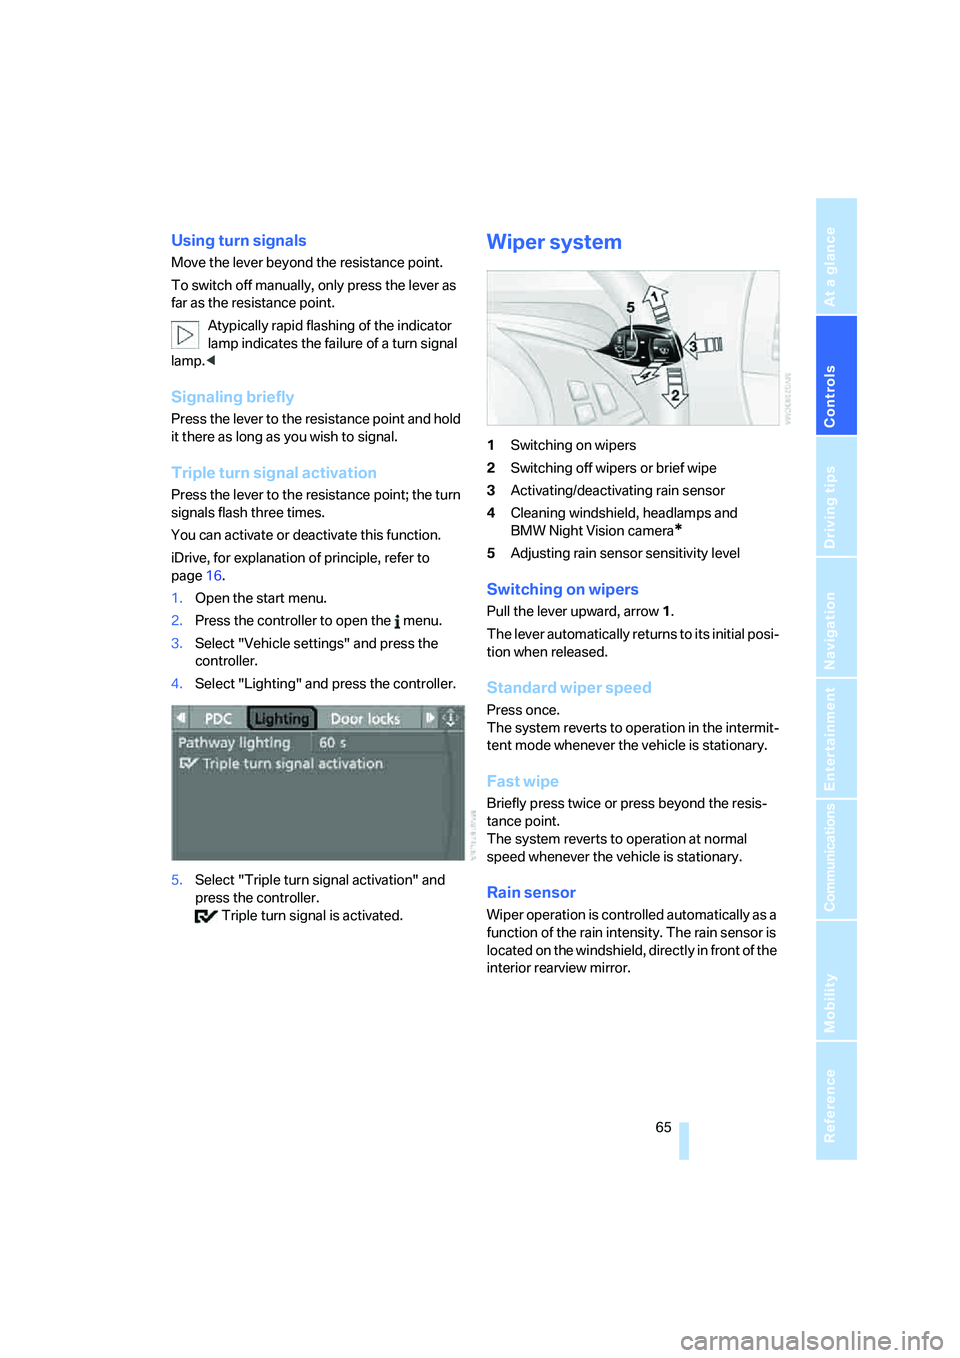
Wiper system
1Switching on wipers
2Switching off wipers or brief wipe
3Activating/deactivating rain sensor
4Cleaning windshield, headlamps and
BMW Night Vision camera
*
5Adjusting rain sensor sensitivity level
Switching on wipers
Pull the lever upward, arrow1.
The lever automatically returns to its initial posi-
tion when released.
Standard wiper speed
Press once.
The system reverts to operation in the intermit-
tent mode whenever the vehicle is stationary.
Fast wipe
Briefly press twice or press beyond the resis-
tance point.
The system reverts to operation at normal
speed whenever the vehicle is stationary.
Rain sensor
Wiper operation is controlled automatically as a
function of the rain intensity. The rain sensor is
located on the windshield, directly in front of the
interior rearview mirror.
Page 68 of 242
Controls
67Reference
At a glance
Driving tips
Communications
Navigation
Entertainment
Mobility
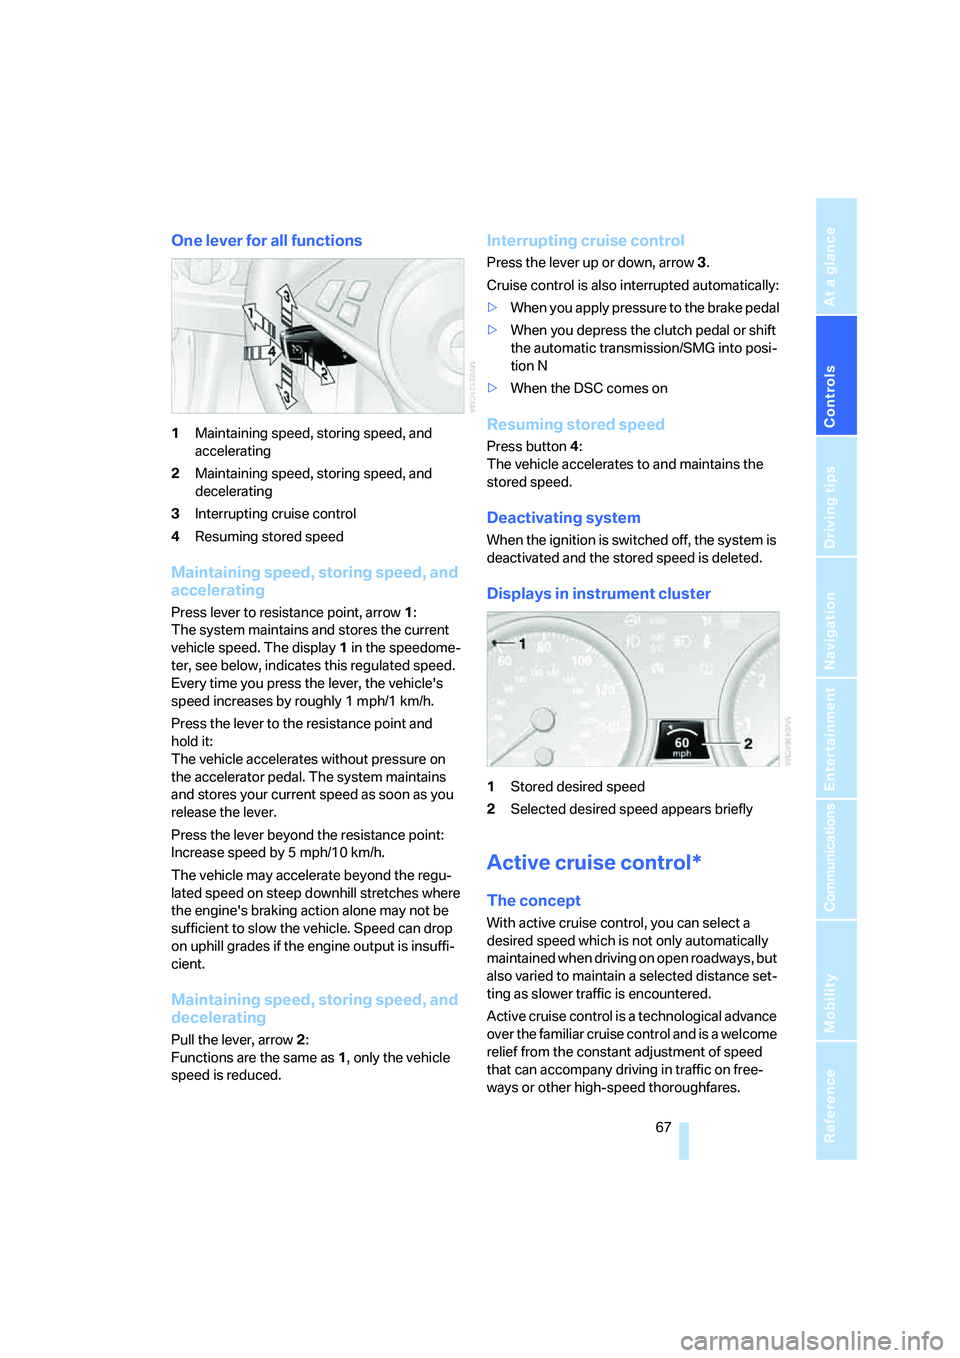
One lever for all functions
1Maintaining speed, storing speed, and
accelerating
2Maintaining speed, storing speed, and
decelerating
3Interrupting cruise control
4Resuming stored speed
Maintaining speed, storing speed, and
accelerating
Press lever to resistance point, arrow 1:
The system maintains and stores the current
vehicle speed. The display1 in the speedome-
ter, see below, indicates this regulated speed.
Every time you press the lever, the vehicle's
speed increases by roughly 1 mph/1 km/h.
Press the lever to the resistance point and
hold it:
The vehicle accelerates without pressure on
the accelerator pedal. The system maintains
and stores your current speed as soon as you
release the lever.
Press the lever beyond the resistance point:
Increase speed by 5 mph/10 km/h.
The vehicle may accelerate beyond the regu-
lated speed on steep downhill stretches where
the engine's braking action alone may not be
sufficient to slow the vehicle. Speed can drop
on uphill grades if the engine output is insuffi-
cient.
Maintaining speed, storing speed, and
decelerating
Pull the lever, arrow2:
Functions are the same as1, only the vehicle
speed is reduced.
Interrupting cruise control
Press the lever up or down, arrow3.
Cruise control is also interrupted automatically:
>When you apply pressure to the brake pedal
>When you depress the clutch pedal or shift
the automatic transmission/SMG into posi-
tion N
>When the DSC comes on
Resuming stored speed
Press button4:
The vehicle accelerates to and maintains the
stored speed.
Deactivating system
When the ignition is switched off, the system is
deactivated and the stored speed is deleted.
Displays in instrument cluster
1Stored desired speed
2Selected desired speed appears briefly
Active cruise control*
The concept
With active cruise control, you can select a
desired speed which is not only automatically
maintained when driving on open roadways, but
also varied to maintain a selected distance set-
ting as slower traffic is encountered.
Active cruise control is a technological advance
over the familiar cruise control and is a welcome
relief from the constant adjustment of speed
that can accompany driving in traffic on free-
ways or other high-speed thoroughfares.
Page 69 of 242
Driving
68 Especially on longer trips, the system can
reduce fatigue and tension, while increasing
your enjoyment of driving. Please use it safely
and responsibly.
In addition to holding a steady cruising speed,
if you encounter slower vehicles ahead, active
cruise control will, within the scope of given
possibilities, adjust your vehicle's speed auto-
matically so that you can flow with the traffic
without having to make constant adjustments.
If, for example, while cruising at the selected
speed, you begin to approach a slower vehicle
ahead of you in the same lane, the system will
reduce your vehicle's speed to the same as that
of the vehicle ahead to maintain your selected
distance setting between your vehicle and the
vehicle ahead. You can vary the distance, which
is also speed-dependent. Based on your
selected distance setting, the system automat-
ically decreases the throttle setting and lightly
applies the brakes if necessary. The vehicle
brake lamps will automatically illuminate to sig-
nal a following driver to take action. In addition,
it may be necessary for the vehicle or the driver
to downshift, depending on the kind of trans-
mission your vehicle is equipped with, to main-
tain the distance setting selected. If the vehicle
ahead speeds up or when the lane ahead
becomes clear, your vehicle will accelerate to
the speed you have selected by increasing the
throttle setting and shifting gears automatically
or with the aid of the driver as needed. Your
selected speed will be maintained when driving
downhill, too.
Active cruise control is not and must not
be used as a collision avoidance/warning
system.<
Since this active cruise control system is
a new technology and operates differ-
ently from conventional cruise control systems
which you may be accustomed to, you are
strongly urged to read all of the pages relating
to this system before use. Pay special attention
to the information contained in the Things to
know about active cruise control section begin-
ning on page71.<
Professional* navigation system
If there is a navigation DVD in the player, refer to
page124, then the system adapts the acceler-
ation and deceleration behavior of the vehicle to
the road on which you are currently driving.
To ensure that the system is informed of
the current course of the road, always use
the latest navigation DVD if possible.<
The influence exerted by the navigation system
is canceled when the vehicle position is
unknown, e.g. when it has left the mapped
region.
Brake pedal feel
>When the system brakes and you also
depress the brake pedal, a somewhat differ-
ent braking feeling results.
>Any noises produced during automatic
braking are normal.
Manual transmission
You can shift gears with the cruise control acti-
vated. If you drive for extended periods at very
high or very low engine speeds, then a shifting
command is issued or the system is deacti-
vated.
SMG
If you drive for extended periods at very high
engine speeds in Sequential mode, then a shift-
ing command is issued or the system is deacti-
vated.
In the Drive mode, the SMG acts similarly to an
automatic transmission in the D position.
Page 70 of 242
Controls
69Reference
At a glance
Driving tips
Communications
Navigation
Entertainment
Mobility
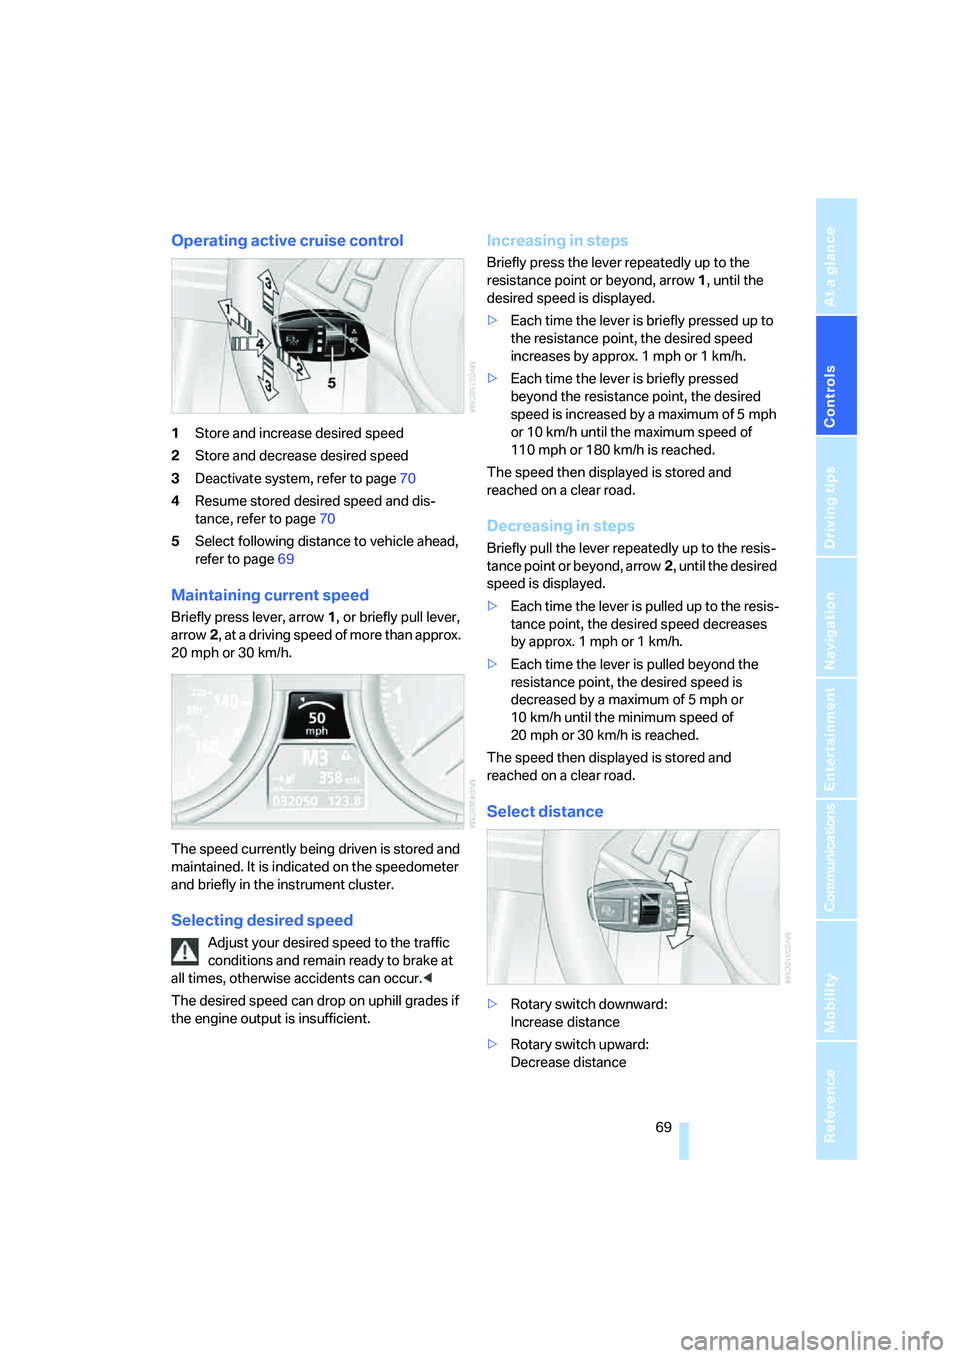
Operating active cruise control
1Store and increase desired speed
2Store and decrease desired speed
3Deactivate system, refer to page70
4Resume stored desired speed and dis-
tance, refer to page70
5Select following distance to vehicle ahead,
refer to page69
Maintaining current speed
Briefly press lever, arrow1, or briefly pull lever,
arrow2, at a driving speed of more than approx.
20 mph or 30 km/h.
The speed currently being driven is stored and
maintained. It is indicated on the speedometer
and briefly in the instrument cluster.
Selecting desired speed
Adjust your desired speed to the traffic
conditions and remain ready to brake at
all times, otherwise accidents can occur.<
The desired speed can drop on uphill grades if
the engine output is insufficient.
Increasing in steps
Briefly press the lever repeatedly up to the
resistance point or beyond, arrow1, until the
desired speed is displayed.
>Each time the lever is briefly pressed up to
the resistance point, the desired speed
increases by approx. 1 mph or 1 km/h.
>Each time the lever is briefly pressed
beyond the resistance point, the desired
speed is increased by a maximum of 5 mph
or 10 km/h until the maximum speed of
110mph or 180km/h is reached.
The speed then displayed is stored and
reached on a clear road.
Decreasing in steps
Briefly pull the lever repeatedly up to the resis-
tance point or beyond, arrow2, until the desired
speed is displayed.
>Each time the lever is pulled up to the resis-
tance point, the desired speed decreases
by approx. 1 mph or 1 km/h.
>Each time the lever is pulled beyond the
resistance point, the desired speed is
decreased by a maximum of 5 mph or
10 km/h until the minimum speed of
20 mph or 30 km/h is reached.
The speed then displayed is stored and
reached on a clear road.
Select distance
>Rotary switch downward:
Increase distance
>Rotary switch upward:
Decrease distance