2006 BMW 650I COUPE&CONVERTIBLE headlamp
[x] Cancel search: headlampPage 102 of 242
Controls
101Reference
At a glance
Driving tips
Communications
Navigation
Entertainment
Mobility
4.Select "Lighting" and press the controller.
5.Select "Pathway lighting" and press the
controller.
6.Turn the controller to select the desired
duration.
7.Press the controller to apply the setting.
Daytime running lamps*
If desired, the light switch can remain in posi-
tion0, 1 or 3.
In position0 and 3 the exterior lighting is auto-
matically switched off after the vehicle is
switched off. In position1 the parking lamps
light up after the ignition is switched off.
Switch on the parking lamps if required as
described under Parking lamps.
Adaptive Head Light*
The concept
Adaptive Head Light is a variable headlamp
control system that enables better illumination
of the road surface. Depending on the steering
angle and other parameters, the light from the
headlamp follows the course of the road.
Activating Adaptive Head Light
In switch position3, the Adaptive Head Light is
active and the automatic headlamp control is
switched on, refer to page100.
To avoid blinding oncoming traffic, the Adaptive
Head Light is not active when driving in reverse
and points toward the passenger side when the
vehicle is stopped.
Malfunction
The LED next to the symbol for automatic head-
lamp control flashes. The Adaptive Head Light
is malfunctioning or has failed. Have the system
checked as soon as possible.
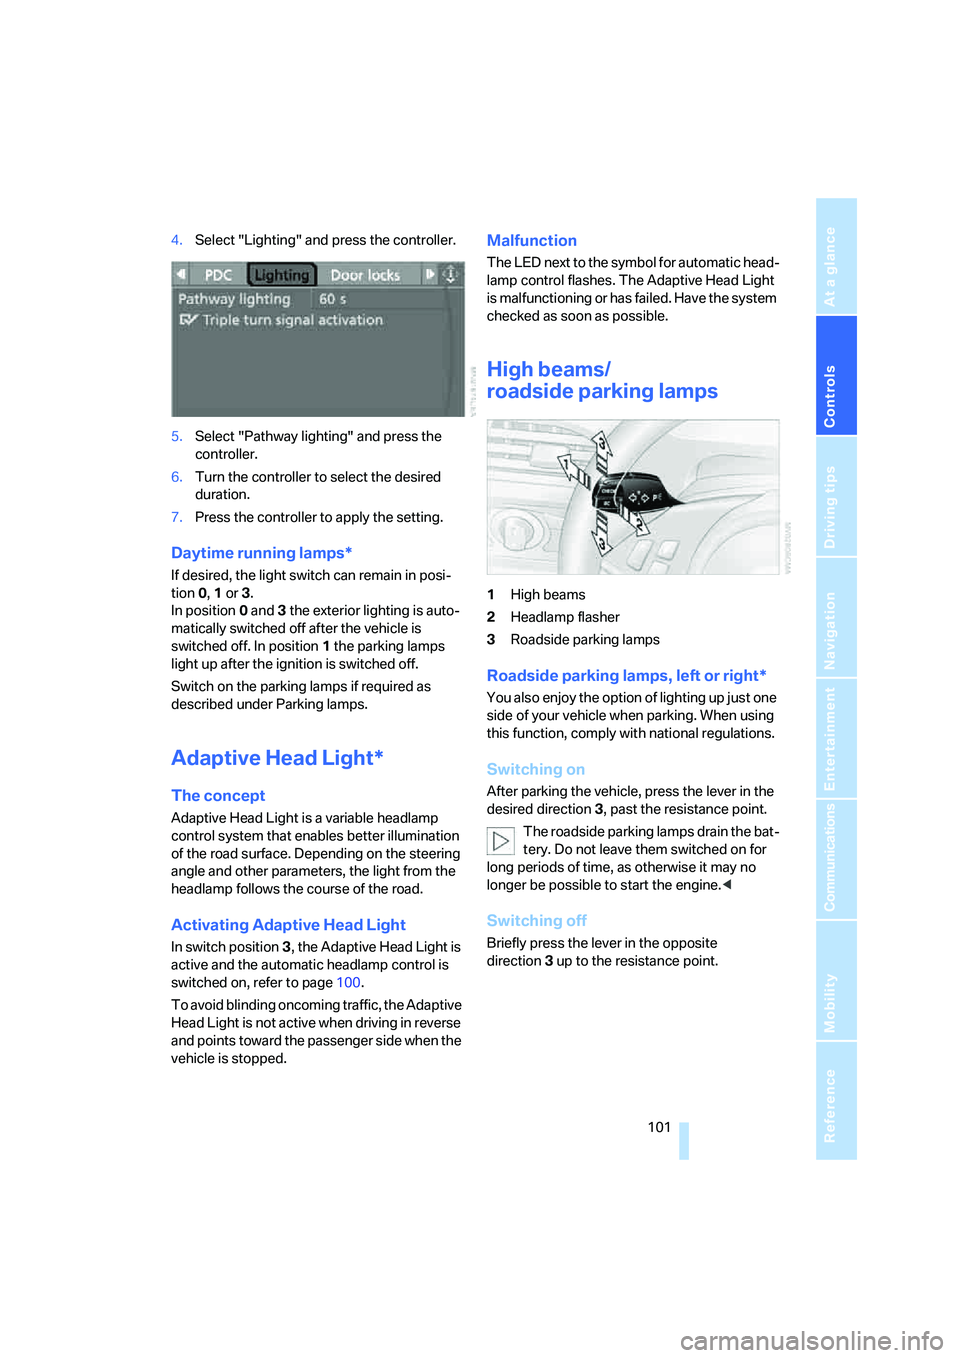
High beams/
roadside parking lamps
1High beams
2Headlamp flasher
3Roadside parking lamps
Roadside parking lamps, left or right*
You also enjoy the option of lighting up just one
side of your vehicle when parking. When using
this function, comply with national regulations.
Switching on
After parking the vehicle, press the lever in the
desired direction3, past the resistance point.
The roadside parking lamps drain the bat-
tery. Do not leave them switched on for
long periods of time, as otherwise it may no
longer be possible to start the engine.<
Switching off
Briefly press the lever in the opposite
direction3 up to the resistance point.
Page 103 of 242
Lamps
102
High-beam assistant*
The concept
This system automatically switches the high
beams on and off again. A sensor on the front of
the interior rearview mirror controls the pro-
cess. The assistant ensures that the high
beams are switched on whenever the traffic sit-
uation allows. This reduces the strain on you
while at the same time providing you with the
best possible visibility. Of course, you can inter-
vene at any time and switch the high beams on
and off in the accustomed manner.
Activating high-beam assistant
1.Turn the light switch to switch position3,
refer to page100.
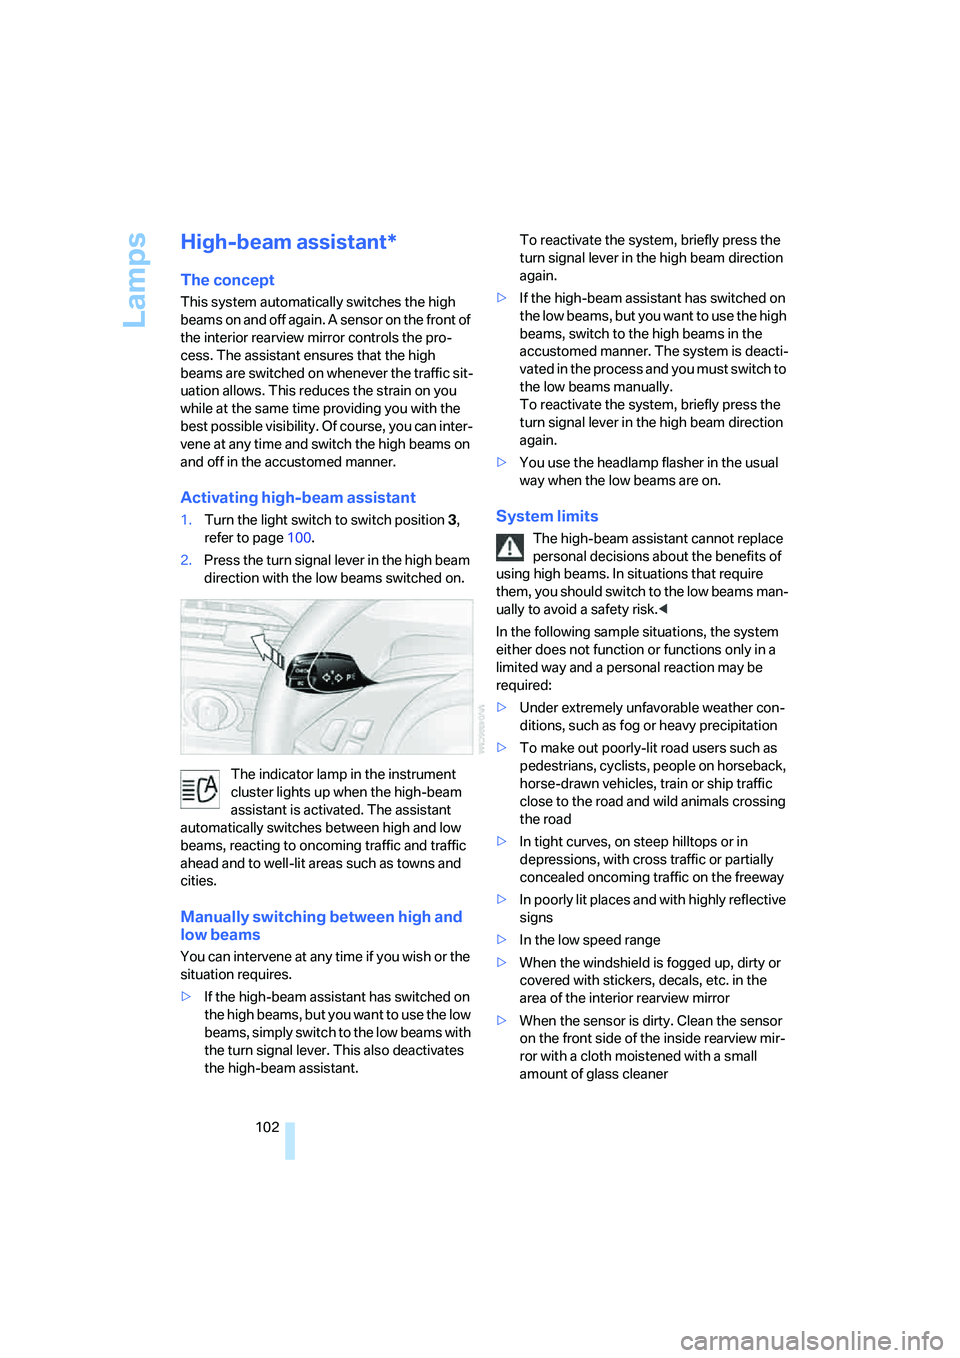
2.Press the turn signal lever in the high beam
direction with the low beams switched on.
The indicator lamp in the instrument
cluster lights up when the high-beam
assistant is activated. The assistant
automatically switches between high and low
beams, reacting to oncoming traffic and traffic
ahead and to well-lit areas such as towns and
cities.
Manually switching between high and
low beams
You can intervene at any time if you wish or the
situation requires.
>If the high-beam assistant has switched on
the high beams, but you want to use the low
beams, simply switch to the low beams with
the turn signal lever. This also deactivates
the high-beam assistant. To reactivate the system, briefly press the
turn signal lever in the high beam direction
again.
>If the high-beam assistant has switched on
the low beams, but you want to use the high
beams, switch to the high beams in the
accustomed manner. The system is deacti-
vated in the process and you must switch to
the low beams manually.
To reactivate the system, briefly press the
turn signal lever in the high beam direction
again.
>You use the headlamp flasher in the usual
way when the low beams are on.
System limits
The high-beam assistant cannot replace
personal decisions about the benefits of
using high beams. In situations that require
them, you should switch to the low beams man-
ually to avoid a safety risk.<
In the following sample situations, the system
either does not function or functions only in a
limited way and a personal reaction may be
required:
>Under extremely unfavorable weather con-
ditions, such as fog or heavy precipitation
>To make out poorly-lit road users such as
pedestrians, cyclists, people on horseback,
horse-drawn vehicles, train or ship traffic
close to the road and wild animals crossing
the road
>In tight curves, on steep hilltops or in
depressions, with cross traffic or partially
concealed oncoming traffic on the freeway
>In poorly lit places and with highly reflective
signs
>In the low speed range
>When the windshield is fogged up, dirty or
covered with stickers, decals, etc. in the
area of the interior rearview mirror
>When the sensor is dirty. Clean the sensor
on the front side of the inside rearview mir-
ror with a cloth moistened with a small
amount of glass cleaner
Page 104 of 242
Controls
103Reference
At a glance
Driving tips
Communications
Navigation
Entertainment
Mobility
Front fog lamps
The parking lamps or low beams must be
switched on for the fog lamps to operate. The
green indicator lamp in the instrument cluster
lights up when the fog lamps are switched on.
The fog lamps are switched off whenever the
high beams are switched on.
If the automatic headlamp control is acti-
vated, the low beams will come on auto-
matically when you switch on the fog lamps.<
Instrument lighting
You can control the lighting intensity by using
the knurled wheel.
Interior lamps
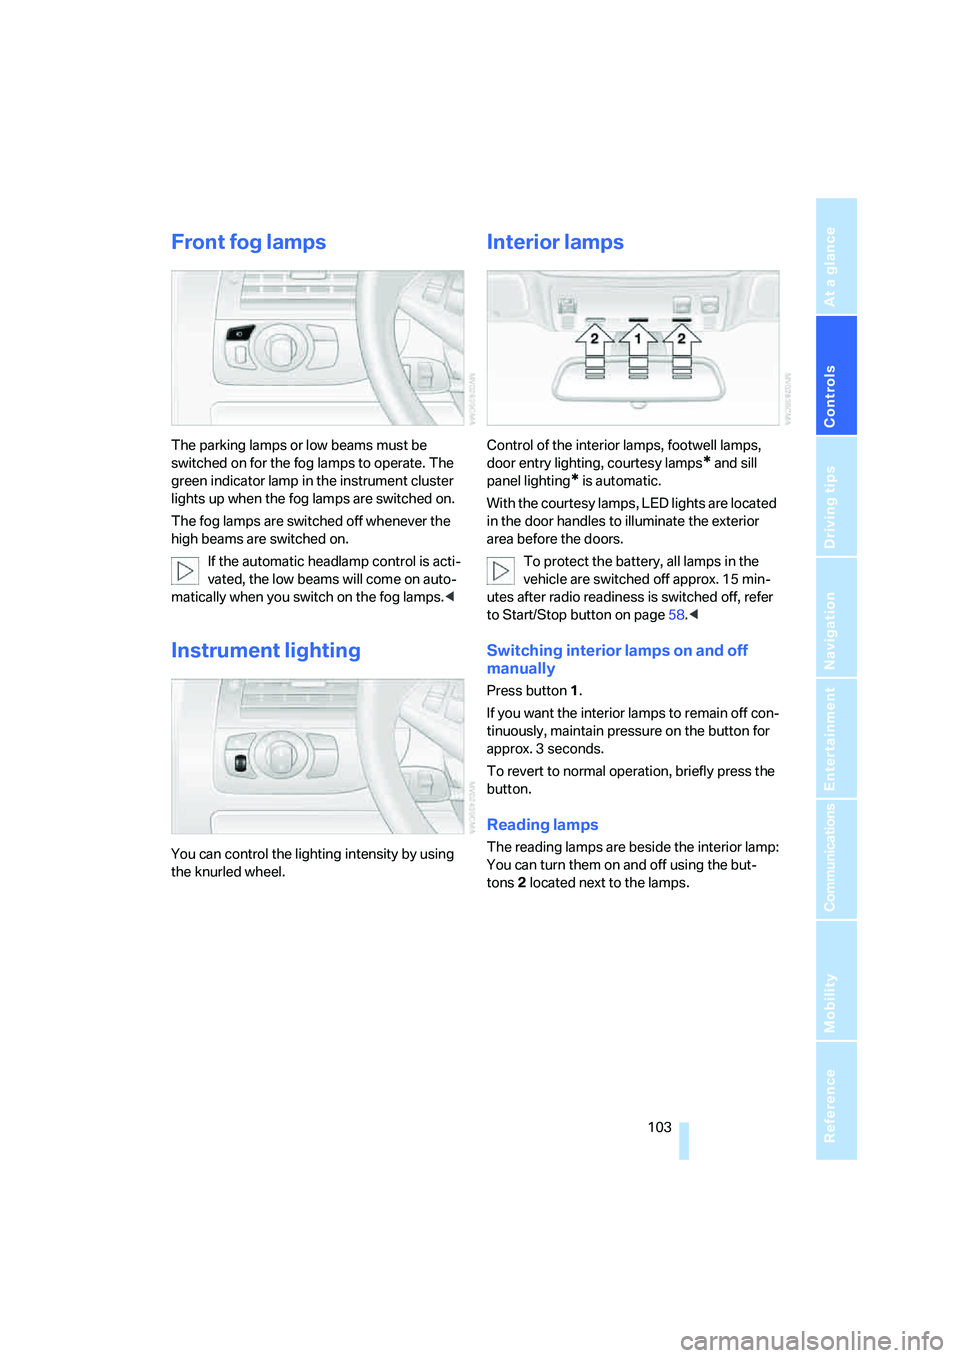
Control of the interior lamps, footwell lamps,
door entry lighting, courtesy lamps
* and sill
panel lighting
* is automatic.
With the courtesy lamps, LED lights are located
in the door handles to illuminate the exterior
area before the doors.
To protect the battery, all lamps in the
vehicle are switched off approx. 15 min-
utes after radio readiness is switched off, refer
to Start/Stop button on page58.<
Switching interior lamps on and off
manually
Press button 1.
If you want the interior lamps to remain off con-
tinuously, maintain pressure on the button for
approx. 3 seconds.
To revert to normal operation, briefly press the
button.
Reading lamps
The reading lamps are beside the interior lamp:
You can turn them on and off using the but-
tons2 located next to the lamps.
Page 196 of 242
Mobility
195Reference
At a glance
Controls
Driving tips
Communications
Navigation
Entertainment
Engine compartment
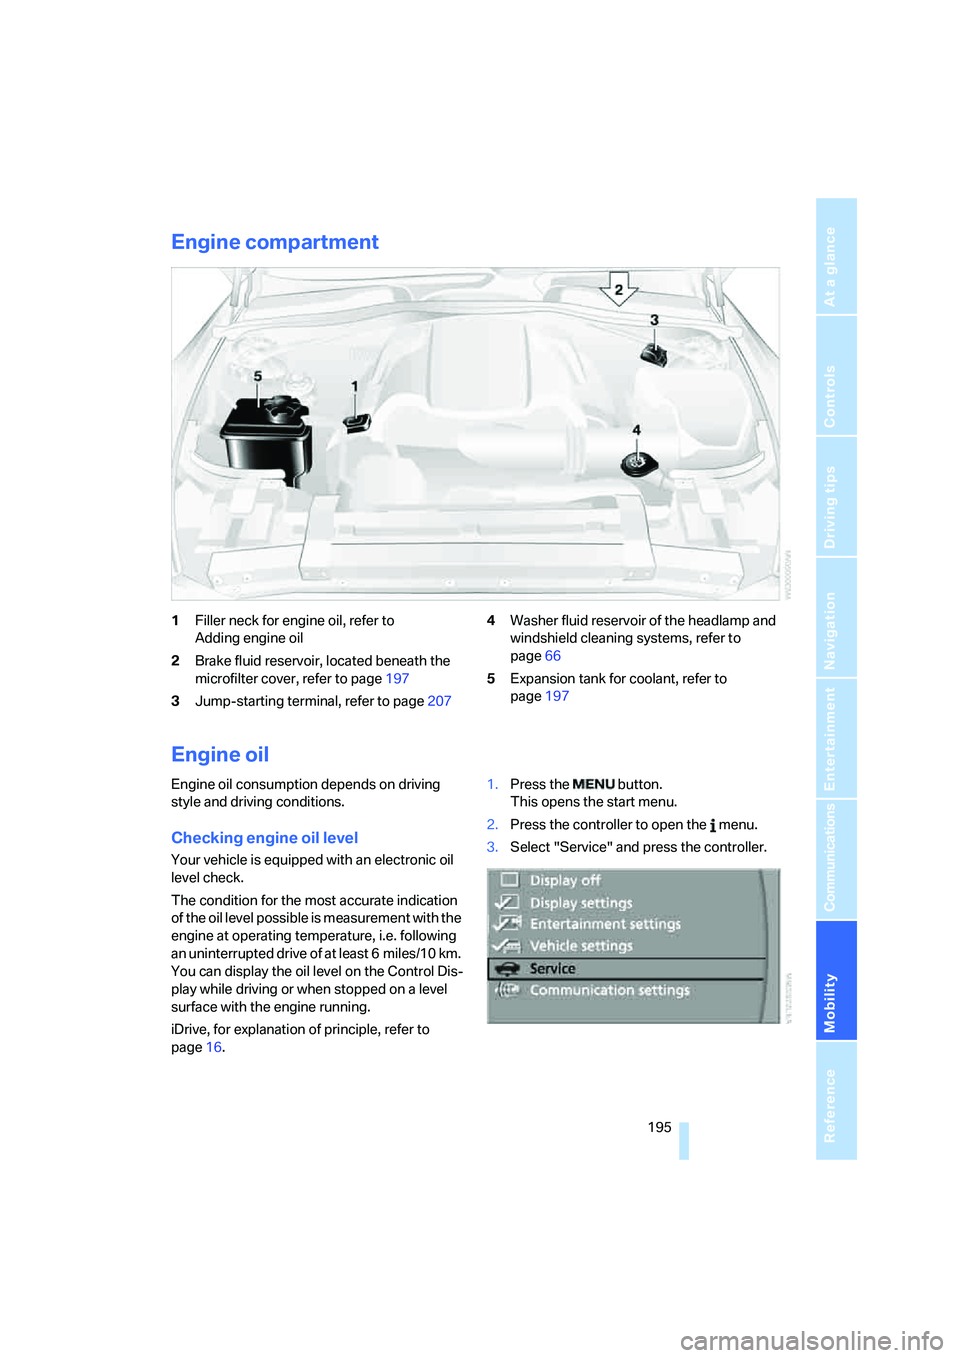
1Filler neck for engine oil, refer to
Adding engine oil
2Brake fluid reservoir, located beneath the
microfilter cover, refer to page197
3Jump-starting terminal, refer to page2074Washer fluid reservoir of the headlamp and
windshield cleaning systems, refer to
page66
5Expansion tank for coolant, refer to
page197
Engine oil
Engine oil consumption depends on driving
style and driving conditions.
Checking engine oil level
Your vehicle is equipped with an electronic oil
level check.
The condition for the most accurate indication
of the oil level possible is measurement with the
engine at operating temperature, i.e. following
an uninterrupted drive of at least 6 miles/10 km.
You can display the oil level on the Control Dis-
play while driving or when stopped on a level
surface with the engine running.
iDrive, for explanation of principle, refer to
page16.1.Press the button.
This opens the start menu.
2.Press the controller to open the menu.
3.Select "Service" and press the controller.
Page 202 of 242
Mobility
201Reference
At a glance
Controls
Driving tips
Communications
Navigation
Entertainment
Replacing components
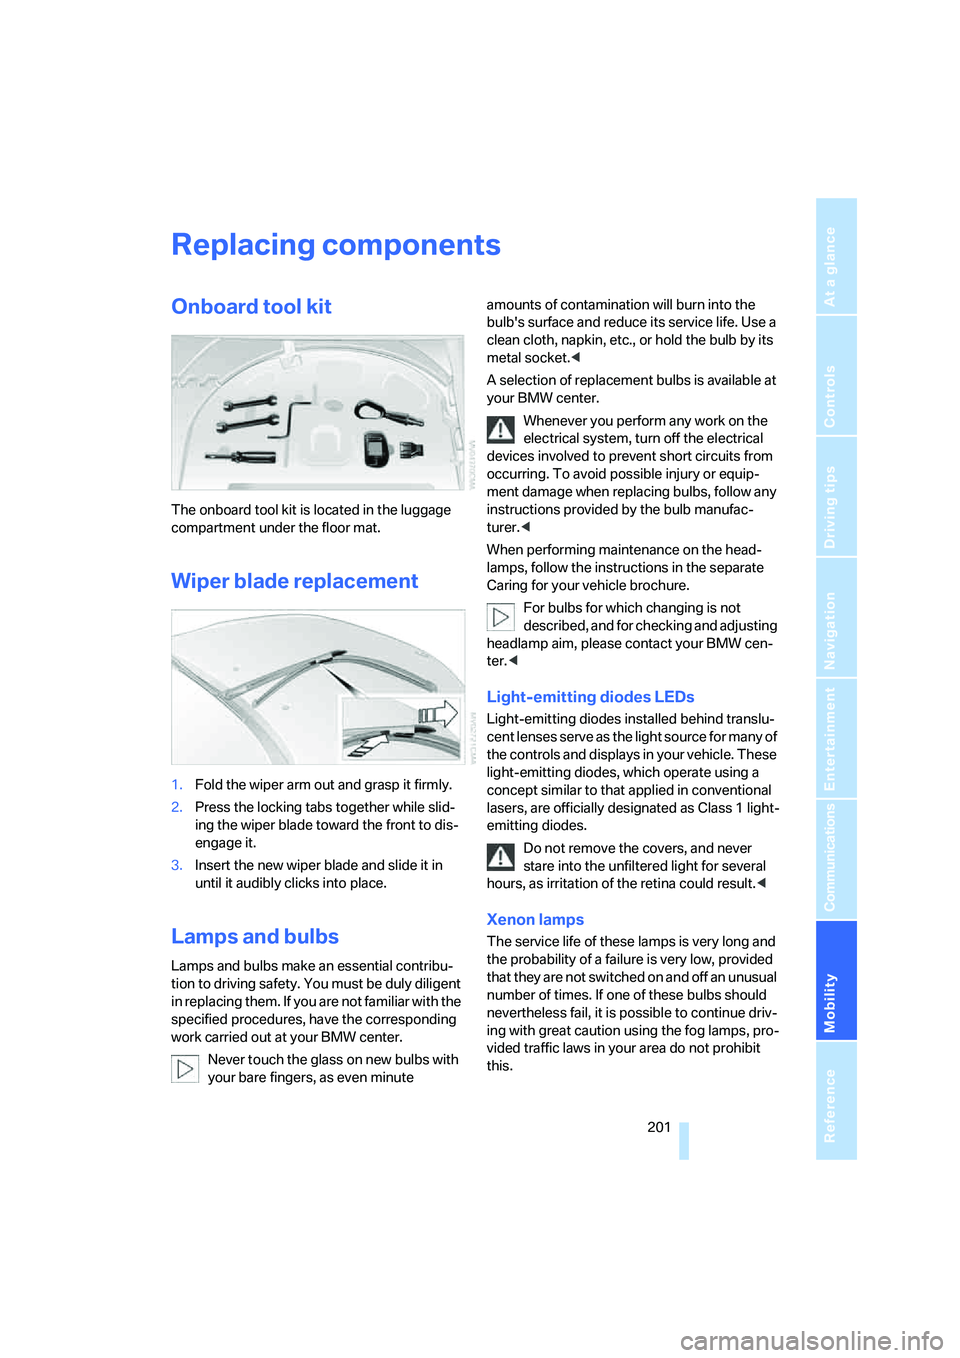
Onboard tool kit
The onboard tool kit is located in the luggage
compartment under the floor mat.
Wiper blade replacement
1.Fold the wiper arm out and grasp it firmly.
2.Press the locking tabs together while slid-
ing the wiper blade toward the front to dis-
engage it.
3.Insert the new wiper blade and slide it in
until it audibly clicks into place.
Lamps and bulbs
Lamps and bulbs make an essential contribu-
tion to driving safety. You must be duly diligent
in replacing them. If you are not familiar with the
specified procedures, have the corresponding
work carried out at your BMW center.
Never touch the glass on new bulbs with
your bare fingers, as even minute amounts of contamination will burn into the
bulb's surface and reduce its service life. Use a
clean cloth, napkin, etc., or hold the bulb by its
metal socket.<
A selection of replacement bulbs is available at
your BMW center.
Whenever you perform any work on the
electrical system, turn off the electrical
devices involved to prevent short circuits from
occurring. To avoid possible injury or equip-
ment damage when replacing bulbs, follow any
instructions provided by the bulb manufac-
turer.<
When performing maintenance on the head-
lamps, follow the instructions in the separate
Caring for your vehicle brochure.
For bulbs for which changing is not
described, and for checking and adjusting
headlamp aim, please contact your BMW cen-
ter.<
Light-emitting diodes LEDs
Light-emitting diodes installed behind translu-
cent lenses serve as the light source for many of
the controls and displays in your vehicle. These
light-emitting diodes, which operate using a
concept similar to that applied in conventional
lasers, are officially designated as Class 1 light-
emitting diodes.
Do not remove the covers, and never
stare into the unfiltered light for several
hours, as irritation of the retina could result.<
Xenon lamps
The service life of these lamps is very long and
the probability of a failure is very low, provided
that they are not switched on and off an unusual
number of times. If one of these bulbs should
nevertheless fail, it is possible to continue driv-
ing with great caution using the fog lamps, pro-
vided traffic laws in your area do not prohibit
this.
Page 218 of 242
Reference 217
At a glance
Controls
Driving tips
Communications
Navigation
Entertainment
Mobility
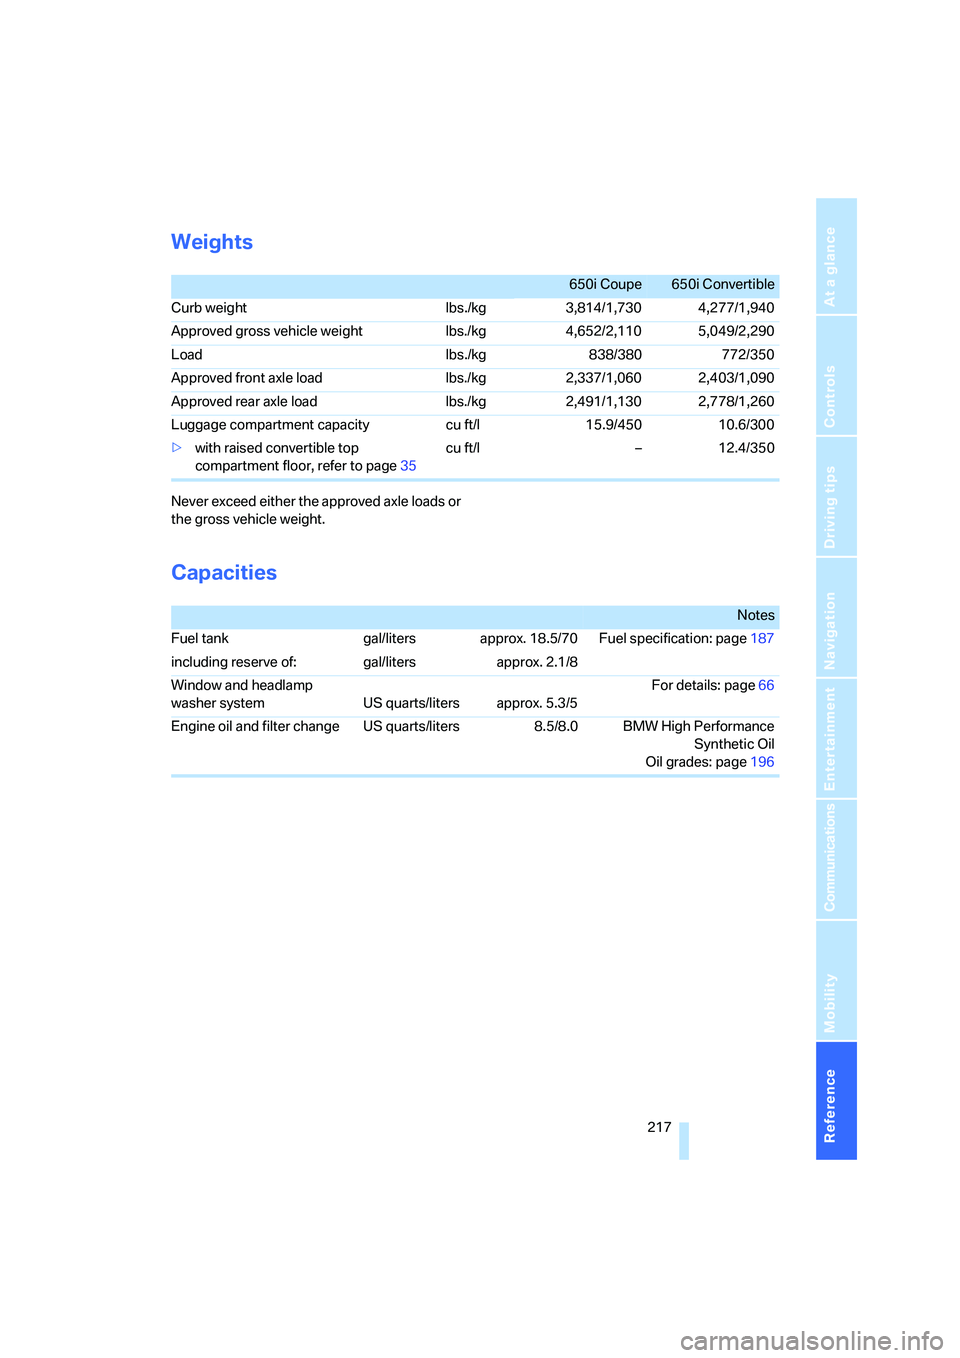
Weights
Never exceed either the approved axle loads or
the gross vehicle weight.
Capacities
650i Coupe 650i Convertible
Curb weight lbs./kg 3,814/1,730 4,277/1,940
Approved gross vehicle weight lbs./kg 4,652/2,110 5,049/2,290
Load lbs./kg 838/380 772/350
Approved front axle load lbs./kg 2,337/1,060 2,403/1,090
Approved rear axle load lbs./kg 2,491/1,130 2,778/1,260
Luggage compartment capacity cu ft/l 15.9/450 10.6/300
>with raised convertible top
compartment floor, refer to page35cu ft/l – 12.4/350
Notes
Fuel tank gal/liters approx. 18.5/70 Fuel specification: page187
including reserve of: gal/liters approx. 2.1/8
Window and headlamp
washer system US quarts/liters approx. 5.3/5For details: page66
Engine oil and filter change US quarts/liters 8.5/8.0 BMW High Performance
Synthetic Oil
Oil grades: page196
Page 224 of 242
Reference 223
At a glance
Controls
Driving tips
Communications
Navigation
Entertainment
Mobility
Audio144
– controls144
– switching on/off144
– tone control145
– volume145
"Audio", refer to Tone
control145
Automatic
– air distribution105
– air volume105
– headlamp control100
– service notification180
– steering wheel adjustment,
refer to Easy entry/exit53
– storing stations149
Automatically switching
between high beams and
low beams, refer to High-
beam assistant102
Automatic car washes120
– also refer to Comfort
access38
– also refer to the Caring for
your vehicle brochure
Automatic climate control104
– automatic air
distribution105
– convertible program105
– switching off107
Automatic closing of doors,
see Automatic soft
closing33
Automatic curb monitor53
Automatic lighting
– refer to Automatic headlamp
control100
– refer to Daytime running
lamps101
– refer to High-beam
assistant102
– refer to Interior lamps103
– refer to Pathway lighting100
"Automatic programs"105
Automatic recirculated-air
control AUC107
Automatic soft closing33
Automatic station search149Automatic transmission with
Steptronic62
– deactivating selector lever
interlock63
– Dynamic Driving Control64
– interlock62
– kick-down63
– selector lever lock,
Interlock62
– shiftlock62
– towing209
– tow-starting210
– with comfort access38
"Automatic ventilation"108
AUTO program with
automatic climate
control105
"Autostore" on the
radio148,150
Average fuel consumption75
– setting units84
Average speed75
"Avoid ferries" for
navigation135
"Avoid highways" for
navigation135
Avoiding freeways for
navigation134
Avoiding unintentional
alarms36
"Avoid tollroads" for
navigation135
Axle loads, refer to
Weights217
"A - Z"171,172
B
Backrest contour, refer to
Lumbar support48
Backrests, refer to Seats48
Backup lamps
– refer to Reverse gear61
– replacing bulbs, refer to Tail
lamps203
"Balance", refer to Tone
control146Balance, refer to Tone
control146
Balance adjustment in audio
mode, right/left146
Band-aids, refer to First-aid
kit207
Bass, refer to Tone
control145
"Bass", tone control146
Battery
– disposal38
– jump starting207
– refer to Vehicle battery204
Battery change38
Being towed209
Belts, refer to Safety belts51
Blower, refer to Air
volume106
"BMW Assist"181
BMW Assist179
– enabling179
– services offered180
"BMW Contact"173
"BMW Contact
Numbers"173
BMW homepage4
BMW Maintenance
System199
BMW Night Vision97
– activating98
– cleaning camera99
– cleaning camera, refer to
Wiper system66
– deactivating98
– making settings98
"BMW Service"181
"BMW Service settings"180
BMW website4
Brake Assistant, refer to DBC
Dynamic Brake Control86
Brake fluid197
– level197
– warning lamp197
Brake force display92
Brake hydraulic system197
Brake lamps
– brake force display92
– replacing bulbs, refer to Tail
lamps203
Page 229 of 242
Everything from A to Z
228
F
"Fader", refer to Tone
control146
Fader, refer to Tone
control146
Failure messages, refer to
Check Control79
False alarms, refer to Avoiding
unintentional alarms36
Fastening safety belts, refer to
Safety belts51
Fastest route for
navigation134
Fast forward
– CD changer161
– CD player161
"Fast route" for
navigation135
"Favorites" calling up with
radio151
Filling capacities217
First aid, refer to First-aid
kit207
First-aid kit207
Flashing when locking and
unlocking, refer to Setting
acknowledgment signals31
Flashlight, refer to
Rechargeable flashlight111
Flat tire
– Flat Tire Monitor88
– run-flat tires89,91,192
– Tire Pressure Monitor89
Flat Tire Monitor88
– false alarms88
– initializing system88
– limits of system88
– show chains193
– warning lamp89
"FM", reception
range144,148
FM, waveband148
Fog lamps103
– indicator lamp13,103
Folding into raised position
convertible top
compartment floor,
Convertible35Footbrake, refer to Braking
safely119
Footwell lighting, refer to
Interior lamps103
For specified oil grades, refer
to Approved engine oils196
For your own safety6
Freeway, refer to Route
criteria134
Front airbags92
Front passenger airbags
deactivating
93
"FTM"89
FTM, refer to Flat Tire
Monitor88
Fuel
– average consumption75
– display75
– fuel specifications187
– high-quality brands187
– quality187
– specifications187
– tank capacity186
Fuel display, refer to Fuel
gauge75
Fuel filler door186
– releasing in the event of
electrical malfunction186
Fuel gauge75
"Full screen" with BMW Night
Vision99
Fuses205
G
Garage-door opener, refer to
Integrated universal remote
control110
Gasoline
– refer to Average fuel
consumption75
– refer to Fuel
specifications187
– refer to Required fuel187
Gasoline display, refer to Fuel
gauge75Gear changes
– automatic transmission with
Steptronic62
– SMG Sequential Manual
Transmission62
Gear display
– automatic transmission with
Steptronic62
– SMG Sequential Manual
Transmission61
Gearshift lever
– automatic transmission with
Steptronic62
– manual transmission60
– SMG Sequential Manual
Transmission61
General driving notes118
Glass sunroof, electric with
raise function40
– comfort operation with
comfort access37
– convenience operation32
– moving manually41
– remote control31
Glove compartment111
– rechargeable flashlight111
GPS navigation, refer to
Navigation system124
Grills, refer to Ventilation107
Gross vehicle weight, refer to
Weights217
H
Handbrake60
– indicator lamp13,60
Hands-free system, refer to
Microphone14
Hazard warning flashers15
HD, refer to High Definition
Radio152
Head airbags92
Headlamp control,
automatic100
Headlamp flasher64