2006 BMW 530I SEDAN page 220
[x] Cancel search: page 220Page 200 of 259
Wheels and tires
198
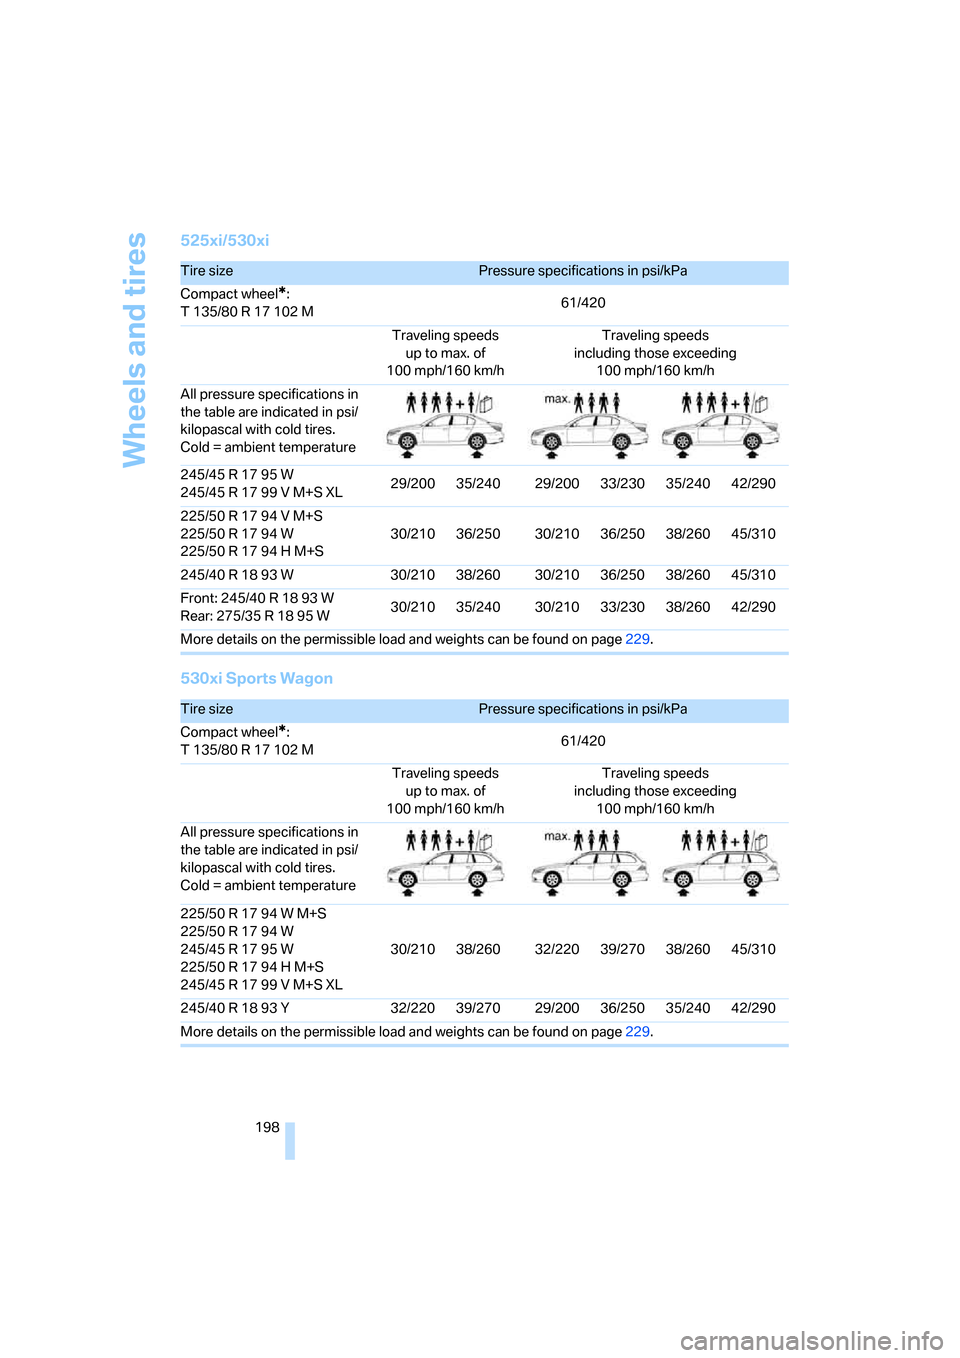
525xi/530xi
530xi Sports Wagon
Tire sizePressure specifications in psi/kPa
Compact wheel
*:
T 135/80 R 17 102 M61/420
Traveling speeds
up to max. of
100 mph/160 km/hTraveling speeds
including those exceeding
100 mph/160 km/h
All pressure specifications in
the table are indicated in psi/
kilopascal with cold tires.
Cold = ambient temperature
245/45 R 17 95 W
245/45 R 17 99 V M+S XL29/200 35/240 29/200 33/230 35/240 42/290
225/50 R 17 94 V M+S
225/50 R 17 94 W
225/50 R 17 94 H M+S30/210 36/250 30/210 36/250 38/260 45/310
245/40 R 18 93 W 30/210 38/260 30/210 36/250 38/260 45/310
Front: 245/40 R 18 93 W
Rear: 275/35 R 18 95 W30/210 35/240 30/210 33/230 38/260 42/290
More details on the permissible load and weights can be found on page229.
Tire sizePressure specifications in psi/kPa
Compact wheel
*:
T 135/80 R 17 102 M61/420
Traveling speeds
up to max. of
100 mph/160 km/hTraveling speeds
including those exceeding
100 mph/160 km/h
All pressure specifications in
the table are indicated in psi/
kilopascal with cold tires.
Cold = ambient temperature
225/50 R 17 94 W M+S
225/50 R 17 94 W
245/45 R 17 95 W
225/50 R 17 94 H M+S
245/45 R 17 99 V M+S XL30/210 38/260 32/220 39/270 38/260 45/310
245/40 R 18 93 Y 32/220 39/270 29/200 36/250 35/240 42/290
More details on the permissible load and weights can be found on page229.
Page 201 of 259

Mobility
199Reference
At a glance
Controls
Driving tips
Communications
Navigation
Entertainment
550i
Tire identification marks
Knowledge of the labeling on the side of the tire
makes it easier to identify and choose the right
tires.
Tire sizeSpeed letter
Q = up to 100 mph/160 km/h
T = up to 118 mph/190 km/h
H = up to 131 mph/210 km/h
V = up to 150 mph/240 km/h
W = up to 167 mph/270 km/h
Y = up to 186 mph/300 km/h
Tire Identification Number
Tires with DOT codes meet the guidelines of
the U.S. Department of Transportation.
DOT code:
Tire sizePressure specifications in psi/kPa
Compact wheel
*:
T 135/80 R 17 102 M61/420
Traveling speeds
up to max. of
100 mph/160 km/hTraveling speeds
including those exceeding
100 mph/160 km/h
All pressure specifications in
the table are indicated in psi/
kilopascal with cold tires.
Cold = ambient temperature
245/40 R 18 93 Y 30/210 38/260 29/200 35/240 33/230 41/280
245/45 R 17 95 W
245/45 R 17 99 V M+S XL29/200 35/240 32/220 38/260 36/250 44/300
225/50 R 17 94 V M+S
225/50 R 17 94 W
225/50 R 17 94 H M+S29/200 36/250 33/230 39/270 38/260 45/310
Front: 245/40 R 18 93 Y
Rear: 275/35R1895Y30/210 35/240 29/200 32/220 33/230 38/260
Front: 245/35 R 19 93 Y XL
Rear: 275/30R1996YXL35/240 39/270 33/230 38/260 38/260 44/300
More details on the permissible load and weights can be found on page229.
e.g.
Nominal width in mm
Aspect ratio in Ξ
Belted construction – radial
Rim diameter in inches
Carrying capacity ID-code
(not in ZR tires)
Speed code letter
(in ZR tires before the R)225/50 R1794 W
e.g.
Manufacturer code
for tire make
Tire size and tire design
Tire ageDOT xxxx xxx 0806
Page 207 of 259
Mobility
205Reference
At a glance
Controls
Driving tips
Communications
Navigation
Entertainment
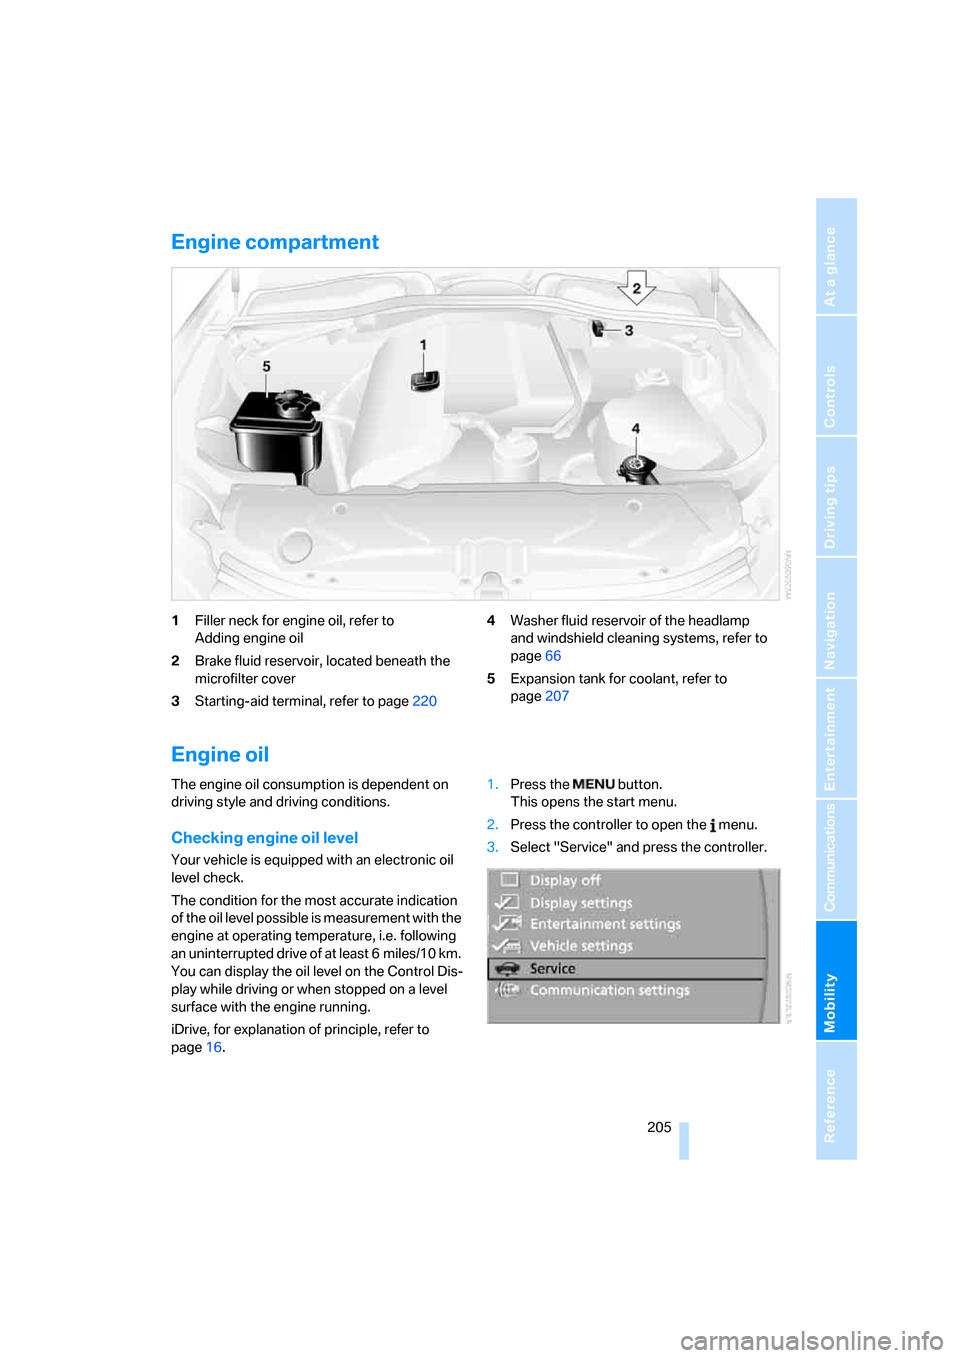
Engine compartment
1Filler neck for engine oil, refer to
Adding engine oil
2Brake fluid reservoir, located beneath the
microfilter cover
3Starting-aid terminal, refer to page2204Washer fluid reservoir of the headlamp
and windshield cleaning systems, refer to
page66
5Expansion tank for coolant, refer to
page207
Engine oil
The engine oil consumption is dependent on
driving style and driving conditions.
Checking engine oil level
Your vehicle is equipped with an electronic oil
level check.
The condition for the most accurate indication
of the oil level possible is measurement with the
engine at operating temperature, i.e. following
an uninterrupted drive of at least 6 miles/10 km.
You can display the oil level on the Control Dis-
play while driving or when stopped on a level
surface with the engine running.
iDrive, for explanation of principle, refer to
page16.1.Press the button.
This opens the start menu.
2.Press the controller to open the menu.
3.Select "Service" and press the controller.
Page 219 of 259
Mobility
217Reference
At a glance
Controls
Driving tips
Communications
Navigation
Entertainment
face of the jack base rests on the ground
perpendicularly beneath the jacking point.
The vehicle jack is designed for
changing wheels only. Do not attempt
to raise another vehicle model with it or to
raise any load of any kind. To do so could
cause accidents and personal injury.<
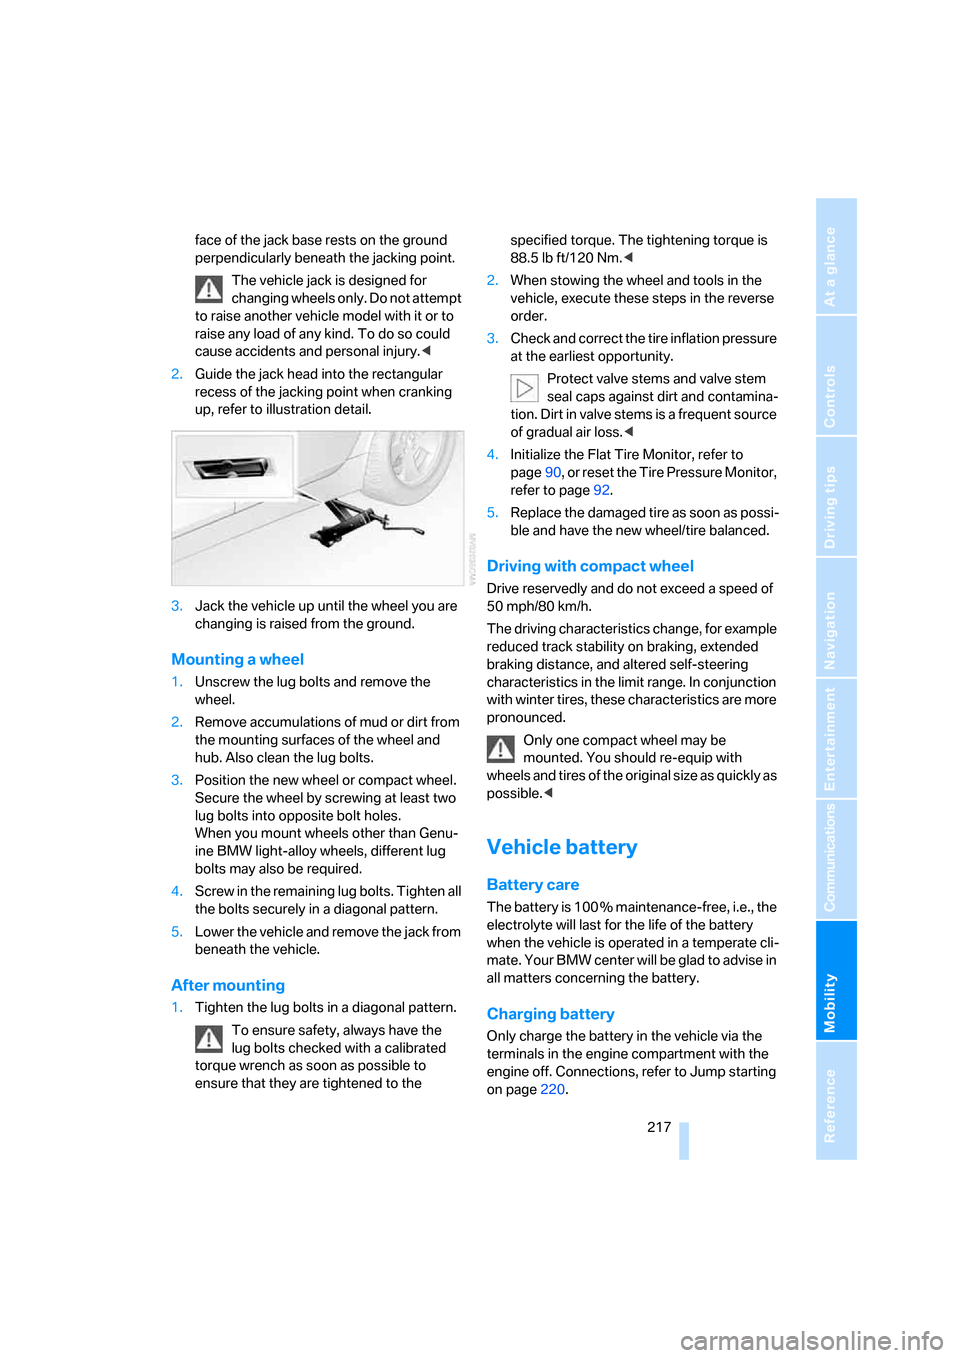
2.Guide the jack head into the rectangular
recess of the jacking point when cranking
up, refer to illustration detail.
3.Jack the vehicle up until the wheel you are
changing is raised from the ground.
Mounting a wheel
1.Unscrew the lug bolts and remove the
wheel.
2.Remove accumulations of mud or dirt from
the mounting surfaces of the wheel and
hub. Also clean the lug bolts.
3.Position the new wheel or compact wheel.
Secure the wheel by screwing at least two
lug bolts into opposite bolt holes.
When you mount wheels other than Genu-
ine BMW light-alloy wheels, different lug
bolts may also be required.
4.Screw in the remaining lug bolts. Tighten all
the bolts securely in a diagonal pattern.
5.Lower the vehicle and remove the jack from
beneath the vehicle.
After mounting
1.Tighten the lug bolts in a diagonal pattern.
To ensure safety, always have the
lug bolts checked with a calibrated
torque wrench as soon as possible to
ensure that they are tightened to the specified torque. The tightening torque is
88.5 lb ft/120 Nm.<
2.When stowing the wheel and tools in the
vehicle, execute these steps in the reverse
order.
3.Check and correct the tire inflation pressure
at the earliest opportunity.
Protect valve stems and valve stem
seal caps against dirt and contamina-
tion. Dirt in valve stems is a frequent source
of gradual air loss.<
4.Initialize the Flat Tire Monitor, refer to
page90, or reset the Tire Pressure Monitor,
refer to page92.
5.Replace the damaged tire as soon as possi-
ble and have the new wheel/tire balanced.
Driving with compact wheel
Drive reservedly and do not exceed a speed of
50 mph/80 km/h.
The driving characteristics change, for example
reduced track stability on braking, extended
braking distance, and altered self-steering
characteristics in the limit range. In conjunction
with winter tires, these characteristics are more
pronounced.
Only one compact wheel may be
mounted. You should re-equip with
wheels and tires of the original size as quickly as
possible.<
Vehicle battery
Battery care
The battery is 100 % maintenance-free, i.e., the
electrolyte will last for the life of the battery
when the vehicle is operated in a temperate cli-
mate. Your BMW center will be glad to advise in
all matters concerning the battery.
Charging battery
Only charge the battery in the vehicle via the
terminals in the engine compartment with the
engine off. Connections, refer to Jump starting
on page220.
Page 222 of 259

Giving and receiving assistance
220
Sports Wagon
Release the two quick-release fasteners and
fold down the trim piece.
First-aid kit*
Some of the articles contained in the first-aid kit
have a limited service life. Therefore, check the
expiration dates of the contents regularly and
replace the contents concerned in good time if
necessary.
Sedan
The first-aid kit is located in the luggage com-
partment lid.
Loosen the wing nut to open.
Sports Wagon
The first-aid kit is located in the right side panel
of the cargo area. Before opening the side
panel, pull the retaining strap
* toward the rear
by its rear end and unhook it.
Roadside Assistance*
The Roadside Assistance of the BMW Group
offers you assistance in the event of a break-
down around the clock, including on weekends
and public holidays.
The phone numbers of the Roadside Assis-
tance in your home country can be found in the
Contact brochure.
With BMW Assist or TeleService, you can con-
tact the Roadside Assistance of the BMW
Group for assistance in the event of a break-
down directly via iDrive, refer to page189.
Jump starting
When your battery is discharged, you can use
two jumper cables to start your BMW with
power from the battery in a second vehicle. You
can also use the same method to help start
another vehicle. Use only jumper cables with
fully-insulated clamp handles.
To avoid the risk of potentially fatal injury,
always avoid all contact with electrical
components while the engine is running. Care-
fully adhere to the following sequence, both to
prevent damage to one or both vehicles, and to
guard against possible personal injuries.<
Page 224 of 259
Giving and receiving assistance
222 Sedan:
It is located in the toolkit in the luggage com-
partment lid, refer to page211.
Sports Wagon:
It is located in the toolkit behind the left side
panel in the cargo area, refer to page211.
Use only the tow fitting provided with the
vehicle and screw it all the way in. Use the
tow fitting for towing only on roads. Avoid lateral
loading of the tow fitting, e.g. do not lift the vehi-
cle by the tow fitting. Otherwise damage to the
tow fitting and the vehicle can occur.<
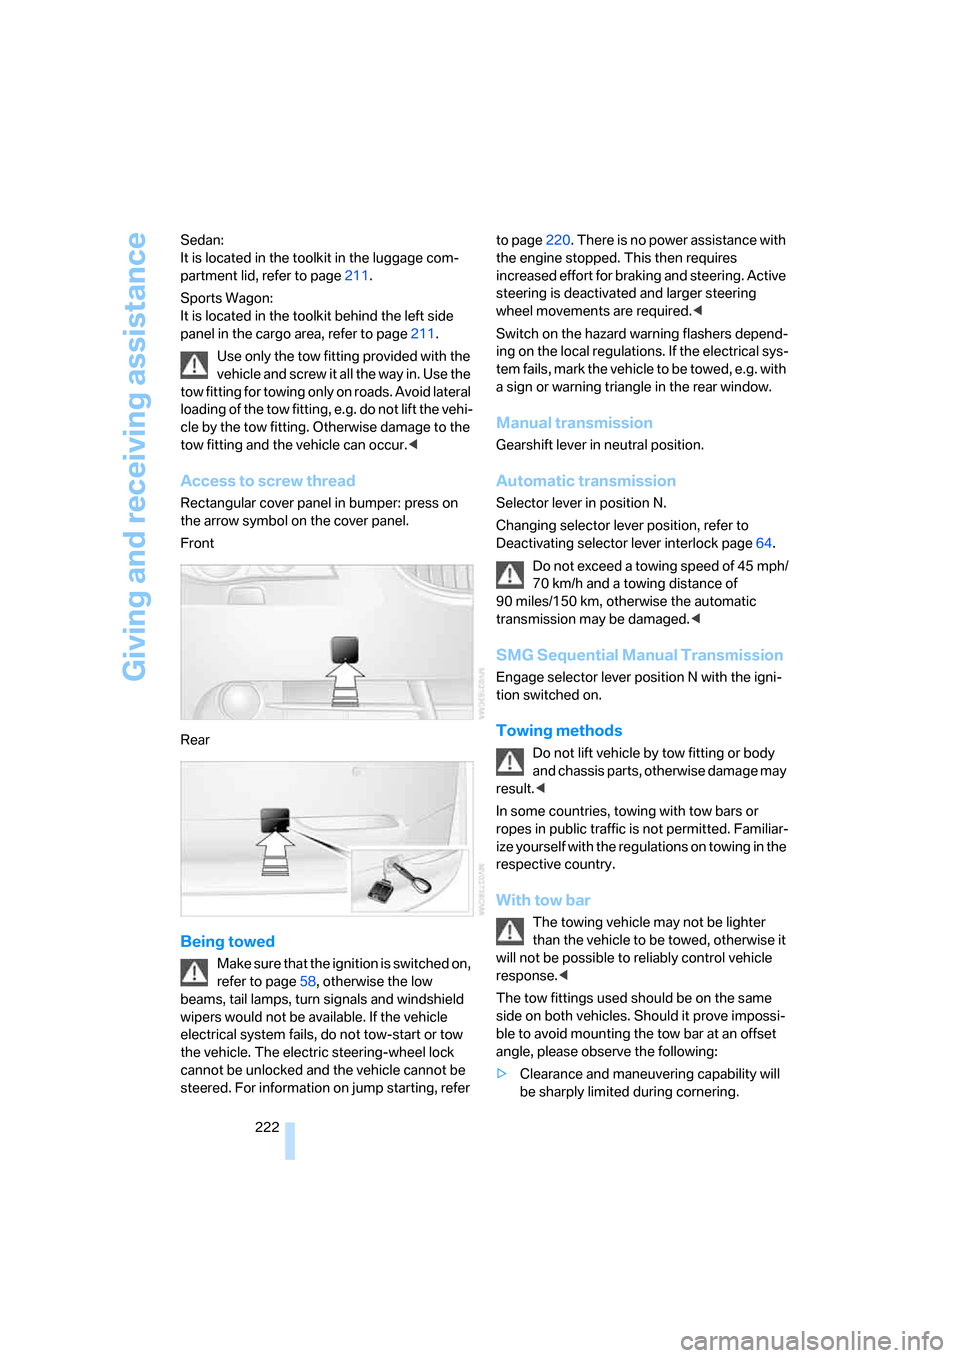
Access to screw thread
Rectangular cover panel in bumper: press on
the arrow symbol on the cover panel.
Front
Rear
Being towed
Make sure that the ignition is switched on,
refer to page58, otherwise the low
beams, tail lamps, turn signals and windshield
wipers would not be available. If the vehicle
electrical system fails, do not tow-start or tow
the vehicle. The electric steering-wheel lock
cannot be unlocked and the vehicle cannot be
steered. For information on jump starting, refer to page220. There is no power assistance with
the engine stopped. This then requires
increased effort for braking and steering. Active
steering is deactivated and larger steering
wheel movements are required.<
Switch on the hazard warning flashers depend-
ing on the local regulations. If the electrical sys-
tem fails, mark the vehicle to be towed, e.g. with
a sign or warning triangle in the rear window.
Manual transmission
Gearshift lever in neutral position.
Automatic transmission
Selector lever in position N.
Changing selector lever position, refer to
Deactivating selector lever interlock page64.
Do not exceed a towing speed of 45 mph/
70 km/h and a towing distance of
90 miles/150 km, otherwise the automatic
transmission may be damaged.<
SMG Sequential Manual Transmission
Engage selector lever position N with the igni-
tion switched on.
Towing methods
Do not lift vehicle by tow fitting or body
and chassis parts, otherwise damage may
result.<
In some countries, towing with tow bars or
ropes in public traffic is not permitted. Familiar-
ize yourself with the regulations on towing in the
respective country.
With tow bar
The towing vehicle may not be lighter
than the vehicle to be towed, otherwise it
will not be possible to reliably control vehicle
response.<
The tow fittings used should be on the same
side on both vehicles. Should it prove impossi-
ble to avoid mounting the tow bar at an offset
angle, please observe the following:
>Clearance and maneuvering capability will
be sharply limited during cornering.
Page 225 of 259
Mobility
223Reference
At a glance
Controls
Driving tips
Communications
Navigation
Entertainment
>When mounted at an angle, the tow bar will
exert lateral forces, tending to push the
vehicle sideways.
Only attach the tow bar to the tow fittings,
as attachment to other vehicle parts can
lead to damage.<
With tow rope
When starting off in the towing vehicle, make
sure that the tow rope is taut.
To avoid jerking and the associated
stresses on vehicle components when
towing, always use nylon ropes or nylon straps.
Only attach tow ropes to the tow fittings, as
attachment to other vehicle parts can lead to
damage.<
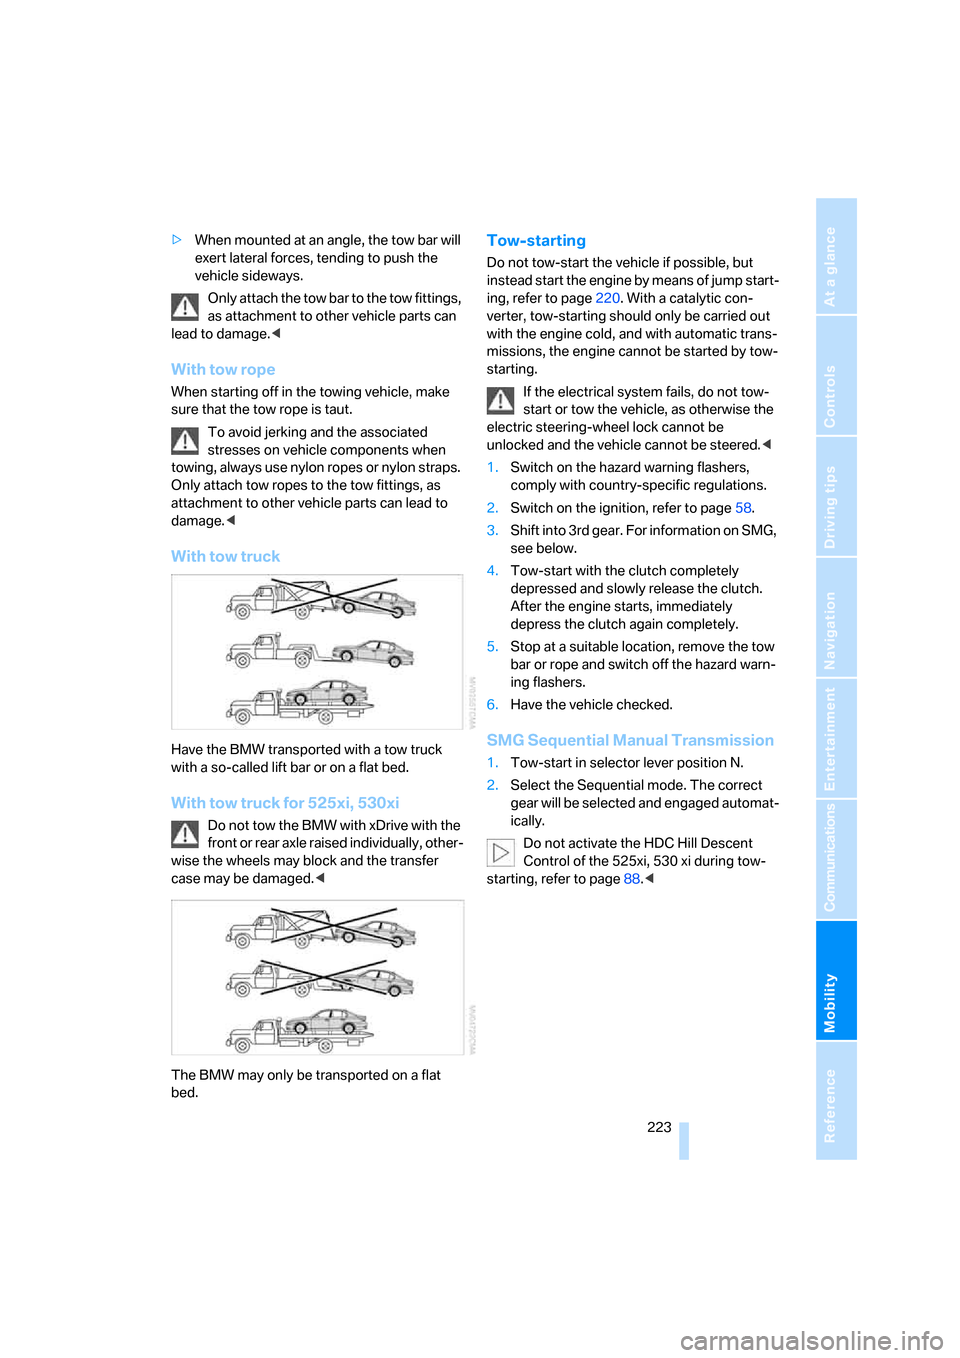
With tow truck
Have the BMW transported with a tow truck
with a so-called lift bar or on a flat bed.
With tow truck for 525xi, 530xi
Do not tow the BMW with xDrive with the
front or rear axle raised individually, other-
wise the wheels may block and the transfer
case may be damaged.<
The BMW may only be transported on a flat
bed.
Tow-starting
Do not tow-start the vehicle if possible, but
instead start the engine by means of jump start-
ing, refer to page220. With a catalytic con-
verter, tow-starting should only be carried out
with the engine cold, and with automatic trans-
missions, the engine cannot be started by tow-
starting.
If the electrical system fails, do not tow-
start or tow the vehicle, as otherwise the
electric steering-wheel lock cannot be
unlocked and the vehicle cannot be steered.<
1.Switch on the hazard warning flashers,
comply with country-specific regulations.
2.Switch on the ignition, refer to page58.
3.Shift into 3rd gear. For information on SMG,
see below.
4.Tow-start with the clutch completely
depressed and slowly release the clutch.
After the engine starts, immediately
depress the clutch again completely.
5.Stop at a suitable location, remove the tow
bar or rope and switch off the hazard warn-
ing flashers.
6.Have the vehicle checked.
SMG Sequential Manual Transmission
1.Tow-start in selector lever position N.
2.Select the Sequential mode. The correct
gear will be selected and engaged automat-
ically.
Do not activate the HDC Hill Descent
Control of the 525xi, 530 xi during tow-
starting, refer to page88.<
Page 232 of 259

Technical data
230 Never exceed either the approved axle loads or
the gross vehicle weight.
Capacities
Sports Wagon530xi
Curb weight
>Manual transmission lbs./kg 3,858/1,750
>Automatic transmission lbs./kg 3,891/1,765
Approved gross vehicle weight
>Manual transmission lbs./kg 5,049/2,290
>Automatic transmission lbs./kg 5,082/2,305
Load lbs./kg 1,190/540
Approved front axle load lbs./kg 2,381/1,080
Approved rear axle load lbs./kg 2,866/1,300
Approved roof load capacity lbs./kg 220/100
Luggage compartment capacity cu ft/l 17.7-58.3/500-1,650
Notes
Fuel tank gal/liters approx. 18.5/70 Fuel grade: page195
of that reserve gal/liters approx. 2.1/8
Window cleaning system For more details: page66
>Sedan US quarts/liters approx. 3.2/3
>incl. headlamp washer system US quarts/liters approx. 5.3/5
>Sports Wagon US quarts/liters approx. 5.3/5
Engine with oil filter change BMW High Performance
Synthetic Oil.
Oil grades: page206 >525i/xi, 530i/xi US quarts/liters 6.9/6.5
>550i US quarts/liters 8.5/8.0