Page 5 of 259

Reference
At a glance
Controls
Driving tips
Communications
Navigation
Entertainment
Mobility
Contents
The fastest way to find specific topics is to use
the index, refer to page236.
Using this Owner's Manual
4Notes
7Reporting safety defects
At a glance
10Cockpit
16iDrive
22Voice command system
Controls
28Opening and closing
45Adjustments
54Transporting children safely
58Driving
74Everything under control
85Technology for comfort, convenience
and safety
101Lamps
105Climate
111Practical interior accessories
Driving tips
124Things to remember when driving
Navigation
132Starting navigation system
133Destination entry
144Destination guidance
149What to do if …
Entertainment
152On/off and tone
156Radio
165CD player and CD changer
171External audio device
Communications
174Telephoning
187TeleService, BMW Assist
Mobility
194Refueling
196Wheels and tires
204Under the hood
209Maintenance
211Replacing components
219Giving and receiving assistance
Reference
226Technical data
231Short commands of voice command
system
236Everything from A to Z
Page 19 of 259

At a glance
17Reference
Controls
Driving tips
Communications
Navigation
Entertainment
Mobility
Menu overview
Communication
>Telephone*
>BMW Assist* or TeleService*
Navigation or onboard information
>Navigation system*
>Onboard information, e.g. for displaying
the average fuel consumption
Entertainment
>Radio
>CD player and CD changer
*
>External audio device
Climate
>Air distribution
>Seat air conditioning
*
>Automatic program
>Parked car ventilation
*
menu
>Switching off Control Display
>Tone and display settings
>Settings for your vehicle, e.g. for the central
locking system
>Display of service requirements and dates
for statutory emission and vehicle inspec-
tions
>Settings for telephone
Operating principle
From radio readiness, refer to page58, the fol-
lowing message is shown on the Control Dis-
play:
To clear the message:
Press the controller.
This displays the start menu.
On vehicles with a single drive, the message
automatically disappears after approx. 10 sec-
onds.
Start menu
You can call up all the functions of iDrive using
five menu items.
Opening start menu
Press the button.
To open the start menu from the menu:
Press the button twice.
Page 21 of 259
At a glance
19Reference
Controls
Driving tips
Communications
Navigation
Entertainment
Mobility
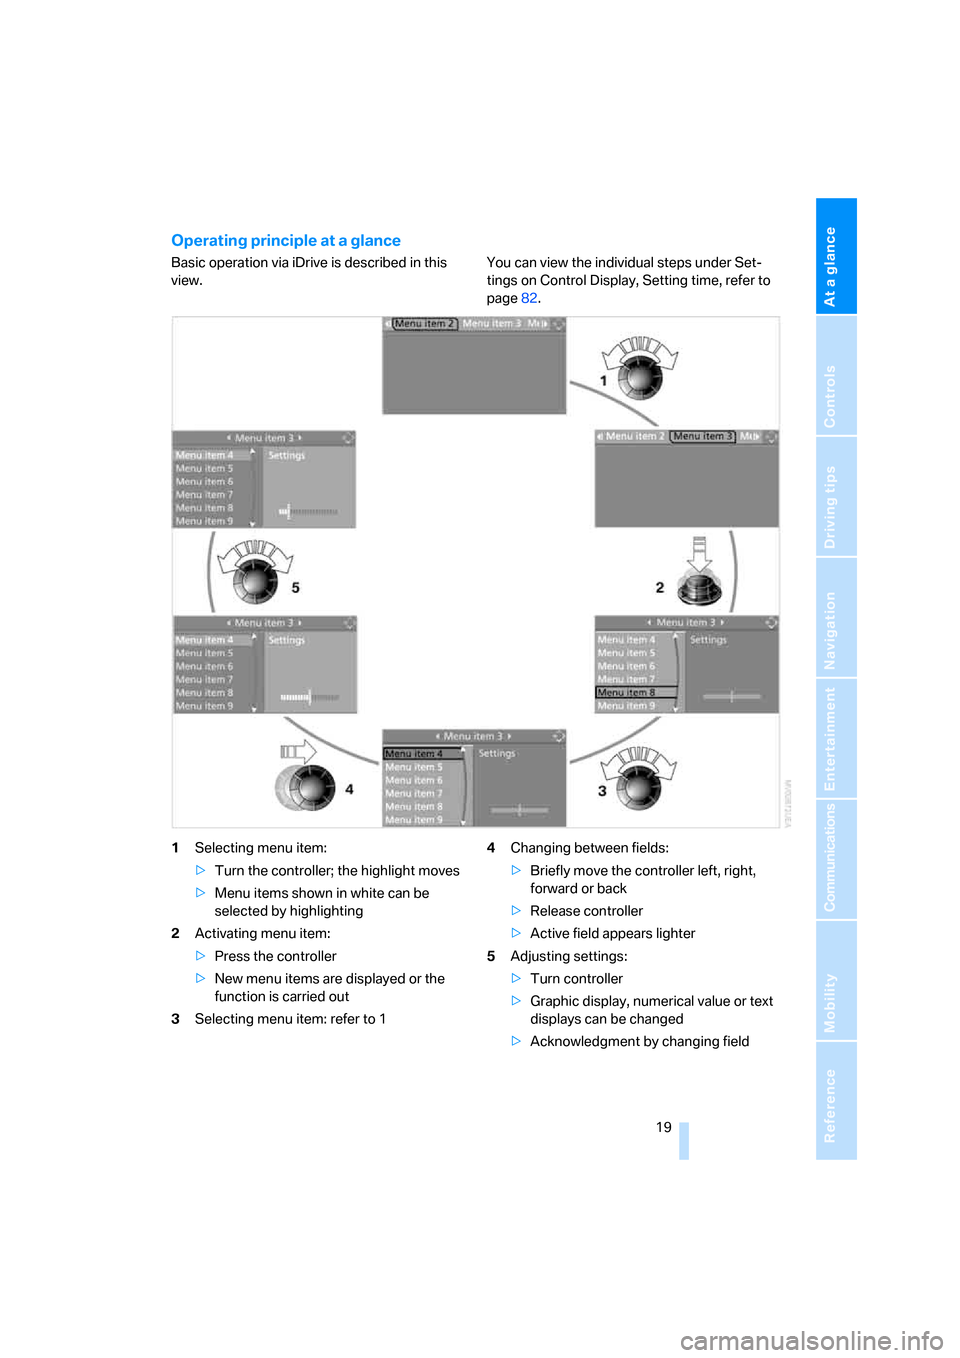
Operating principle at a glance
Basic operation via iDrive is described in this
view.You can view the individual steps under Set-
tings on Control Display, Setting time, refer to
page82.
1Selecting menu item:
>Turn the controller; the highlight moves
>Menu items shown in white can be
selected by highlighting
2Activating menu item:
>Press the controller
>New menu items are displayed or the
function is carried out
3Selecting menu item: refer to 14Changing between fields:
>Briefly move the controller left, right,
forward or back
>Release controller
>Active field appears lighter
5Adjusting settings:
>Turn controller
>Graphic display, numerical value or text
displays can be changed
>Acknowledgment by changing field
Page 22 of 259

iDrive
20
Status information
1Display for:
>Entertainment:
Radio, CD
>Telephone
* in "Communication":
Name of linked mobile phone, network
search or no network
>"BMW Assist"
*:
Existing voice connection with a service
from BMW Assist
2Entertainment sound output off
3Display for:
> New entries present in "Missed calls"
*
> Roaming active
4 Telephoning
* possible if the mobile
phone is logged-on in the vehicle
Mobile phone network with strong
reception, display dependent on mobile
phone
5Time
Other displays:
The status information is temporarily hidden
when there are Check Control instructions or
inputs via the voice command system
*.
Assistance window*
Additional information can be displayed in the
assistance window:
>The computer or the trip computer
*
>The arrow or map view with a navigation
system
*
>The current position
Selecting display
1.Move the controller to the right to change to
the assistance window and press the con-
troller.
2.Select a menu item.
3.Press the controller.
Page 23 of 259
At a glance
21Reference
Controls
Driving tips
Communications
Navigation
Entertainment
Mobility
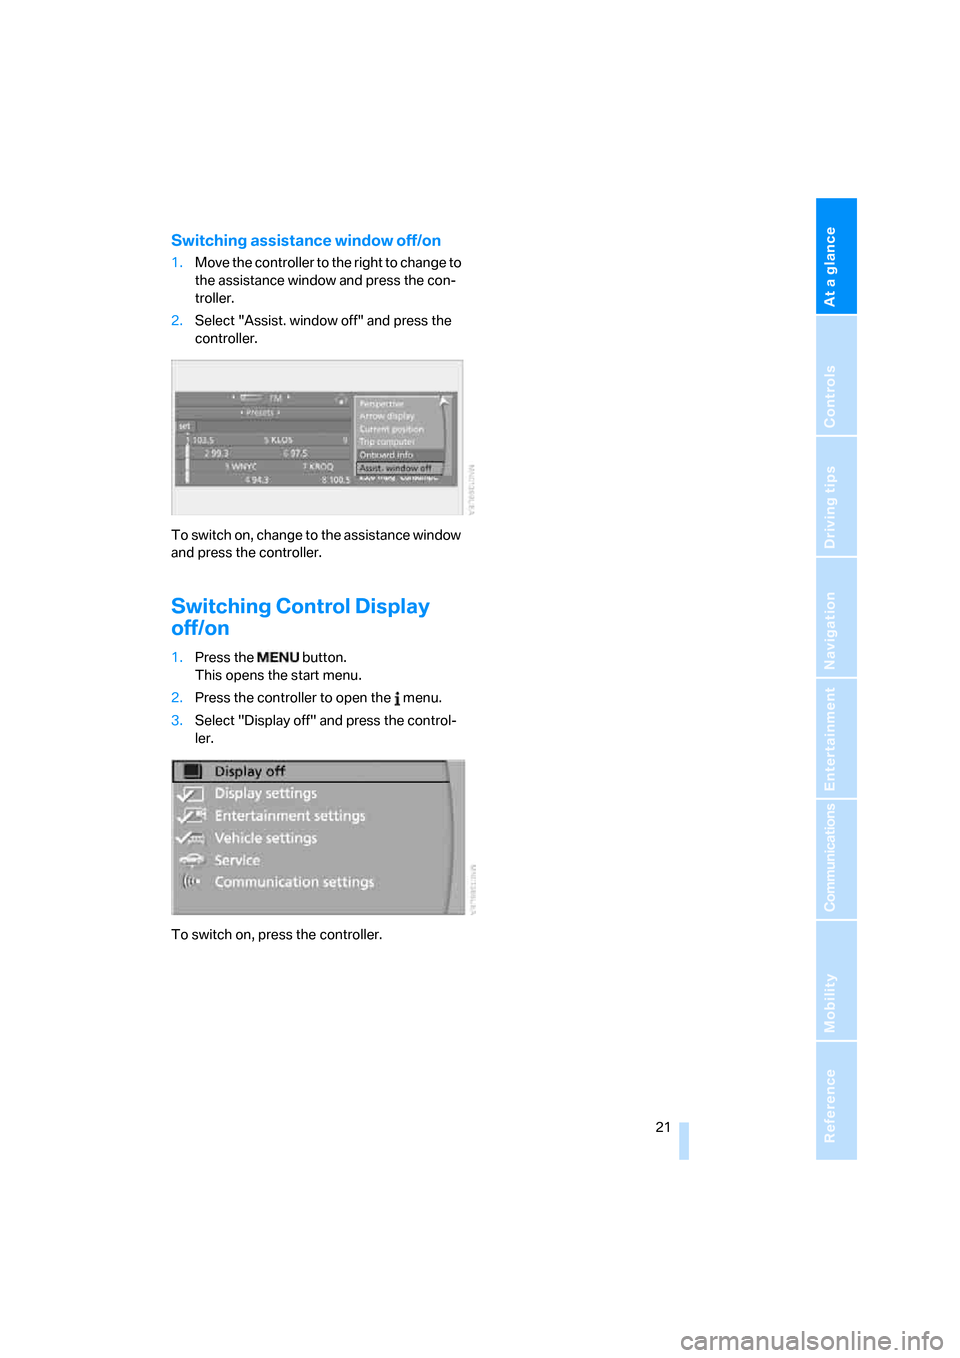
Switching assistance window off/on
1.Move the controller to the right to change to
the assistance window and press the con-
troller.
2.Select "Assist. window off" and press the
controller.
To switch on, change to the assistance window
and press the controller.
Switching Control Display
off/on
1.Press the button.
This opens the start menu.
2.Press the controller to open the menu.
3.Select "Display off" and press the control-
ler.
To switch on, press the controller.
Page 25 of 259
At a glance
23Reference
Controls
Driving tips
Communications
Navigation
Entertainment
Mobility
If no other commands are possible, then oper-
ate the equipment using iDrive.
Terminating or canceling voice
command system
Press the button on the steering wheel or in
the center console
or
Commands
Having possible commands read aloud
You can have the system read aloud the possi-
ble commands related to the selected menu
item on the Control Display.
To have the system list the possible com-
mands:
For example, if you have selected "CD", the
system will read aloud the possible commands
for operating the CD player and the CD
changer
*.
Opening help
Using alternative commands
There are often a number of commands to run a
function, e.g.:
Running functions directly with short
commands
With short commands you can carry out certain
functions directly, regardless of which menu
item is selected, refer to page231.
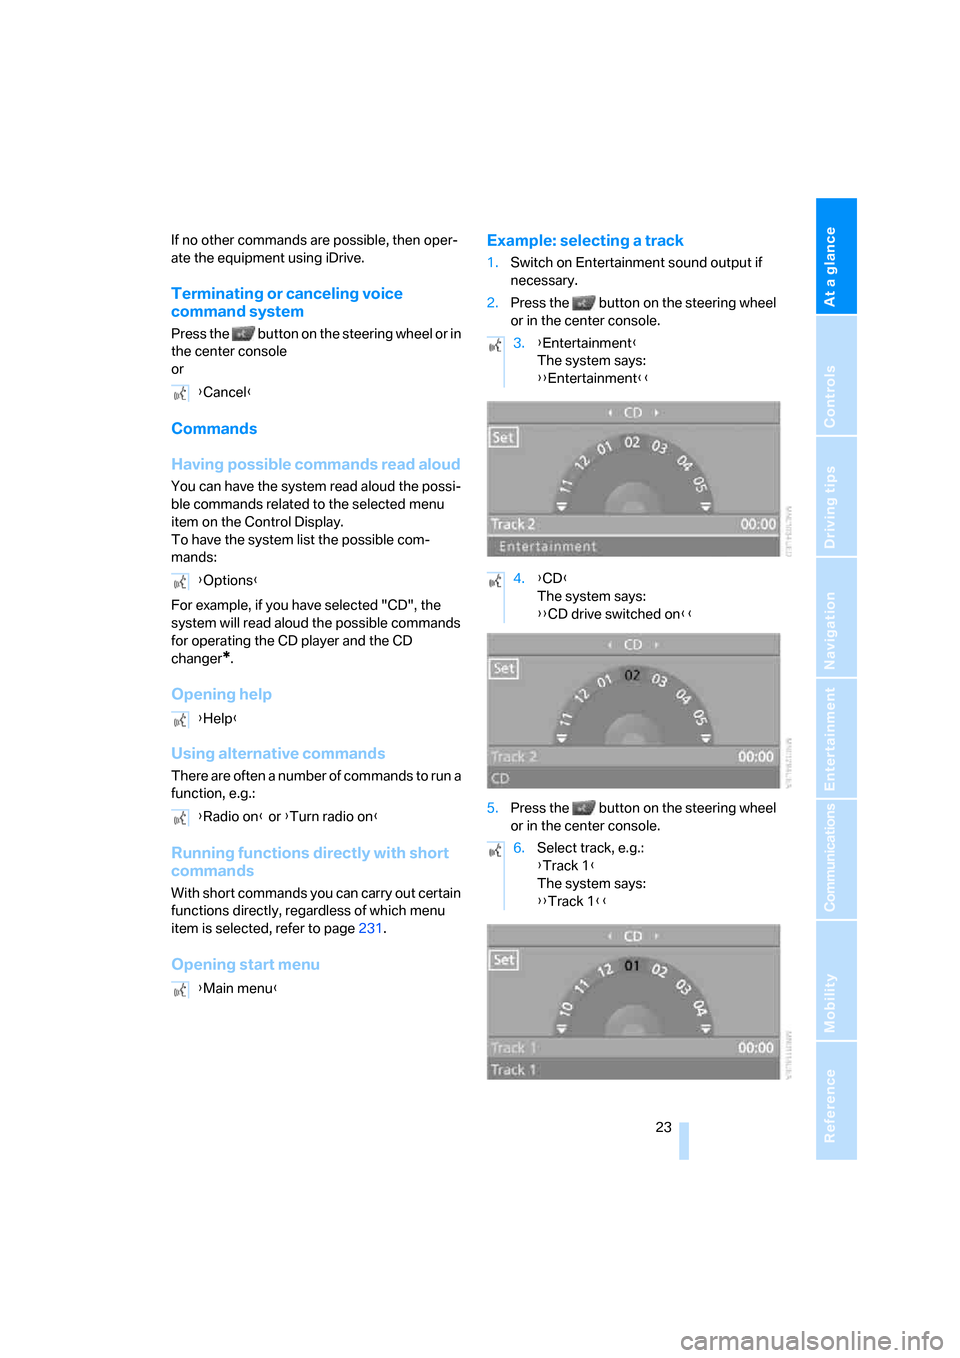
Opening start menuExample: selecting a track
1.Switch on Entertainment sound output if
necessary.
2.Press the button on the steering wheel
or in the center console.
5.Press the button on the steering wheel
or in the center console. {Cancel}
{Options}
{Help}
{Radio on} or {Turn radio on}
{Main menu}
3.{Entertainment}
The system says:
{{Entertainment}}
4.{CD}
The system says:
{{CD drive switched on}}
6.Select track, e.g.:
{Track 1}
The system says:
{{Track 1}}
Page 34 of 259

Opening and closing
32
For US owners only
The transmitter and receiver units comply with
part 15 of the FCC/Federal Communication
Commission regulations. Operation is gov-
erned by the following:
FCC ID:
LX8766S
LX8766E
LX8CAS
LX8CAS2
Compliance statement:
This device complies with part 15 of the FCC
Rules. Operation is subject to the following two
conditions:
>This device must not cause harmful inter-
ference, and
>this device must accept any interference
received, including interference that may
cause undesired operation.
Any unauthorized modifications or
changes to these devices could void the
user's authority to operate this equipment.<
Using door lock
When unlocking
1.Turning the key once unlocks the driver's
door and the fuel filler door.
2.Turning the key a second time unlocks the
remaining doors and the luggage compart-
ment lid/tailgate.
Convenience operation
You also have the option of operating the win-
dows and the glass sunroof
* from the driver's
door lock.
Turn and hold the key in the positions for
unlocking or locking.
Watch during the closing process to be
sure that no one is injured. Releasing the
key stops the operation.<
Manual operation
In the event of an electrical malfunction, you can
turn a key all the way to the right or left in the
door lock to lock or unlock the driver's door.
Opening and closing: from
inside
This button serves to unlock or lock doors and
the luggage compartment lid or tailgate and
rear window with the front doors closed, but
does not activate the anti-theft system. The fuel
filler door remains unlocked.
You can also set the situations in which the
vehicle is locked.
iDrive, for explanation of principle, refer to
page16.
1.Press the button.
This opens the start menu.
2.Press the controller to open the menu.
3.Select "Vehicle settings" and press the
controller.
4.Select "Door locks" and press the control-
ler.
Page 38 of 259
Opening and closing
36
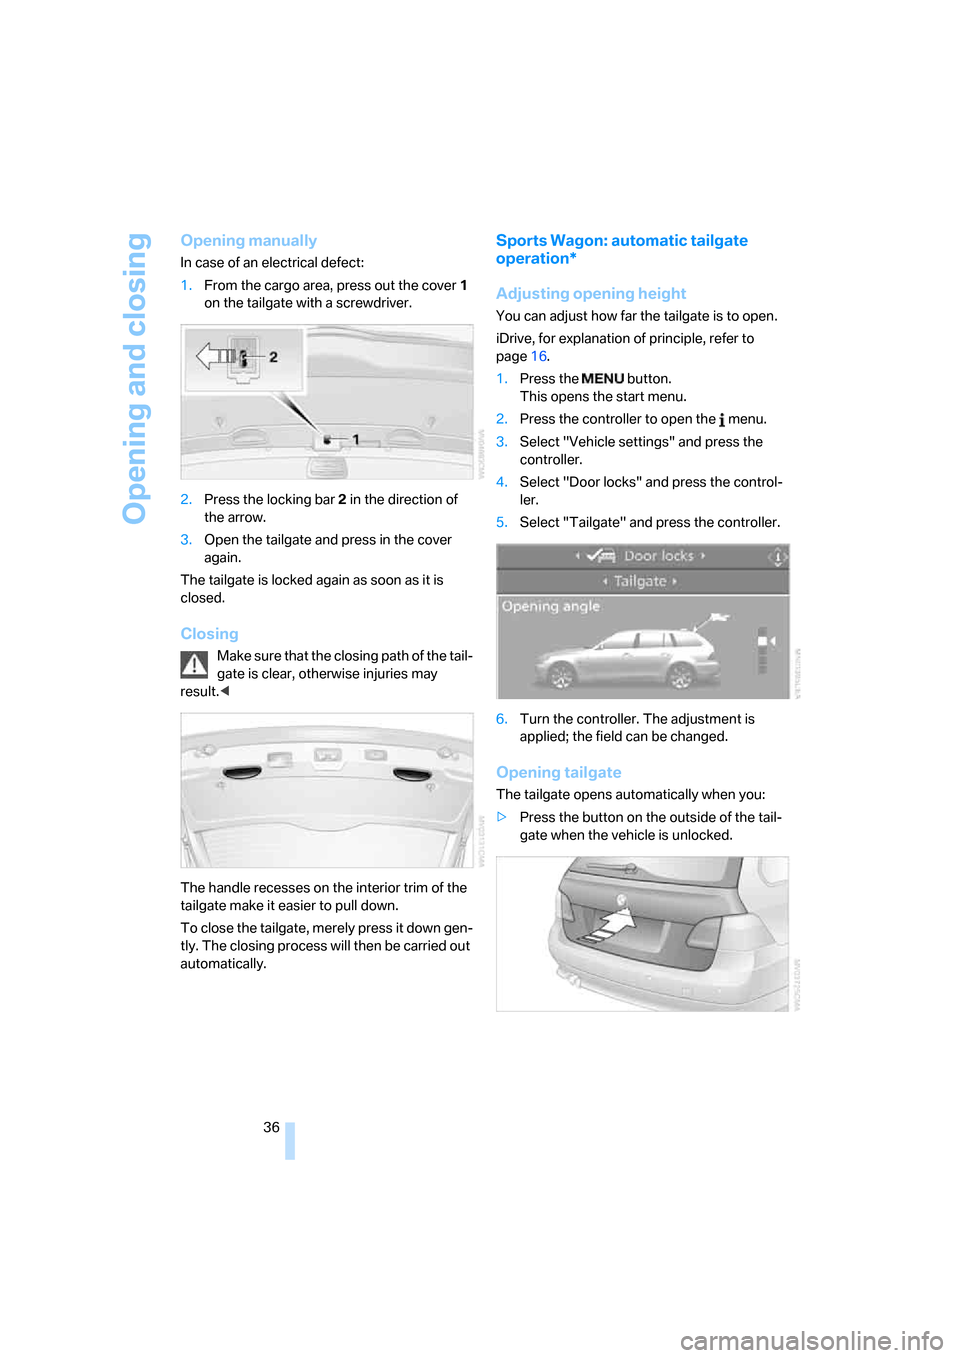
Opening manually
In case of an electrical defect:
1.From the cargo area, press out the cover1
on the tailgate with a screwdriver.
2.Press the locking bar2 in the direction of
the arrow.
3.Open the tailgate and press in the cover
again.
The tailgate is locked again as soon as it is
closed.
Closing
Make sure that the closing path of the tail-
gate is clear, otherwise injuries may
result.<
The handle recesses on the interior trim of the
tailgate make it easier to pull down.
To close the tailgate, merely press it down gen-
tly. The closing process will then be carried out
automatically.
Sports Wagon: automatic tailgate
operation*
Adjusting opening height
You can adjust how far the tailgate is to open.
iDrive, for explanation of principle, refer to
page16.
1.Press the button.
This opens the start menu.
2.Press the controller to open the menu.
3.Select "Vehicle settings" and press the
controller.
4.Select "Door locks" and press the control-
ler.
5.Select "Tailgate" and press the controller.
6.Turn the controller. The adjustment is
applied; the field can be changed.
Opening tailgate
The tailgate opens automatically when you:
>Press the button on the outside of the tail-
gate when the vehicle is unlocked.