2006 BMW 525XI light
[x] Cancel search: lightPage 57 of 248

Driving
56
Driving
Ignition lock
Insert the remote control as far as possible into
the ignition lock.
>Radio readiness switches on.
Some current consumers are ready for
operation.
>The electric steering-wheel lock audibly
unlocks.
Before moving the vehicle, insert the
remote control into the ignition lock,
otherwise the electric steering-wheel lock will
not be unlocked and the vehicle cannot be
steered.<
Removing remote control from ignition
lock
Briefly press in the remote control; it is pushed
out somewhat.
At the same time:
>The ignition is switched off if it was still
switched on.
>The electric steering-wheel lock audibly
locks.
Automatic transmission
The remote control can only be removed when
the selector lever position P is selected: inter-
lock.
Start/Stop button
Briefly pressing the Start/Stop button several
times switches the radio readiness or the igni-
tion on and off.
Briefly pressing the Start/Stop button
with the brake or clutch pedal depressed
starts the engine.<
Radio readiness
Some current consumers are ready for opera-
tion. The time and outside temperature are dis-
played in the instrument cluster.
Radio readiness is automatically switched off:
>immediately when the remote control is
removed from the ignition lock
>with comfort access
* by touching the sen-
sitive surface on the door handle, refer to
Locking on page38
Ignition on
Most indicator and warning lamps in the display
area1 of the instrument cluster, refer to
page13, light up for different periods.
Radio readiness and ignition off
All indicator and warning lamps in the instru-
ment cluster go out.
Page 59 of 248
Driving
58
Manual transmission
1.Briefly press the Start/Stop button with the
vehicle stopped.
2.Shift into first gear or reverse.
3.Apply the handbrake.
SMG Sequential Manual Gearbox*
1.Apply the handbrake.
2.Engage a driving position.
3.Briefly press Start/Stop button.
If the position N is engaged when the
engine is switched off, this is pointed out
visually and acoustically.
Automatic transmission*
1.Select the selector lever position P with the
vehicle stopped.
2.Briefly press Start/Stop button.
Handbrake
The handbrake is primarily intended to prevent
the vehicle from rolling while parked; it brakes
the rear wheels.
Indicator lamp
The indicator lamp lights up, and a sig-
nal also sounds when starting off. The
handbrake is applied.
Indicator lamp for Canadian models.
Applying
The lever locks in position automatically.
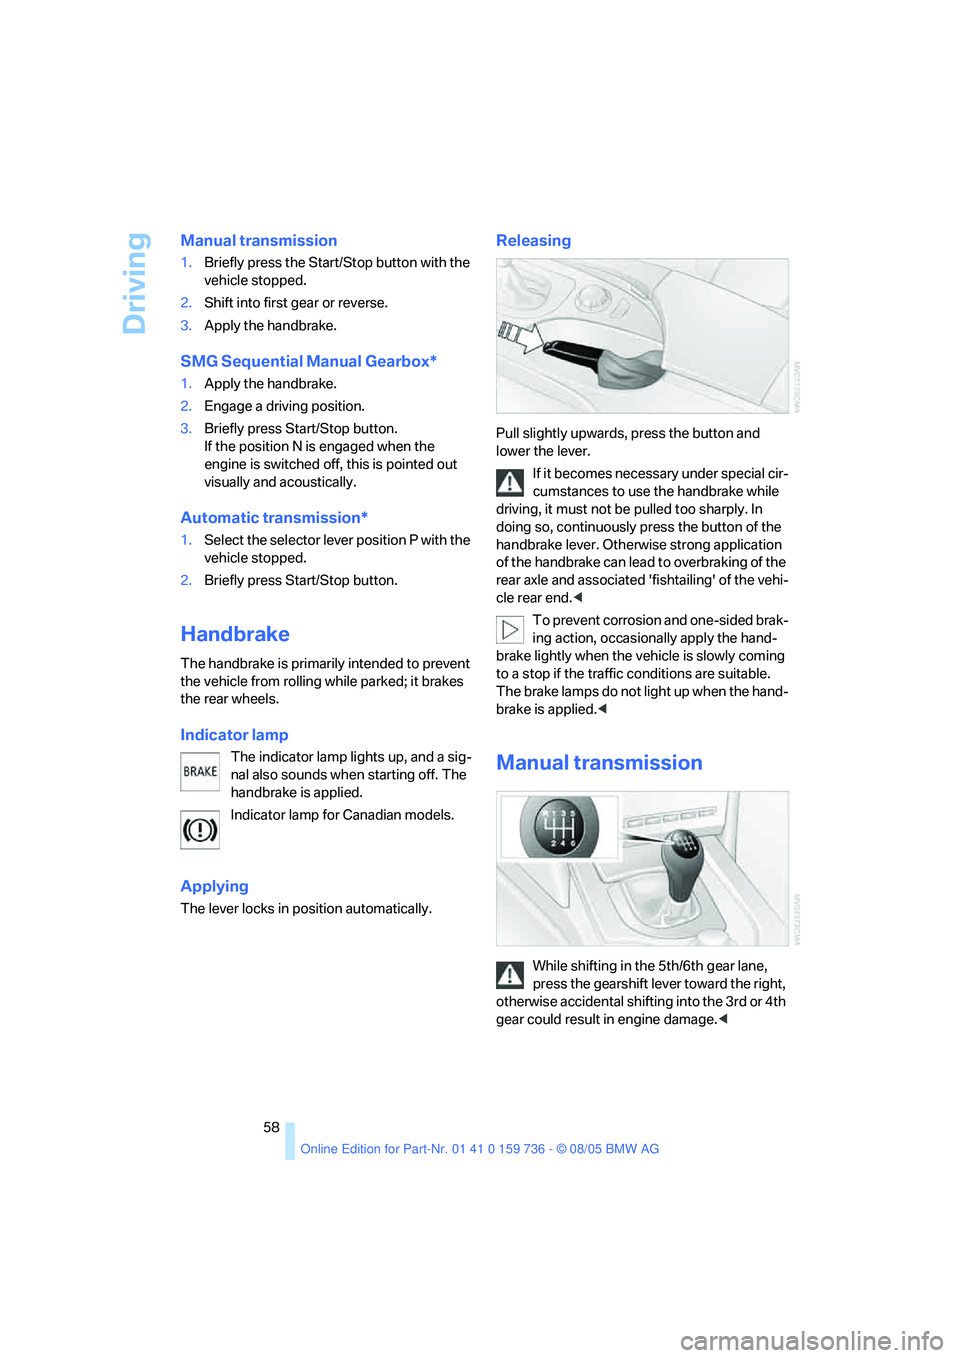
Releasing
Pull slightly upwards, press the button and
lower the lever.
If it becomes necessary under special cir-
cumstances to use the handbrake while
driving, it must not be pulled too sharply. In
doing so, continuously press the button of the
handbrake lever. Otherwise strong application
of the handbrake can lead to overbraking of the
rear axle and associated 'fishtailing' of the vehi-
cle rear end.<
To prevent corrosion and one-sided brak-
ing action, occasionally apply the hand-
brake lightly when the vehicle is slowly coming
to a stop if the traffic conditions are suitable.
The brake lamps do not light up when the hand-
brake is applied.<
Manual transmission
While shifting in the 5th/6th gear lane,
press the gearshift lever toward the right,
otherwise accidental shifting into the 3rd or 4th
gear could result in engine damage.<
Page 61 of 248
Driving
60 It is also possible to start off in second gear, e. g.
in slippery conditions.
In the following situations, SMG thinks for you:
>Upshifts and downshifts are executed only
when they will result in a plausible combina-
tion of engine and vehicle speed; thus, for
example, a downshift that would cause the
engine to overrev will not be executed by
the system.
>When the vehicle is stationary, the trans-
mission automatically downshifts into first
gear.
>Shortly before dropping below a gear-
dependent minimum speed, the transmis-
sion downshifts automatically even without
your intervention.
D Drive mode
In the Drive mode, all forward gears are shifted
automatically.
Shifting from Sequential mode to Drive mode:
press selector lever to the right toward D.
Kick-down: for rapid acceleration, e. g. when
passing, press the accelerator pedal as far
down as it will go. You achieve maximum accel-
eration.
To switch back into the Sequential mode: press
selector lever to the right again toward D or shift
using the shifting paddles or the selector lever.
Start off quickly on slopes. Do not hold
the vehicle on a hill by pressing the accel-
erator, but apply the handbrake instead. Other-
wise overheating can occur in the transmission
region.<
Gear changes
Using selector lever
>To upshift, pull the selector lever back.
>To downshift, push the selector lever for-
ward.
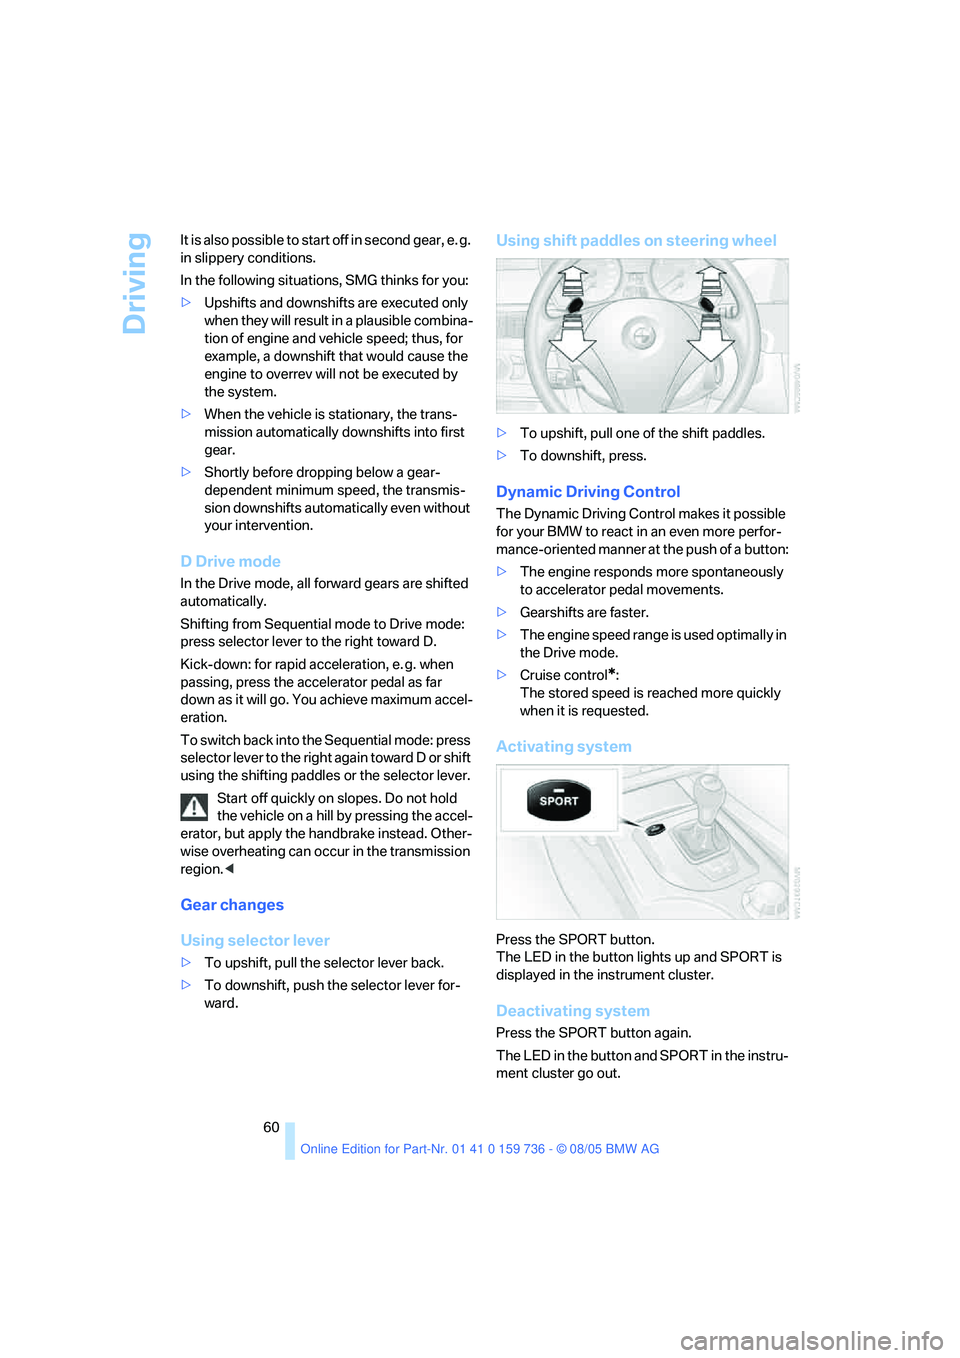
Using shift paddles on steering wheel
>To upshift, pull one of the shift paddles.
>To downshift, press.
Dynamic Driving Control
The Dynamic Driving Control makes it possible
for your BMW to react in an even more perfor-
mance-oriented manner at the push of a button:
>The engine responds more spontaneously
to accelerator pedal movements.
>Gearshifts are faster.
>The engine speed range is used optimally in
the Drive mode.
>Cruise control
*:
The stored speed is reached more quickly
when it is requested.
Activating system
Press the SPORT button.
The LED in the button lights up and SPORT is
displayed in the instrument cluster.
Deactivating system
Press the SPORT button again.
The LED in the button and SPORT in the instru-
ment cluster go out.
Page 64 of 248
Controls
63Reference
At a glance
Driving tips
Communications
Navigation
Entertainment
Mobility
Triple turn signal activation
Press the lever to the resistance point; the turn
signal flashes three times.
You can activate or deactivate this function.
iDrive, for principle details, refer to page16.
1.Open the start menu.
2.Press the controller to open the menu.
3.Select "Vehicle settings" and press the
controller.
4.Select "Lighting" and press the controller.
5.Select "Triple turn signal activation" and
press the controller.
Triple turn signaling is activated.
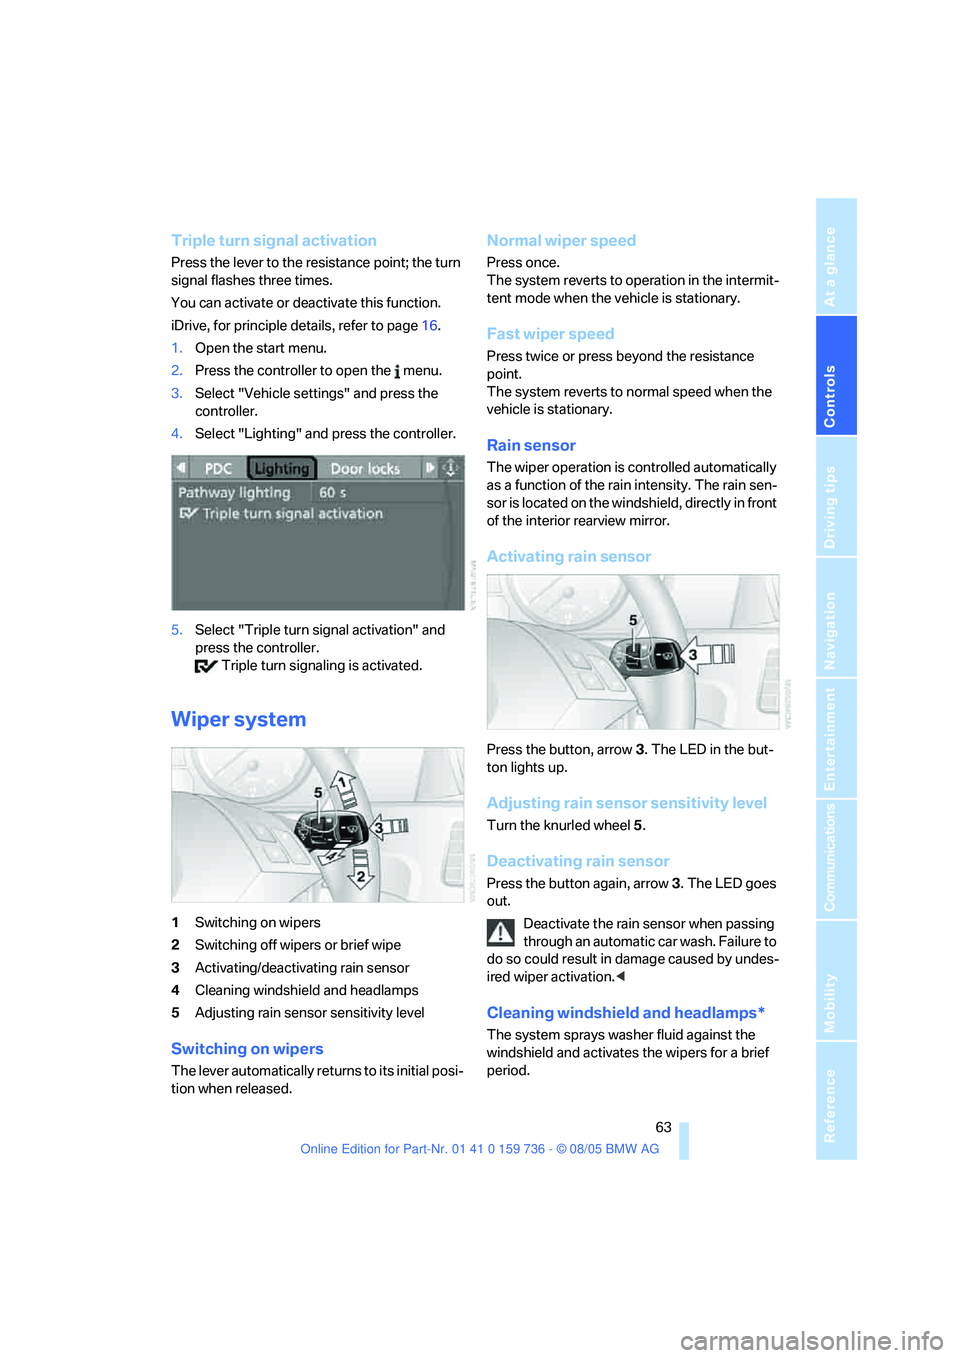
Wiper system
1Switching on wipers
2Switching off wipers or brief wipe
3Activating/deactivating rain sensor
4Cleaning windshield and headlamps
5Adjusting rain sensor
sensitivity level
Switching on wipers
The lever automatically returns to its initial posi-
tion when released.
Normal wiper speed
Press once.
The system reverts to operation in the intermit-
tent mode when the vehicle is stationary.
Fast wiper speed
Press twice or press beyond the resistance
point.
The system reverts to normal speed when the
vehicle is stationary.
Rain sensor
The wiper operation is controlled automatically
as a function of the rain intensity. The rain sen-
sor is located on the windshield, directly in front
of the interior rearview mirror.
Activating rain sensor
Press the button, arrow3. The LED in the but-
ton lights up.
Adjusting rain sensor sensitivity level
Turn the knurled wheel5.
Deactivating rain sensor
Press the button again, arrow3. The LED goes
out.
Deactivate the rain sensor when passing
through an automatic car wash. Failure to
do so could result in damage caused by undes-
ired wiper activation.<
Cleaning windshield and headlamps*
The system sprays washer fluid against the
windshield and activates the wipers for a brief
period.
Page 65 of 248
Driving
64 When the vehicle lighting system is switched
on, the headlamps are cleaned at regular and
appropriate intervals.
Do not use the washers if there is any
danger that the fluid will freeze on the
windshield. If you do so, your vision could be
obscured. To avoid freezing, use a washer fluid
antifreeze, refer to Washer fluid. Do not use
washing mechanisms when the washer fluid
reservoir is empty, otherwise you will damage
the washer pump.<
Windshield washer nozzles
Both windshield washer nozzles are automati-
cally heated with the engine running or the igni-
tion switched on.
Sports Wagon:
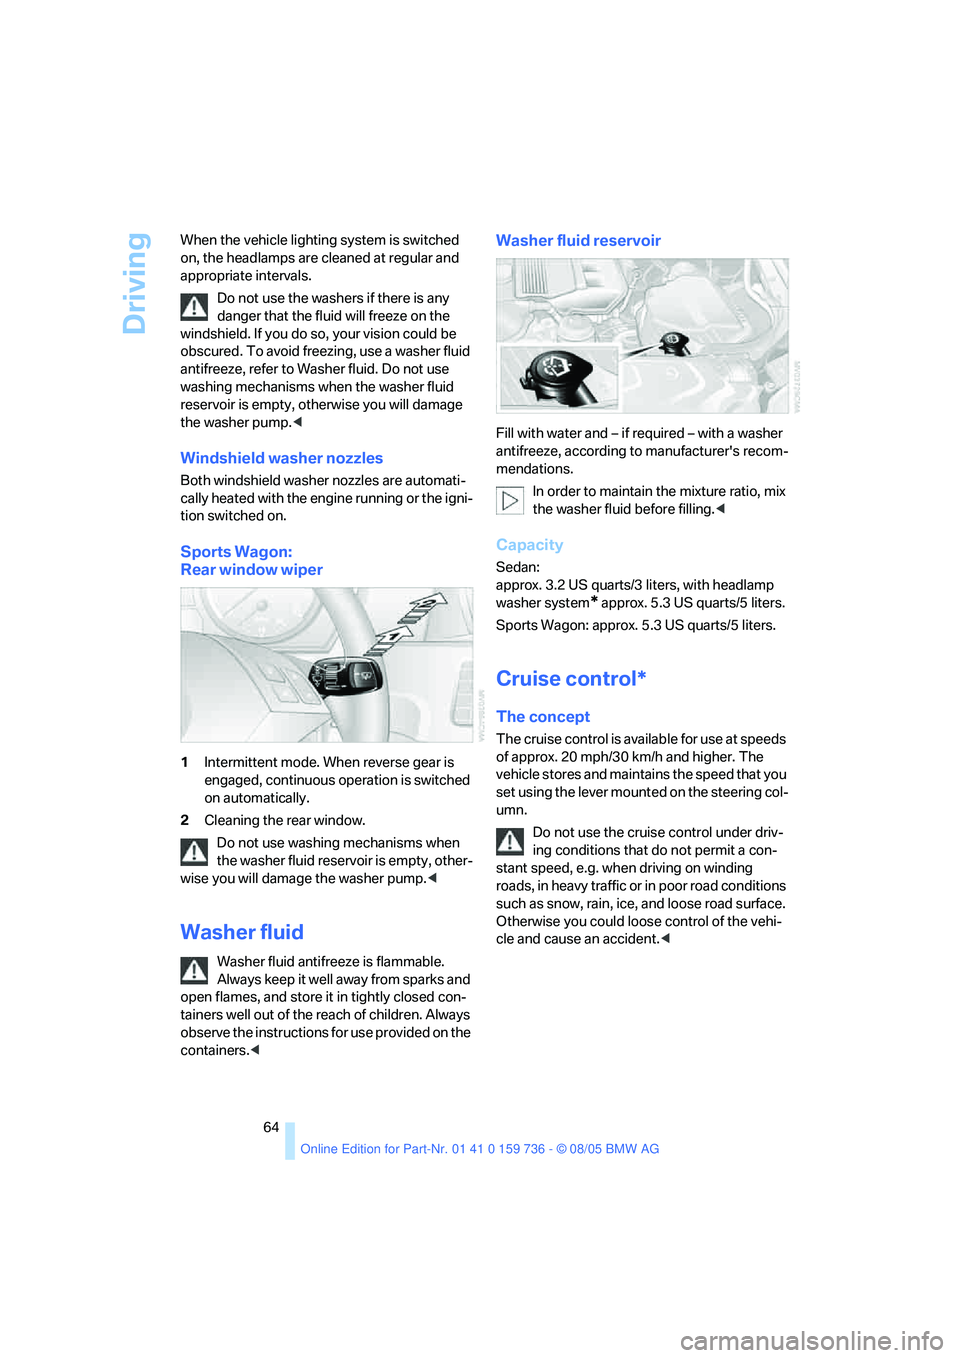
Rear window wiper
1Intermittent mode. When reverse gear is
engaged, continuous operation is switched
on automatically.
2Cleaning the rear window.
Do not use washing mechanisms when
the washer fluid reservoir is empty, other-
wise you will damage the washer pump.<
Washer fluid
Washer fluid antifreeze is flammable.
Always keep it well away from sparks and
open flames, and store it in tightly closed con-
tainers well out of the reach of children. Always
observe the instructions for use provided on the
containers.<
Washer fluid reservoir
Fill with water and – if required – with a washer
antifreeze, according to manufacturer's recom-
mendations.
In order to maintain the mixture ratio, mix
the washer fluid before filling.<
Capacity
Sedan:
approx. 3.2 US quarts/3 liters, with headlamp
washer system
* approx. 5.3USquarts/5liters.
Sports Wagon: approx. 5.3 US quarts/5 liters.
Cruise control*
The concept
The cruise control is available for use at speeds
of approx. 20 mph/30 km/h and higher. The
vehicle stores and maintains the speed that you
set using the lever mounted on the steering col-
umn.
Do not use the cruise control under driv-
ing conditions that do not permit a con-
stant speed, e.g. when driving on winding
roads , in heavy traffic or in poor roa d co nditions
such as snow, rain, ice, and loose road surface.
Otherwise you could loose control of the vehi-
cle and cause an accident.<
Page 67 of 248
Driving
66 fares. Especially on longer trips, the system can
reduce fatigue and tension, while increasing
your enjoyment of driving. Please use it safely
and responsibly.
In addition to holding a steady cruising speed,
if you encounter slower vehicles ahead, active
cruise control will, within the scope of given
possibilities, adjust your vehicle's speed auto-
matically so that you can flow with the traffic
without having to make constant adjustments.
If, for example, while cruising at the selected
speed, you begin to approach a slower vehicle
ahead of you in the same lane, the system will
reduce your vehicle's speed to the same as that
of the vehicle ahead to maintain your selected
distance setting between your vehicle and the
vehicle ahead. You can vary the distance, which
is additionally speed-dependent. Based on
your selected distance setting, the system
automatically decreases the throttle setting and
lightly applies the brakes if necessary. The vehi-
cle brake lamps will automatically illuminate to
signal a following driver to take action. In addi-
tion, it may be necessary for the vehicle or the
driver to downshift, depending on the kind of
transmission your vehicle is equipped with, to
maintain the distance setting selected. If the
vehicle ahead speeds up or when the lane
ahead becomes clear, your vehicle will acceler-
ate to the speed you have selected by increas-
ing the throttle setting and shifting gears auto-
matically or by the driver as needed. Your
selected speed will be held when driving down-
hill, too.
Active cruise control is not and must not
be used as a collision avoidance/warning
system.<
Since this active cruise control system is
a new technology and operates differ-
ently from conventional cruise control systems
which you may be accustomed to, you are
strongly urged to read all of the pages relating
to this system before use. Pay special attention
to the information contained in the Things to
know about active cruise control section begin-
ning on page69.<
Navigation system Professional*
If a navigation DVD is in the drive, refer to
page124, the system adjusts the accelerating
and braking behavior of the vehicle to the road
you are driving on.
When the vehicle position is unknown, e.g.
when you leave the map area, this influence of
the navigation system is not available.
Manual transmission
You can shift with the cruise control activated.
Shifting information is provided or the system
deactivates itself if you drive at very high or very
low engine speeds for a longer period.
SMG
In the Sequential mode, shifting information is
provided or the system deactivates itself if you
drive at very high engine speeds for a longer
period.
In the Drive mode the SMG acts similarly to an
automatic transmission in the D position.
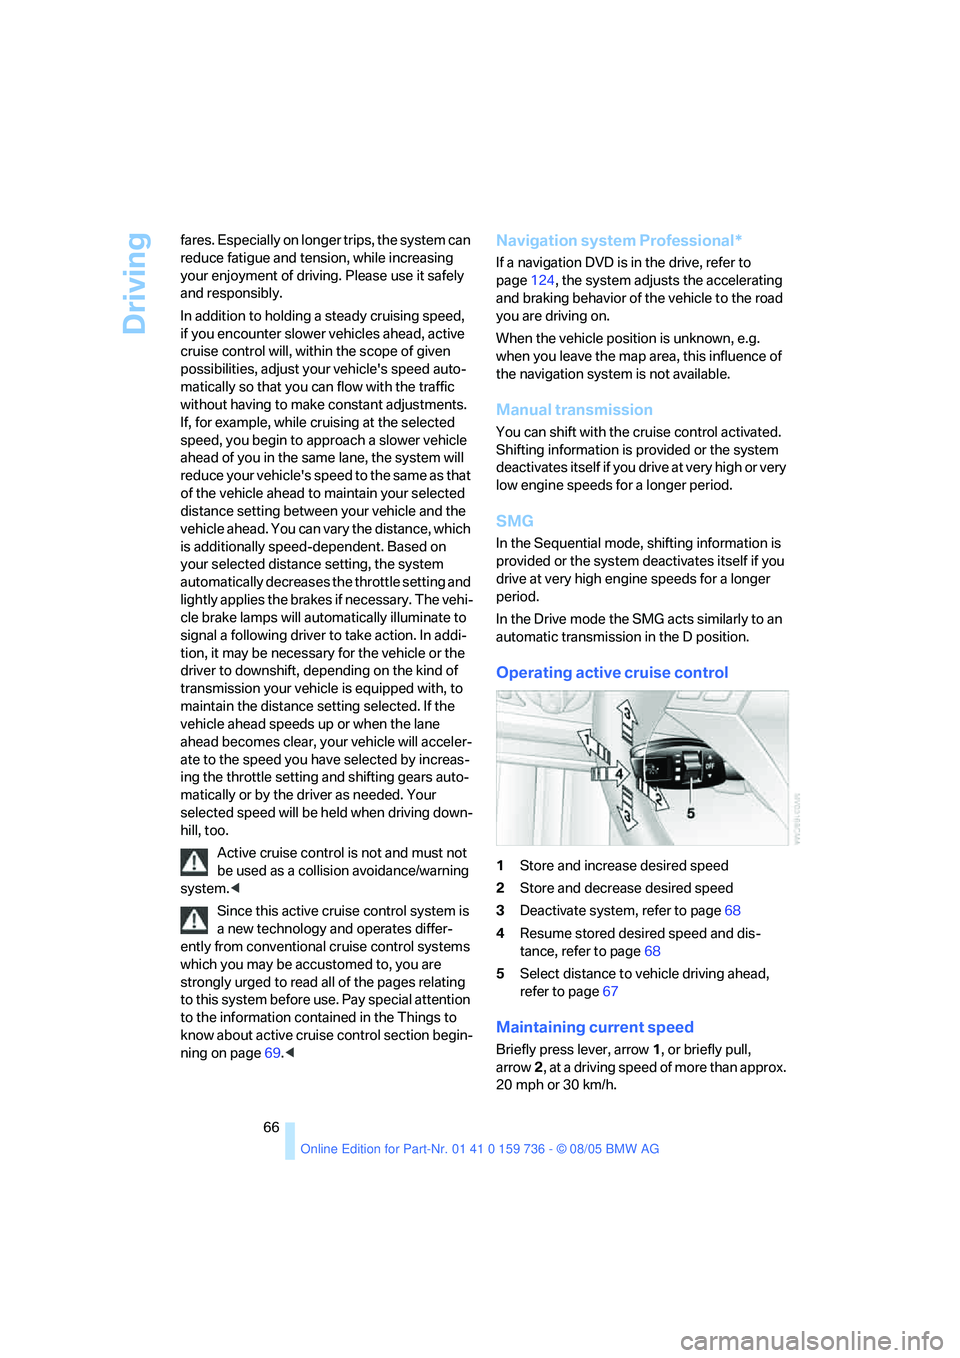
Operating active cruise control
1Store and increase desired speed
2Store and decrease desired speed
3Deactivate system, refer to page68
4Resume stored desired speed and dis-
tance, refer to page68
5Select distance to vehicle driving ahead,
refer to page67
Maintaining current speed
Briefly press lever, arrow1, or briefly pull,
arrow2, at a driving speed of more than approx.
20 mph or 30 km/h.
Page 68 of 248

Controls
67Reference
At a glance
Driving tips
Communications
Navigation
Entertainment
Mobility
The speed currently being driven is stored and
maintained. It is indicated on the speedometer
and briefly in the instrument cluster.
The controlled speed can drop on uphill grades
if the engine output is insufficient. If the engine
braking effect is not sufficient on a downhill
grade, the system lightly brakes the vehicle.
Setting desired speed
Adjust your desired speed to the traffic
conditions and remain ready to brake at
all times, otherwise accidents can occur. Great
differences in speed to the vehicle ahead, e. g.
when quickly approaching a truck or when
another vehicle swerves into your lane, cannot
be compensated for by the system.<
Increasing in steps
Briefly press the lever repeatedly up to the
pressure point or past the pressure point,
arrow1, until the desired speed is displayed.
>Each time the lever is briefly pressed up to
the pressure point, the desired speed
increases by approx. 1 mph or 1 km/h.
>Each time the lever is briefly pressed
beyond the pressure point, the desired
speed is increased by a maximum of 5 mph
or 10 km/h until the maximum speed of
110mph or 180km/h is reached.
The speed then displayed is stored and
reached on clear roads.
Increasing steplessly
Press the lever up to the pressure point or past
the pressure point, arrow1, until the desired
speed is reached.
The speed then displayed is stored and
reached on clear roads.
Decreasing steplessly
Pull the lever up to the pressure point or past
the pressure point, arrow2, until the desired
speed is displayed.
>Each time the lever is pulled up to the pres-
sure point, the desired speed decreases by
approx. 1 mph or 1 km/h.
>Each time the lever is pulled beyond the
pressure point, the desired speed is
decreased by a maximum of 5 mph or
10 km/h until the minimum speed of
20 mph or 30 km/h is reached.
The speed then displayed is stored and
reached on clear roads.
Select distance
>Rotary switch downward:
Increase distance.
>Rotary switch upward:
Decrease distance.
Page 69 of 248
Driving
68 The selected distance is displayed in the instru-
ment cluster.
Use good judgment to select the appro-
priate following distance given road con-
ditions, traffic, applicable laws and driving rec-
ommendations for safe following distance.<
Deactivate system
Press the lever up or down. The displays in the
instrument cluster disappear.
You also deactivate the system when you
brake, shift very slowly or into neutral, or
engage the selector lever position N. In addi-
tion, the system is deactivated automatically:
>when you activate the DTC Dynamic Trac-
tion Control
>when you deactivate the DSC Dynamic Sta-
bility Control>When the system does not recognize any
objects for a longer time, e. g. on infre-
quently traveled roads without a shoulder or
guard rails, or if the radar sensor is covered
with dirt, refer to page69
>When the speed is reduced to below
20 mph/30 km/h due to a traffic situation
The system deactivates automatically
when the speed is set to below 20 mph/
30 km/h. A signal sounds and a message
appears in the Control Display. The active inter-
vention of the driver is required, otherwise acci-
dents can occur.<
Resume stored desired speed and
distance
Press button 4.
The displays appear in the instrument cluster.
When you switch off the ignition, the stored
desired speed is deleted.
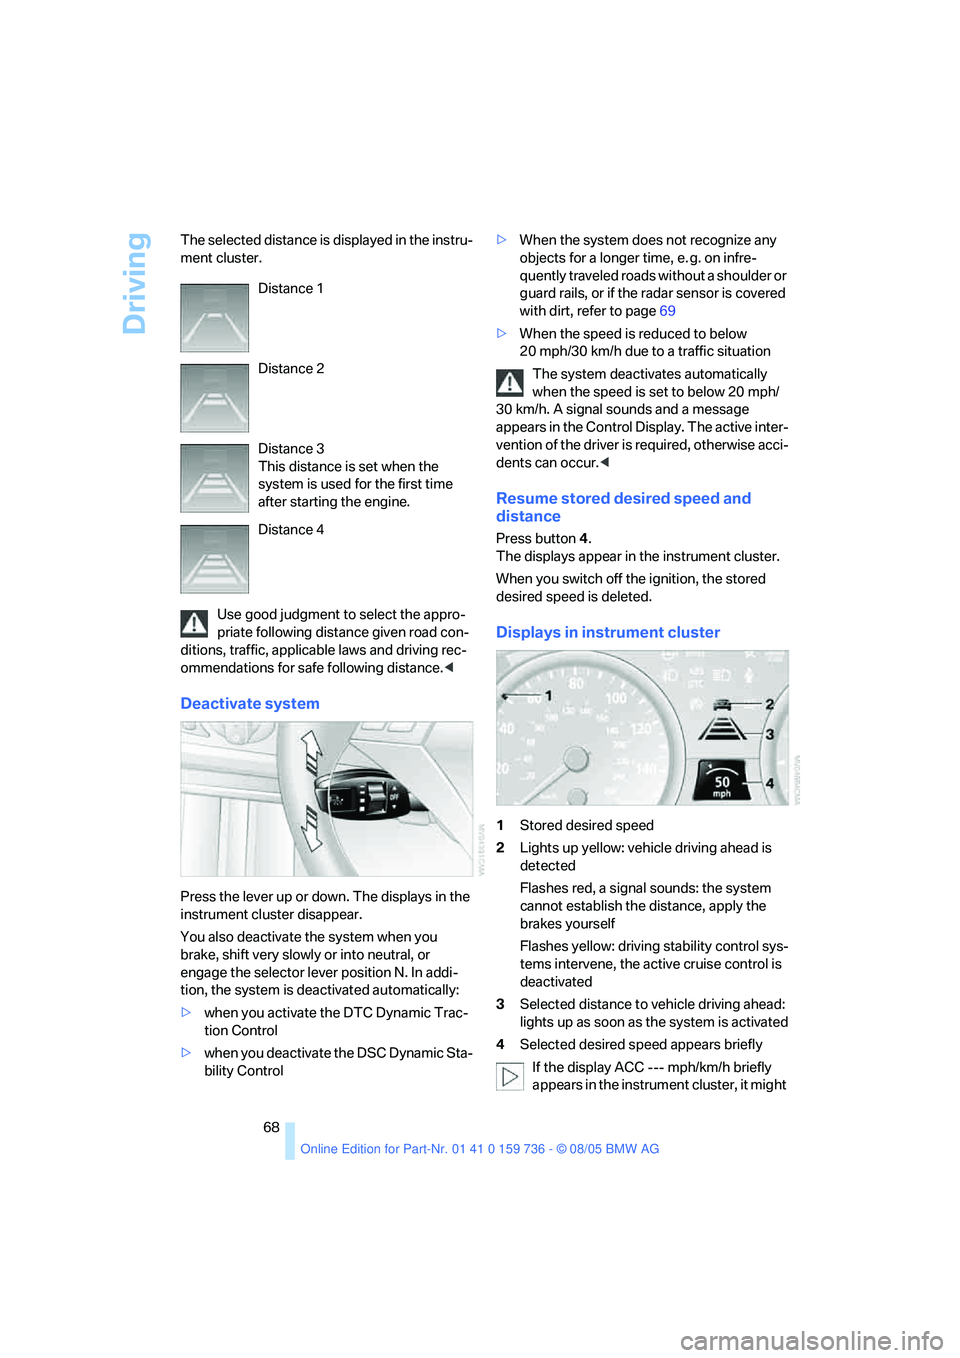
Displays in instrument cluster
1Stored desired speed
2Lights up yellow: vehicle driving ahead is
detected
Flashes red, a signal sounds: the system
cannot establish the distance, apply the
brakes yourself
Flashes yellow: driving stability control sys-
tems intervene, the active cruise control is
deactivated
3Selected distance to vehicle driving ahead:
lights up as soon as the system is activated
4Selected desired speed appears briefly
If the display ACC --- mph/km/h briefly
appears in the instrument cluster, it might Distance 1
Distance 2
Distance 3
This distance is set when the
system is used for the first time
after starting the engine.
Distance 4