2006 BMW 525I SEDAN sport
[x] Cancel search: sportPage 118 of 259
Practical interior accessories
116
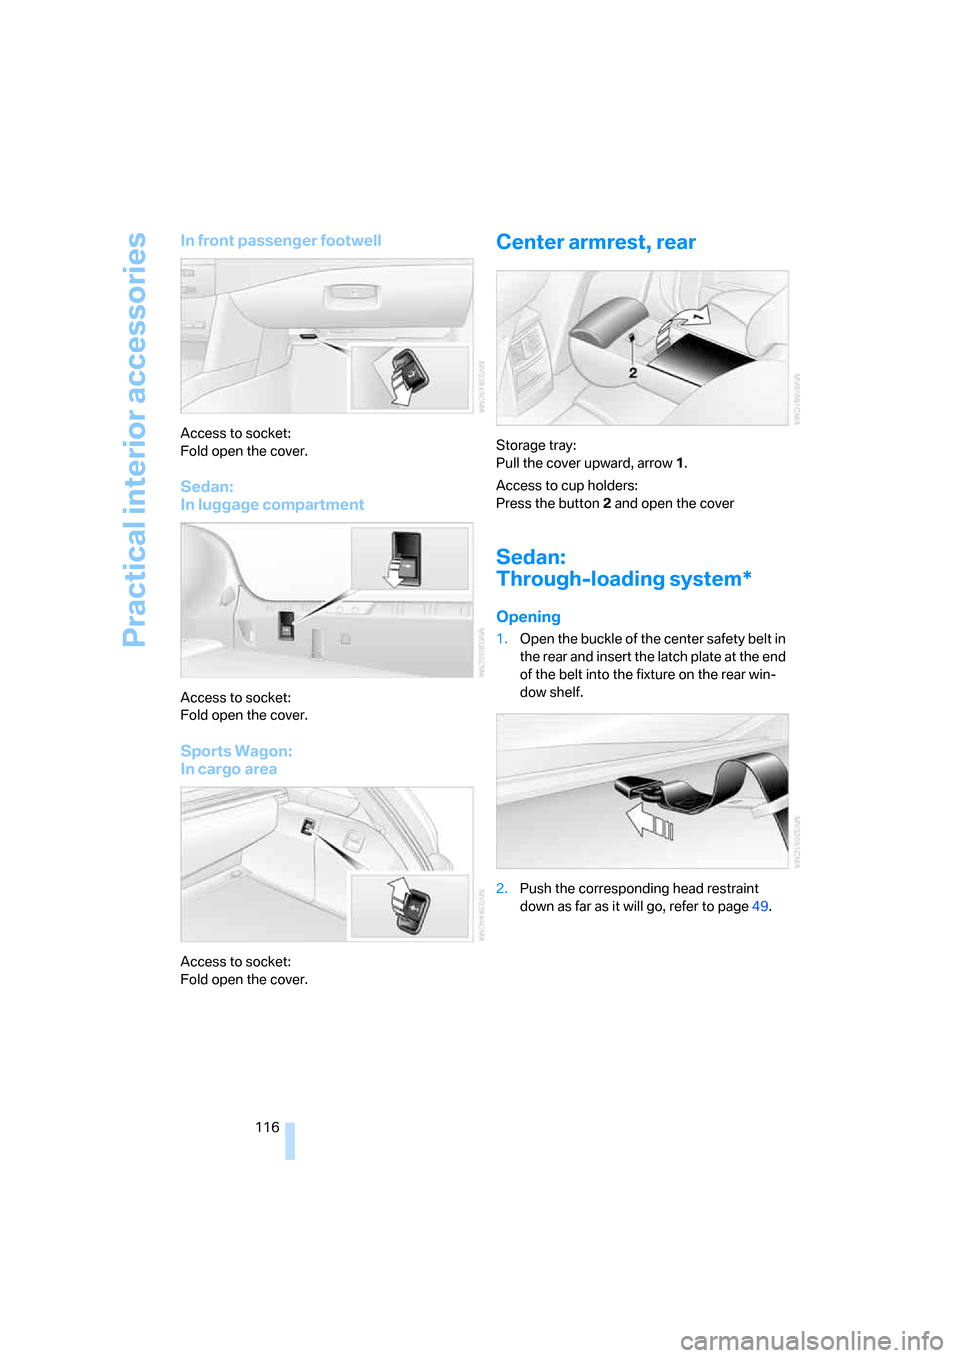
In front passenger footwell
Access to socket:
Fold open the cover.
Sedan:
In luggage compartment
Access to socket:
Fold open the cover.
Sports Wagon:
In cargo area
Access to socket:
Fold open the cover.
Center armrest, rear
Storage tray:
Pull the cover upward, arrow1.
Access to cup holders:
Press the button2 and open the cover
Sedan:
Through-loading system*
Opening
1.Open the buckle of the center safety belt in
the rear and insert the latch plate at the end
of the belt into the fixture on the rear win-
dow shelf.
2.Push the corresponding head restraint
down as far as it will go, refer to page49.
Page 119 of 259
Controls
117Reference
At a glance
Driving tips
Communications
Navigation
Entertainment
Mobility
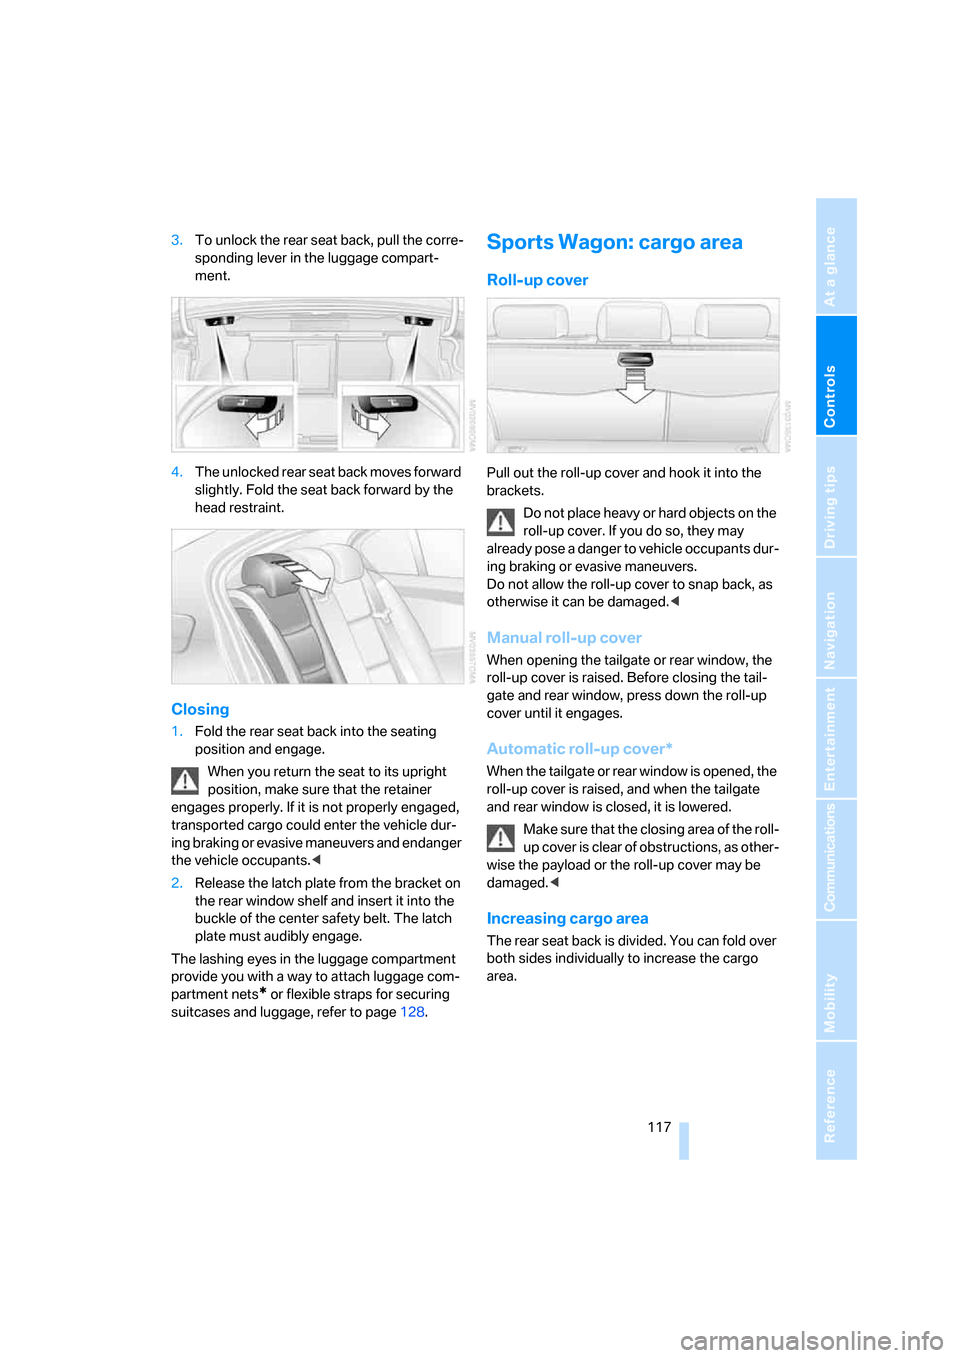
3.To unlock the rear seat back, pull the corre-
sponding lever in the luggage compart-
ment.
4.The unlocked rear seat back moves forward
slightly. Fold the seat back forward by the
head restraint.
Closing
1.Fold the rear seat back into the seating
position and engage.
When you return the seat to its upright
position, make sure that the retainer
engages properly. If it is not properly engaged,
transported cargo could enter the vehicle dur-
ing braking or evasive maneuvers and endanger
the vehicle occupants.<
2.Release the latch plate from the bracket on
the rear window shelf and insert it into the
buckle of the center safety belt. The latch
plate must audibly engage.
The lashing eyes in the luggage compartment
provide you with a way to attach luggage com-
partment nets
* or flexible straps for securing
suitcases and luggage, refer to page128.
Sports Wagon: cargo area
Roll-up cover
Pull out the roll-up cover and hook it into the
brackets.
Do not place heavy or hard objects on the
roll-up cover. If you do so, they may
already pose a danger to vehicle occupants dur-
ing braking or evasive maneuvers.
Do not allow the roll-up cover to snap back, as
otherwise it can be damaged.<
Manual roll-up cover
When opening the tailgate or rear window, the
roll-up cover is raised. Before closing the tail-
gate and rear window, press down the roll-up
cover until it engages.
Automatic roll-up cover*
When the tailgate or rear window is opened, the
roll-up cover is raised, and when the tailgate
and rear window is closed, it is lowered.
Make sure that the closing area of the roll-
up cover is clear of obstructions, as other-
wise the payload or the roll-up cover may be
damaged.<
Increasing cargo area
The rear seat back is divided. You can fold over
both sides individually to increase the cargo
area.
Page 120 of 259
Practical interior accessories
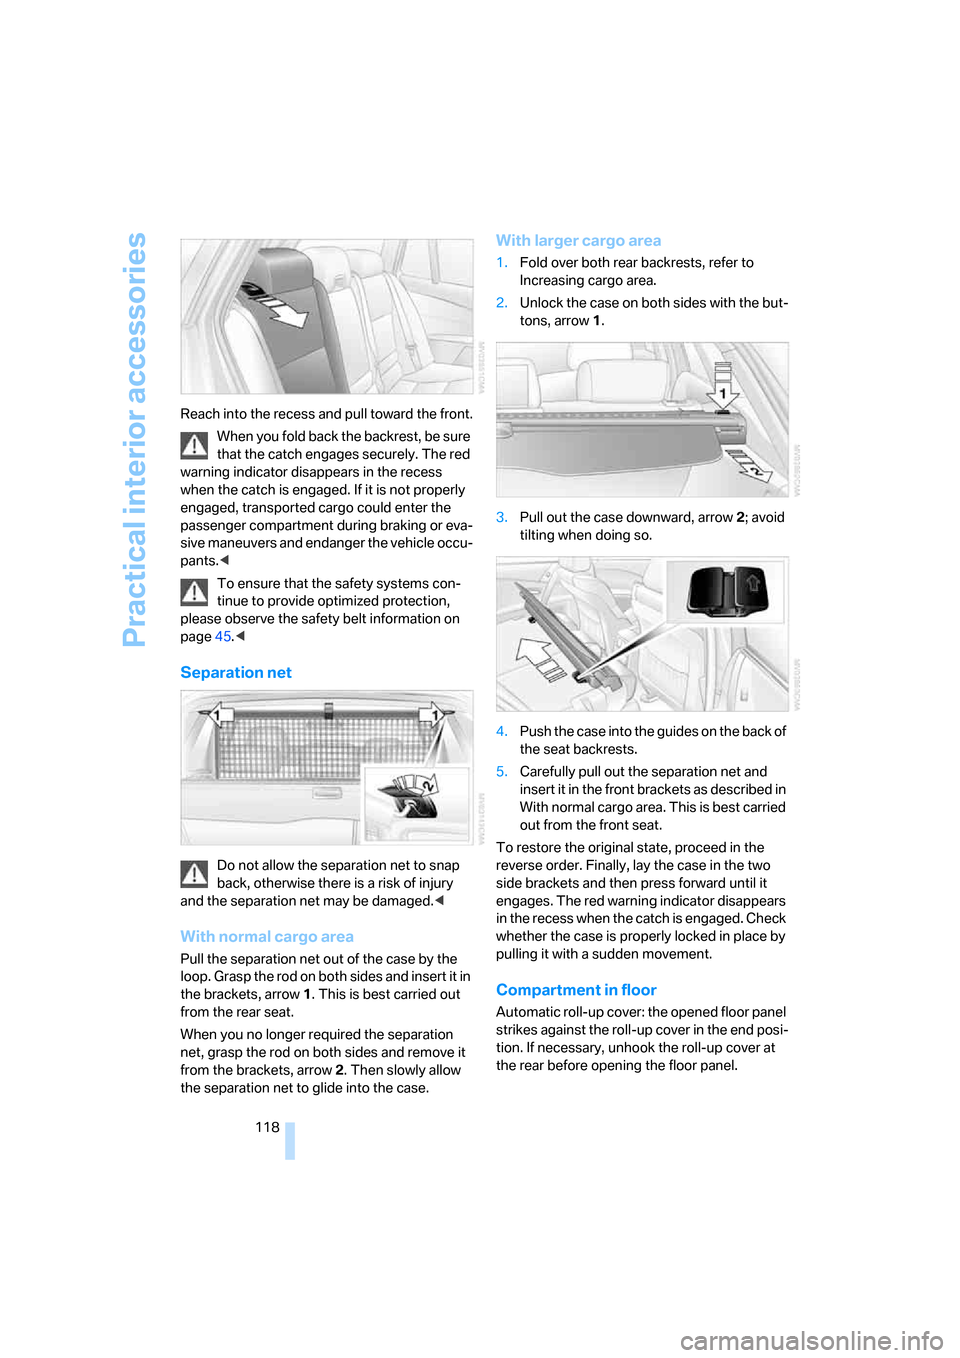
118 Reach into the recess and pull toward the front.
When you fold back the backrest, be sure
that the catch engages securely. The red
warning indicator disappears in the recess
when the catch is engaged. If it is not properly
engaged, transported cargo could enter the
passenger compartment during braking or eva-
sive maneuvers and endanger the vehicle occu-
pants.<
To ensure that the safety systems con-
tinue to provide optimized protection,
please observe the safety belt information on
page45.<
Separation net
Do not allow the separation net to snap
back, otherwise there is a risk of injury
and the separation net may be damaged.<
With normal cargo area
Pull the separation net out of the case by the
loop. Grasp the rod on both sides and insert it in
the brackets, arrow1. This is best carried out
from the rear seat.
When you no longer required the separation
net, grasp the rod on both sides and remove it
from the brackets, arrow2. Then slowly allow
the separation net to glide into the case.
With larger cargo area
1.Fold over both rear backrests, refer to
Increasing cargo area.
2.Unlock the case on both sides with the but-
tons, arrow1.
3.Pull out the case downward, arrow2; avoid
tilting when doing so.
4.Push the case into the guides on the back of
the seat backrests.
5.Carefully pull out the separation net and
insert it in the front brackets as described in
With normal cargo area. This is best carried
out from the front seat.
To restore the original state, proceed in the
reverse order. Finally, lay the case in the two
side brackets and then press forward until it
engages. The red warning indicator disappears
in the recess when the catch is engaged. Check
whether the case is properly locked in place by
pulling it with a sudden movement.
Compartment in floor
Automatic roll-up cover: the opened floor panel
strikes against the roll-up cover in the end posi-
tion. If necessary, unhook the roll-up cover at
the rear before opening the floor panel.
Page 122 of 259
Practical interior accessories
120 around and endanger occupants, e.g. during
braking or evasive maneuvers.<
Ski bag*
Designed for safe, clean transport of up to
4 pairs of standard skis or up to 2 snowboards.
With the ski bag you can stow skis with a length
o f u p t o 6 . 9 f t / 2 . 1 0 m . W h e n s k i s o f 6 . 9 f t / 2 . 1 0 m
in length are loaded, the ski bag will tend to con-
tract, reducing its overall capacity.
Loading
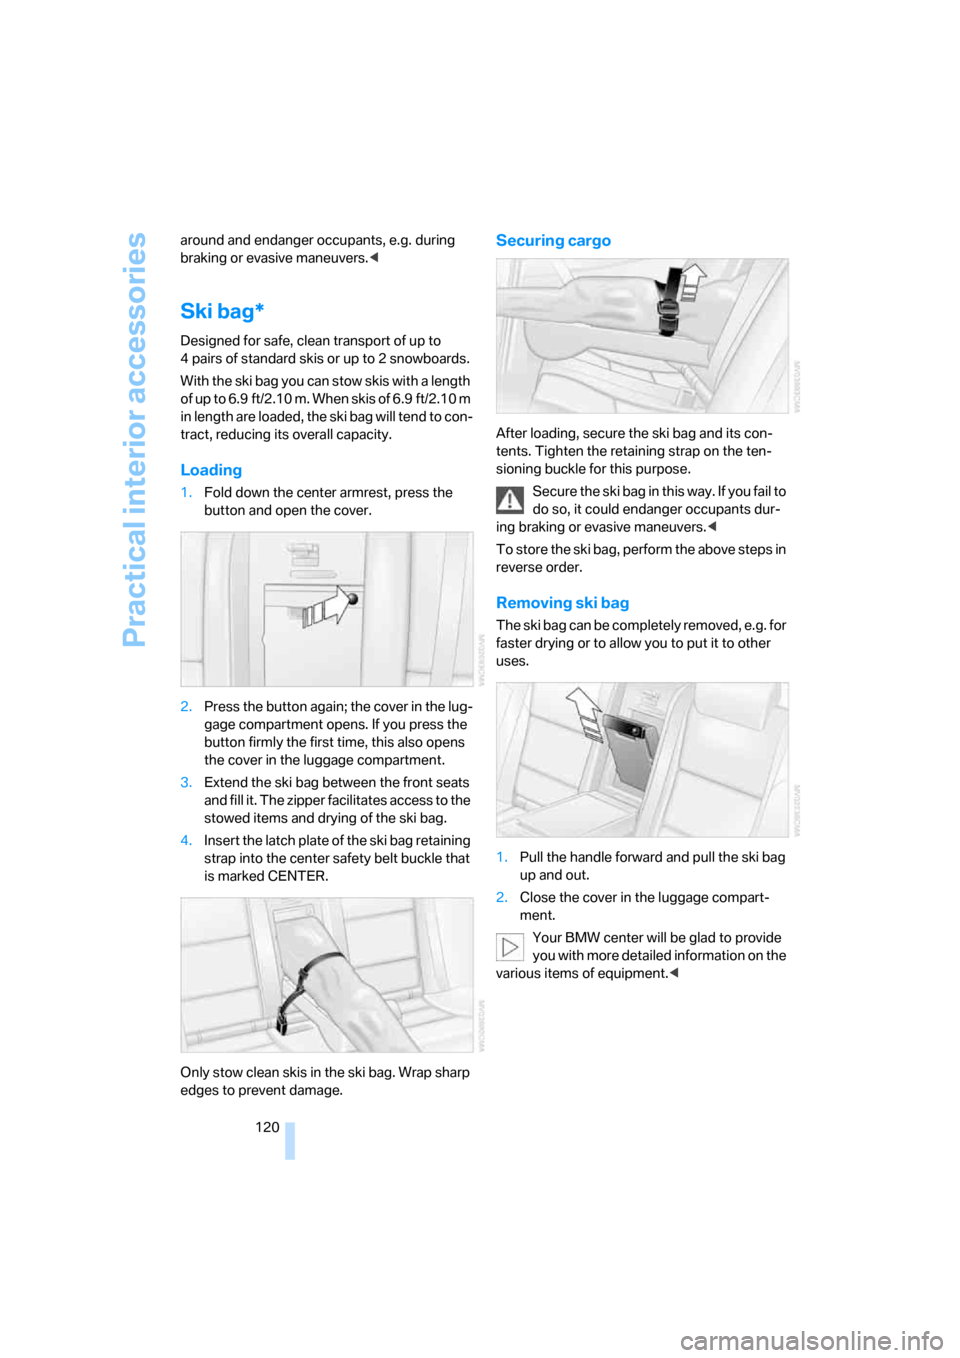
1.Fold down the center armrest, press the
button and open the cover.
2.Press the button again; the cover in the lug-
gage compartment opens. If you press the
button firmly the first time, this also opens
the cover in the luggage compartment.
3.Extend the ski bag between the front seats
and fill it. The zipper facilitates access to the
stowed items and drying of the ski bag.
4.Insert the latch plate of the ski bag retaining
strap into the center safety belt buckle that
is marked CENTER.
Only stow clean skis in the ski bag. Wrap sharp
edges to prevent damage.
Securing cargo
After loading, secure the ski bag and its con-
tents. Tighten the retaining strap on the ten-
sioning buckle for this purpose.
Secure the ski bag in this way. If you fail to
do so, it could endanger occupants dur-
ing braking or evasive maneuvers.<
To store the ski bag, perform the above steps in
reverse order.
Removing ski bag
The ski bag can be completely removed, e.g. for
faster drying or to allow you to put it to other
uses.
1.Pull the handle forward and pull the ski bag
up and out.
2.Close the cover in the luggage compart-
ment.
Your BMW center will be glad to provide
you with more detailed information on the
various items of equipment.<
Page 129 of 259
Driving tips
127Reference
At a glance
Controls
Communications
Navigation
Entertainment
Mobility
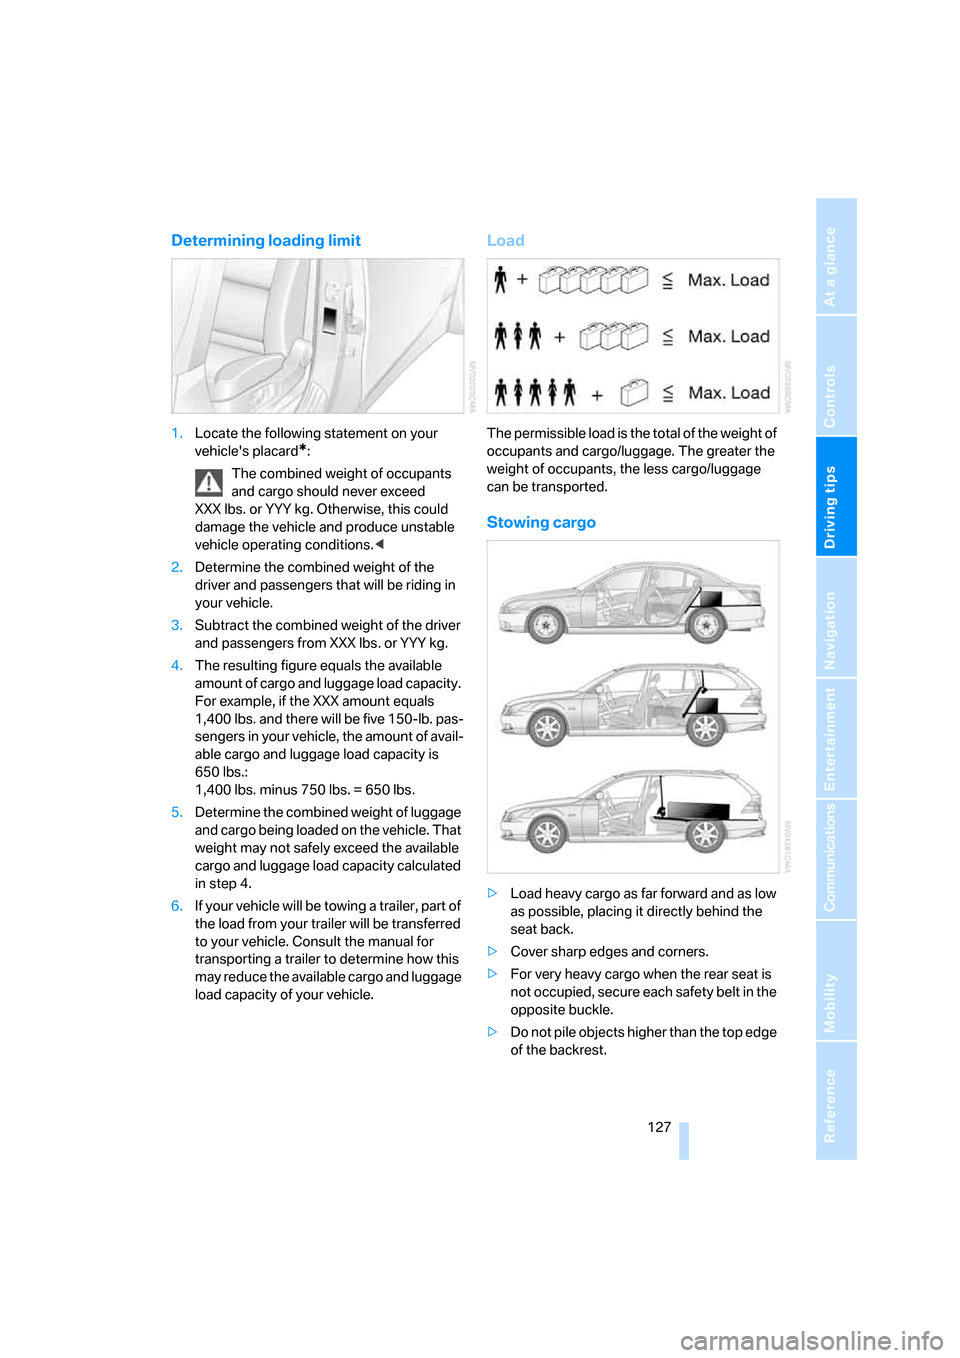
Determining loading limit
1.Locate the following statement on your
vehicle's placard
*:
The combined weight of occupants
and cargo should never exceed
XXX lbs. or YYY kg. Otherwise, this could
damage the vehicle and produce unstable
vehicle operating conditions.<
2.Determine the combined weight of the
driver and passengers that will be riding in
your vehicle.
3.Subtract the combined weight of the driver
and passengers from XXX lbs. or YYY kg.
4.The resulting figure equals the available
amount of cargo and luggage load capacity.
For example, if the XXX amount equals
1,400 lbs. and there will be five 150-lb. pas-
sengers in your vehicle, the amount of avail-
able cargo and luggage load capacity is
650 lbs.:
1,400 lbs. minus 750 lbs. = 650 lbs.
5.Determine the combined weight of luggage
and cargo being loaded on the vehicle. That
weight may not safely exceed the available
cargo and luggage load capacity calculated
in step 4.
6.If your vehicle will be towing a trailer, part of
the load from your trailer will be transferred
to your vehicle. Consult the manual for
transporting a trailer to determine how this
may reduce the available cargo and luggage
load capacity of your vehicle.
Load
The permissible load is the total of the weight of
occupants and cargo/luggage. The greater the
weight of occupants, the less cargo/luggage
can be transported.
Stowing cargo
>Load heavy cargo as far forward and as low
as possible, placing it directly behind the
seat back.
>Cover sharp edges and corners.
>For very heavy cargo when the rear seat is
not occupied, secure each safety belt in the
opposite buckle.
>Do not pile objects higher than the top edge
of the backrest.
Page 130 of 259
Things to remember when driving
128 >Sports Wagon:
Use the separation net to protect the occu-
pants, refer to page118. Make sure that
objects cannot penetrate through the sepa-
ration net.
Wrap sharp-edged or pointed objects
which could strike the rear window while
driving.
Securing cargo
>Use the luggage net*, luggage straps, or
securing straps to hold down small and
lightweight luggage and cargo.
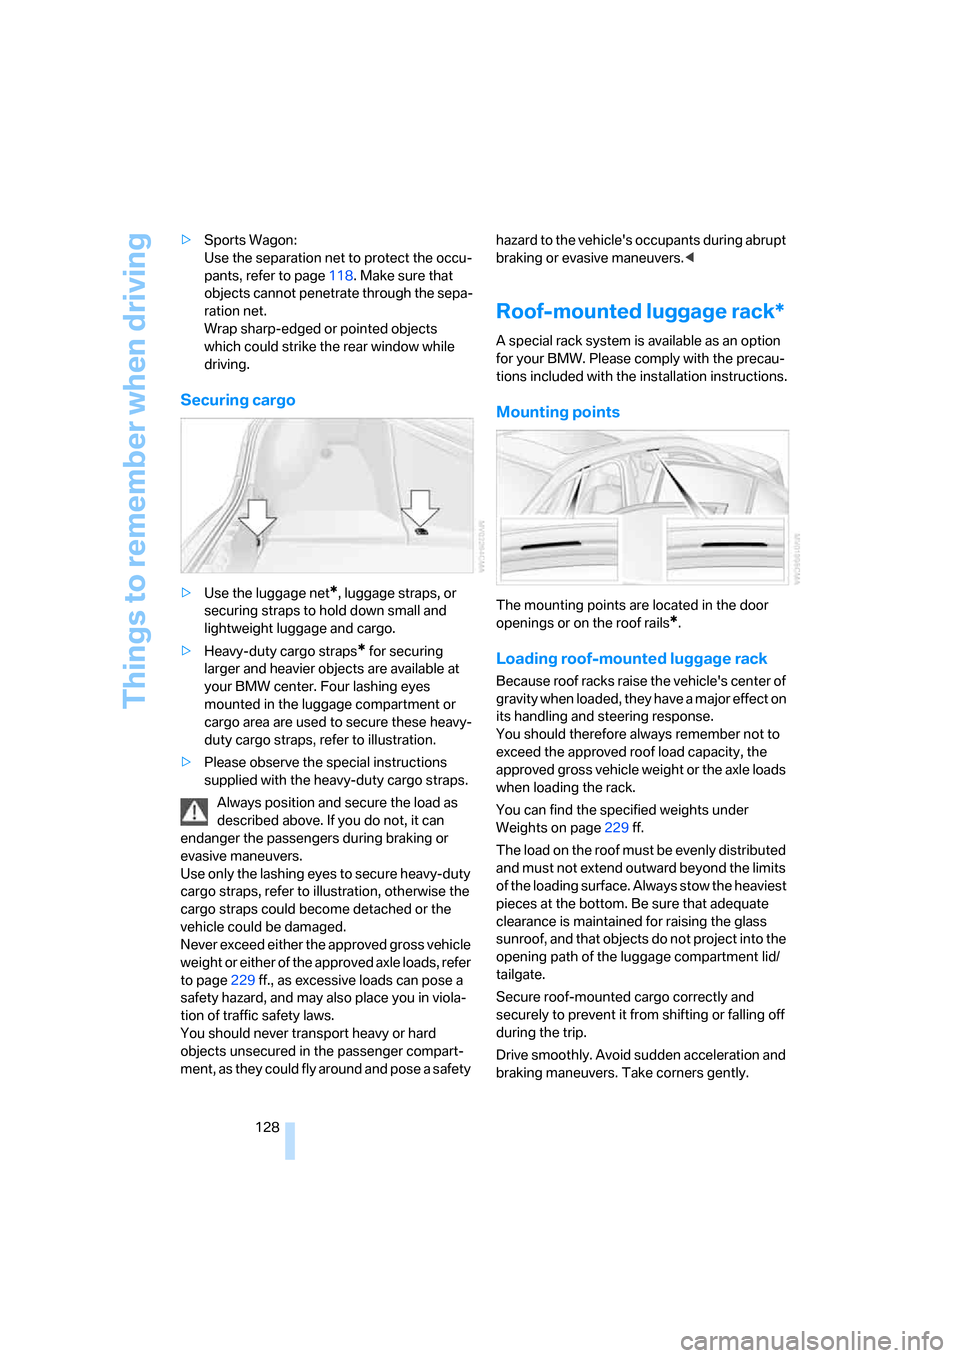
>Heavy-duty cargo straps
* for securing
larger and heavier objects are available at
your BMW center. Four lashing eyes
mounted in the luggage compartment or
cargo area are used to secure these heavy-
duty cargo straps, refer to illustration.
>Please observe the special instructions
supplied with the heavy-duty cargo straps.
Always position and secure the load as
described above. If you do not, it can
endanger the passengers during braking or
evasive maneuvers.
Use only the lashing eyes to secure heavy-duty
cargo straps, refer to illustration, otherwise the
cargo straps could become detached or the
vehicle could be damaged.
Never exceed either the approved gross vehicle
weight or either of the approved axle loads, refer
to page229 ff., as excessive loads can pose a
safety hazard, and may also place you in viola-
tion of traffic safety laws.
You should never transport heavy or hard
objects unsecured in the passenger compart-
ment, as they could fly around and pose a safety hazard to the vehicle's occupants during abrupt
braking or evasive maneuvers.<
Roof-mounted luggage rack*
A special rack system is available as an option
for your BMW. Please comply with the precau-
tions included with the installation instructions.
Mounting points
The mounting points are located in the door
openings or on the roof rails
*.
Loading roof-mounted luggage rack
Because roof racks raise the vehicle's center of
gravity when loaded, they have a major effect on
its handling and steering response.
You should therefore always remember not to
exceed the approved roof load capacity, the
approved gross vehicle weight or the axle loads
when loading the rack.
You can find the specified weights under
Weights on page229 ff.
The load on the roof must be evenly distributed
and must not extend outward beyond the limits
of the loading surface. Always stow the heaviest
pieces at the bottom. Be sure that adequate
clearance is maintained for raising the glass
sunroof, and that objects do not project into the
opening path of the luggage compartment lid/
tailgate.
Secure roof-mounted cargo correctly and
securely to prevent it from shifting or falling off
during the trip.
Drive smoothly. Avoid sudden acceleration and
braking maneuvers. Take corners gently.
Page 196 of 259

Refueling
194
Refueling
Always switch off the engine before refu-
eling, otherwise no fuel can be filled into
the tank and a message is displayed.<
When handling fuel, always observe all
applicable precautionary measures and
regulations. Never transport reserve fuel con-
tainers in the vehicle. These could become
leaky and cause an explosion or a fire in an acci-
dent.<
Fuel filler door
To open and close: press the rear edge of the
fuel filler door.
Manual release
If an electrical malfunction should occur, you
can unlock the fuel filler door manually.
Sedan
1.In the luggage compartment, raise the floor
mat and the cover located beneath it.
2.Open the snap fasteners of the right side
panel and take off the side panel.3.Pull the knob with the gas pump symbol.
Sports Wagon
1.Unhook the retaining strap*, refer to
page119.
2.Open the right-hand side panel in the cargo
area.
3.Pull the knob with the gas pump symbol.
Observe the following when refueling
When handling fuels always observe any
safety guidelines posted at the service
station.<
Place the fuel filler cap in the bracket attached
to the fuel filler door.
Page 200 of 259
Wheels and tires
198
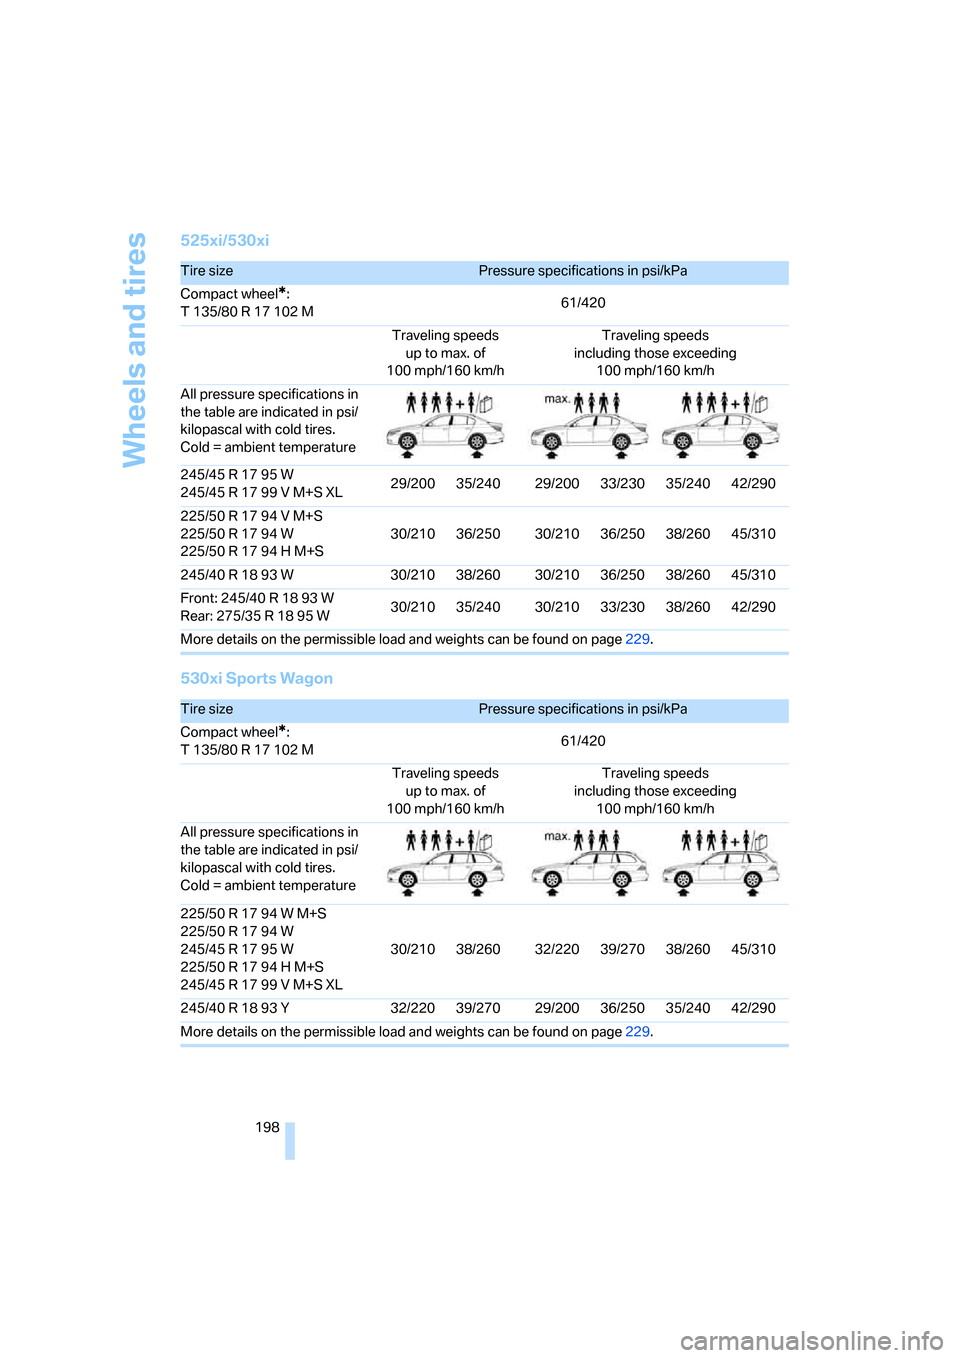
525xi/530xi
530xi Sports Wagon
Tire sizePressure specifications in psi/kPa
Compact wheel
*:
T 135/80 R 17 102 M61/420
Traveling speeds
up to max. of
100 mph/160 km/hTraveling speeds
including those exceeding
100 mph/160 km/h
All pressure specifications in
the table are indicated in psi/
kilopascal with cold tires.
Cold = ambient temperature
245/45 R 17 95 W
245/45 R 17 99 V M+S XL29/200 35/240 29/200 33/230 35/240 42/290
225/50 R 17 94 V M+S
225/50 R 17 94 W
225/50 R 17 94 H M+S30/210 36/250 30/210 36/250 38/260 45/310
245/40 R 18 93 W 30/210 38/260 30/210 36/250 38/260 45/310
Front: 245/40 R 18 93 W
Rear: 275/35 R 18 95 W30/210 35/240 30/210 33/230 38/260 42/290
More details on the permissible load and weights can be found on page229.
Tire sizePressure specifications in psi/kPa
Compact wheel
*:
T 135/80 R 17 102 M61/420
Traveling speeds
up to max. of
100 mph/160 km/hTraveling speeds
including those exceeding
100 mph/160 km/h
All pressure specifications in
the table are indicated in psi/
kilopascal with cold tires.
Cold = ambient temperature
225/50 R 17 94 W M+S
225/50 R 17 94 W
245/45 R 17 95 W
225/50 R 17 94 H M+S
245/45 R 17 99 V M+S XL30/210 38/260 32/220 39/270 38/260 45/310
245/40 R 18 93 Y 32/220 39/270 29/200 36/250 35/240 42/290
More details on the permissible load and weights can be found on page229.