2006 BMW 335I COUPE sunroof
[x] Cancel search: sunroofPage 17 of 239
At a glance
15Reference
Controls
Driving tips
Communications
Navigation
Entertainment
Mobility
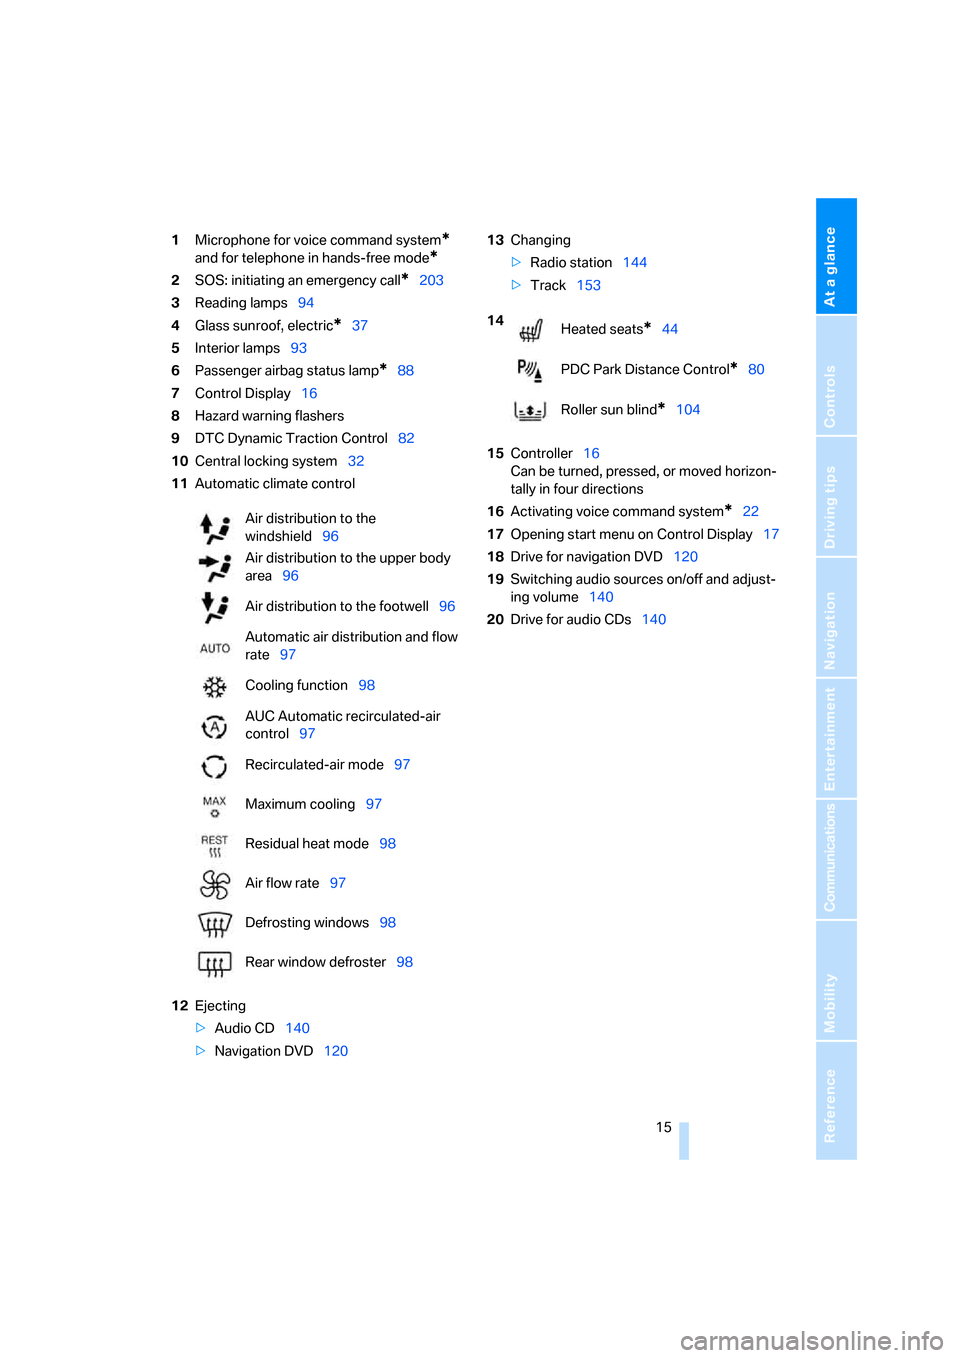
1Microphone for voice command system*
and for telephone in hands-free mode*
2SOS: initiating an emergency call*203
3Reading lamps94
4Glass sunroof, electric
*37
5Interior lamps93
6Passenger airbag status lamp
*88
7Control Display16
8Hazard warning flashers
9DTC Dynamic Traction Control82
10Central locking system32
11Automatic climate control
12Ejecting
>Audio CD140
>Navigation DVD12013Changing
>Radio station144
>Track153
15Controller16
Can be turned, pressed, or moved horizon-
tally in four directions
16Activating voice command system
*22
17Opening start menu on Control Display17
18Drive for navigation DVD120
19Switching audio sources on/off and adjust-
ing volume140
20Drive for audio CDs140 Air distribution to the
windshield96
Air distribution to the upper body
area96
Air distribution to the footwell96
Automatic air distribution and flow
rate97
Cooling function98
AUC Automatic recirculated-air
control97
Recirculated-air mode97
Maximum cooling97
Residual heat mode98
Air flow rate97
Defrosting windows98
Rear window defroster98
14
Heated seats*44
PDC Park Distance Control
*80
Roller sun blind
*104
ba8_E9293_US.book Seite 15 Freitag, 5. Mai 2006 1:02 13
Page 26 of 239
Voice command system
24 5.Press the button on the steering wheel
or in the center console.
Notes
For information on voice control of the
telephone, refer also to the separate
Owner's Manual.<
For voice commands, bear in mind the follow-
ing:
>Pronounce the commands and digits
smoothly and at normal volume, avoiding
excessive emphases and pauses. The same
applies to spelling when entering a destina-
tion for navigation.
>Always speak the commands in the lan-
guage of the voice command system.
>When selecting a radio station, use the
standard pronunciation of the station name.
>For entries in the voice-activated phone
book, only use names in the language of the
voice command system and no abbrevia-
tions
>Keep the doors, windows and glass sunroof
closed to prevent interference from outside
noise.
>Avoid ambient noise in the vehicle while
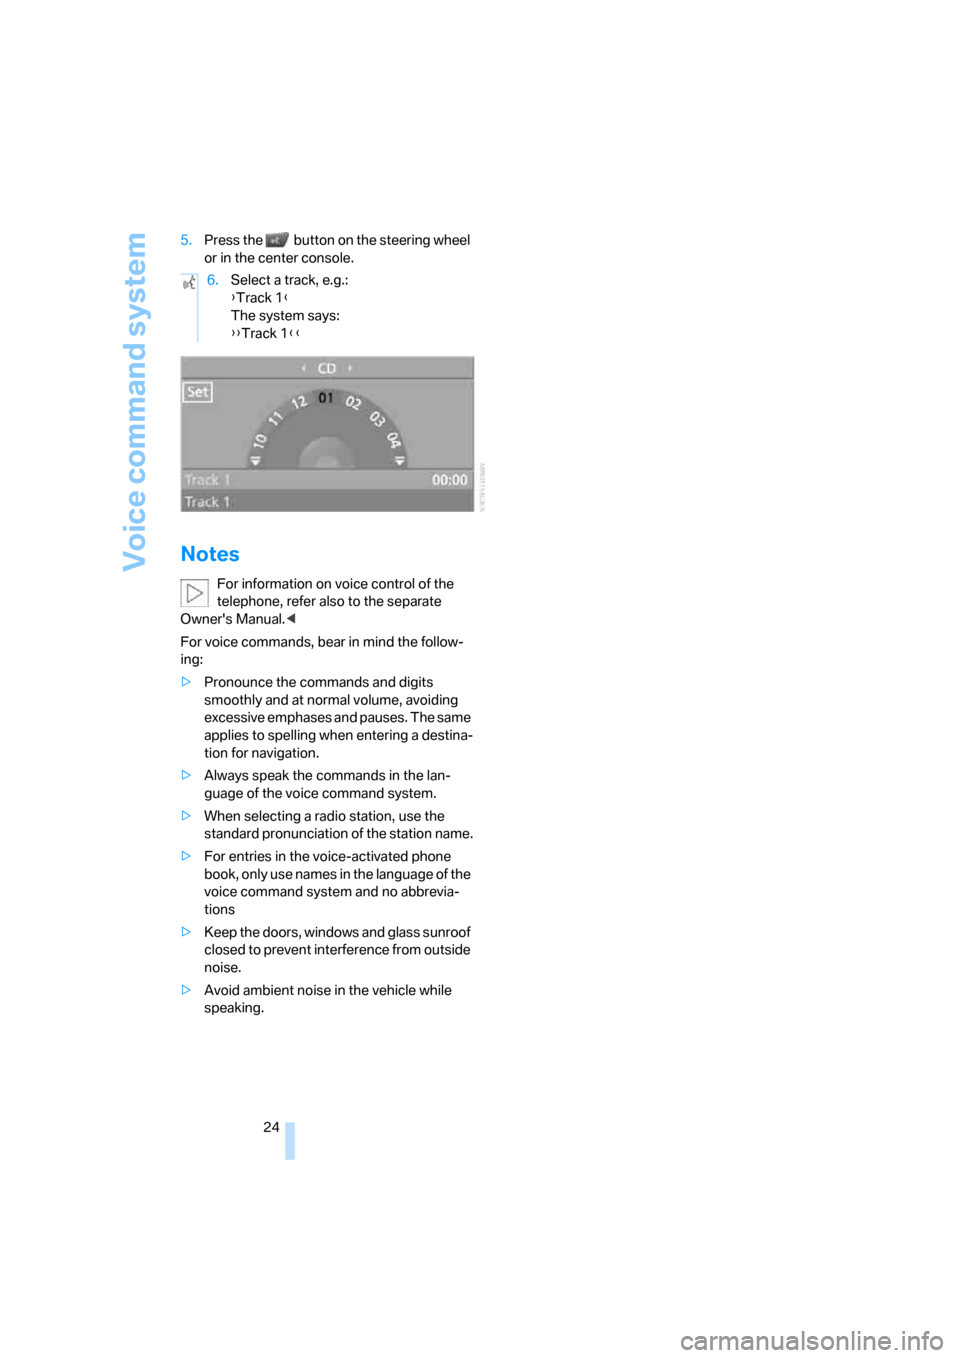
speaking.6.Select a track, e.g.:
{Track 1}
The system says:
{{Track 1}}
ba8_E9293_US.book Seite 24 Freitag, 5. Mai 2006 1:02 13
Page 32 of 239
Opening and closing
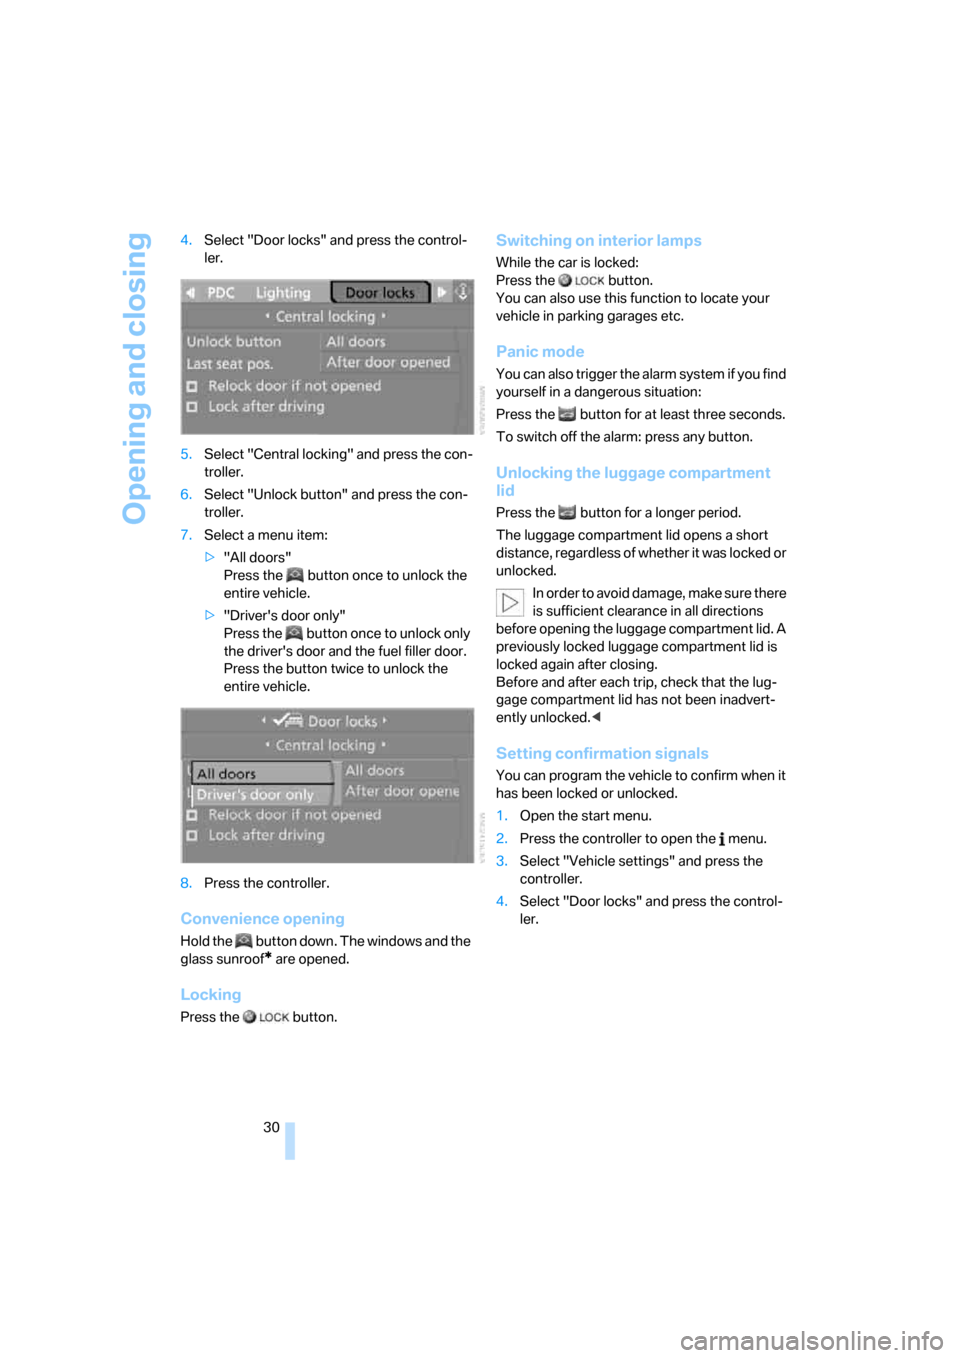
30 4.Select "Door locks" and press the control-
ler.
5.Select "Central locking" and press the con-
troller.
6.Select "Unlock button" and press the con-
troller.
7.Select a menu item:
>"All doors"
Press the button once to unlock the
entire vehicle.
>"Driver's door only"
Press the button once to unlock only
the driver's door and the fuel filler door.
Press the button twice to unlock the
entire vehicle.
8.Press the controller.
Convenience opening
Hold the button down. The windows and the
glass sunroof
* are opened.
Locking
Press the button.
Switching on interior lamps
While the car is locked:
Press the button.
You can also use this function to locate your
vehicle in parking garages etc.
Panic mode
You can also trigger the alarm system if you find
yourself in a dangerous situation:
Press the button for at least three seconds.
To switch off the alarm: press any button.
Unlocking the luggage compartment
lid
Press the button for a longer period.
The luggage compartment lid opens a short
distance, regardless of whether it was locked or
unlocked.
In order to avoid damage, make sure there
is sufficient clearance in all directions
before opening the luggage compartment lid. A
previously locked luggage compartment lid is
locked again after closing.
Before and after each trip, check that the lug-
gage compartment lid has not been inadvert-
ently unlocked.<
Setting confirmation signals
You can program the vehicle to confirm when it
has been locked or unlocked.
1.Open the start menu.
2.Press the controller to open the menu.
3.Select "Vehicle settings" and press the
controller.
4.Select "Door locks" and press the control-
ler.
ba8_E9293_US.book Seite 30 Freitag, 5. Mai 2006 1:02 13
Page 33 of 239
Controls
31Reference
At a glance
Driving tips
Communications
Navigation
Entertainment
Mobility
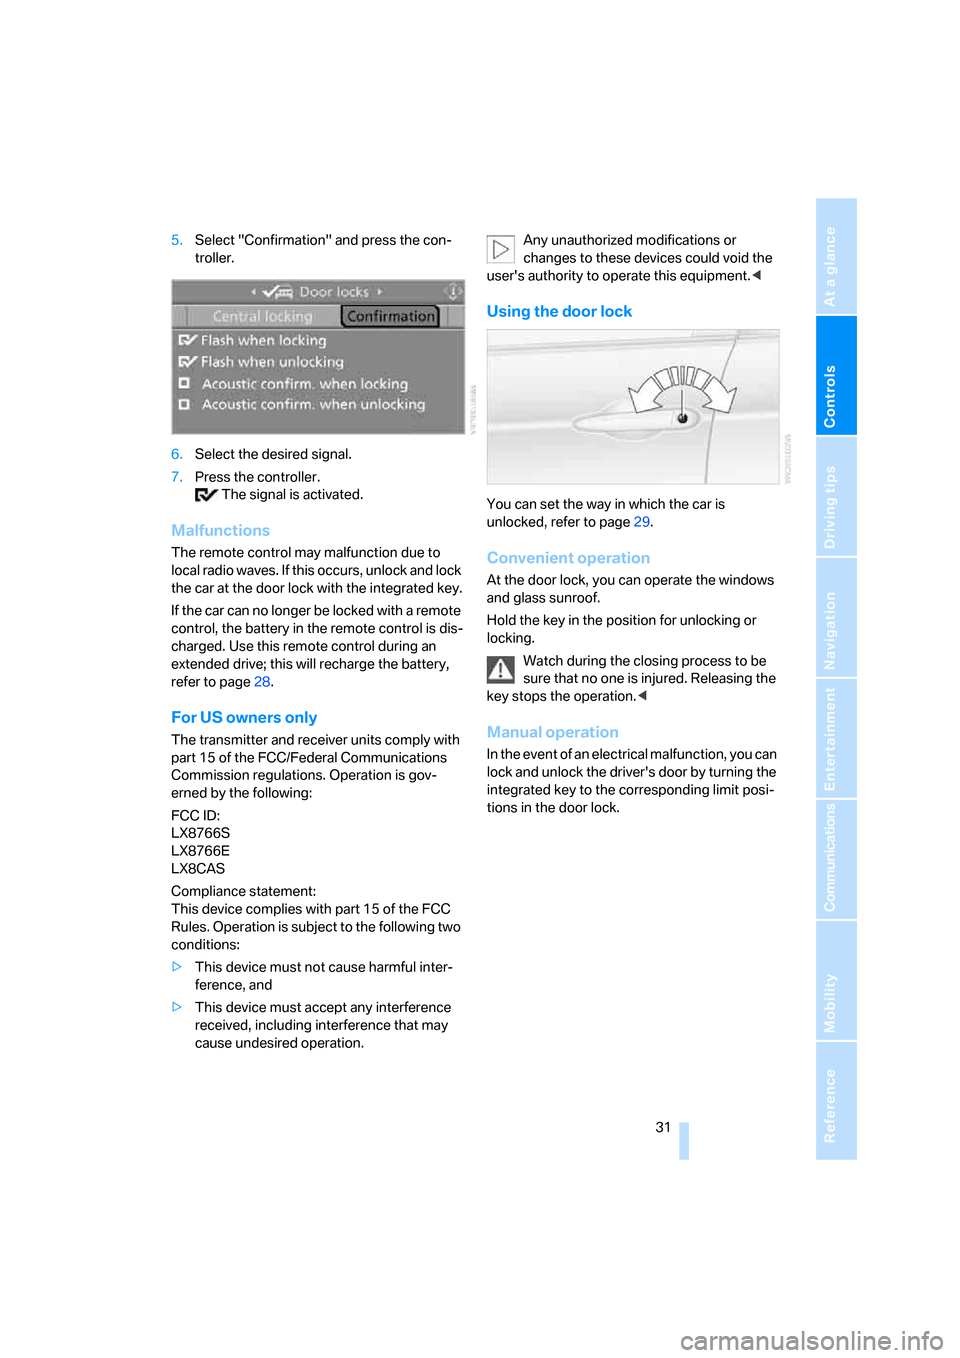
5.Select "Confirmation" and press the con-
troller.
6.Select the desired signal.
7.Press the controller.
The signal is activated.
Malfunctions
The remote control may malfunction due to
local radio waves. If this occurs, unlock and lock
the car at the door lock with the integrated key.
If the car can no longer be locked with a remote
control, the battery in the remote control is dis-
charged. Use this remote control during an
extended drive; this will recharge the battery,
refer to page28.
For US owners only
The transmitter and receiver units comply with
part 15 of the FCC/Federal Communications
Commission regulations. Operation is gov-
erned by the following:
FCC ID:
LX8766S
LX8766E
LX8CAS
Compliance statement:
This device complies with part 15 of the FCC
Rules. Operation is subject to the following two
conditions:
>This device must not cause harmful inter-
ference, and
>This device must accept any interference
received, including interference that may
cause undesired operation.Any unauthorized modifications or
changes to these devices could void the
user's authority to operate this equipment.<
Using the door lock
You can set the way in which the car is
unlocked, refer to page29.
Convenient operation
At the door lock, you can operate the windows
and glass sunroof.
Hold the key in the position for unlocking or
locking.
Watch during the closing process to be
sure that no one is injured. Releasing the
key stops the operation.<
Manual operation
In the event of an electrical malfunction, you can
lock and unlock the driver's door by turning the
integrated key to the corresponding limit posi-
tions in the door lock.
ba8_E9293_US.book Seite 31 Freitag, 5. Mai 2006 1:02 13
Page 37 of 239

Controls
35Reference
At a glance
Driving tips
Communications
Navigation
Entertainment
Mobility
Interior motion sensor
In order for the interior motion sensor to func-
tion properly, the windows and glass sunroof
must be completely closed.
Avoiding unintentional alarms
The tilt alarm sensor and interior motion sensor
may be switched off at the same time. This pre-
vents unintentional alarms, e.g. in the following
situations:
>In duplex garages
>When transporting on car-carrying trains
>When animals are to remain in the vehicle
Switching off tilt alarm sensor and
interior motion sensor
Press the button on the remote control
again as soon as the vehicle is locked.
The indicator lamp comes on for approx. two
seconds, then begins to flash steadily. The tilt
alarm sensor and the interior motion sensor are
switched off until the next time the vehicle is
unlocked and subsequently locked again.
Convenient access*
Convenient access enables you to enter your
vehicle without needing to hold the remote con-
trol in your hand. All you need to do is wear the
remote control close to your body, e.g. in your
jacket pocket. The vehicle automatically
detects the corresponding remote control
within the immediate vicinity or in the passen-
ger compartment.
Convenient access supports the following
functions:
>Unlocking/locking the vehicle
>Unlocking the luggage compartment lid
separately
>Engine starting
>Convenient closure
Functional requirement
>The vehicle or the luggage compartment lid
can only be locked when the vehicle detects
that the remote control currently in use is
outside of the vehicle.
>The vehicle cannot be locked or unlocked
again until after approx. 2 seconds.
>The engine can only be started when the
vehicle detects that the remote control cur-
rently in use is inside the vehicle.
Comparison to standard remote
controls
In general, there is no difference between using
convenient access or pressing the buttons on
the remote control to carry out the functions
mentioned above. You should therefore first
familiarize yourself with the instructions on
opening and closing starting on page28.
Special features regarding the use of conve-
nient access are described below.
If you notice a brief delay while opening or
closing the windows or glass sunroof, the
system is checking whether a remote control is
inside the vehicle. Please repeat the opening or
closing procedure, if necessary.<
Unlocking
Grasp the handle on the driver's or front pas-
senger's door completely, arrow 1. This corre-
sponds to pressing the button.
If a remote control is detected inside the car
after the vehicle is unlocked, the electric steer-
ing wheel lock is released, refer to page52.
ba8_E9293_US.book Seite 35 Freitag, 5. Mai 2006 1:02 13
Page 39 of 239
Controls
37Reference
At a glance
Driving tips
Communications
Navigation
Entertainment
Mobility
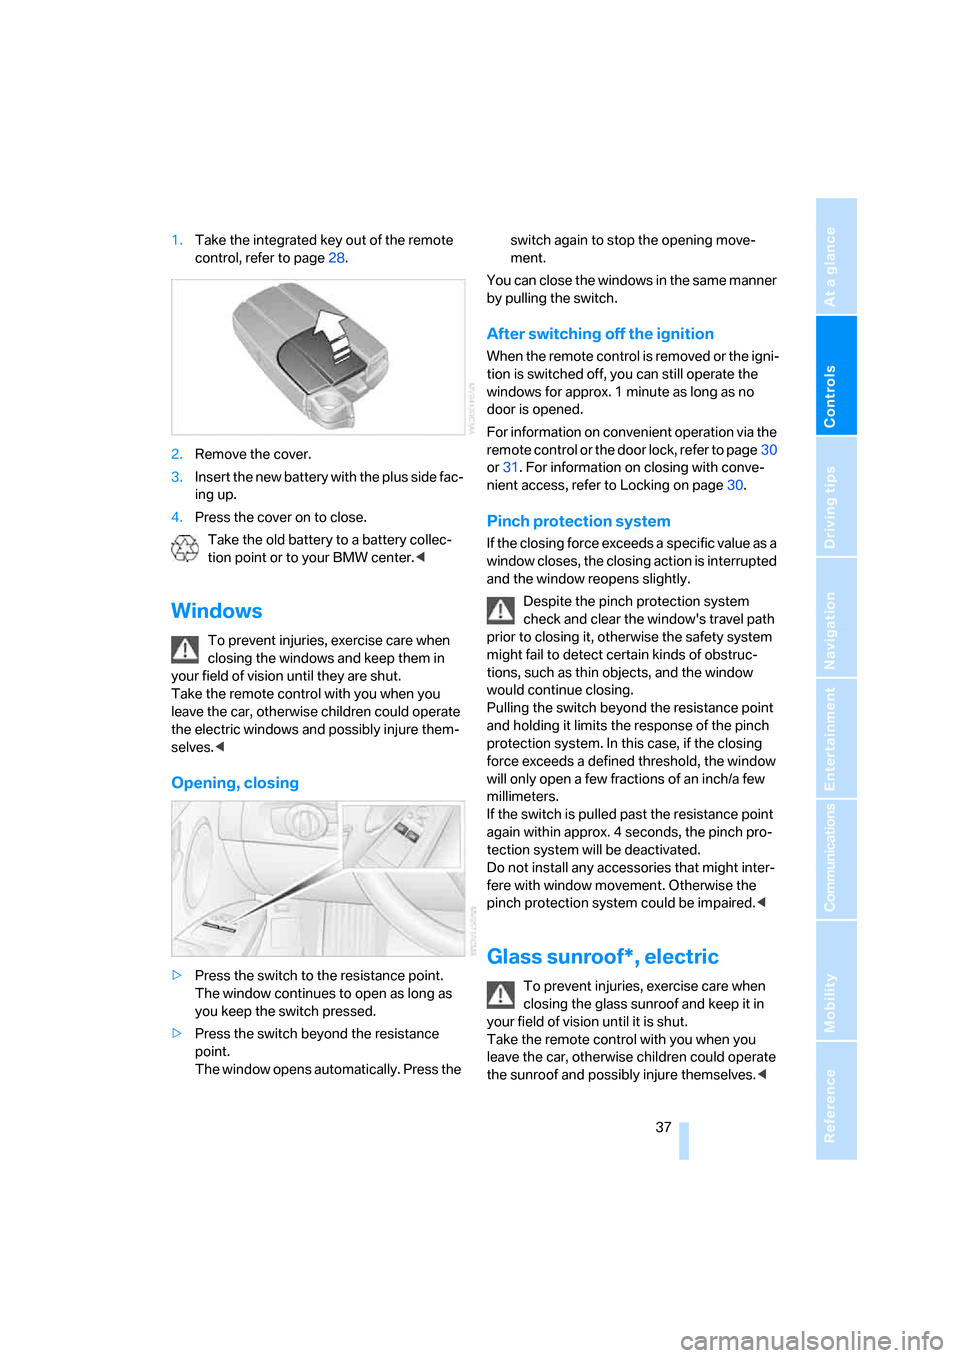
1.Take the integrated key out of the remote
control, refer to page28.
2.Remove the cover.
3.Insert the new battery with the plus side fac-
ing up.
4.Press the cover on to close.
Take the old battery to a battery collec-
tion point or to your BMW center.<
Windows
To prevent injuries, exercise care when
closing the windows and keep them in
your field of vision until they are shut.
Take the remote control with you when you
leave the car, otherwise children could operate
the electric windows and possibly injure them-
selves.<
Opening, closing
>Press the switch to the resistance point.
The window continues to open as long as
you keep the switch pressed.
>Press the switch beyond the resistance
point.
The window opens automatically. Press the switch again to stop the opening move-
ment.
You can close the windows in the same manner
by pulling the switch.
After switching off the ignition
When the remote control is removed or the igni-
tion is switched off, you can still operate the
windows for approx. 1 minute as long as no
door is opened.
For information on convenient operation via the
remote control or the door lock, refer to page30
or31. For information on closing with conve-
nient access, refer to Locking on page30.
Pinch protection system
If the closing force exceeds a specific value as a
window closes, the closing action is interrupted
and the window reopens slightly.
Despite the pinch protection system
check and clear the window's travel path
prior to closing it, otherwise the safety system
might fail to detect certain kinds of obstruc-
tions, such as thin objects, and the window
would continue closing.
Pulling the switch beyond the resistance point
and holding it limits the response of the pinch
protection system. In this case, if the closing
force exceeds a defined threshold, the window
will only open a few fractions of an inch/a few
millimeters.
If the switch is pulled past the resistance point
again within approx. 4 seconds, the pinch pro-
tection system will be deactivated.
Do not install any accessories that might inter-
fere with window movement. Otherwise the
pinch protection system could be impaired.<
Glass sunroof*, electric
To prevent injuries, exercise care when
closing the glass sunroof and keep it in
your field of vision until it is shut.
Take the remote control with you when you
leave the car, otherwise children could operate
the sunroof and possibly injure themselves.<
ba8_E9293_US.book Seite 37 Freitag, 5. Mai 2006 1:02 13
Page 40 of 239
Opening and closing
38
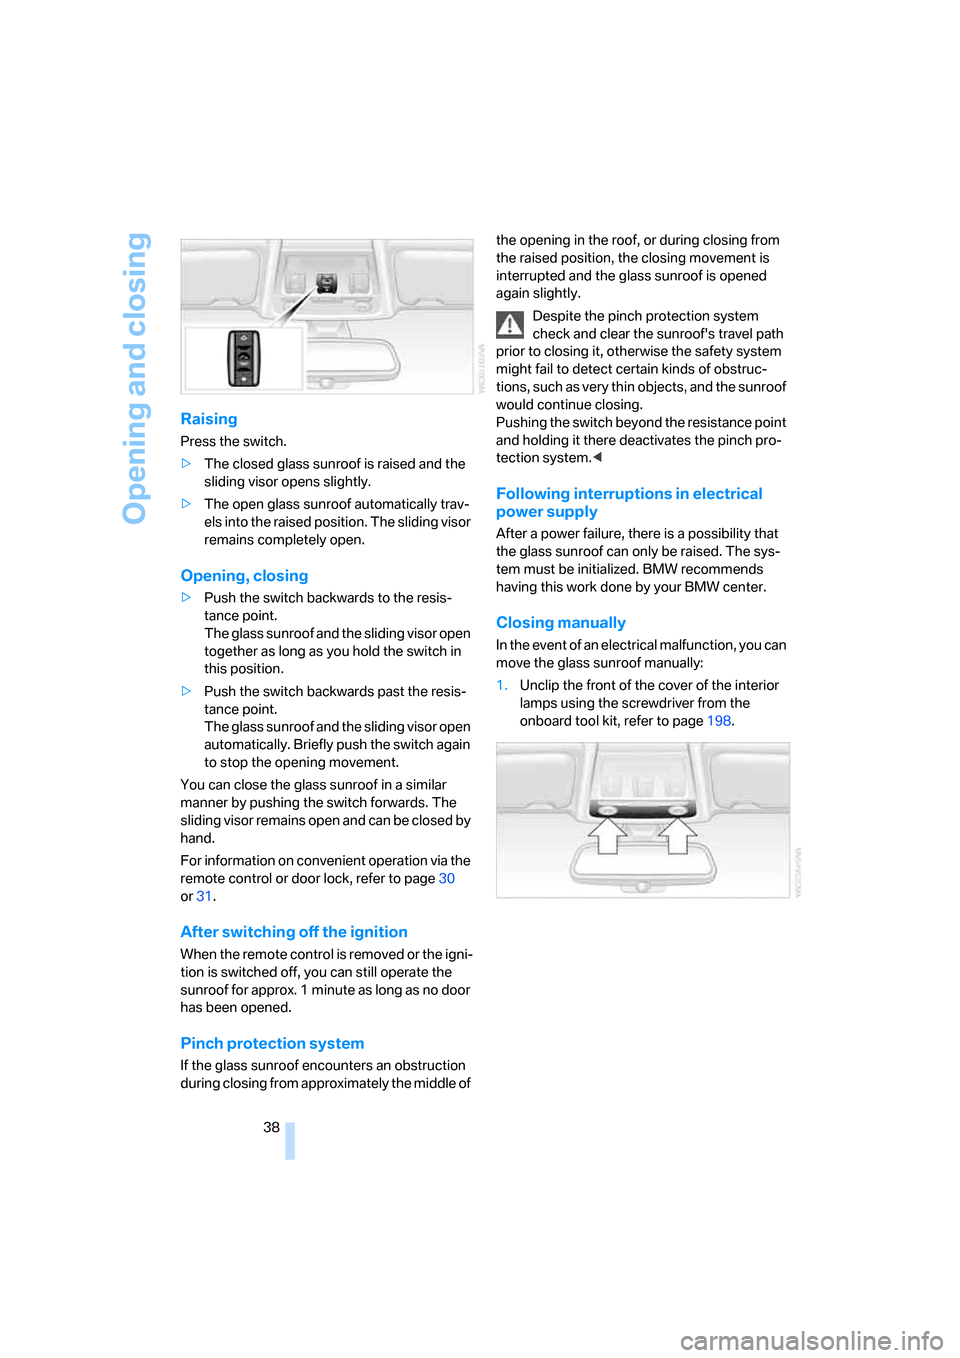
Raising
Press the switch.
>The closed glass sunroof is raised and the
sliding visor opens slightly.
>The open glass sunroof automatically trav-
els into the raised position. The sliding visor
remains completely open.
Opening, closing
>Push the switch backwards to the resis-
tance point.
The glass sunroof and the sliding visor open
together as long as you hold the switch in
this position.
>Push the switch backwards past the resis-
tance point.
The glass sunroof and the sliding visor open
automatically. Briefly push the switch again
to stop the opening movement.
You can close the glass sunroof in a similar
manner by pushing the switch forwards. The
sliding visor remains open and can be closed by
hand.
For information on convenient operation via the
remote control or door lock, refer to page30
or31.
After switching off the ignition
When the remote control is removed or the igni-
tion is switched off, you can still operate the
sunroof for approx. 1 minute as long as no door
has been opened.
Pinch protection system
If the glass sunroof encounters an obstruction
during closing from approximately the middle of the opening in the roof, or during closing from
the raised position, the closing movement is
interrupted and the glass sunroof is opened
again slightly.
Despite the pinch protection system
check and clear the sunroof's travel path
prior to closing it, otherwise the safety system
might fail to detect certain kinds of obstruc-
tions, such as very thin objects, and the sunroof
would continue closing.
Pushing the switch beyond the resistance point
and holding it there deactivates the pinch pro-
tection system.<
Following interruptions in electrical
power supply
After a power failure, there is a possibility that
the glass sunroof can only be raised. The sys-
tem must be initialized. BMW recommends
having this work done by your BMW center.
Closing manually
In the event of an electrical malfunction, you can
move the glass sunroof manually:
1.Unclip the front of the cover of the interior
lamps using the screwdriver from the
onboard tool kit, refer to page198.
ba8_E9293_US.book Seite 38 Freitag, 5. Mai 2006 1:02 13
Page 41 of 239
Controls
39Reference
At a glance
Driving tips
Communications
Navigation
Entertainment
Mobility
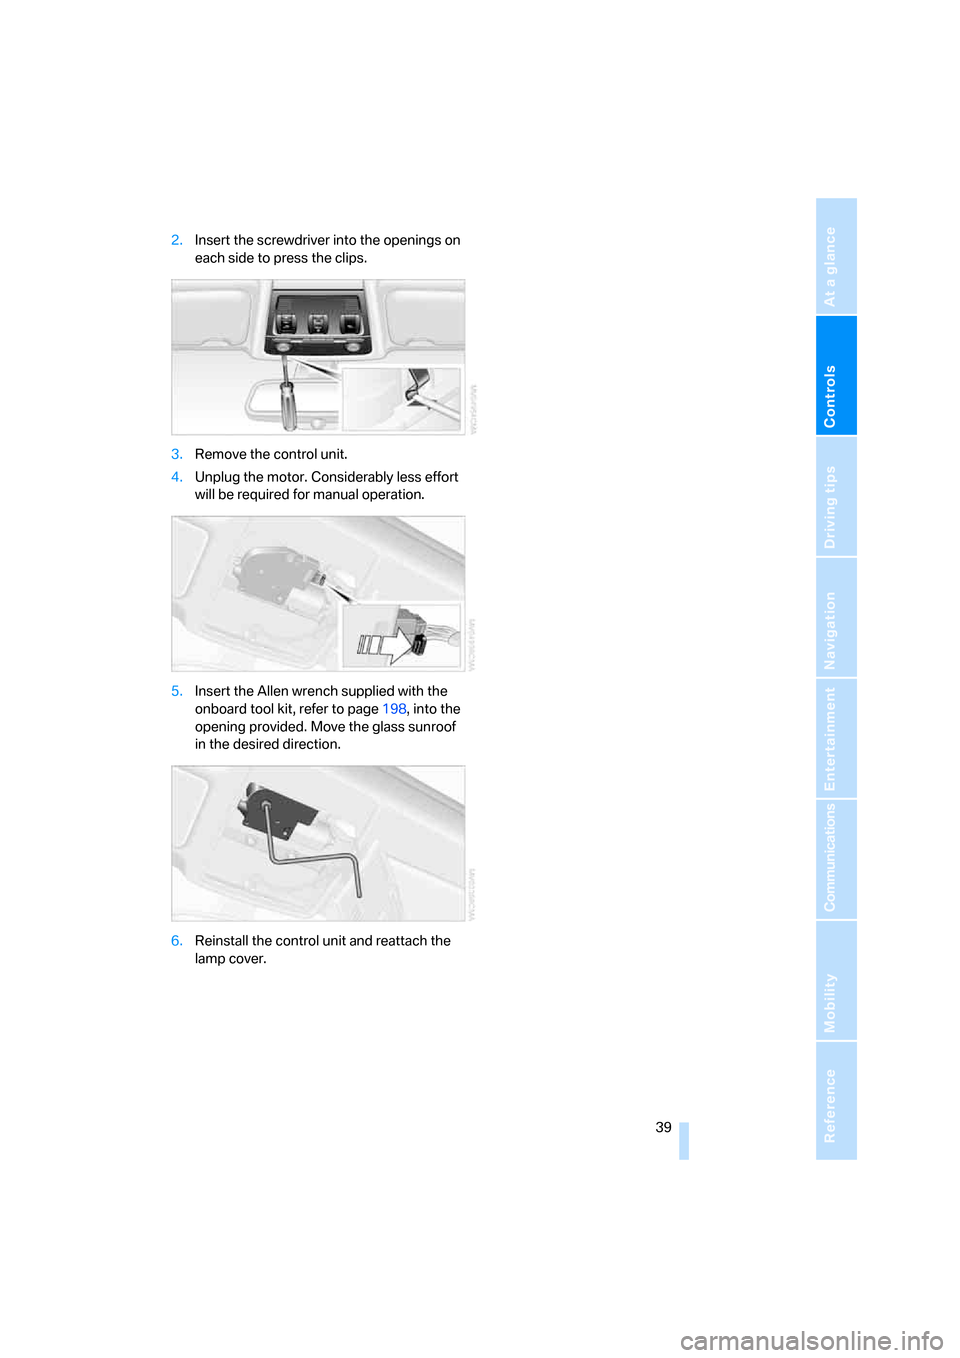
2.Insert the screwdriver into the openings on
each side to press the clips.
3.Remove the control unit.
4.Unplug the motor. Considerably less effort
will be required for manual operation.
5.Insert the Allen wrench supplied with the
onboard tool kit, refer to page198, into the
opening provided. Move the glass sunroof
in the desired direction.
6.Reinstall the control unit and reattach the
lamp cover.
ba8_E9293_US.book Seite 39 Freitag, 5. Mai 2006 1:02 13