2006 BMW 335I COUPE rear entertainment
[x] Cancel search: rear entertainmentPage 17 of 239
At a glance
15Reference
Controls
Driving tips
Communications
Navigation
Entertainment
Mobility
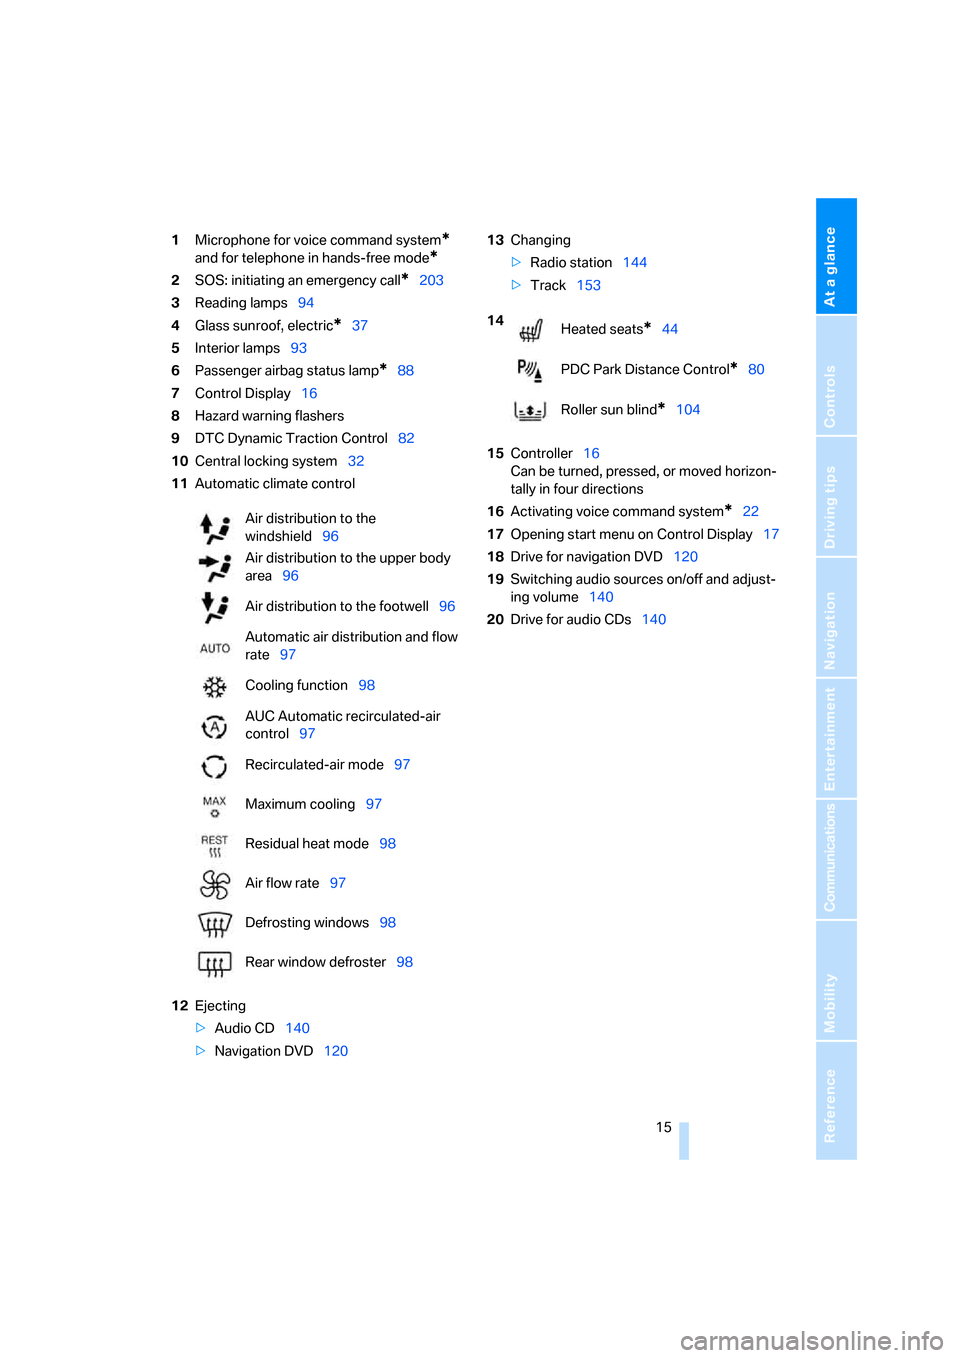
1Microphone for voice command system*
and for telephone in hands-free mode*
2SOS: initiating an emergency call*203
3Reading lamps94
4Glass sunroof, electric
*37
5Interior lamps93
6Passenger airbag status lamp
*88
7Control Display16
8Hazard warning flashers
9DTC Dynamic Traction Control82
10Central locking system32
11Automatic climate control
12Ejecting
>Audio CD140
>Navigation DVD12013Changing
>Radio station144
>Track153
15Controller16
Can be turned, pressed, or moved horizon-
tally in four directions
16Activating voice command system
*22
17Opening start menu on Control Display17
18Drive for navigation DVD120
19Switching audio sources on/off and adjust-
ing volume140
20Drive for audio CDs140 Air distribution to the
windshield96
Air distribution to the upper body
area96
Air distribution to the footwell96
Automatic air distribution and flow
rate97
Cooling function98
AUC Automatic recirculated-air
control97
Recirculated-air mode97
Maximum cooling97
Residual heat mode98
Air flow rate97
Defrosting windows98
Rear window defroster98
14
Heated seats*44
PDC Park Distance Control
*80
Roller sun blind
*104
ba8_E9293_US.book Seite 15 Freitag, 5. Mai 2006 1:02 13
Page 43 of 239
Controls
41Reference
At a glance
Driving tips
Communications
Navigation
Entertainment
Mobility
incline the backrest too far to the rear while the
vehicle is being driven, otherwise there is a dan-
ger in the event of an accident of sliding under
the safety belt, eliminating the protection nor-
mally provided by the belt.<
Comply with the instructions on head restraint
height on page42, and on damaged safety
belts on page46.
Manual adjustment
Observe the adjustment instructions on
page40 to ensure the best possible per-
sonal protection.<
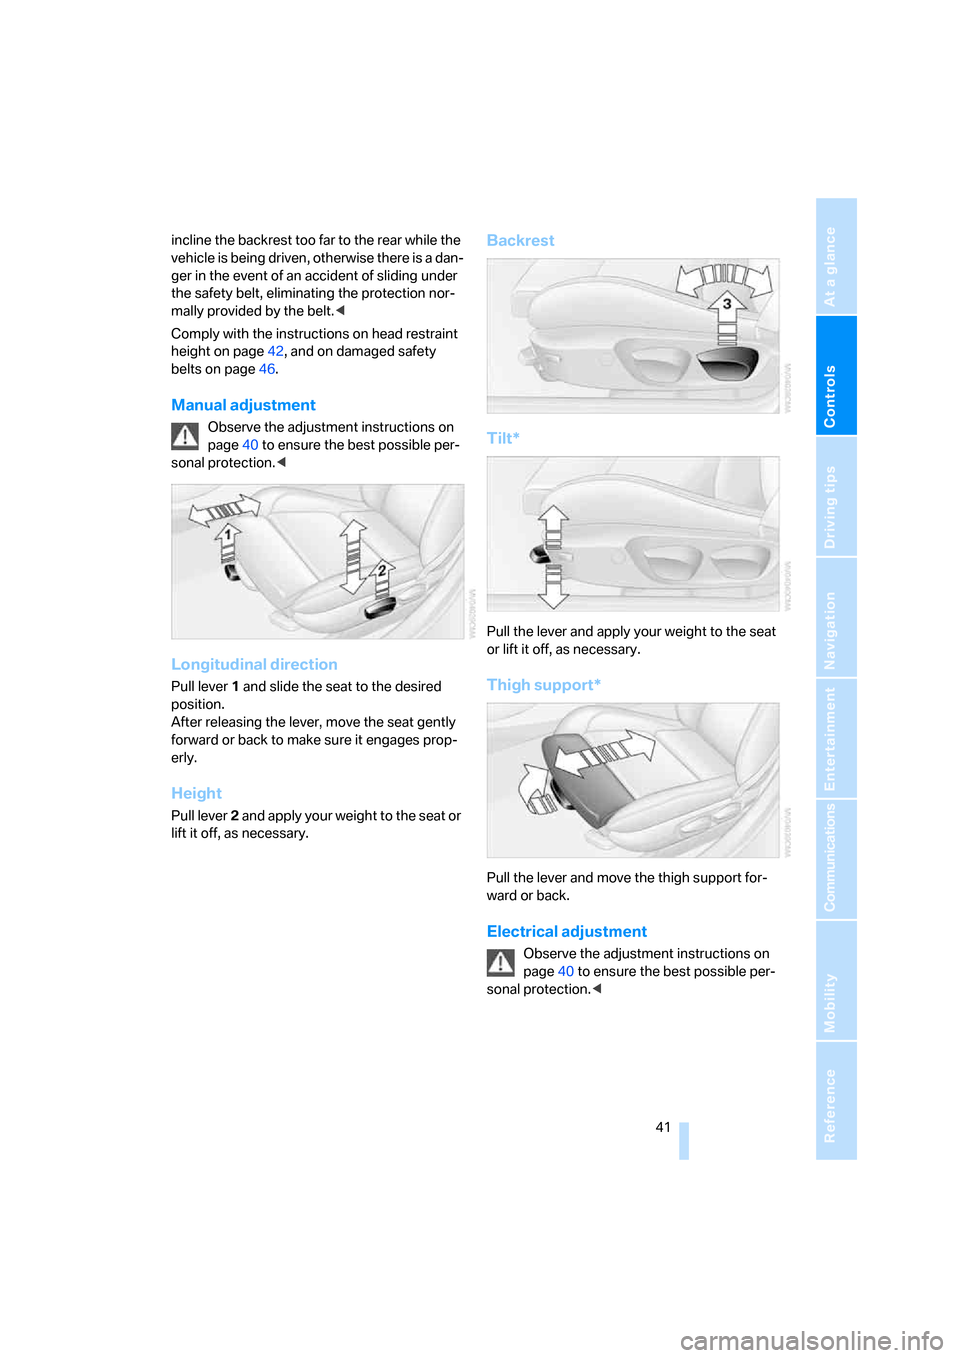
Longitudinal direction
Pull lever 1 and slide the seat to the desired
position.
After releasing the lever, move the seat gently
forward or back to make sure it engages prop-
erly.
Height
Pull lever 2 and apply your weight to the seat or
lift it off, as necessary.
Backrest
Tilt*
Pull the lever and apply your weight to the seat
or lift it off, as necessary.
Thigh support*
Pull the lever and move the thigh support for-
ward or back.
Electrical adjustment
Observe the adjustment instructions on
page40 to ensure the best possible per-
sonal protection.<
ba8_E9293_US.book Seite 41 Freitag, 5. Mai 2006 1:02 13
Page 45 of 239
Controls
43Reference
At a glance
Driving tips
Communications
Navigation
Entertainment
Mobility
erwise, there is an increased risk of injury in the
event of an accident.<
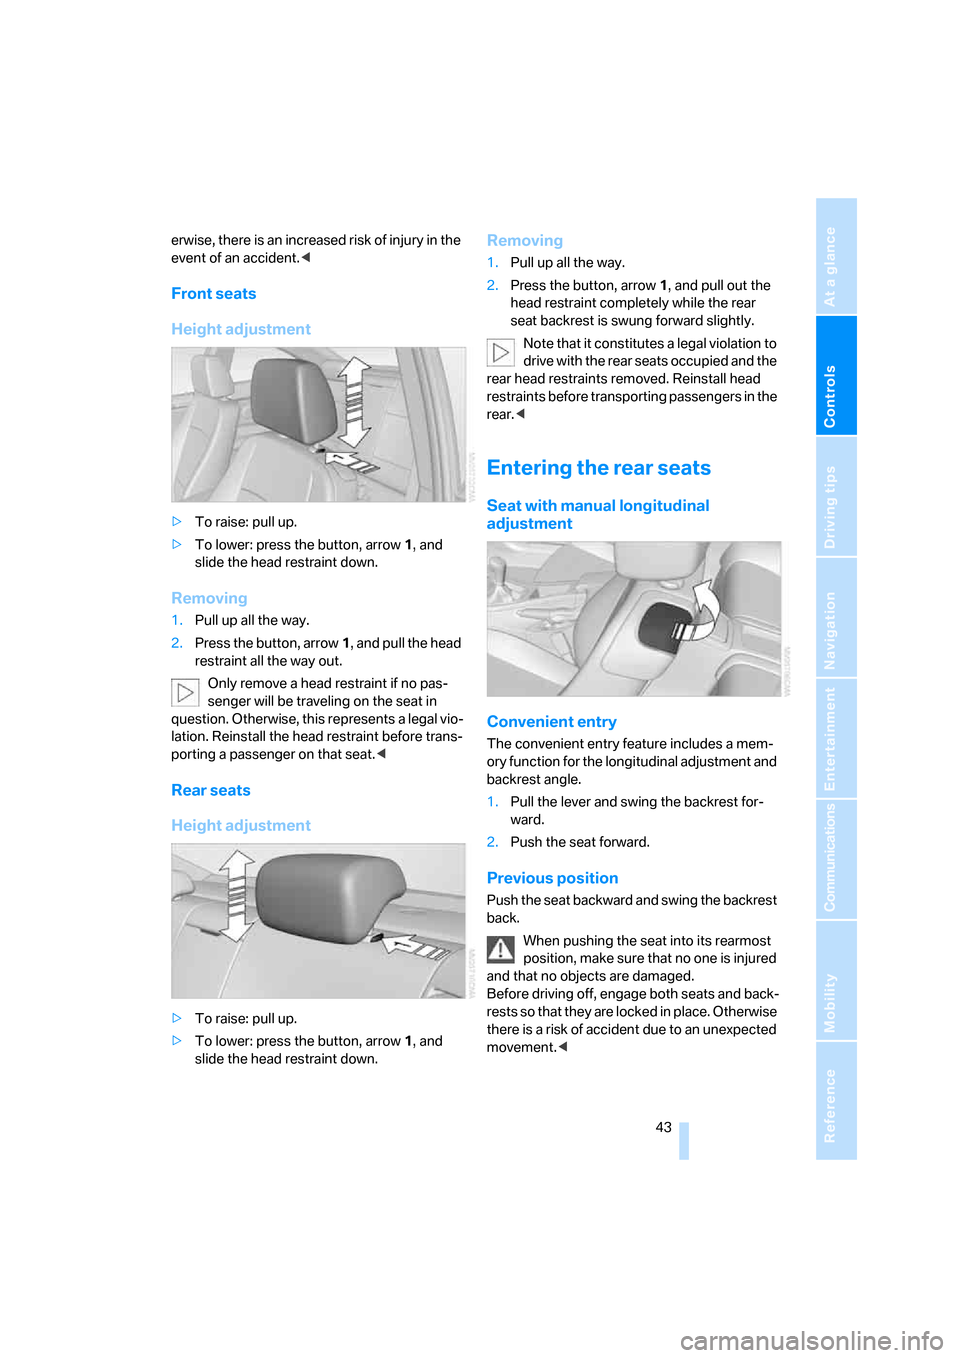
Front seats
Height adjustment
>To raise: pull up.
>To lower: press the button, arrow1, and
slide the head restraint down.
Removing
1.Pull up all the way.
2.Press the button, arrow1, and pull the head
restraint all the way out.
Only remove a head restraint if no pas-
senger will be traveling on the seat in
question. Otherwise, this represents a legal vio-
lation. Reinstall the head restraint before trans-
porting a passenger on that seat.<
Rear seats
Height adjustment
>To raise: pull up.
>To lower: press the button, arrow1, and
slide the head restraint down.
Removing
1.Pull up all the way.
2.Press the button, arrow 1, and pull out the
head restraint completely while the rear
seat backrest is swung forward slightly.
Note that it constitutes a legal violation to
drive with the rear seats occupied and the
rear head restraints removed. Reinstall head
restraints before transporting passengers in the
rear.<
Entering the rear seats
Seat with manual longitudinal
adjustment
Convenient entry
The convenient entry feature includes a mem-
ory function for the longitudinal adjustment and
backrest angle.
1.Pull the lever and swing the backrest for-
ward.
2.Push the seat forward.
Previous position
Push the seat backward and swing the backrest
back.
When pushing the seat into its rearmost
position, make sure that no one is injured
and that no objects are damaged.
Before driving off, engage both seats and back-
rests so that they are locked in place. Otherwise
there is a risk of accident due to an unexpected
movement.<
ba8_E9293_US.book Seite 43 Freitag, 5. Mai 2006 1:02 13
Page 47 of 239
Controls
45Reference
At a glance
Driving tips
Communications
Navigation
Entertainment
Mobility
The driver's seat and exterior mirror posi-
tions are stored for the remote control cur-
rently in use.
Automatic call-up
The driver's seat position last stored is stored
for the remote control currently in use.
You can select the occasion on which the seat is
reset to that position.
>Call-up when the vehicle is unlocked
>Call-up when the driver's door is opened.
When this Personal Profile function is
used, first make sure that the footwell
behind the driver's seat is free of obstacles.
Failure to do so could cause injury to persons or
damage to objects as a result of a rearward
movement of the seat.<
The adjusting procedure is halted when you
touch a seat adjustment switch or one of the
MEMORY buttons.
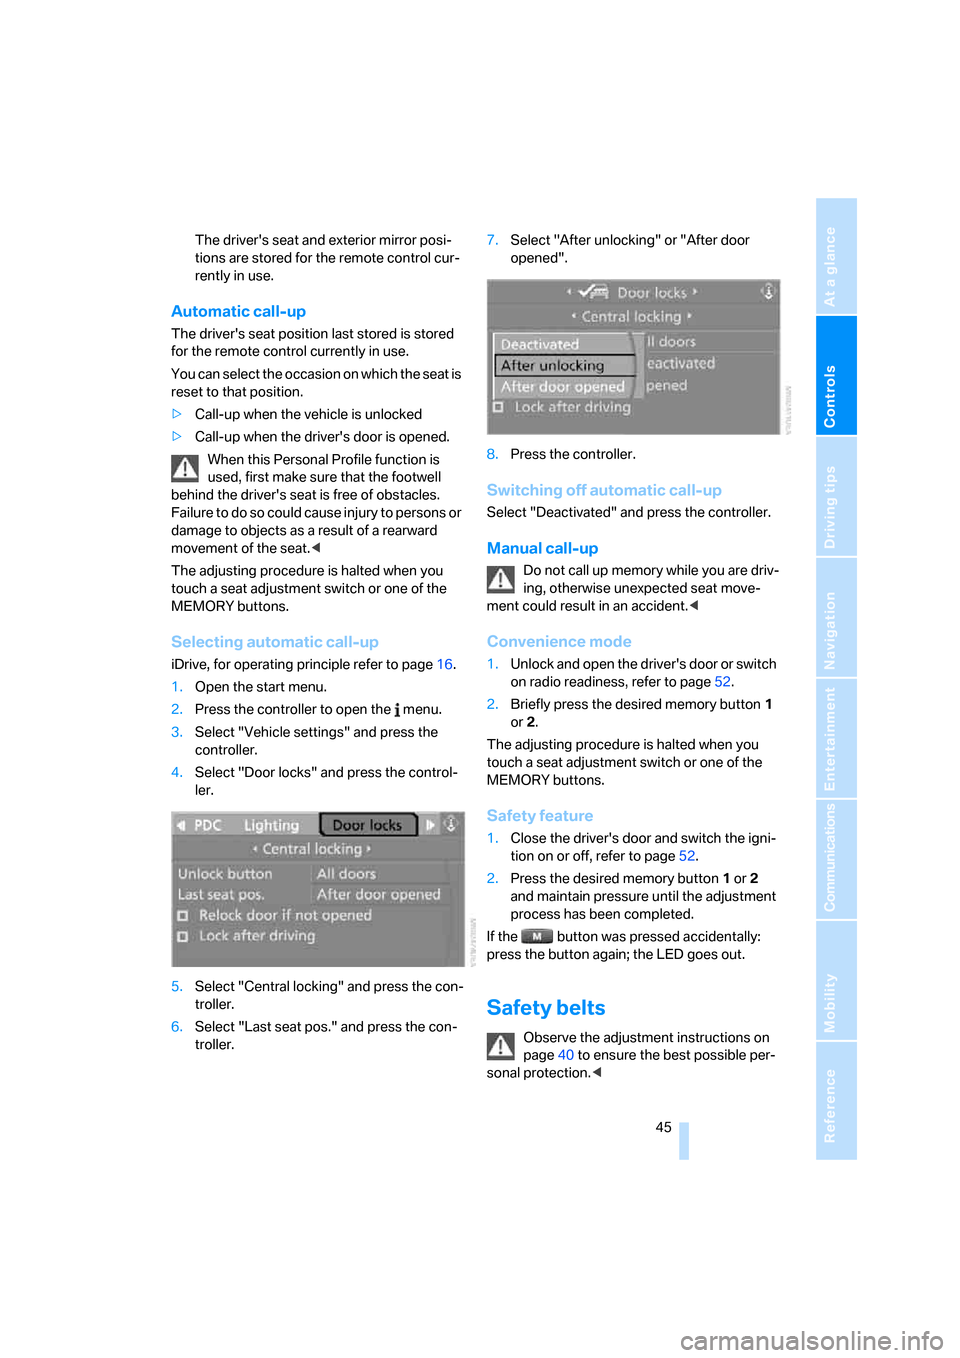
Selecting automatic call-up
iDrive, for operating principle refer to page16.
1.Open the start menu.
2.Press the controller to open the menu.
3.Select "Vehicle settings" and press the
controller.
4.Select "Door locks" and press the control-
ler.
5.Select "Central locking" and press the con-
troller.
6.Select "Last seat pos." and press the con-
troller.7.Select "After unlocking" or "After door
opened".
8.Press the controller.
Switching off automatic call-up
Select "Deactivated" and press the controller.
Manual call-up
Do not call up memory while you are driv-
ing, otherwise unexpected seat move-
ment could result in an accident.<
Convenience mode
1.Unlock and open the driver's door or switch
on radio readiness, refer to page52.
2.Briefly press the desired memory button1
or 2.
The adjusting procedure is halted when you
touch a seat adjustment switch or one of the
MEMORY buttons.
Safety feature
1.Close the driver's door and switch the igni-
tion on or off, refer to page52.
2.Press the desired memory button1 or2
and maintain pressure until the adjustment
process has been completed.
If the button was pressed accidentally:
press the button again; the LED goes out.
Safety belts
Observe the adjustment instructions on
page40 to ensure the best possible per-
sonal protection.<
ba8_E9293_US.book Seite 45 Freitag, 5. Mai 2006 1:02 13
Page 49 of 239
Controls
47Reference
At a glance
Driving tips
Communications
Navigation
Entertainment
Mobility
Mirrors
Exterior mirrors
The front passenger's mirror is more convex
than the driver's mirror. The objects seen in the
mirror are closer than they appear. Do not
gauge your distance from traffic behind you on
the basis of what you see in the mirror; other-
wise there is an increased risk of an accident.<
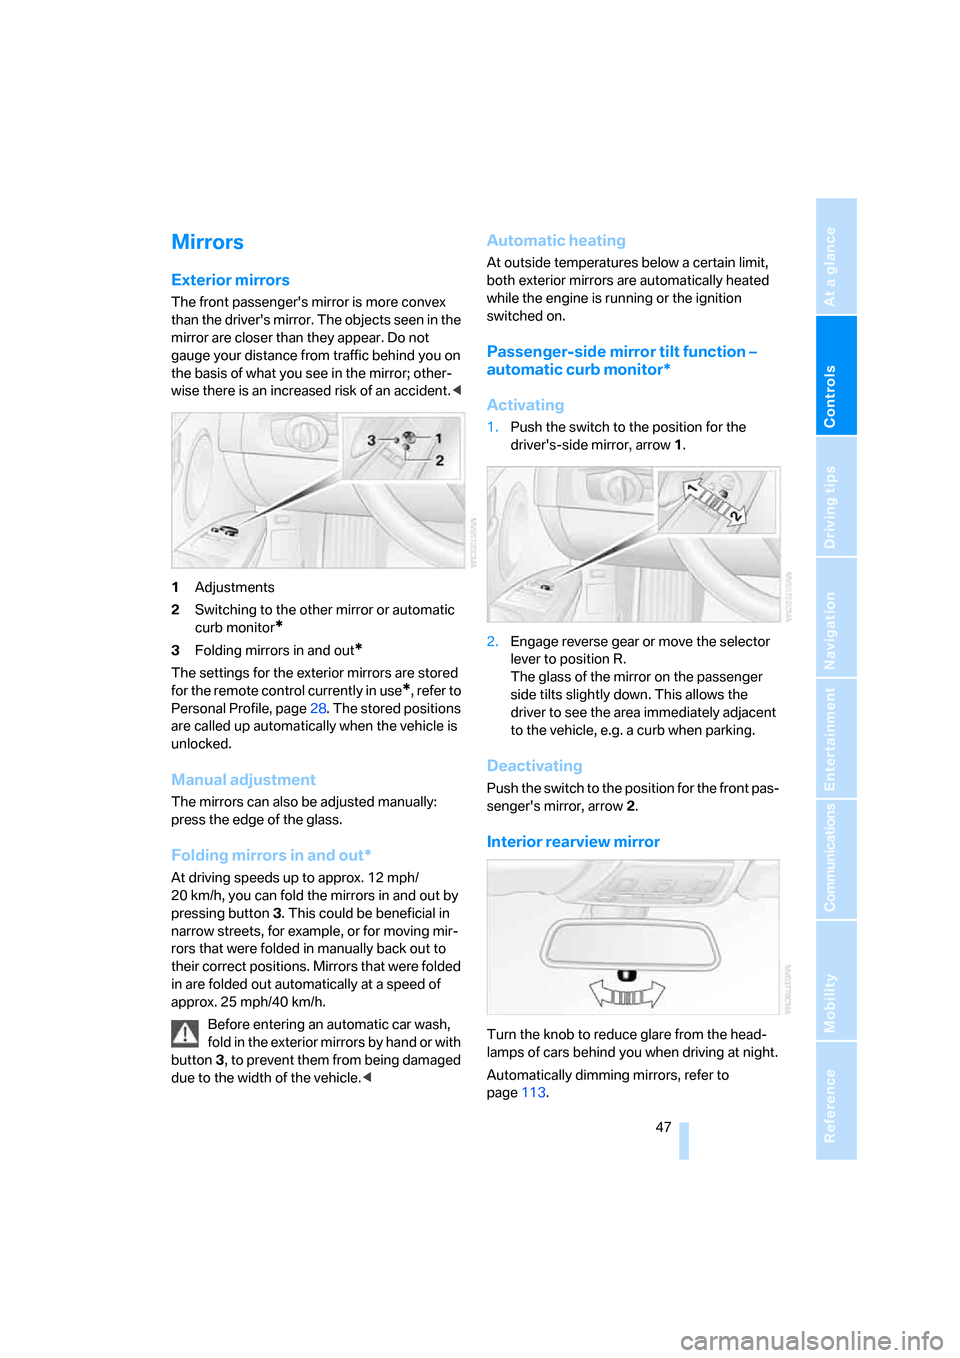
1Adjustments
2Switching to the other mirror or automatic
curb monitor
*
3Folding mirrors in and out*
The settings for the exterior mirrors are stored
for the remote control currently in use
*, refer to
Personal Profile, page28. The stored positions
are called up automatically when the vehicle is
unlocked.
Manual adjustment
The mirrors can also be adjusted manually:
press the edge of the glass.
Folding mirrors in and out*
At driving speeds up to approx. 12 mph/
20 km/h, you can fold the mirrors in and out by
pressing button3. This could be beneficial in
narrow streets, for example, or for moving mir-
rors that were folded in manually back out to
their correct positions. Mirrors that were folded
in are folded out automatically at a speed of
approx. 25 mph/40 km/h.
Before entering an automatic car wash,
fold in the exterior mirrors by hand or with
button3, to prevent them from being damaged
due to the width of the vehicle.<
Automatic heating
At outside temperatures below a certain limit,
both exterior mirrors are automatically heated
while the engine is running or the ignition
switched on.
Passenger-side mirror tilt function –
automatic curb monitor*
Activating
1.Push the switch to the position for the
driver's-side mirror, arrow1.
2.Engage reverse gear or move the selector
lever to position R.
The glass of the mirror on the passenger
side tilts slightly down. This allows the
driver to see the area immediately adjacent
to the vehicle, e.g. a curb when parking.
Deactivating
Push the switch to the position for the front pas-
senger's mirror, arrow2.
Interior rearview mirror
Turn the knob to reduce glare from the head-
lamps of cars behind you when driving at night.
Automatically dimming mirrors, refer to
page113.
ba8_E9293_US.book Seite 47 Freitag, 5. Mai 2006 1:02 13
Page 53 of 239
Controls
51Reference
At a glance
Driving tips
Communications
Navigation
Entertainment
Mobility
To unlock the safety belt
1.Open the belt buckle
2.Remove the child-restraint system.
3.Allow the safety belt strap to retract all the
way.
Child-restraint system with tether
strap
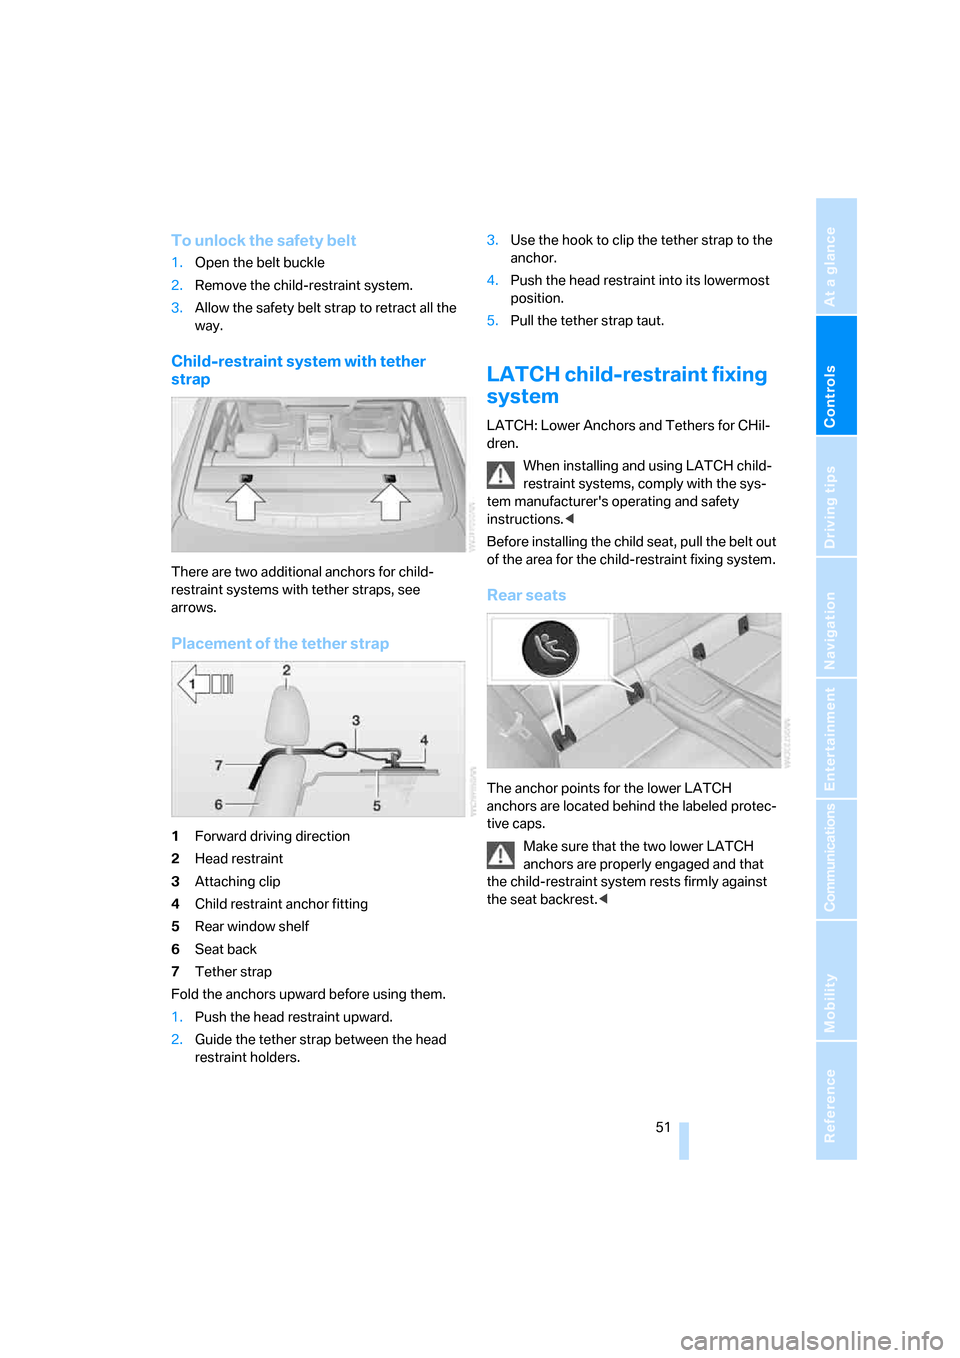
There are two additional anchors for child-
restraint systems with tether straps, see
arrows.
Placement of the tether strap
1Forward driving direction
2Head restraint
3Attaching clip
4Child restraint anchor fitting
5Rear window shelf
6Seat back
7Tether strap
Fold the anchors upward before using them.
1.Push the head restraint upward.
2.Guide the tether strap between the head
restraint holders.3.Use the hook to clip the tether strap to the
anchor.
4.Push the head restraint into its lowermost
position.
5.Pull the tether strap taut.
LATCH child-restraint fixing
system
LATCH: Lower Anchors and Tethers for CHil-
dren.
When installing and using LATCH child-
restraint systems, comply with the sys-
tem manufacturer's operating and safety
instructions.<
Before installing the child seat, pull the belt out
of the area for the child-restraint fixing system.
Rear seats
The anchor points for the lower LATCH
anchors are located behind the labeled protec-
tive caps.
Make sure that the two lower LATCH
anchors are properly engaged and that
the child-restraint system rests firmly against
the seat backrest.<
ba8_E9293_US.book Seite 51 Freitag, 5. Mai 2006 1:02 13
Page 57 of 239
Controls
55Reference
At a glance
Driving tips
Communications
Navigation
Entertainment
Mobility
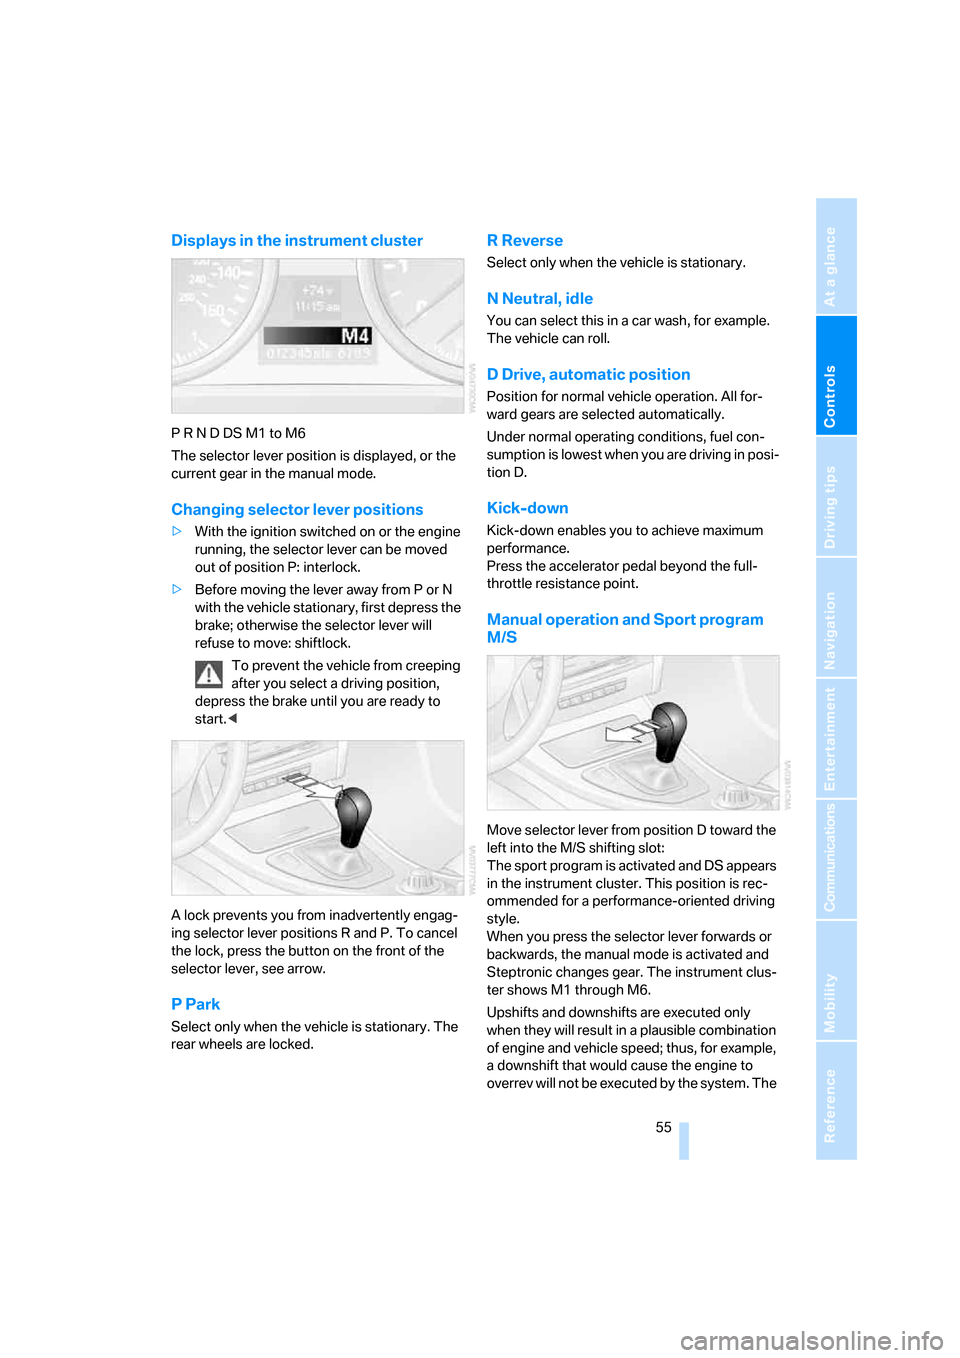
Displays in the instrument cluster
P R N D DS M1 to M6
The selector lever position is displayed, or the
current gear in the manual mode.
Changing selector lever positions
>With the ignition switched on or the engine
running, the selector lever can be moved
out of position P: interlock.
>Before moving the lever away from P or N
with the vehicle stationary, first depress the
brake; otherwise the selector lever will
refuse to move: shiftlock.
To prevent the vehicle from creeping
after you select a driving position,
depress the brake until you are ready to
start.<
A lock prevents you from inadvertently engag-
ing selector lever positions R and P. To cancel
the lock, press the button on the front of the
selector lever, see arrow.
P Park
Select only when the vehicle is stationary. The
rear wheels are locked.
R Reverse
Select only when the vehicle is stationary.
N Neutral, idle
You can select this in a car wash, for example.
The vehicle can roll.
D Drive, automatic position
Position for normal vehicle operation. All for-
ward gears are selected automatically.
Under normal operating conditions, fuel con-
sumption is lowest when you are driving in posi-
tion D.
Kick-down
Kick-down enables you to achieve maximum
performance.
Press the accelerator pedal beyond the full-
throttle resistance point.
Manual operation and Sport program
M/S
Move selector lever from position D toward the
left into the M/S shifting slot:
The sport program is activated and DS appears
in the instrument cluster. This position is rec-
ommended for a performance-oriented driving
style.
When you press the selector lever forwards or
backwards, the manual mode is activated and
Steptronic changes gear. The instrument clus-
ter shows M1 through M6.
Upshifts and downshifts are executed only
when they will result in a plausible combination
of engine and vehicle speed; thus, for example,
a downshift that would cause the engine to
overrev will not be executed by the system. The
ba8_E9293_US.book Seite 55 Freitag, 5. Mai 2006 1:02 13
Page 59 of 239

Controls
57Reference
At a glance
Driving tips
Communications
Navigation
Entertainment
Mobility
Triple turn signal activation
Press the lever as far as the resistance point.
The turn signals flash three times.
You can activate or deactivate this function.
iDrive, for operating principle refer to page16.
1.Open the start menu.
2.Press the controller to open the menu.
3.Select "Vehicle settings" and press the
controller.
4.Select "Lighting" and press the controller.
5.Select "Triple turn signal activation" and
press the controller.
Triple turn signaling is activated.
Wiper system
1Switching on wipers
2Switching off wipers or brief wipe
3Activating/deactivating intermittent wipe or
rain sensor
*
4Cleaning windshield and headlamps*
5Setting speed for intermittent wipe, or sen-
sitivity of the rain sensor
Switching on wipers
Press the lever upward, arrow 1.
The lever automatically returns to its initial posi-
tion when released.
Normal wiper speed
Press once.
The system switches to operation in the inter-
mittent mode when the vehicle is stationary.
Fast wiper speed
Press twice or press beyond the resistance
point.
The system switches to normal speed when the
vehicle is stationary.
Intermittent wipe or rain sensor*
If the car is not equipped with a rain sensor, the
intermittent-wipe time is a preset.
If the car is equipped with a rain sensor, the time
between wipes is controlled automatically and
depends on the intensity of the rainfall. The
sensor is mounted on the windshield, directly in
front of the interior rearview mirror.
Activating intermittent wipe or rain
sensor
Press the button, arrow3. The LED in the but-
ton lights up.
Setting speed for intermittent wipe or
sensitivity of the rain sensor
Turn knurled wheel5 up or down.
ba8_E9293_US.book Seite 57 Freitag, 5. Mai 2006 1:02 13