2006 BMW 330CI IDRIVE COUPE service
[x] Cancel search: servicePage 72 of 239
Everything under control
70
Settings and information
Operating principle
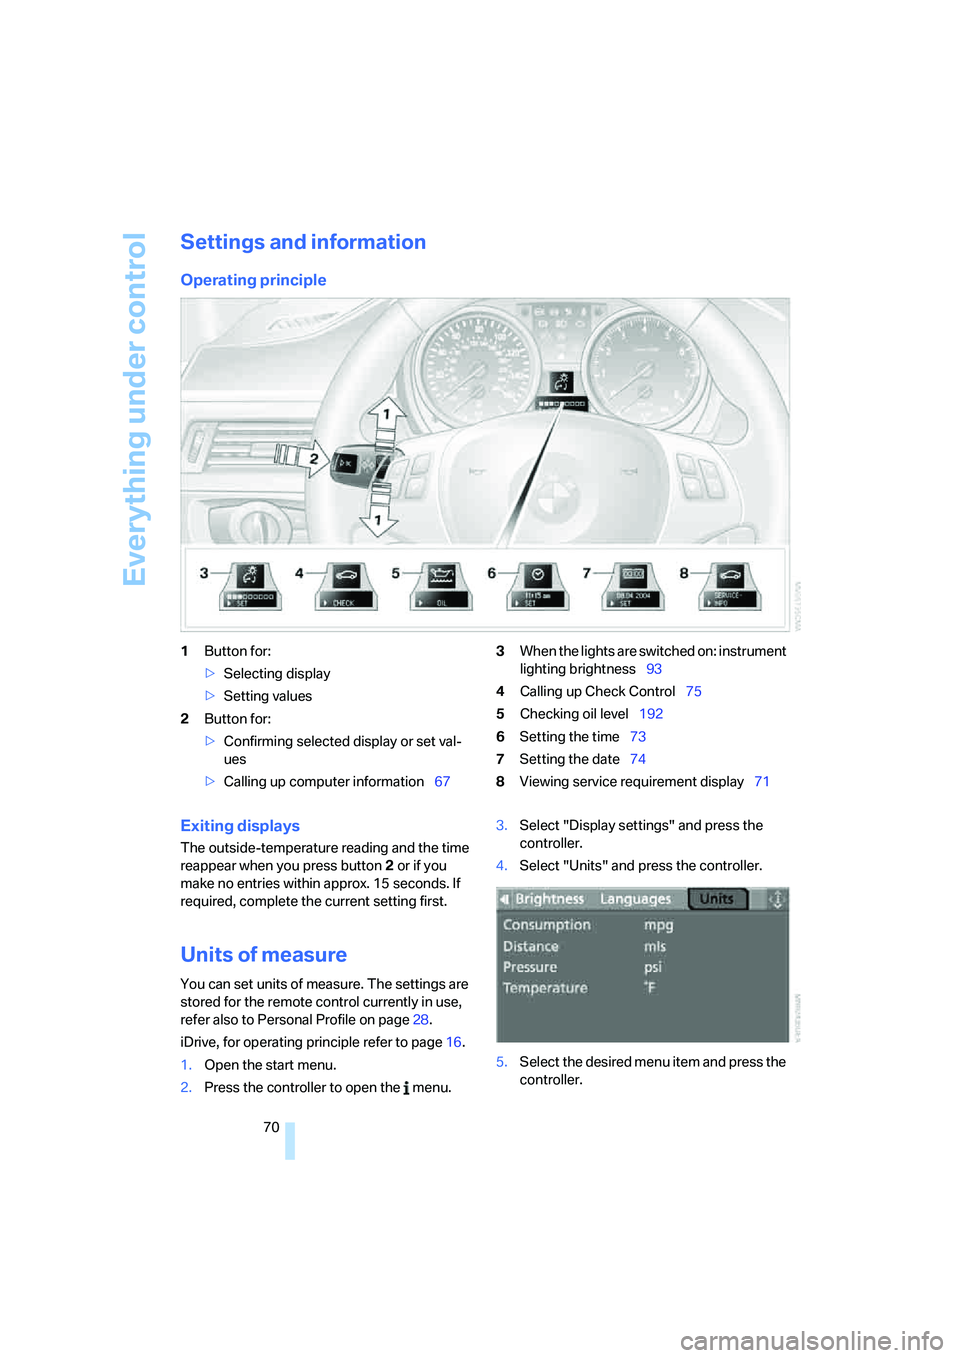
1Button for:
>Selecting display
>Setting values
2Button for:
>Confirming selected display or set val-
ues
>Calling up computer information673When the lights are switched on: instrument
lighting brightness93
4Calling up Check Control75
5Checking oil level192
6Setting the time73
7Setting the date74
8Viewing service requirement display71
Exiting displays
The outside-temperature reading and the time
reappear when you press button2 or if you
make no entries within approx. 15 seconds. If
required, complete the current setting first.
Units of measure
You can set units of measure. The settings are
stored for the remote control currently in use,
refer also to Personal Profile on page28.
iDrive, for operating principle refer to page16.
1.Open the start menu.
2.Press the controller to open the menu.3.Select "Display settings" and press the
controller.
4.Select "Units" and press the controller.
5.Select the desired menu item and press the
controller.
ba8_E9293_US.book Seite 70 Freitag, 5. Mai 2006 1:02 13
Page 73 of 239
Controls
71Reference
At a glance
Driving tips
Communications
Navigation
Entertainment
Mobility
6.Select the desired measurement unit and
press the controller.
Service requirements
The remaining driving distance and the date of
the next scheduled service are displayed briefly
immediately after you start the engine or switch
on the ignition.
The extent of service work required can
be read out from the remote control by
your BMW Service Advisor.
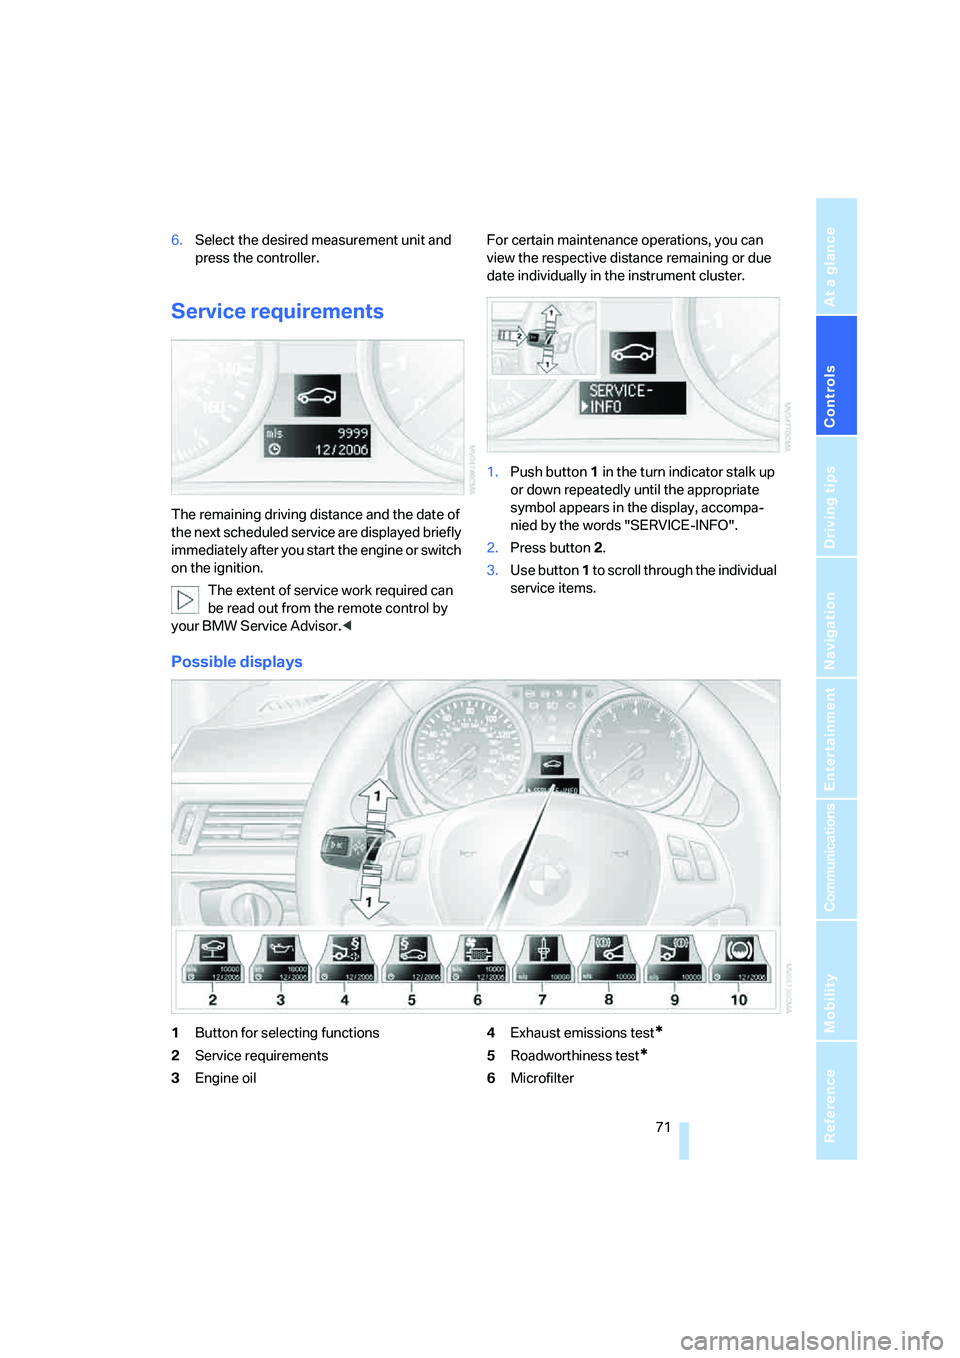
date individually in the instrument cluster.
1.Push button 1 in the turn indicator stalk up
or down repeatedly until the appropriate
symbol appears in the display, accompa-
nied by the words "SERVICE-INFO".
2.Press button 2.
3.Use button 1 to scroll through the individual
service items.
Possible displays
1Button for selecting functions
2Service requirements
3Engine oil4Exhaust emissions test*
5Roadworthiness test*
6Microfilter
ba8_E9293_US.book Seite 71 Freitag, 5. Mai 2006 1:02 13
Page 74 of 239
Everything under control
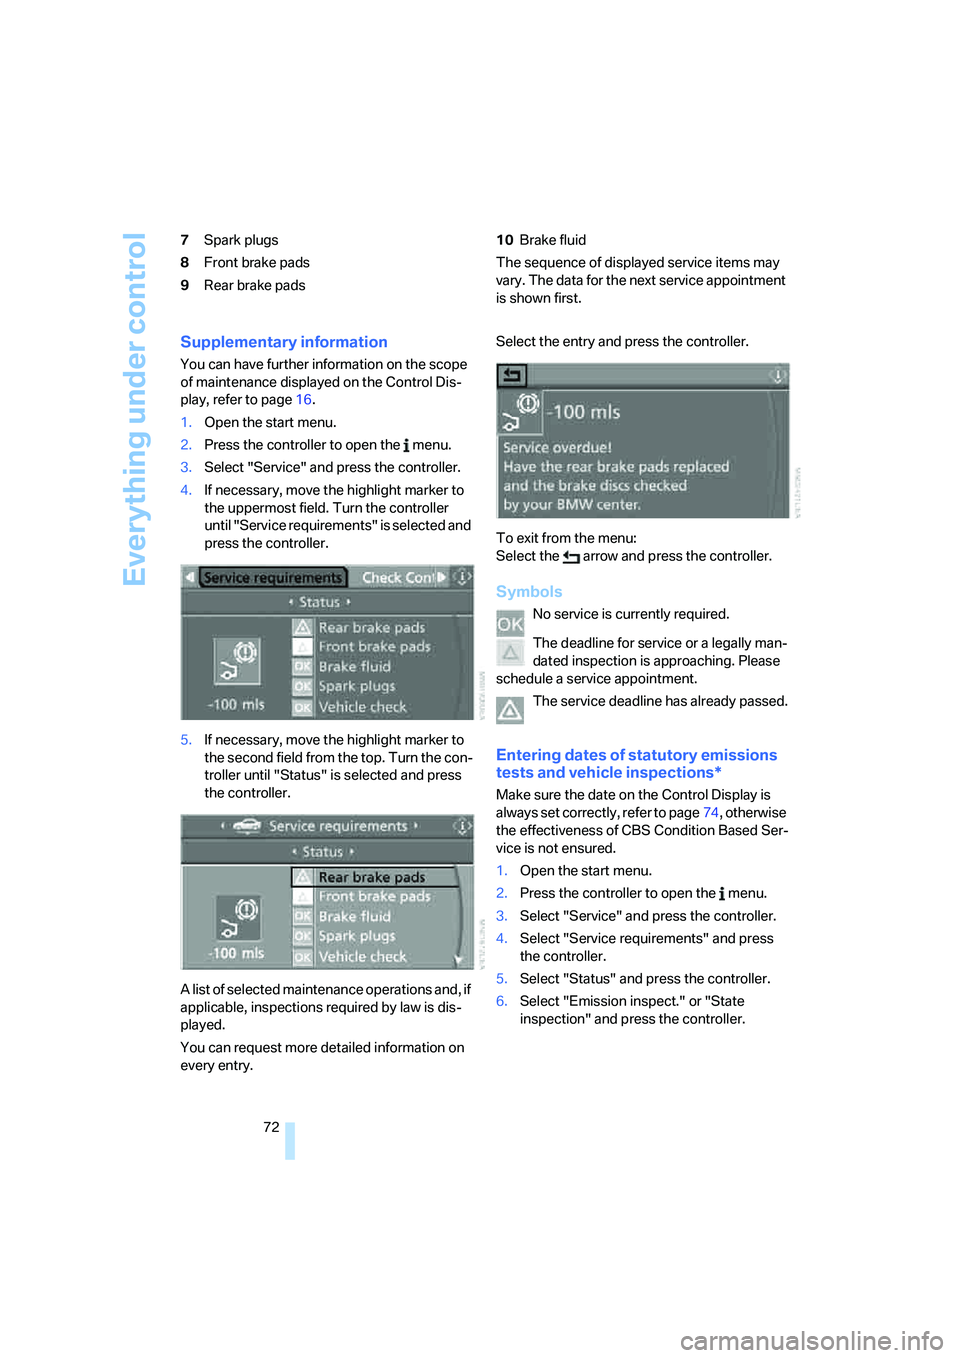
72 7Spark plugs
8Front brake pads
9Rear brake pads10Brake fluid
The sequence of displayed service items may
vary. The data for the next service appointment
is shown first.
Supplementary information
You can have further information on the scope
of maintenance displayed on the Control Dis-
play, refer to page16.
1.Open the start menu.
2.Press the controller to open the menu.
3.Select "Service" and press the controller.
4.If necessary, move the highlight marker to
the uppermost field. Turn the controller
until "Service requirements" is selected and
press the controller.
5.If necessary, move the highlight marker to
the second field from the top. Turn the con-
troller until "Status" is selected and press
the controller.
A list of selected maintenance operations and, if
applicable, inspections required by law is dis-
played.
You can request more detailed information on
every entry.Select the entry and press the controller.
To exit from the menu:
Select the arrow and press the controller.
Symbols
No service is currently required.
The deadline for service or a legally man-
dated inspection is approaching. Please
schedule a service appointment.
The service deadline has already passed.
Entering dates of statutory emissions
tests and vehicle inspections*
Make sure the date on the Control Display is
always set correctly, refer to page74, otherwise
the effectiveness of CBS Condition Based Ser-
vice is not ensured.
1.Open the start menu.
2.Press the controller to open the menu.
3.Select "Service" and press the controller.
4.Select "Service requirements" and press
the controller.
5.Select "Status" and press the controller.
6.Select "Emission inspect." or "State
inspection" and press the controller.
ba8_E9293_US.book Seite 72 Freitag, 5. Mai 2006 1:02 13
Page 75 of 239
Controls
73Reference
At a glance
Driving tips
Communications
Navigation
Entertainment
Mobility
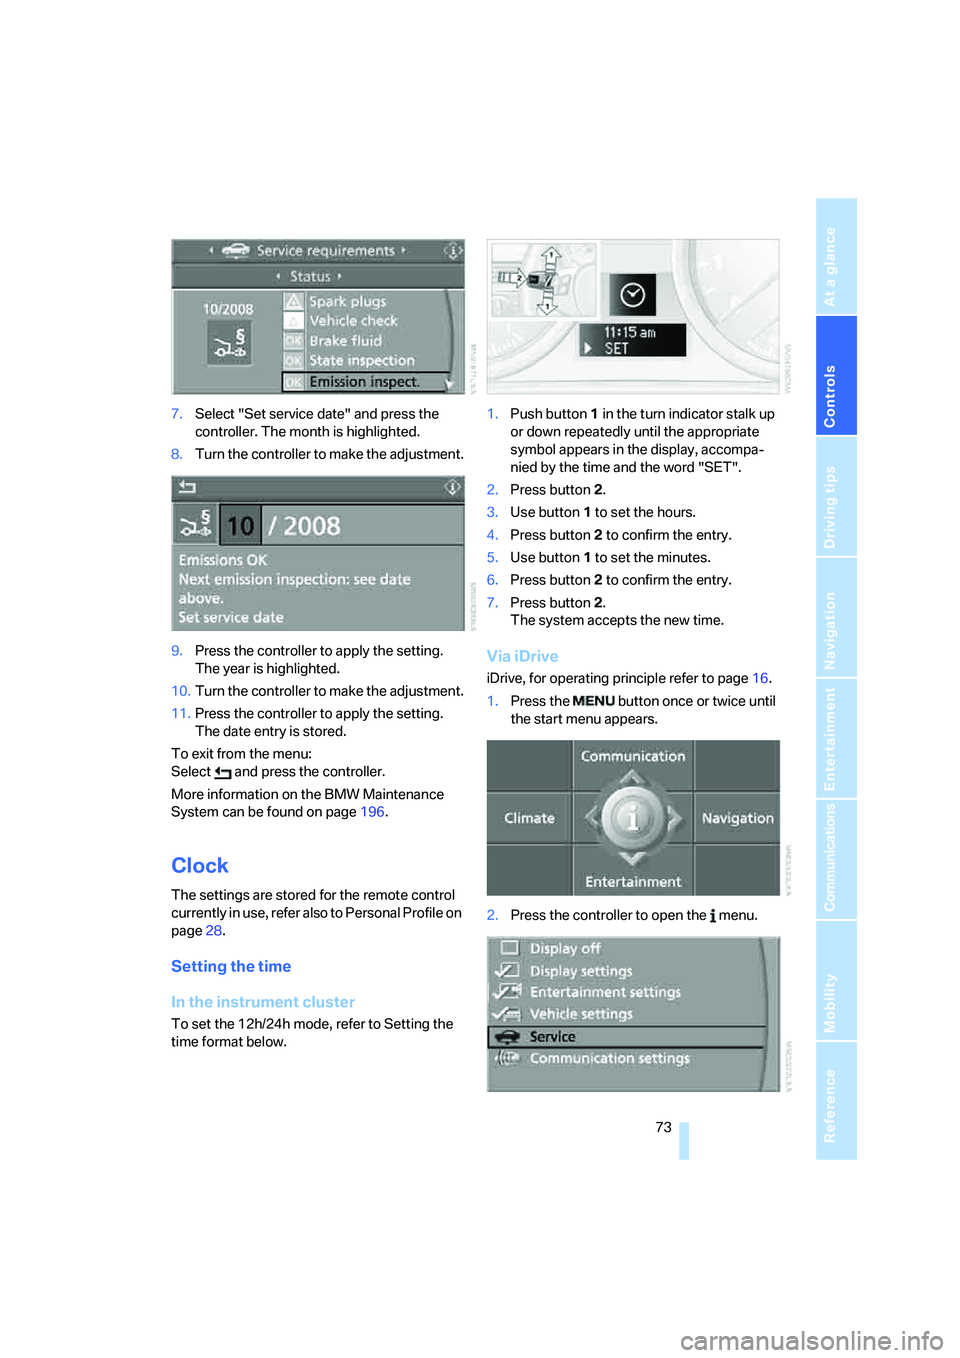
7.Select "Set service date" and press the
controller. The month is highlighted.
8.Turn the controller to make the adjustment.
9.Press the controller to apply the setting.
The year is highlighted.
10.Turn the controller to make the adjustment.
11.Press the controller to apply the setting.
The date entry is stored.
To exit from the menu:
Select and press the controller.
More information on the BMW Maintenance
System can be found on page196.
Clock
The settings are stored for the remote control
currently in use, refer also to Personal Profile on
page28.
Setting the time
In the instrument cluster
To set the 12h/24h mode, refer to Setting the
time format below.1.Push button 1 in the turn indicator stalk up
or down repeatedly until the appropriate
symbol appears in the display, accompa-
nied by the time and the word "SET".
2.Press button 2.
3.Use button 1 to set the hours.
4.Press button 2 to confirm the entry.
5.Use button 1 to set the minutes.
6.Press button 2 to confirm the entry.
7.Press button 2.
The system accepts the new time.
Via iDrive
iDrive, for operating principle refer to page16.
1.Press the button once or twice until
the start menu appears.
2.Press the controller to open the menu.
ba8_E9293_US.book Seite 73 Freitag, 5. Mai 2006 1:02 13
Page 79 of 239
Controls
77Reference
At a glance
Driving tips
Communications
Navigation
Entertainment
Mobility
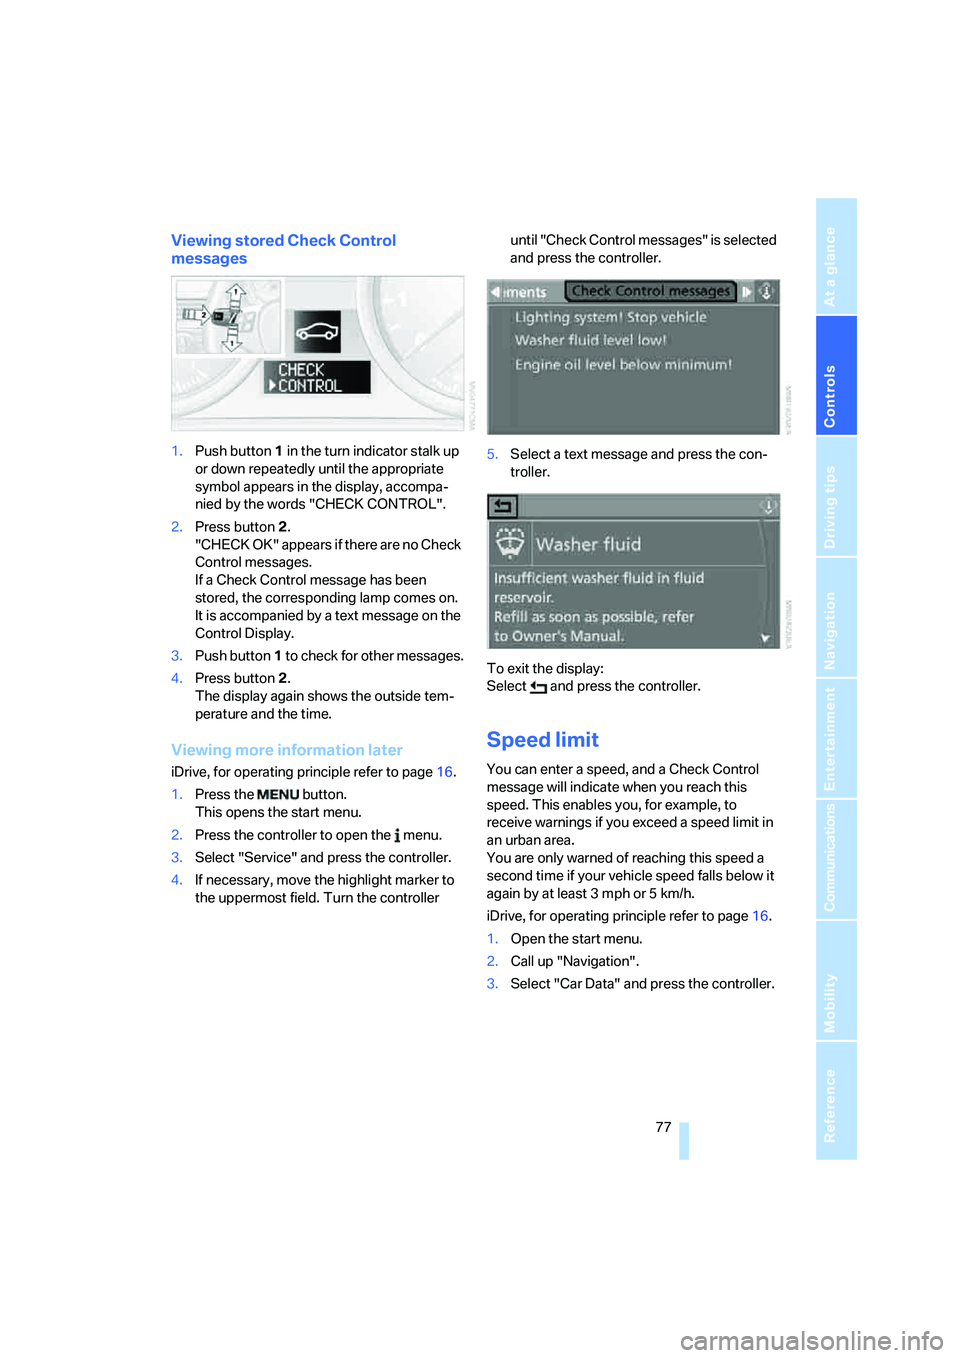
Viewing stored Check Control
messages
1.Push button 1 in the turn indicator stalk up
or down repeatedly until the appropriate
symbol appears in the display, accompa-
nied by the words "CHECK CONTROL".
2.Press button 2.
"CHECK OK" appears if there are no Check
Control messages.
If a Check Control message has been
stored, the corresponding lamp comes on.
It is accompanied by a text message on the
Control Display.
3.Push button 1 to check for other messages.
4.Press button 2.
The display again shows the outside tem-
perature and the time.
Viewing more information later
iDrive, for operating principle refer to page16.
1.Press the button.
This opens the start menu.
2.Press the controller to open the menu.
3.Select "Service" and press the controller.
4.If necessary, move the highlight marker to
the uppermost field. Turn the controller until "Check Control messages" is selected
and press the controller.
5.Select a text message and press the con-
troller.
To exit the display:
Select and press the controller.
Speed limit
You can enter a speed, and a Check Control
message will indicate when you reach this
speed. This enables you, for example, to
receive warnings if you exceed a speed limit in
an urban area.
You are only warned of reaching this speed a
second time if your vehicle speed falls below it
again by at least 3 mph or 5 km/h.
iDrive, for operating principle refer to page16.
1.Open the start menu.
2.Call up "Navigation".
3.Select "Car Data" and press the controller.
ba8_E9293_US.book Seite 77 Freitag, 5. Mai 2006 1:02 13
Page 90 of 239

Technology for driving comfort and safety
88
Protective action
Observe the adjustment instructions on
page40 to ensure the best possible per-
sonal protection.<
The front airbags help protect the driver and
front passenger by responding to frontal
impacts in which safety belts alone cannot pro-
vide adequate restraint. When needed, the
head and side airbags help provide protection in
the event of side impact. The relevant side air-
bag supports the side upper body area. The
head air bag supports the head.
The airbags will purposely not be activated by
every collision, e.g. not by more minor acci-
dents, certain roll-over situations and rear-end
collisions.
Do not apply adhesive materials to the
cover panels of the airbags, cover them or
modify them in any other way. Do not attach
seat covers, cushions or other objects not spe-
cifically approved for seats with integral side air-
bags to the front seats. Do not hang items of
clothing such as coats or jackets over the back-
rests. Do not attempt to remove the airbag
retention system from the vehicle. Do not mod-
ify the individual components of the system or
its wiring in any way. This includes the uphol-
stered covers on the steering wheel, instrument
panel, seats and roof posts, as well as the sides
of the roof lining. Do not attempt to remove or
dismantle the steering wheel.
Do not touch the individual components imme-
diately after the system has been triggered,
because there is a danger of burns.
In the event of malfunctions, deactivation, or
triggering of the airbag restraint system, have
the testing, repair, removal, and disposal of air-
bag generators executed only by a BMW center
or a workshop that works according to BMW
repair procedures with correspondingly trained
personnel and has the required explosives
licenses. Unprofessional attempts to service
the system could lead to failure in an emer-
gency or undesired airbag activation, either of
which could result in personal injury.<
Warning notices and information about the air-
bags can also be found on the sun visors.
Automatic deactivation of the front
passenger airbags
An analysis of the impression in the front pas-
senger seat cushion determines whether and
how the seat is occupied. The front and side air-
bags for the front passenger are activated or
deactivated by the system accordingly.
The indicator lamp above the interior
rearview mirror shows the current status
of the front passenger airbags, deactivated or
activated, refer to Status of front passenger air-
bags below.
Before transporting a child on the front
passenger seat, read the safety precau-
tions and handling instructions under Trans-
porting children safely, refer to page50.
The front and side airbags can also be deacti-
vated by adolescents and adults sitting in cer-
tain positions; the indicator lamp for the front
passenger airbags comes on. In such cases, the
passenger should change his or her sitting
position so that the front passenger airbags are
activated and the indicator lamp goes out. If the
desired airbag status cannot be achieved by
changing the sitting position, transport the rele-
vant passenger on a rear seat. Do not attach
seat covers, seat cushion padding, ball mats or
other items to the front passenger seat unless
they are specifically recommended by BMW.
Do not place any items under the seat which
could press against the seat from below. Other-
wise a correct analysis of the seat cushion is not
ensured.<
Status of front passenger airbags
The indicator lamp for the front passenger air-
bags shows the functional status of the front
passenger's front and side airbags in accor-
ba8_E9293_US.book Seite 88 Freitag, 5. Mai 2006 1:02 13
Page 101 of 239

Controls
99Reference
At a glance
Driving tips
Communications
Navigation
Entertainment
Mobility
2Use the knurled wheel to smoothly open
and close the air vents
3Use the lever to change the direction of the
airflow
Microfilter/activated-charcoal filter
The microfilter traps dust and pollen in the
incoming air. The activated-charcoal filter pro-
vides additional protection by filtering gaseous
pollutants from the outside air. Your BMW cen-
ter replaces this combined filter during routine
maintenance.
You can call up further information in the service
requirements display, refer to page71.
Parked car ventilation
The concept
The parked car ventilation/heating provides
ventilation to the passenger compartment and
lowers its temperature, if necessary. It is ready
for use at any outside temperature, as of radio
readiness.
The parked car ventilation/heating remains
switched on for 30 minutes. Two different
switch-on times can be preselected. The sys-
tem can also be switched on and off directly.
Due to its high power consumption, it should
not be switched on twice in a row without driv-
ing in between to allow the battery to recharge.
The air emerges from the air vents for the upper
body area in the instrument panel. The air vents
must therefore be open.
The parked car ventilation system is operated
via iDrive.
Switching on/off directly
iDrive, for operating principle refer to page16.
1.Open the start menu.
2.Move the controller to the left to call up "Cli-
mate".
3.Select "Parked car operation" and press the
controller.
4.Select "Automatic ventilation" and press
the controller.5.Select "Parked car ventilation" and press
the controller.
The parked car ventilation/heating is
switched on.
The symbol on the automatic climate control
display flashes.
Preselecting switch-on times
iDrive, for operating principle refer to page16.
1.Open the start menu.
2.Move the controller to the left to call up "Cli-
mate".
3.Select "Parked car operation" and press the
controller.
4.Select "Activation time" and press the con-
troller.
5.Move the controller to the left or right to
select "Timer 1" or "Timer 2".
ba8_E9293_US.book Seite 99 Freitag, 5. Mai 2006 1:02 13
Page 114 of 239
Things to remember when driving
112
Things to remember when driving
Break-in period
Moving parts need breaking-in time to adjust to
each other. Please follow the instructions below
in order to achieve the optimal service life and
economy of operation for your vehicle.
Engine and differential
Always obey all official speed limits.
Up to 1,200 miles/2,000 km
Drive at varying engine and road speeds, but do
not exceed an engine speed of 4,500 rpm or a
road speed of 100 mph/160 km/h.
Avoid full-throttle operation and use of the
transmission's kick-down mode.
After driving 1,200 miles/2,000 km
Engine and vehicle speeds can be gradually
increased.
Tires
Due to technical factors associated with their
manufacture, tires do not achieve their full trac-
tion potential until after an initial break-in
period. Therefore, drive cautiously during the
first 200 miles/300 km.
Brake system
Brakes require an initial break-in period of
approx. 300 miles/500 km to achieve optimized
contact and wear patterns between brake pads
and rotors. Drive cautiously during this break-in
period.
Clutch
The function of the clutch reaches its optimal
level only after a distance driven of approx.
300 miles/500 km. During this break-in period,
engage the clutch gently.
Following part replacement
The same break-in procedures should be
observed if any of the components mentioned
above have to be renewed in the course of the
vehicle's operating life.
General driving notes
Close the luggage compartment lid
Operate the vehicle only when the lug-
gage compartment lid is closed. Other-
wise, exhaust fumes could enter the interior of
the vehicle.<
If special circumstances make it absolutely nec-
essary to drive with the luggage compartment
lid open:
1.Close all windows and the glass sunroof.
2.Increase the air flow rate of the automatic
climate control considerably, refer to
page97.
Hot exhaust system
In all vehicles, extremely high tempera-
tures are generated in the exhaust sys-
tem. Do not remove the heat shields installed
adjacent to various sections of the exhaust sys-
tem, and never apply undercoating to them.
When driving, standing at idle and while park-
ing, take care to avoid possible contact
between the hot exhaust system and any highly
flammable materials such as hay, leaves, grass,
etc. Such contact could lead to a fire, with the
risk of serious personal injuries and property
damage. Do not touch hot exhaust tail pipes.
Otherwise there is a risk of burns.<
Mobile phone in the vehicle
BMW discourages the use of mobile
communications devices, e.g. mobile
phones, inside the vehicle without a direct con-
nection to an outside antenna. Otherwise, the
vehicle electronics and mobile communication
ba8_E9293_US.book Seite 112 Freitag, 5. Mai 2006 1:02 13