2006 BMW 328I COUPE language
[x] Cancel search: languagePage 24 of 239
Voice command system
22
Voice command system
The concept
The voice command system allows you to con-
trol operation of various vehicle systems with-
out removing your hands from the steering
wheel.
Individual menu items on the Control Display
can be spoken as commands. It is not neces-
sary to use the controller.
The voice command system transforms your
oral commands into control signals for the
selected systems and provides support in the
form of instructions or questions.
The voice command system uses a special
microphone located in the area of the interior
rearview mirror, refer to page14.
Precondition
Via iDrive, select the language in which the
voice command system is operating, so that the
spoken commands can be identified. Selecting
the language for iDrive, refer to page78.
Symbols in the Owner's Manual
Saying commands
Activating voice command system
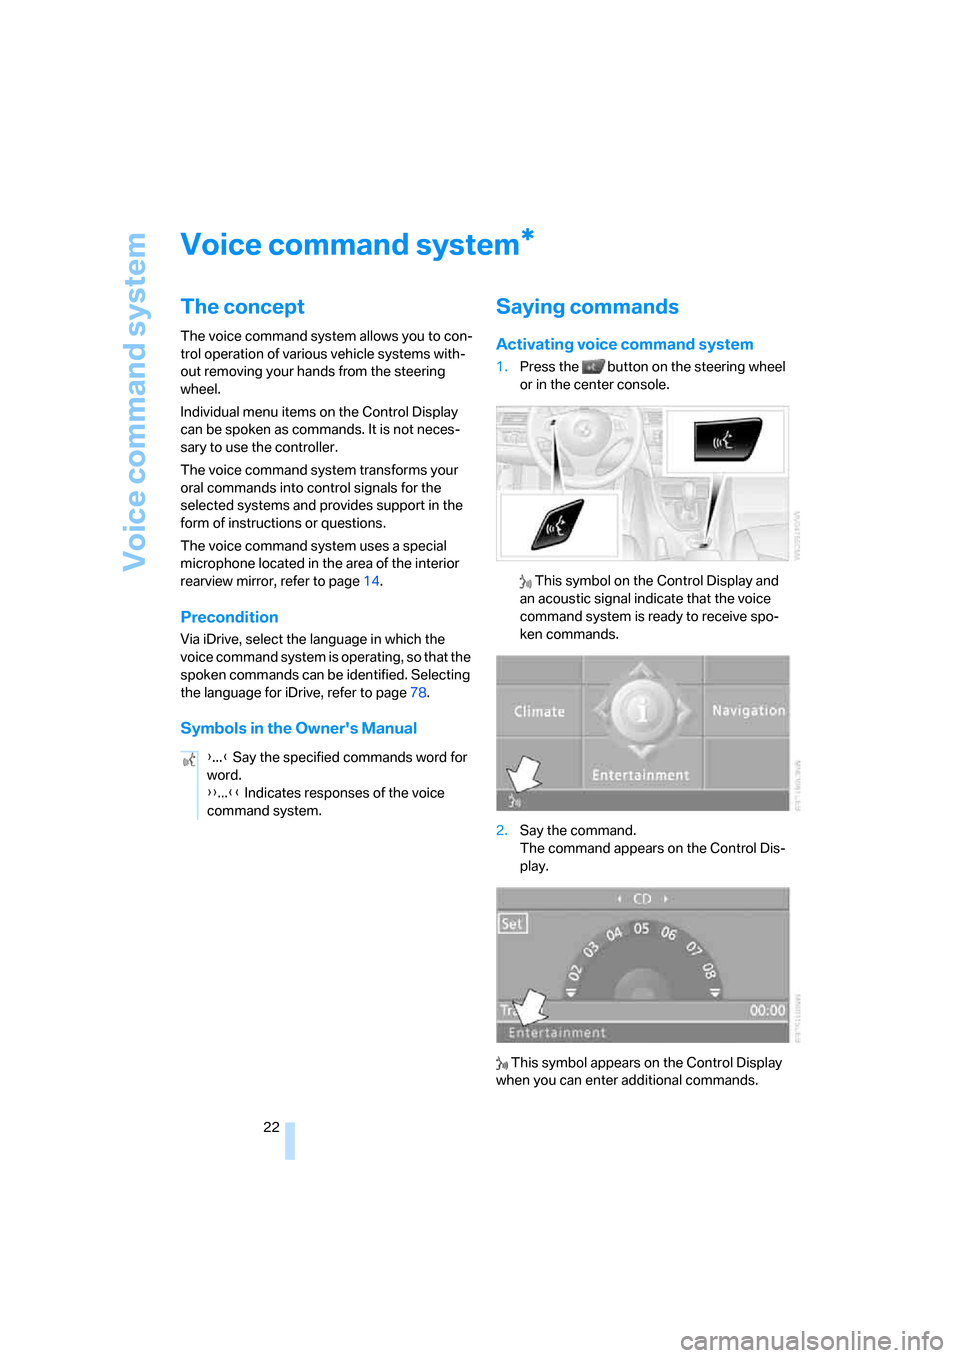
1.Press the button on the steering wheel
or in the center console.
This symbol on the Control Display and
an acoustic signal indicate that the voice
command system is ready to receive spo-
ken commands.
2.Say the command.
The command appears on the Control Dis-
play.
This symbol appears on the Control Display
when you can enter additional commands.
*
{...} Say the specified commands word for
word.
{{...}} Indicates responses of the voice
command system.
ba8_E9293_US.book Seite 22 Freitag, 5. Mai 2006 1:02 13
Page 26 of 239
Voice command system
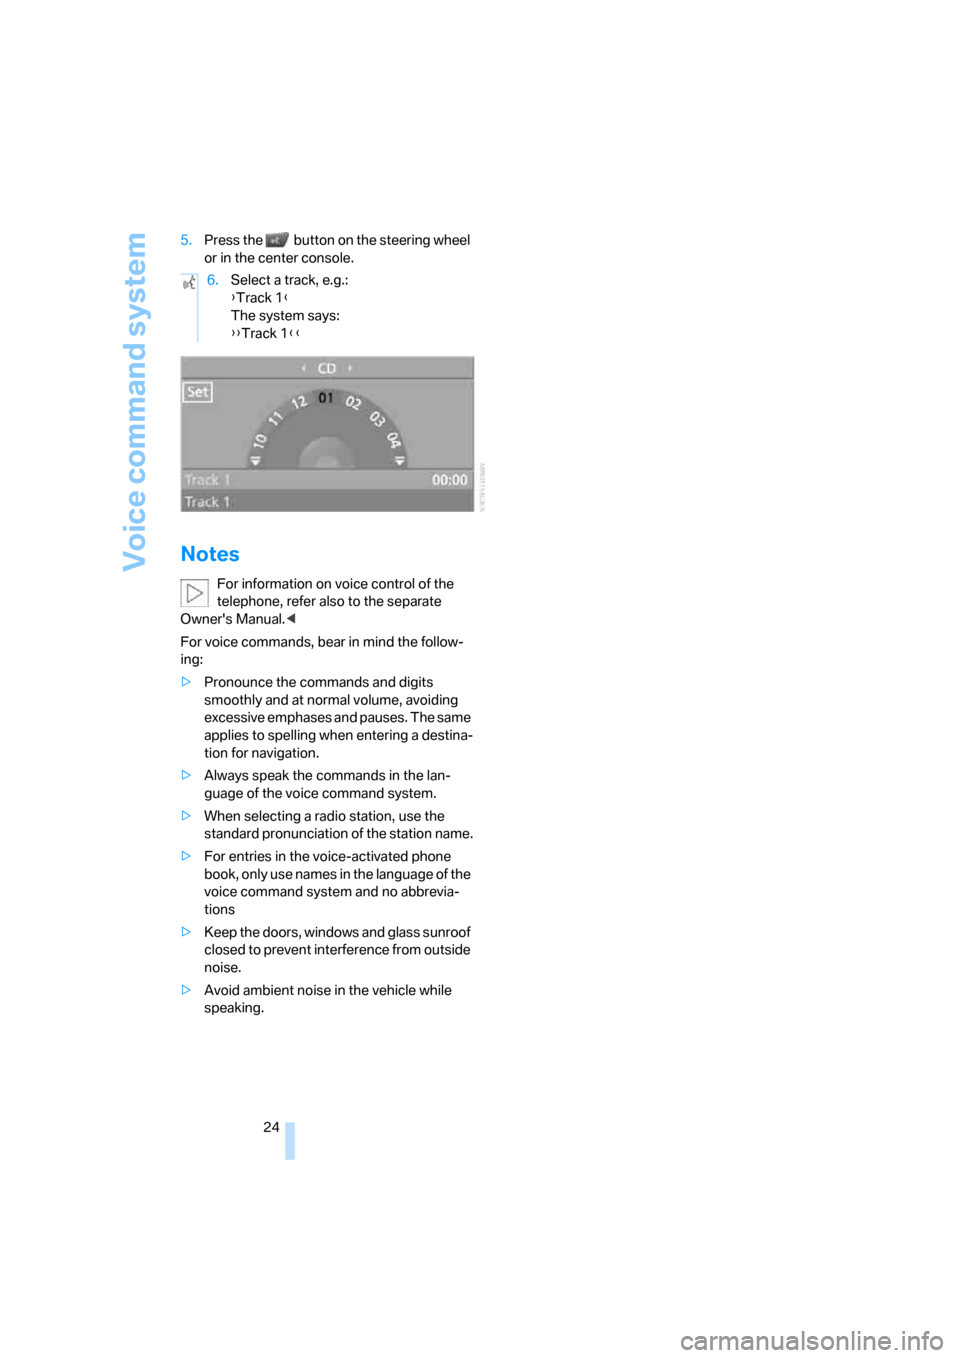
24 5.Press the button on the steering wheel
or in the center console.
Notes
For information on voice control of the
telephone, refer also to the separate
Owner's Manual.<
For voice commands, bear in mind the follow-
ing:
>Pronounce the commands and digits
smoothly and at normal volume, avoiding
excessive emphases and pauses. The same
applies to spelling when entering a destina-
tion for navigation.
>Always speak the commands in the lan-
guage of the voice command system.
>When selecting a radio station, use the
standard pronunciation of the station name.
>For entries in the voice-activated phone
book, only use names in the language of the
voice command system and no abbrevia-
tions
>Keep the doors, windows and glass sunroof
closed to prevent interference from outside
noise.
>Avoid ambient noise in the vehicle while
speaking.6.Select a track, e.g.:
{Track 1}
The system says:
{{Track 1}}
ba8_E9293_US.book Seite 24 Freitag, 5. Mai 2006 1:02 13
Page 31 of 239
Controls
29Reference
At a glance
Driving tips
Communications
Navigation
Entertainment
Mobility
>Brightness of the Control Display, refer to
page79
>Language on the Control Display, refer to
page78
>Units of measure for fuel consumption, dis-
tance covered/remaining distances, and
temperature, refer to page70
>Show visual warning for Park Distance Con-
trol PDC
*, refer to page80
>Automatic climate control: AUTO program,
activating/deactivating cooling function and
automatic recirculated-air control, setting
temperature, air flow rate and distribution,
refer to page96 ff
>Audio volume, refer to page141
>Tone control, refer to page141
>Speed-dependent volume control, refer to
page141
Central locking system
The concept
The central locking system is ready for opera-
tion whenever the driver's door is closed.
The system simultaneously engages and
releases the locks on the following:
>Doors
>Luggage compartment lid
>Fuel filler door
Operating from outside
>Via the remote control
>Via the door lock
>In cars with convenient access
*, via the
handles on the driver's and front passen-
ger's doors
The anti-theft system is operated at the same
time. It prevents the doors from being unlocked
using the lock buttons or door handles. In addi-
tion, if the remote control is used, the welcome
lamps, interior lamps and the door's courtesy
lamps
* are switched on or off. The alarm sys-
tem
* is also armed or disarmed.For further details of the alarm system,
refer to
page34.
Operating from inside
By means of the button for central locking, refer
to page32.
In the event of a sufficiently severe accident, the
central locking system unlocks automatically. In
addition, the hazard warning flashers and inte-
rior lamps come on.
Opening and closing: from
outside
Using the remote control
Persons or animals in a parked vehicle
could lock the doors from the inside. You
should therefore take the remote control with
you so that the car can be opened from the out-
side.<
Unlocking
Press the button.
The interior lamps, the courtesy lamps
* and the
welcome lamps come on.
You can also set the way in which the car is
unlocked. The setting is stored for the remote
control currently in use.
iDrive, for operating principle refer to page16.
1.Press the button.
This opens the start menu.
2.Press the controller to open the menu.
3.Select "Vehicle settings" and press the
controller.
ba8_E9293_US.book Seite 29 Freitag, 5. Mai 2006 1:02 13
Page 80 of 239
Everything under control
78 4.Select "Limit" and press the controller.
Setting or changing the limit
1.Select speed value and press the controller.
2.Turn the controller to set the limit.
3.Press the controller to apply the setting.
Applying your current speed as limit
Select "Select current speed" and press the
controller. The system adopts your current
speed as the limit.
Activating the limit
Select "On" and press the controller.
Limit is activated.
Stopwatch
iDrive, for operating principle refer to page16.
1.Open the start menu.
2.Call up "Navigation".
3.Select "Car Data" and press the controller.
4.Select "Stopwatch" and press the control-
ler.
Starting, stopping or resetting
>Select "Start" and press the controller.
The stopwatch starts at the displayed time.
>Select "Reset" and press the controller.
The stopwatch is reset and restarts if it was
running beforehand.
>Select "Stop" and press the controller.
This stops the timer.
Taking an interim time reading
Select "Interim time" and press the controller.
The interim time appears below the ongoing
primary stopwatch count.
All of the remaining functions remain
available at all times while the stopwatch
is running. The stopwatch continues operation
in the background.<
Altering settings
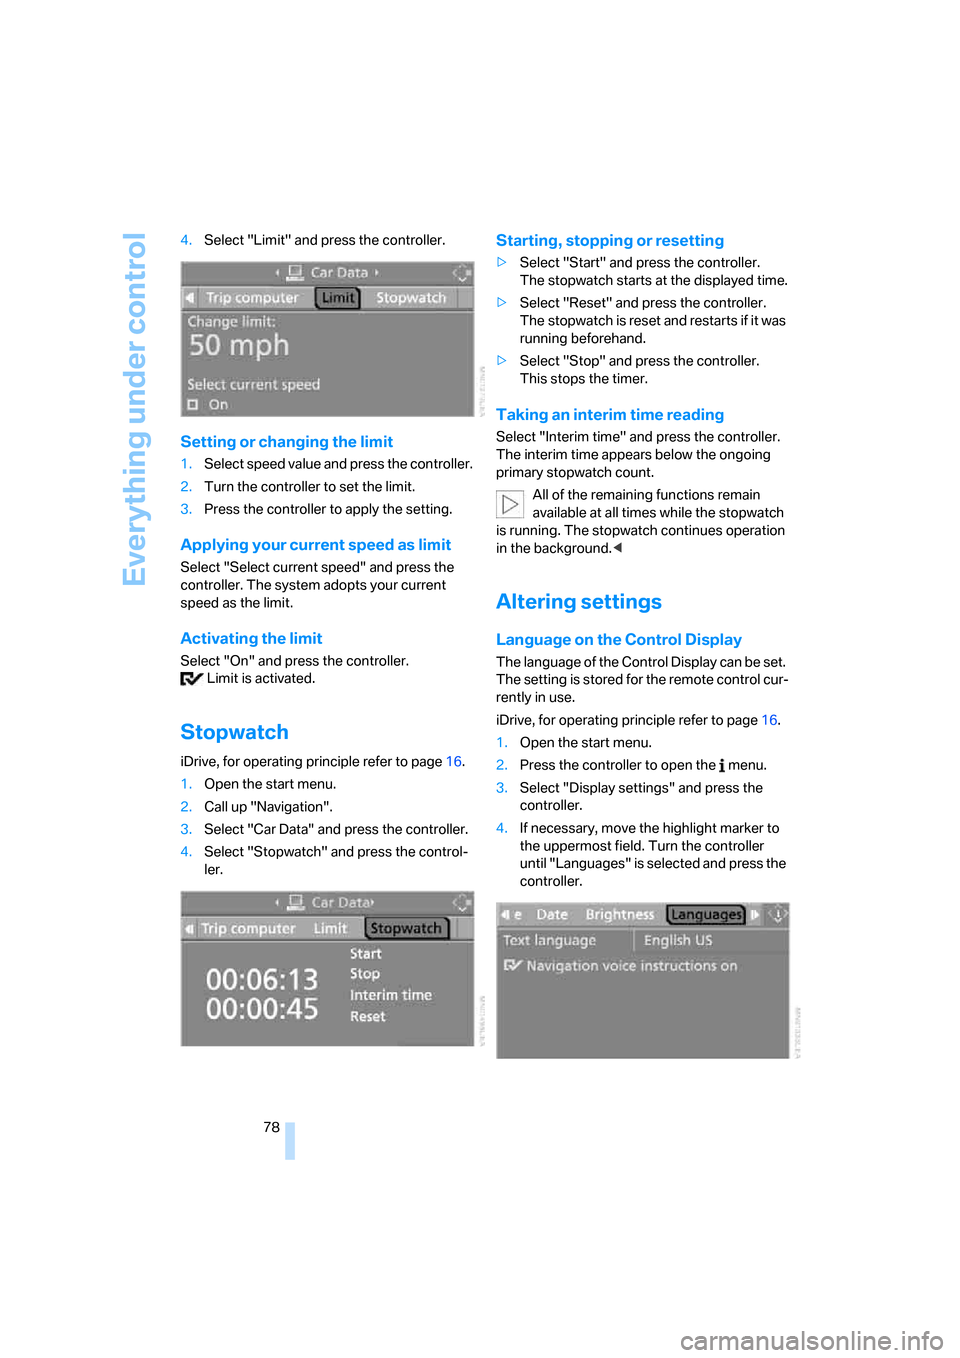
Language on the Control Display
The language of the Control Display can be set.
The setting is stored for the remote control cur-
rently in use.
iDrive, for operating principle refer to page16.
1.Open the start menu.
2.Press the controller to open the menu.
3.Select "Display settings" and press the
controller.
4.If necessary, move the highlight marker to
the uppermost field. Turn the controller
until "Languages" is selected and press the
controller.
ba8_E9293_US.book Seite 78 Freitag, 5. Mai 2006 1:02 13
Page 81 of 239
Controls
79Reference
At a glance
Driving tips
Communications
Navigation
Entertainment
Mobility
5.Select "Text language" and press the con-
troller. You can switch to another language
for the display texts and navigation mes-
sages.
6.Select and activate the desired language by
pressing the controller.
Brightness of the Control Display
The brightness is automatically adapted to the
ambient lighting conditions. Note, however,
that you can change the basic setting while the
low beams are switched on. The setting is
stored for the remote control currently in use.
iDrive, for operating principle refer to page16.
1.Open the start menu.
2.Press the controller to open the menu.
3.Select "Display settings" and press the
controller.
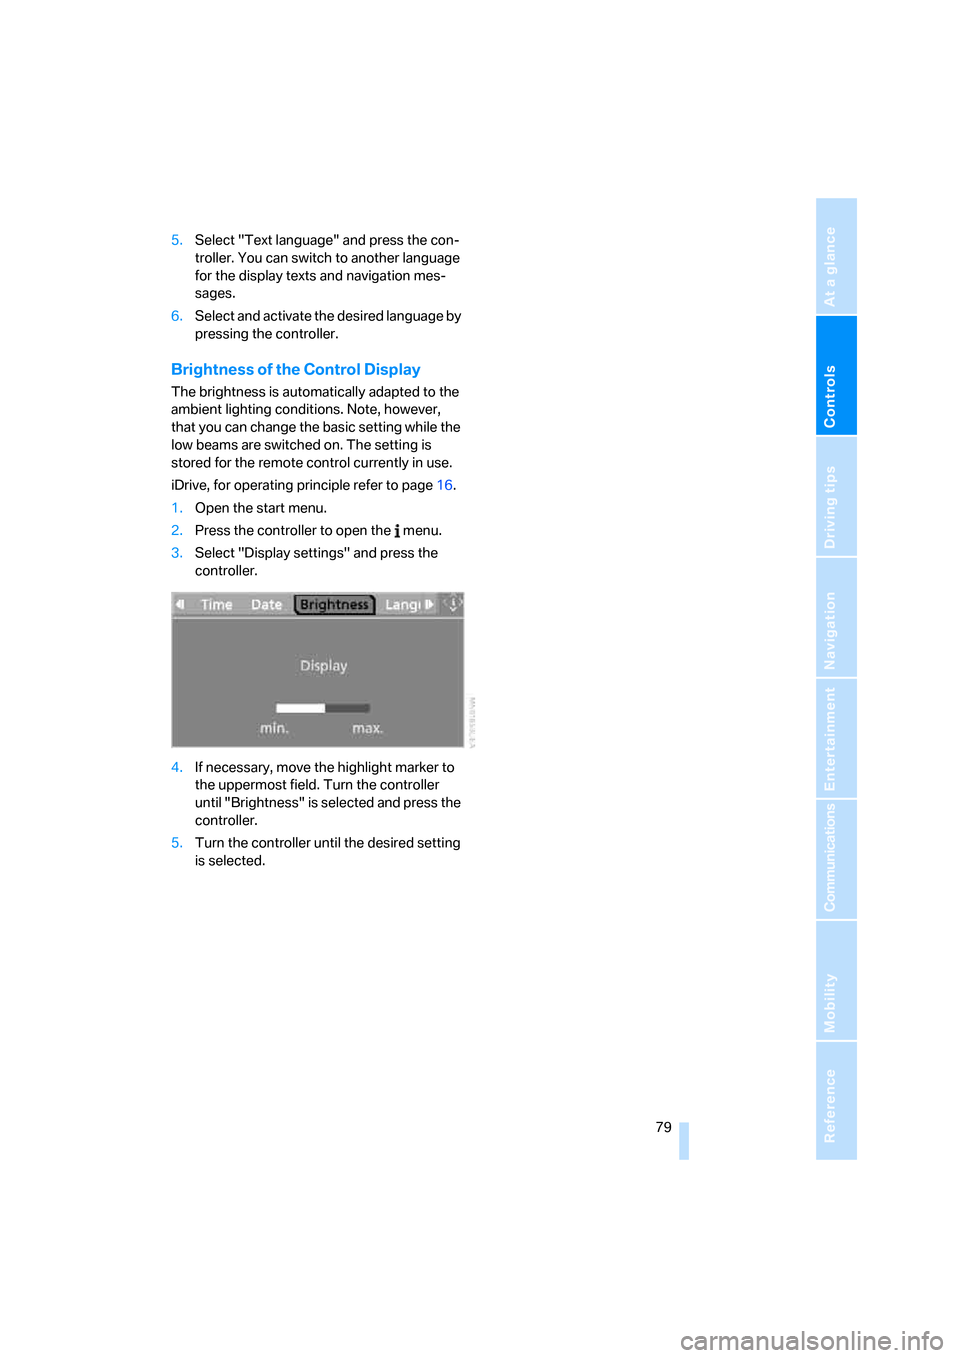
4.If necessary, move the highlight marker to
the uppermost field. Turn the controller
until "Brightness" is selected and press the
controller.
5.Turn the controller until the desired setting
is selected.
ba8_E9293_US.book Seite 79 Freitag, 5. Mai 2006 1:02 13
Page 127 of 239
Navigation
Driving tips
125Reference
At a glance
Controls
Communications
Entertainment
Mobility
Selecting country
Say the name of the destination country in the
language of the voice command system.
Entering destination
To enter a destination, spell it in the way it is
commonly spelled in the destination country.
Pronounce the letters smoothly and at normal
volume, avoiding excessive emphases and
pauses.
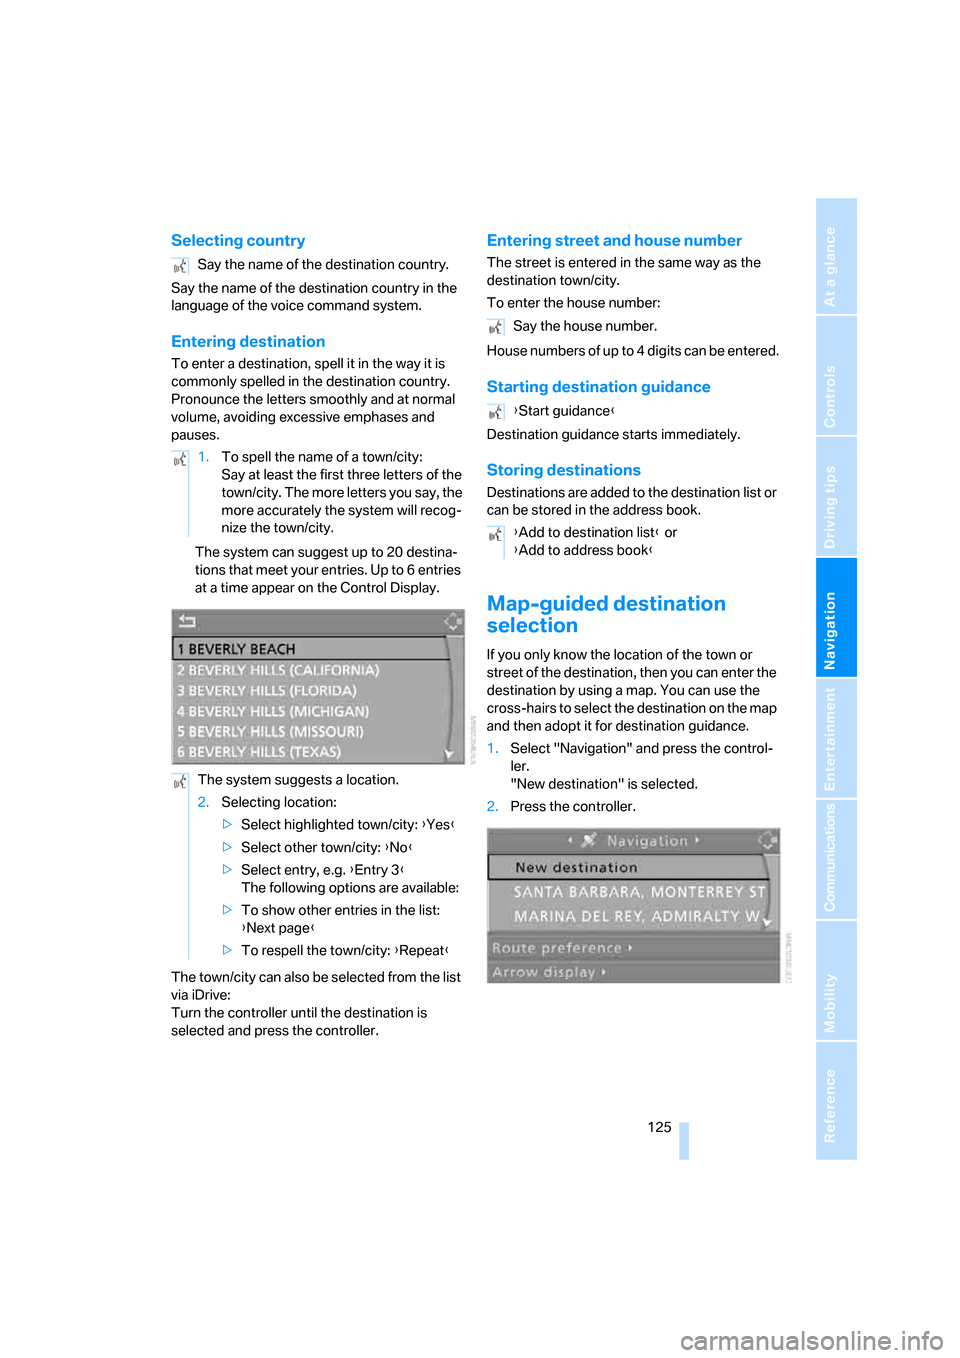
The system can suggest up to 20 destina-
tions that meet your entries. Up to 6 entries
at a time appear on the Control Display.
The town/city can also be selected from the list
via iDrive:
Turn the controller until the destination is
selected and press the controller.
Entering street and house number
The street is entered in the same way as the
destination town/city.
To enter the house number:
House numbers of up to 4 digits can be entered.
Starting destination guidance
Destination guidance starts immediately.
Storing destinations
Destinations are added to the destination list or
can be stored in the address book.
Map-guided destination
selection
If you only know the location of the town or
street of the destination, then you can enter the
destination by using a map. You can use the
cross-hairs to select the destination on the map
and then adopt it for destination guidance.
1.Select "Navigation" and press the control-
ler.
"New destination" is selected.
2.Press the controller. Say the name of the destination country.
1.To spell the name of a town/city:
Say at least the first three letters of the
town/city. The more letters you say, the
more accurately the system will recog-
nize the town/city.
The system suggests a location.
2.Selecting location:
>Select highlighted town/city: {Yes}
>Select other town/city: {No}
>Select entry, e.g. {Entry 3}
The following options are available:
>To show other entries in the list:
{Next page}
>To respell the town/city: {Repeat}
Say the house number.
{Start guidance}
{Add to destination list} or
{Add to address book}
ba8_E9293_US.book Seite 125 Freitag, 5. Mai 2006 1:02 13
Page 137 of 239
Navigation
Driving tips
135Reference
At a glance
Controls
Communications
Entertainment
Mobility
Displaying towns/cities and streets
along the route
You can have the roads and towns along the
route displayed during destination guidance.
The distances remaining to be traveled within
each section of the route are also displayed.
1.Select "Navigation" and press the control-
ler.
2.Move the highlight marker to the third field
from the top. Turn the controller until
"Route list" is selected and press the con-
troller.
To exit from the menu:
Select the arrow and press the controller.
Destination guidance
through voice instructions
Switching voice instructions on/off
Voice instructions can be switched on or off
during the destination guidance in the arrow or
map view:
Select the symbol and press the controller.
To switch the voice instructions on/off at any
time:1.Open the start menu.
2.Press the controller to open the menu.
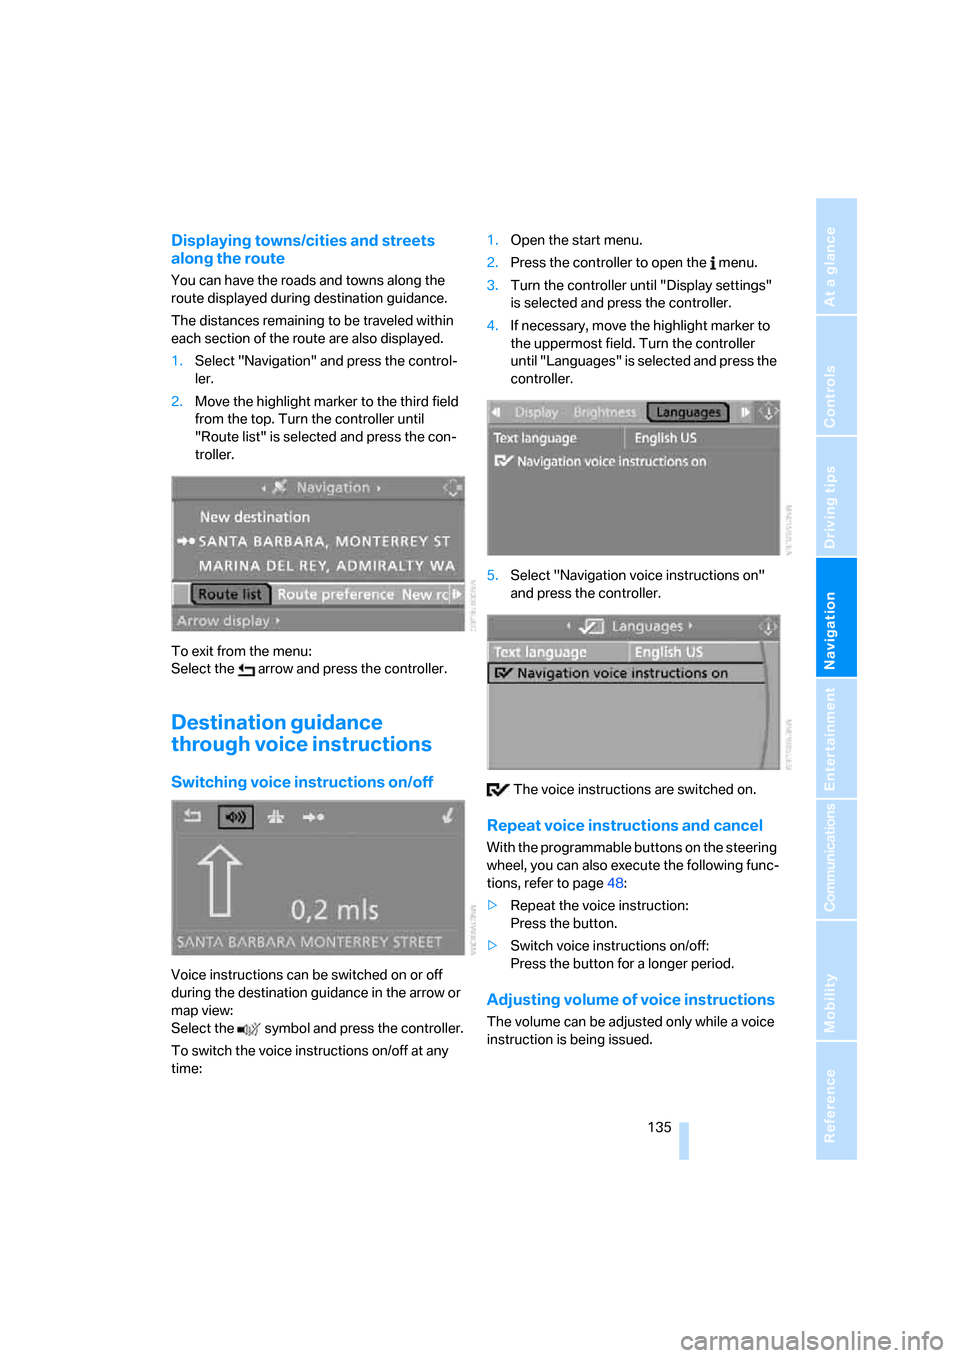
3.Turn the controller until "Display settings"
is selected and press the controller.
4.If necessary, move the highlight marker to
the uppermost field. Turn the controller
until "Languages" is selected and press the
controller.
5.Select "Navigation voice instructions on"
and press the controller.
The voice instructions are switched on.
Repeat voice instructions and cancel
With the programmable buttons on the steering
wheel, you can also execute the following func-
tions, refer to page48:
>Repeat the voice instruction:
Press the button.
>Switch voice instructions on/off:
Press the button for a longer period.
Adjusting volume of voice instructions
The volume can be adjusted only while a voice
instruction is being issued.
ba8_E9293_US.book Seite 135 Freitag, 5. Mai 2006 1:02 13
Page 175 of 239
173
Entertainment
Reference
At a glance
Controls
Driving tips Communications
Navigation
Mobility
Selecting an entry
The connection to the phone number of the
selected entry is established.
Redialing
The {Redial} command calls up "Redial".
Notes
The commands in English were available
as of this printing. Other languages are
currently in preparation. To operate the mobile
phone via the voice command system, refer to
page22.<
Important for voice commands
For voice commands, bear in mind the follow-
ing:
>Pronounce the commands smoothly and at
normal volume, avoiding excessive empha-
ses and pauses.
>Keep the doors, windows and glass sunroof
closed to prevent interference from outside
noise.
>Avoid ambient noise in the vehicle while
speaking.
Inserting/removing snap-in
adapter
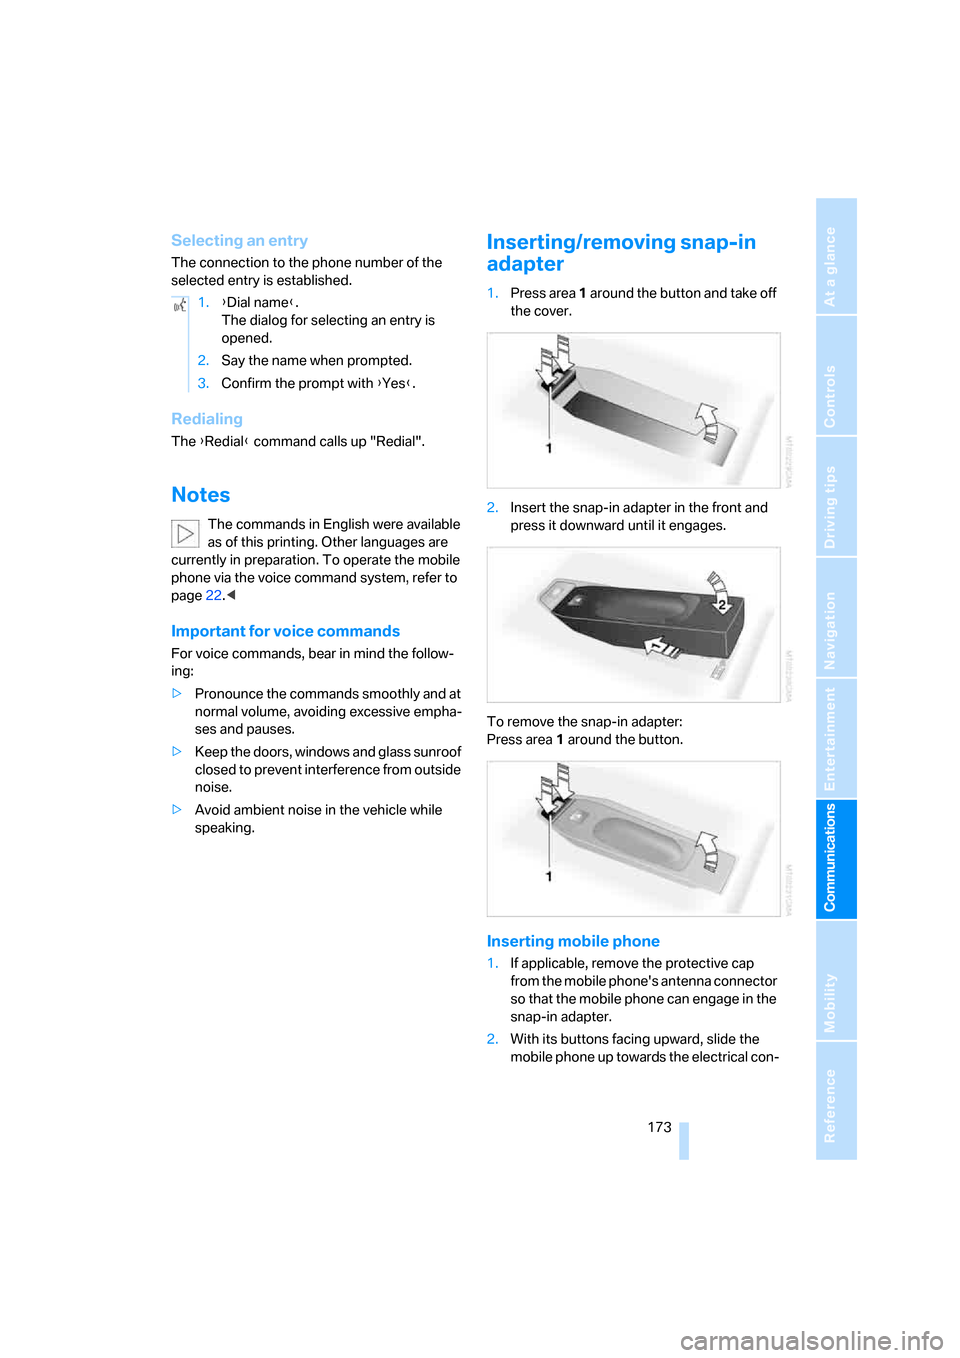
1.Press area 1 around the button and take off
the cover.
2.Insert the snap-in adapter in the front and
press it downward until it engages.
To remove the snap-in adapter:
Press area 1 around the button.
Inserting mobile phone
1.If applicable, remove the protective cap
from the mobile phone's antenna connector
so that the mobile phone can engage in the
snap-in adapter.
2.With its buttons facing upward, slide the
mobile phone up towards the electrical con- 1.{Dial name}.
The dialog for selecting an entry is
opened.
2.Say the name when prompted.
3.Confirm the prompt with {Yes}.
ba8_E9293_US.book Seite 173 Freitag, 5. Mai 2006 1:02 13