Page 57 of 239

Controls
55Reference
At a glance
Driving tips
Communications
Navigation
Entertainment
Mobility
Displays in the instrument cluster
P R N D DS M1 to M6
The selector lever position is displayed, or the
current gear in the manual mode.
Changing selector lever positions
>With the ignition switched on or the engine
running, the selector lever can be moved
out of position P: interlock.
>Before moving the lever away from P or N
with the vehicle stationary, first depress the
brake; otherwise the selector lever will
refuse to move: shiftlock.
To prevent the vehicle from creeping
after you select a driving position,
depress the brake until you are ready to
start.<
A lock prevents you from inadvertently engag-
ing selector lever positions R and P. To cancel
the lock, press the button on the front of the
selector lever, see arrow.
P Park
Select only when the vehicle is stationary. The
rear wheels are locked.
R Reverse
Select only when the vehicle is stationary.
N Neutral, idle
You can select this in a car wash, for example.
The vehicle can roll.
D Drive, automatic position
Position for normal vehicle operation. All for-
ward gears are selected automatically.
Under normal operating conditions, fuel con-
sumption is lowest when you are driving in posi-
tion D.
Kick-down
Kick-down enables you to achieve maximum
performance.
Press the accelerator pedal beyond the full-
throttle resistance point.
Manual operation and Sport program
M/S
Move selector lever from position D toward the
left into the M/S shifting slot:
The sport program is activated and DS appears
in the instrument cluster. This position is rec-
ommended for a performance-oriented driving
style.
When you press the selector lever forwards or
backwards, the manual mode is activated and
Steptronic changes gear. The instrument clus-
ter shows M1 through M6.
Upshifts and downshifts are executed only
when they will result in a plausible combination
of engine and vehicle speed; thus, for example,
a downshift that would cause the engine to
overrev will not be executed by the system. The
ba8_E9293_US.book Seite 55 Freitag, 5. Mai 2006 1:02 13
Page 58 of 239

Driving
56 gear selected appears briefly in the instrument
cluster, followed by the gear actually in use.
To use the automatic function again, move the
selector lever to the right into position D.
Shifting gears via shift paddles* on the
steering wheel
>To shift up: pull one of the shift paddles.
>To shift down: press one of the shift pad-
dles.
D Drive, automatic position
With the selector lever in position D, you can
shift gears by pulling or pressing a shift paddle.
The gear currently engaged appears in the
instrument cluster; manual shifting mode is
temporarily activated. If you do not accelerate
or shift gears within approx. 12 seconds, the
transmission switches back to automatic mode.
The system also switches back to automatic
mode when you shift to another gear slot.
Manual operation and Sport program
M/S
In the Sport program, pulling or pressing a shift
paddle shifts gears and switches the transmis-
sion to permanent manual mode. The gear cur-
rently engaged appears in the instrument clus-
ter. The transmission switches back to
automatic mode when you shift to another gear
slot.
Overriding selector lever lock
Should the selector lever refuse to move out of
position P although the button on the selector
lever is pressed, the selector lever lock can be
overridden:1.Unclip the sleeve of the selector lever.
2.Pull the sleeve up over the selector lever
until the sleeve is inside out.
3.Using the screwdriver from the onboard
tool kit, refer to page198, press the red
lever while moving the selector lever to the
desired position.
Turn signals/
headlamp flasher
1High beams
2Headlamp flasher
3Turn signals
Using turn signals
Press the lever beyond the resistance point.
To turn off manually, press the lever to the
resistance point.
Unusually rapid flashing of the indicator
lamp indicates that a turn signal indicator
has failed.<
Indicating a turn briefly
Press the lever as far as the resistance point for
as long as you wish to indicate a turn.
ba8_E9293_US.book Seite 56 Freitag, 5. Mai 2006 1:02 13
Page 59 of 239

Controls
57Reference
At a glance
Driving tips
Communications
Navigation
Entertainment
Mobility
Triple turn signal activation
Press the lever as far as the resistance point.
The turn signals flash three times.
You can activate or deactivate this function.
iDrive, for operating principle refer to page16.
1.Open the start menu.
2.Press the controller to open the menu.
3.Select "Vehicle settings" and press the
controller.
4.Select "Lighting" and press the controller.
5.Select "Triple turn signal activation" and
press the controller.
Triple turn signaling is activated.
Wiper system
1Switching on wipers
2Switching off wipers or brief wipe
3Activating/deactivating intermittent wipe or
rain sensor
*
4Cleaning windshield and headlamps*
5Setting speed for intermittent wipe, or sen-
sitivity of the rain sensor
Switching on wipers
Press the lever upward, arrow 1.
The lever automatically returns to its initial posi-
tion when released.
Normal wiper speed
Press once.
The system switches to operation in the inter-
mittent mode when the vehicle is stationary.
Fast wiper speed
Press twice or press beyond the resistance
point.
The system switches to normal speed when the
vehicle is stationary.
Intermittent wipe or rain sensor*
If the car is not equipped with a rain sensor, the
intermittent-wipe time is a preset.
If the car is equipped with a rain sensor, the time
between wipes is controlled automatically and
depends on the intensity of the rainfall. The
sensor is mounted on the windshield, directly in
front of the interior rearview mirror.
Activating intermittent wipe or rain
sensor
Press the button, arrow3. The LED in the but-
ton lights up.
Setting speed for intermittent wipe or
sensitivity of the rain sensor
Turn knurled wheel5 up or down.
ba8_E9293_US.book Seite 57 Freitag, 5. Mai 2006 1:02 13
Page 60 of 239

Driving
58
Deactivating intermittent wipe or rain
sensor
Press the button again, arrow3.
The LED goes out.
Deactivate the rain sensor before enter-
ing an automatic car wash. Failure to do
so could result in damage caused by undesired
wiper activation.<
Cleaning windshield and headlamps*
Pull the lever, arrow 4.
Washer fluid is sprayed onto the windshield and
the wipers are operated for a short time.
When the vehicle lighting system is switched
on, the headlamps are cleaned at regular and
appropriate intervals.
Do not use the washers if there is any
danger that the fluid will freeze on the
windshield. If you do, your vision could be
obscured. Antifreeze should therefore be
added to the fluid, refer to Washer fluid.
Do not use the washers when the washer fluid
reservoir is empty, otherwise you will damage
the washer pump.<
Windshield washer nozzles
The windshield washer nozzles are heated
automatically while the engine is running or the
ignition is switched on.
Washer fluid
Washer fluid antifreeze is flammable.
Always keep it well away from sparks and
open flames, and store it in the tightly closed
original container, well out of the reach of chil-
dren. Comply with the instructions on the con-
tainer.<
Washer fluid reservoir
Fill with water and, if required, with a washer
antifreeze, according to manufacturer's recom-
mendations.
All washer nozzles are supplied with washer
fluid by the same reservoir.
Mix the water and antifreeze before filling
the washer fluid reservoir to make sure
the correct concentration is maintained.<
Capacity
Approx. 6.3USquarts/6liters.
Cruise control*
The concept
Cruise control is available for use at speeds of
approx. 20 mph or 30 km/h. The car then stores
and maintains the speed that you specify using
the lever on the steering column. In order to
maintain the specified speed, the system
brakes the vehicle when the engine braking
effect is insufficient on downhill gradients.
Do not use cruise control when condi-
tions are unfavorable for driving at a con-
stant speed, e.g. on winding roads, in dense
traffic or under poor road conditions due to,
e.g., snow, rain, ice, or loose surfaces. Other-
wise you could lose control of the vehicle and
cause an accident as a result.<
Manual transmission
You can shift gears while cruise control is acti-
vated. An indicator lamp notifies you that you
should shift gears when you drive for an
ba8_E9293_US.book Seite 58 Freitag, 5. Mai 2006 1:02 13
Page 61 of 239

Controls
59Reference
At a glance
Driving tips
Communications
Navigation
Entertainment
Mobility
extended period at very high or very low engine
speeds, or the system is deactivated.
One lever for all functions
1Storing and maintaining speed or accelerat-
ing
2Storing and maintaining speed or deceler-
ating
3Deactivating cruise control
4Resuming a speed stored beforehand
Maintaining current speed
Tap the lever, arrow 1, or pull it briefly, arrow 2.
The car's current speed is stored and main-
tained. It is displayed in the speedometer and
briefly in the instrument cluster.
On uphill gradients, it may prove impossible to
maintain the set speed if current engine power
output is insufficient. If the engine braking
effect is insufficient on downhill slopes, the sys-
tem will brake the vehicle slightly.
Increasing desired speed
Repeatedly press the lever to the resistance
point or beyond, arrow1, until the desired
speed is reached.
>Each time the lever is pressed to the resis-
tance point, the desired speed is increased
by approx. 1 mph or 1 km/h.
>Each time the lever is pressed beyond the
resistance point, the desired speed is
increased by up to 5 mph or 10 km/h.
The system stores and maintains the speed.
Accelerating using the lever
Accelerating slightly:Press the lever to the resistance point, arrow 1,
until the desired speed is reached.
Accelerating significantly:
Press the lever beyond the resistance point,
arrow 1, until the desired speed is reached.
The vehicle accelerates without pressure on
the accelerator pedal. The system stores and
maintains the speed.
Decreasing desired speed
Repeatedly pull the lever to the resistance point
or beyond, arrow 2, until the desired speed is
displayed.
>Each time the lever is pulled to the resis-
tance point, the desired speed is decreased
by approx. 1 mph or 1 km/h.
>Each time the lever is pulled beyond the
resistance point, the desired speed is
reduced by up to 5 mph or 10 km/h until the
minimum speed of 20 mph or 30 km/h is
achieved.
The system stores and maintains the speed.
If the speed is to be reduced significantly,
depress the brake; otherwise, decelera-
tion may be insufficient and dangerous situa-
tions could result.<
Deactivating cruise control
Tap the lever upwards or downwards, arrow3.
The displays in the speedometer disappear.
In addition, the system is automatically deacti-
vated:
>When you brake the vehicle
>When you switch gears very slowly or shift
to idle in cars with manual transmission
>When you select the automatic transmis-
sion's neutral position N
>When you activate DTC or deactivate DSC
>When DSC or ABS is intervening
Cruise control is not deactivated by depressing
the accelerator pedal. Once the accelerator
pedal is released, the stored speed is achieved
again and maintained.
ba8_E9293_US.book Seite 59 Freitag, 5. Mai 2006 1:02 13
Page 62 of 239

Driving
60
Warning lamp
The warning lamp comes on when
cruise control has been automatically
deactivated by engaging the hand-
brake or as a result of DSC intervening. A mes-
sage appears on the Control Display.
Resuming a speed stored beforehand
Briefly press the button, arrow 4. the stored
speed is resumed and maintained.
In the following instances, the stored speed is
deleted and can no longer be resumed:
>When driving stability control systems are
intervening
>In cars with ma nual trans mis sio n: when you
shift gears very slowly or shift to idle posi-
tion
>In cars with automatic transmission: when
you engage selector lever position N
>When the ignition is switched off
Displays in the instrument cluster
1Stored speed
2Selected speed is displayed briefly
If --- mph or --- km/h temporarily appears
in the instrument cluster display, it is pos-
sible that the system prerequisites for operation
are currently not met.
Calling up Check Control messages, refer to
page77.<
Malfunction
The warning lamp comes on when
the system has failed. A message
appears on the Control Display. You
can find more information starting on page75.
Active cruise control*
The concept
With active cruise control, you can select a
desired speed which is not only automatically
maintained when driving on open roadways, but
also varied to maintain a selected distance set-
ting as slower traffic is encountered.
Active cruise control is a technological advance
over the familiar cruise control and is a welcome
relief from the constant adjustment of speed
that can accompany driving in traffic on high-
ways or other high-speed thoroughfares. Espe-
cially on longer trips, the system can reduce
fatigue and tension, while increasing your
enjoyment of driving. Please use it safely and
responsibly.
Within the limits of its capability, the system
automatically adapts the car's speed to that of a
slower vehicle in front of you. You can specify
the distance to be maintained from the vehicle
in front in four stages. For safety reasons, the
distance is speed-dependent. Based on your
selected distance setting, the system automat-
ically decreases the throttle setting and lightly
applies the brakes if necessary. The vehicle
brake lamps will automatically illuminate to sig-
nal a following driver to take action. In addition,
it may be necessary for the vehicle or the driver
to downshift, depending on the kind of trans-
mission your vehicle is equipped with, to main-
tain the distance setting selected. If the vehicle
ahead speeds up or when the lane ahead
becomes clear, your vehicle will accelerate to
the speed you have selected by increasing the
throttle setting and shifting gears automatically
or by the driver as needed. Your selected speed
will be held when driving downhill, too.
Since this active cruise control system is a new
technology and operates differently from con-
ventional cruise control systems which you may
be accustomed to, you are strongly urged to
read all of the pages relating to this system
before use. Pay special attention to the System
limitations section beginning on page64.
ba8_E9293_US.book Seite 60 Freitag, 5. Mai 2006 1:02 13
Page 63 of 239

Controls
61Reference
At a glance
Driving tips
Communications
Navigation
Entertainment
Mobility
Braking sensation
The system's automatic brake operation results
in a braking sensation that is slightly different
from what you feel when you brake the vehicle
yourself in a similar situation. Possible noises
during automatic deceleration are normal.
Manual transmission
You can shift gears while cruise control is acti-
vated. An indicator lamp notifies you that you
should shift gears when you drive for an
extended period at very high or very low engine
speeds, or the system is deactivated.
Range of applications
The minimum desired speed is 20 mph or
30 km/h, and the maximum desired speed is
110 mph or 180 km/h.
As with conventional cruise control sys-
tems, active cruise control in no way
diminishes or substitutes for the driver’s own
personal responsibility, alertness and aware-
ness in adjusting speed, braking or otherwise
controlling the vehicle. The driver should
decide when to use the system on the basis of
road, traffic, visibility, and weather conditions.
Active cruise control is intended for use on
highway-type roadways where traffic is moving
relatively smoothly. Do not use this system in
city driving; heavy traffic such as during rush
hour; on curvy, winding roads, slippery roads or
roads with sharp curves such as highway off-
ramps; during inclement weather such as snow,
strong rain or fog; or when entering inter-
changes, service/parking areas or toll booths.
It is also important to regulate your vehicle's
speed and distance setting within applicable
legal limits. Always be ready to take action or
apply the brakes if necessary, especially when
the system is actively following a vehicle in front
of you. Otherwise, driving conditions could
result which violate the law or pose a risk of
accident.<
One lever for all functions
1Store and increase desired speed
2Store and decrease desired speed
3Deactivate system, refer to page62
4Resume stored desired speed and dis-
tance, refer to page63
5Select distance to vehicle driving ahead,
refer to page62
Maintaining current speed
Briefly press the lever, arrow 1, or briefly pull it,
arrow 2, at a driving speed of more than approx.
20 mph or 30 km/h.
The car's current speed is stored and main-
tained. It is displayed in the speedometer and
briefly in the instrument cluster.
On uphill gradients, it may prove impossible to
maintain the set speed if current engine power
output is insufficient. If the engine braking
effect is insufficient on downhill slopes, the sys-
tem will brake the vehicle slightly.
Adjusting desired speed
Adjust your desired speed to the traffic
conditions and remain ready to brake at
all times, otherwise there is a risk of accident.
Great differences in speed to the vehicle ahead,
ba8_E9293_US.book Seite 61 Freitag, 5. Mai 2006 1:02 13
Page 64 of 239

Driving
62 e.g. when quickly approaching a truck or when
another vehicle swerves into your lane, cannot
be compensated for by the system.<
Increasing in increments
Repeatedly tap the lever to the resistance point
or beyond, arrow1, until the desired speed is
reached.
>Each time the lever is tapped to the resis-
tance point, the desired speed is increased
by approx. 1 mph or 1 km/h.
>Each time the lever is tapped beyond the
resistance point, the desired speed is
increased by up to 5 mph or 10 km/h until
the maximum speed of 110 mph or
180 km/h is achieved.
The speed then displayed is stored and
achieved on a clear road.
Decreasing in increments
Repeatedly pull the lever to the resistance point
or beyond, arrow 2, until the desired speed is
reached.
>Each time the lever is pulled to the resis-
tance point, the desired speed is decreased
by approx. 1 mph or 1 km/h.
>Each time the lever is pulled beyond the
resistance point, the desired speed is
reduced by up to 5 mph or 10 km/h until the
minimum speed of 20 mph or 30 km/h is
achieved.
The speed then displayed is stored and
achieved on a clear road.
Selecting distance
>Press downward:
Increase distance>Press upward:
Decrease distance.
The selected distance is displayed in the instru-
ment cluster.
Use good judgment to select the appro-
priate following distance given road con-
ditions, traffic, applicable laws and driving rec-
ommendations for safe following distance.
Otherwise, you may be in violation of the law or
an accident could result.<
Deactivating cruise control
Press the lever upward or downward, arrow3.
The displays in the speedometer disappear.
In addition, the system is automatically deacti-
vated:
>When you brake the vehicle
Distance 1
Distance 2
Distance 3
This distance is always set when
the system is used for the first
time after starting the engine.
Distance 4
ba8_E9293_US.book Seite 62 Freitag, 5. Mai 2006 1:02 13
 1
1 2
2 3
3 4
4 5
5 6
6 7
7 8
8 9
9 10
10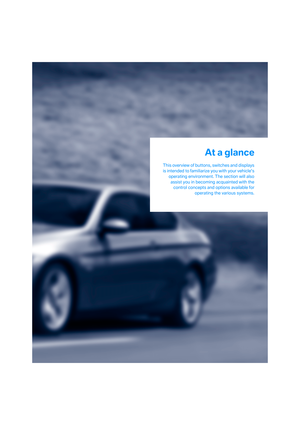 11
11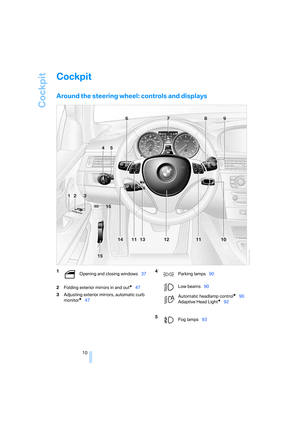 12
12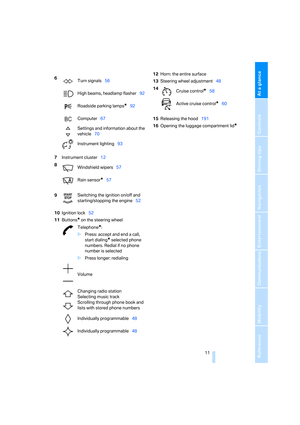 13
13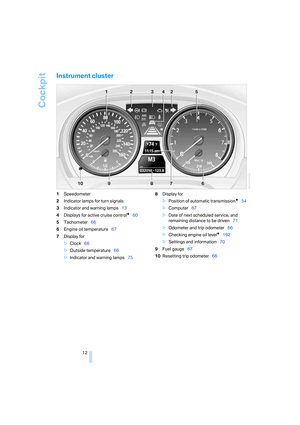 14
14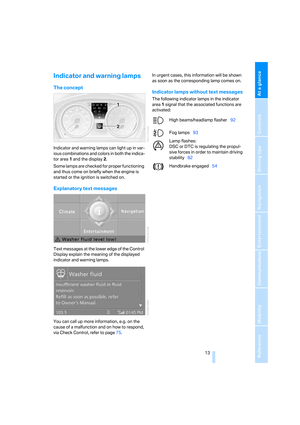 15
15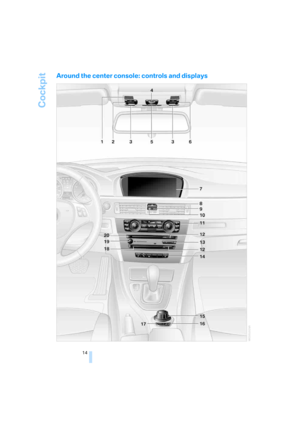 16
16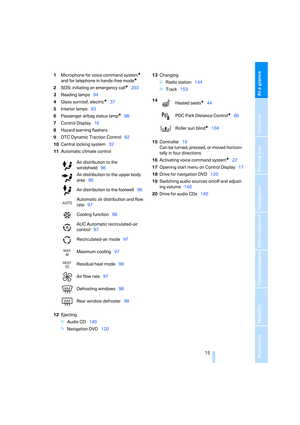 17
17 18
18 19
19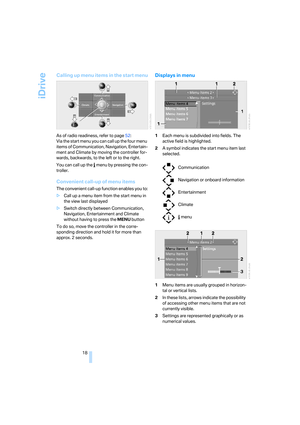 20
20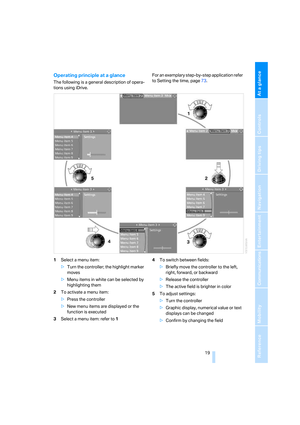 21
21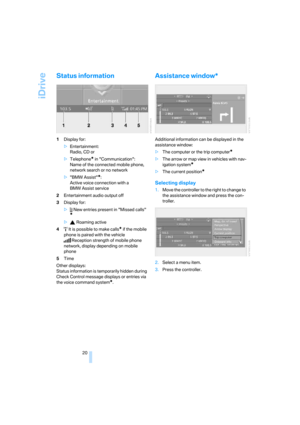 22
22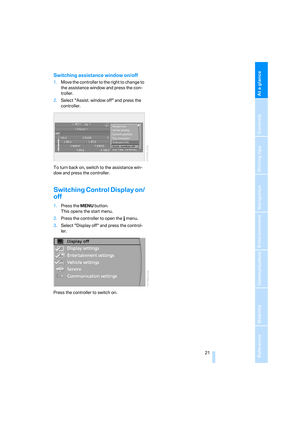 23
23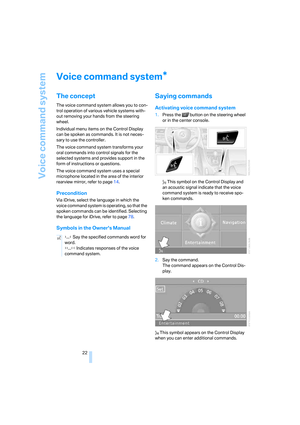 24
24 25
25 26
26 27
27 28
28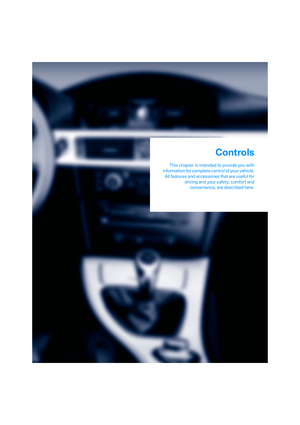 29
29 30
30 31
31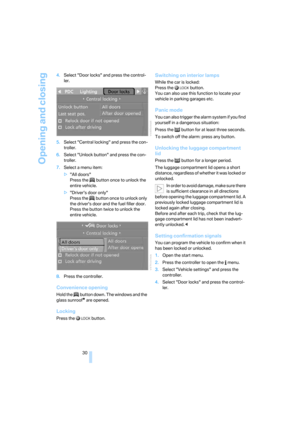 32
32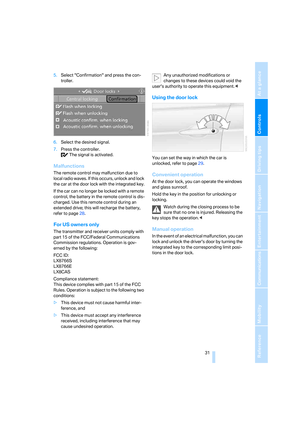 33
33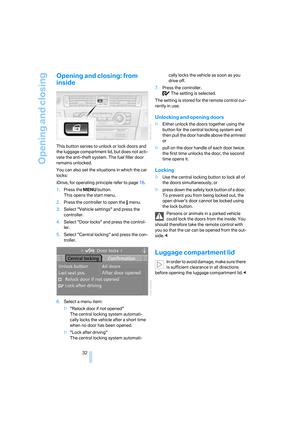 34
34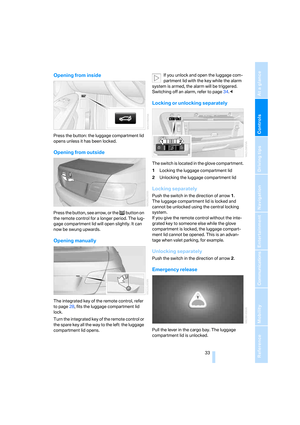 35
35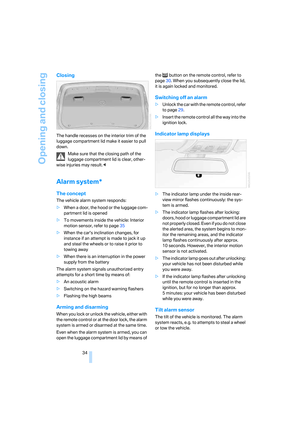 36
36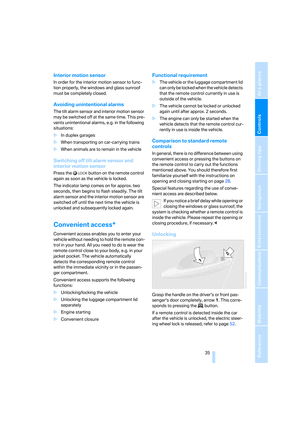 37
37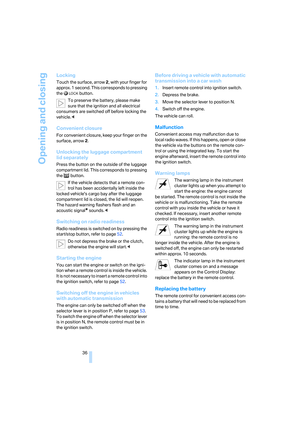 38
38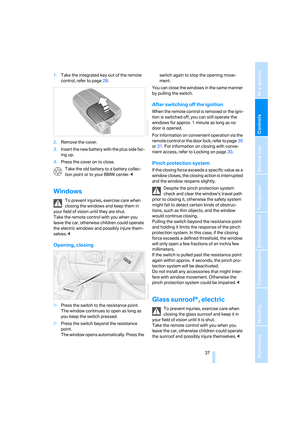 39
39 40
40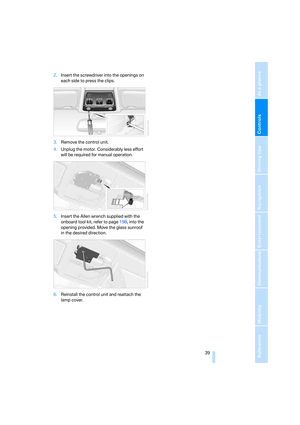 41
41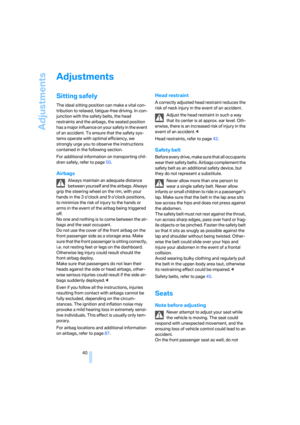 42
42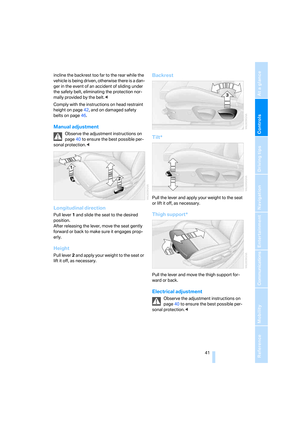 43
43 44
44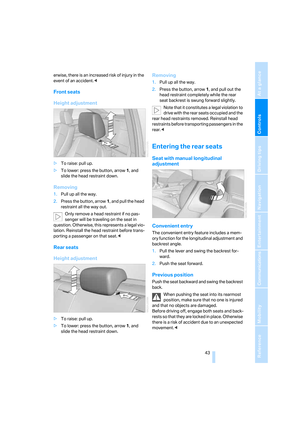 45
45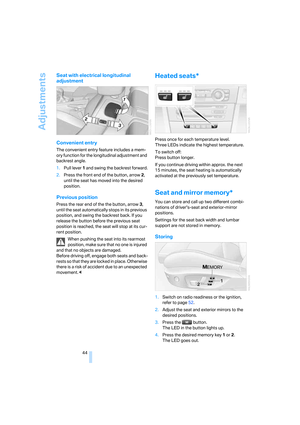 46
46 47
47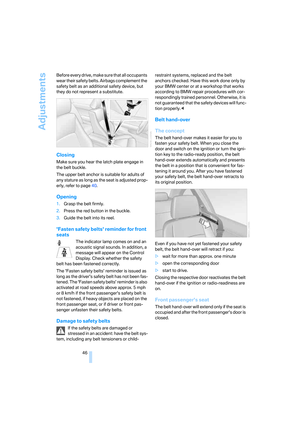 48
48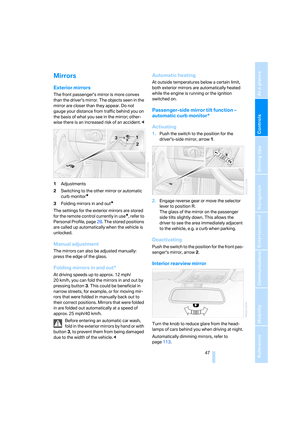 49
49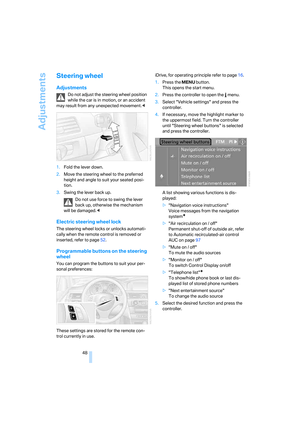 50
50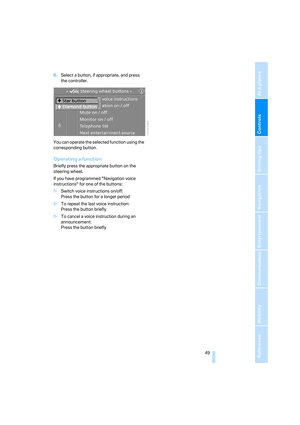 51
51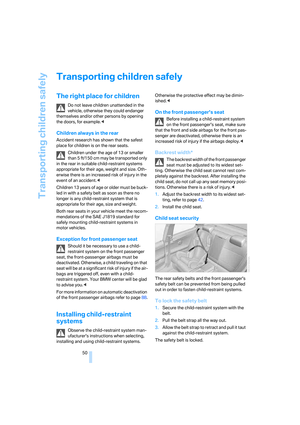 52
52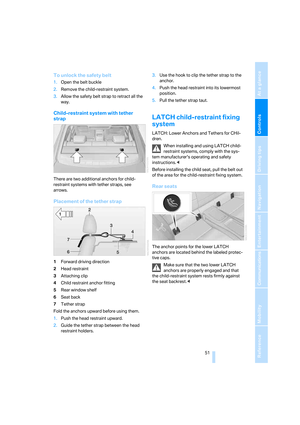 53
53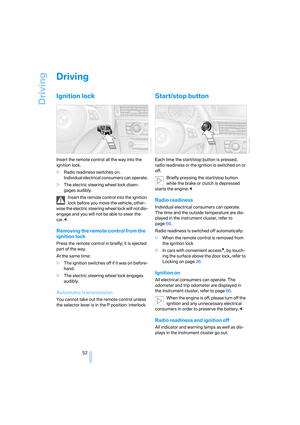 54
54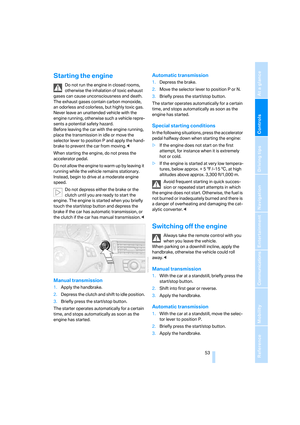 55
55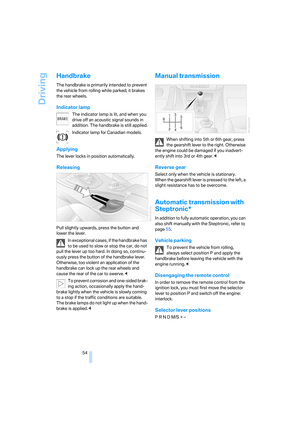 56
56 57
57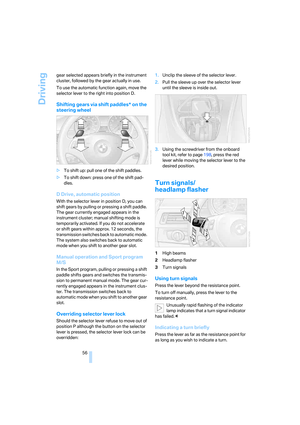 58
58 59
59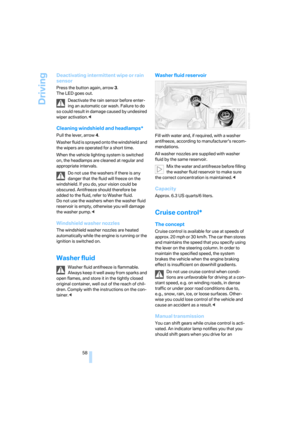 60
60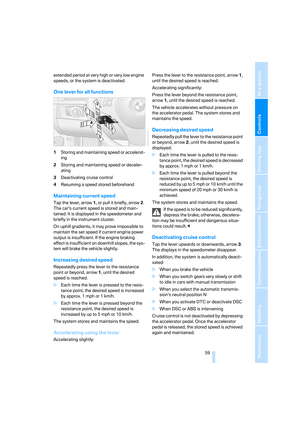 61
61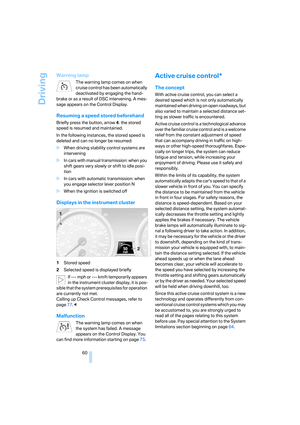 62
62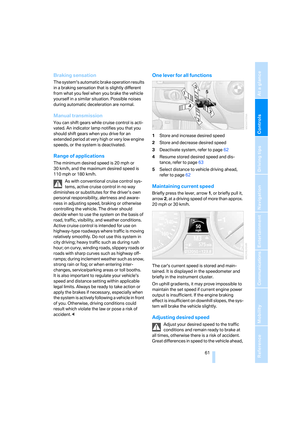 63
63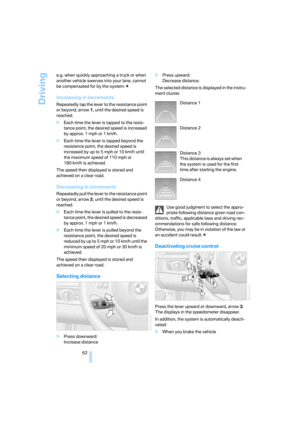 64
64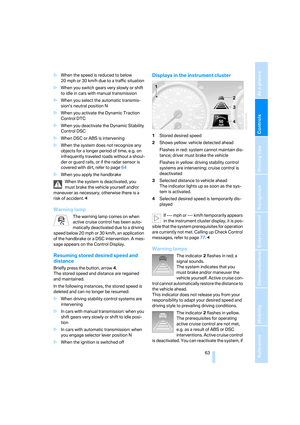 65
65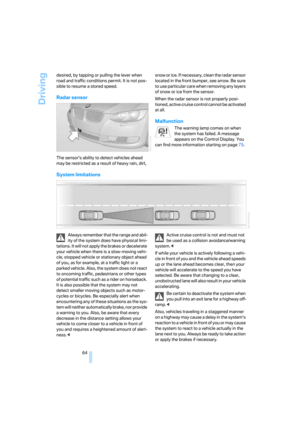 66
66 67
67 68
68 69
69 70
70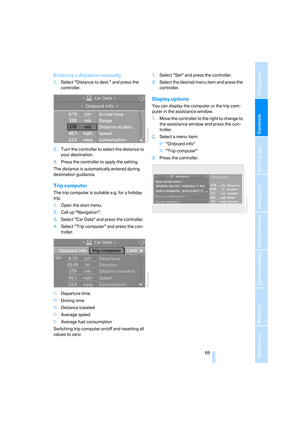 71
71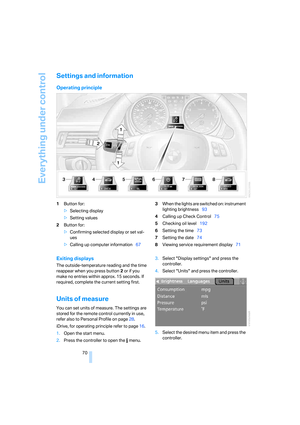 72
72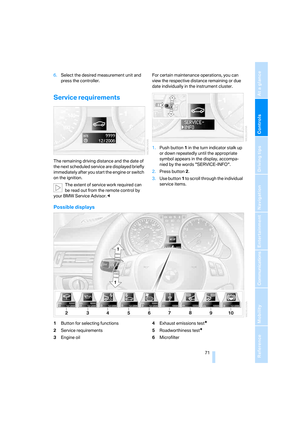 73
73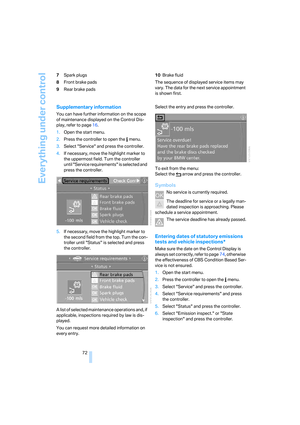 74
74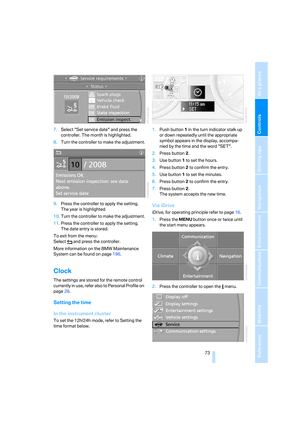 75
75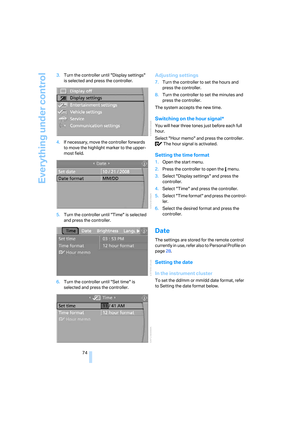 76
76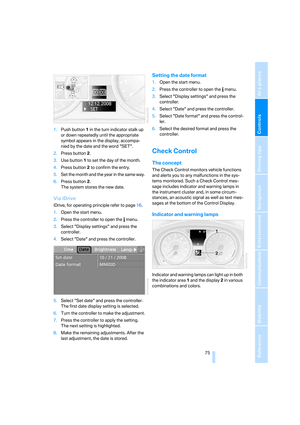 77
77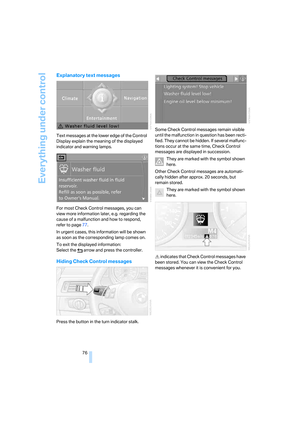 78
78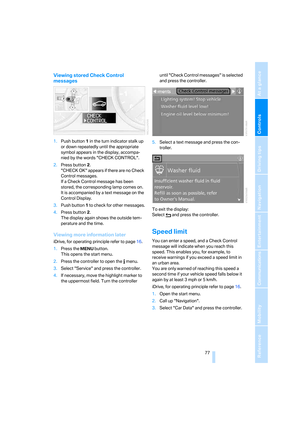 79
79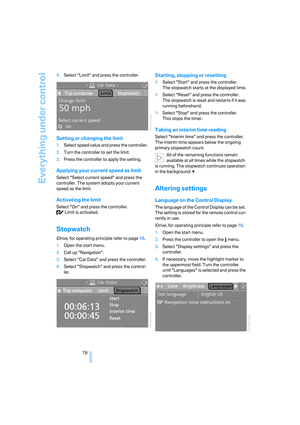 80
80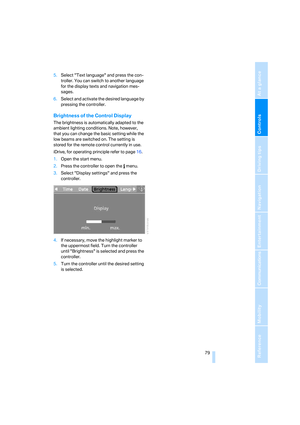 81
81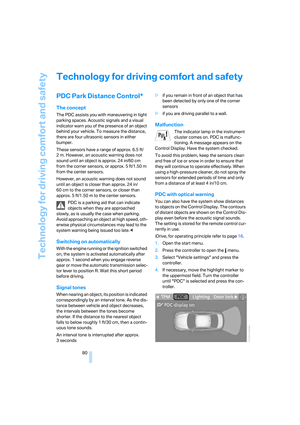 82
82 83
83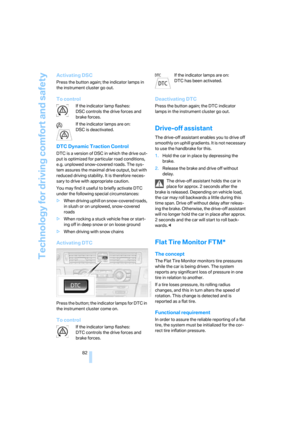 84
84 85
85 86
86 87
87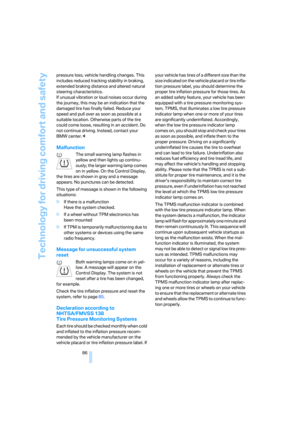 88
88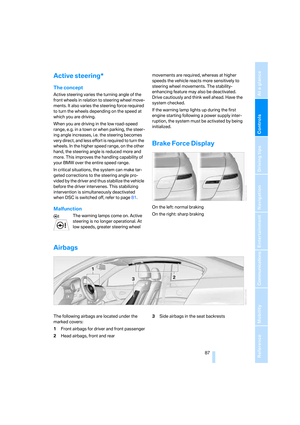 89
89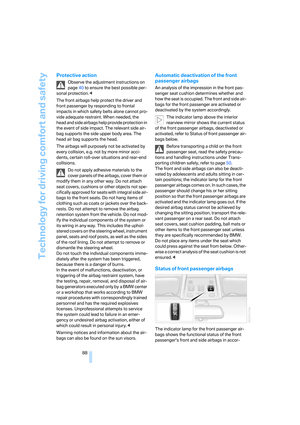 90
90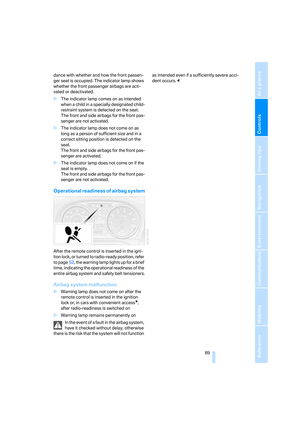 91
91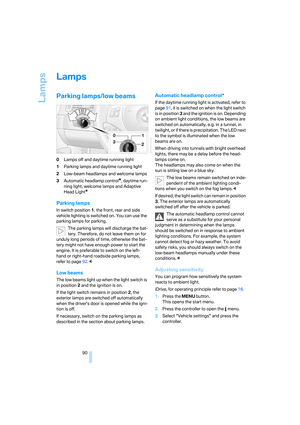 92
92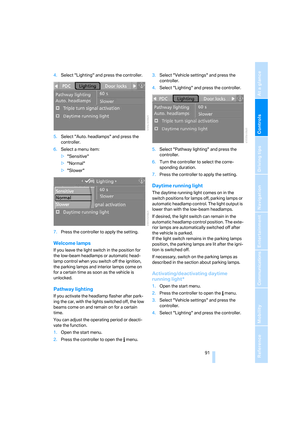 93
93 94
94 95
95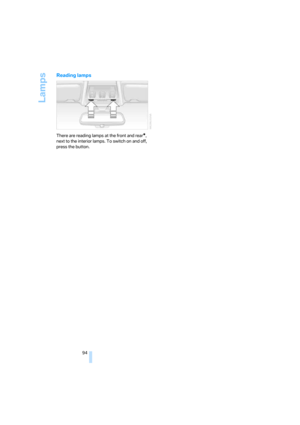 96
96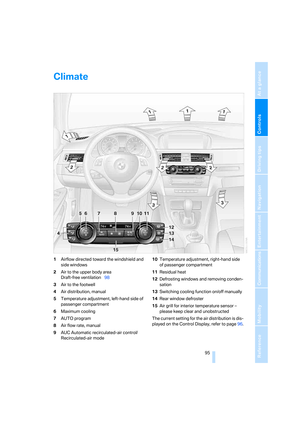 97
97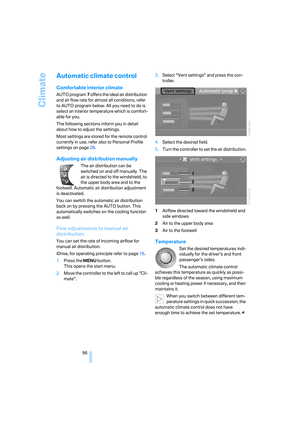 98
98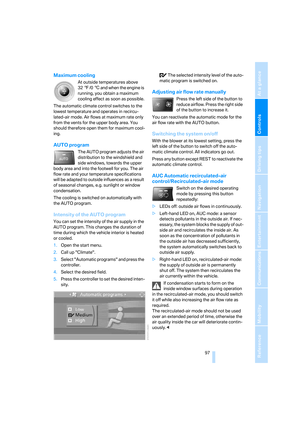 99
99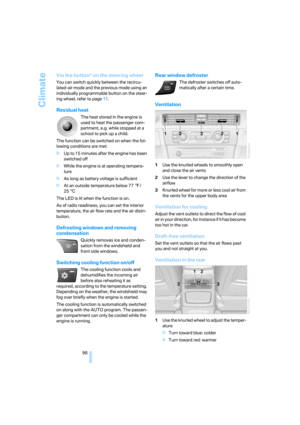 100
100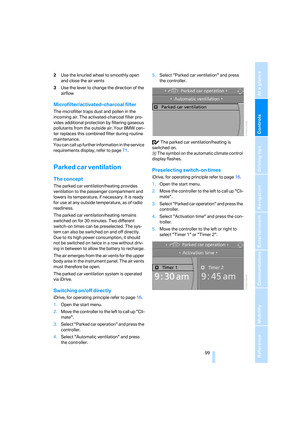 101
101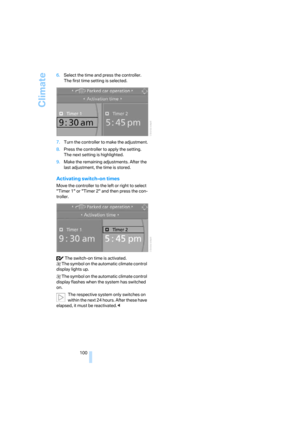 102
102 103
103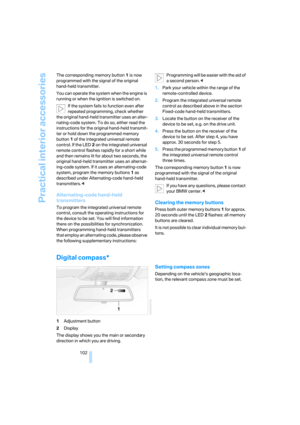 104
104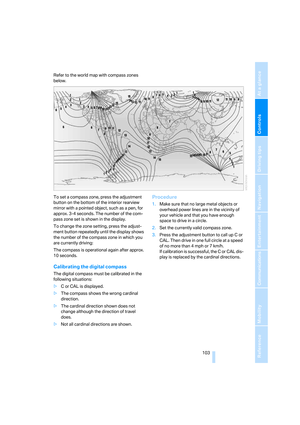 105
105 106
106 107
107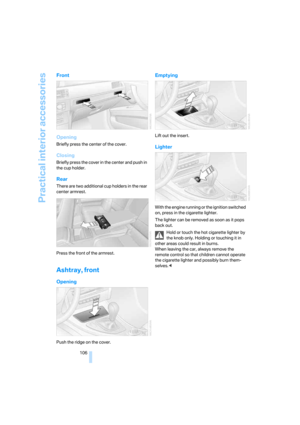 108
108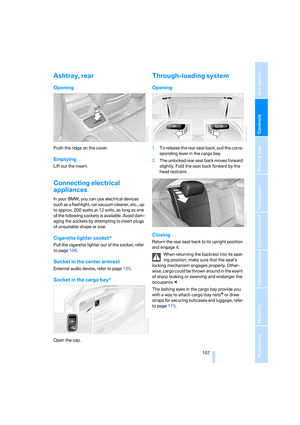 109
109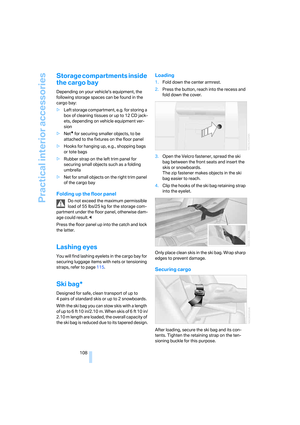 110
110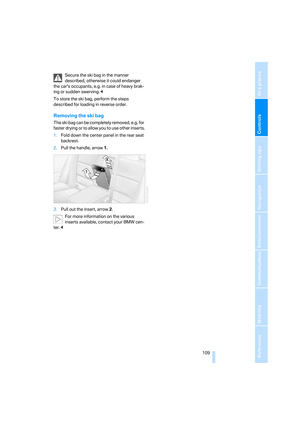 111
111 112
112 113
113 114
114 115
115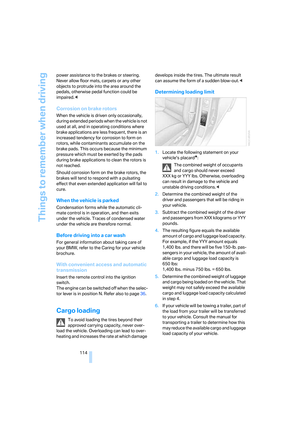 116
116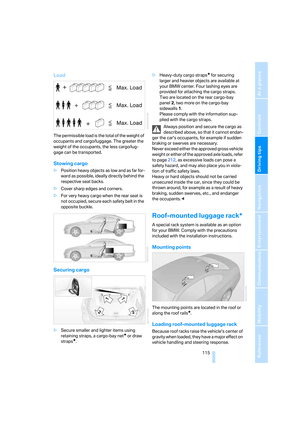 117
117 118
118 119
119 120
120 121
121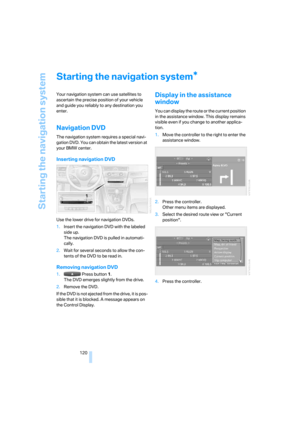 122
122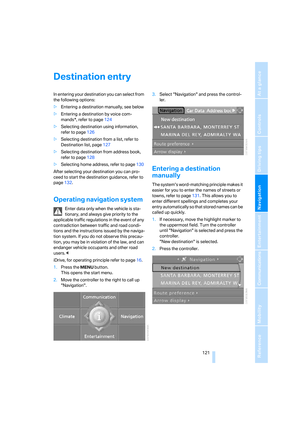 123
123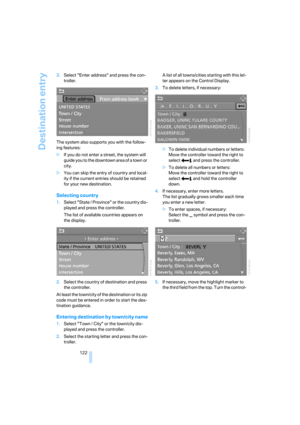 124
124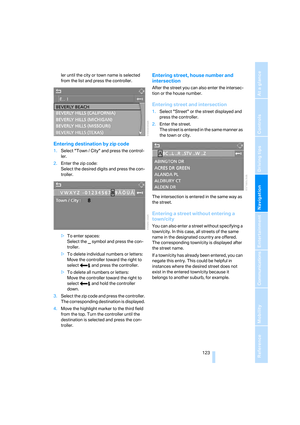 125
125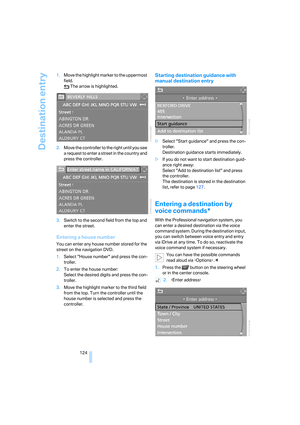 126
126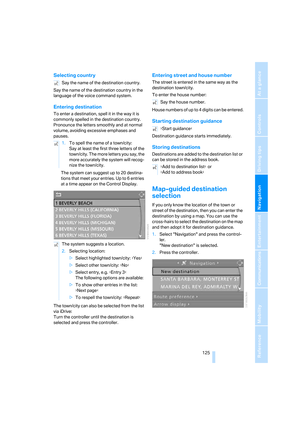 127
127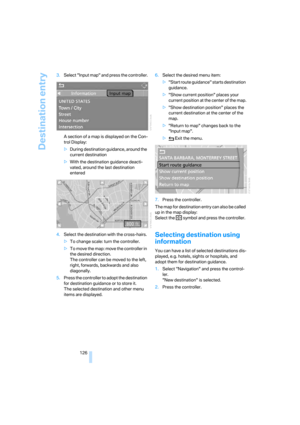 128
128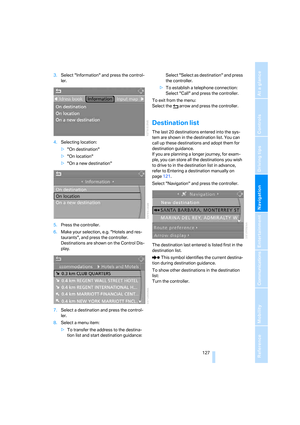 129
129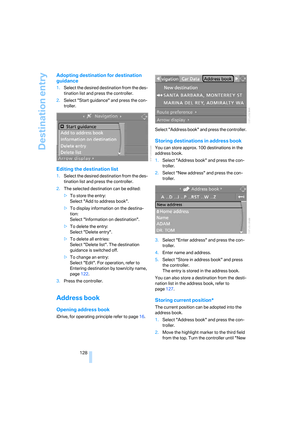 130
130 131
131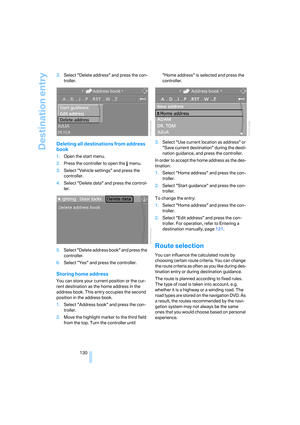 132
132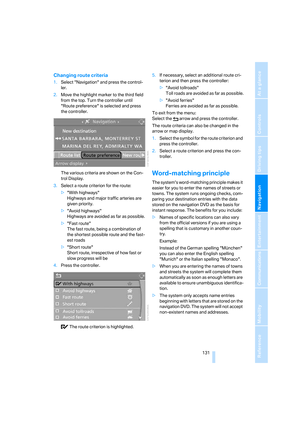 133
133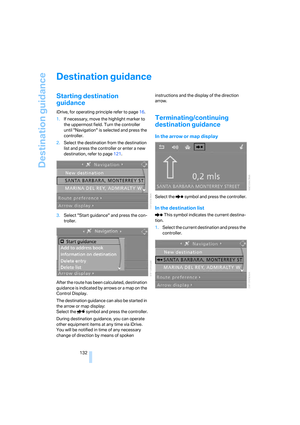 134
134 135
135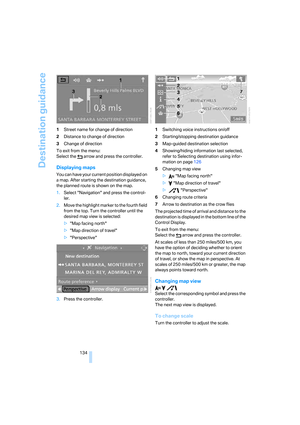 136
136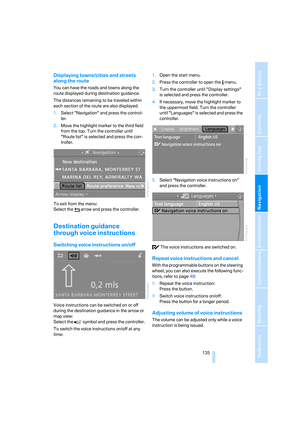 137
137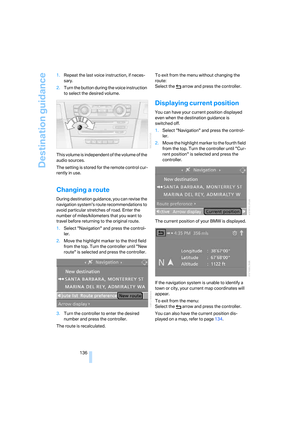 138
138 139
139 140
140 141
141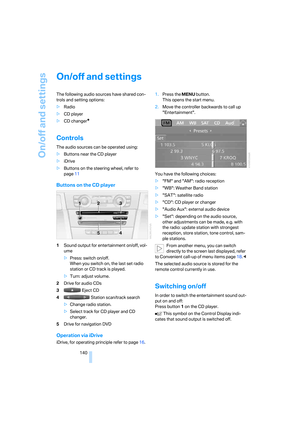 142
142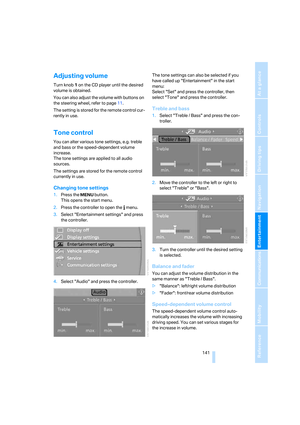 143
143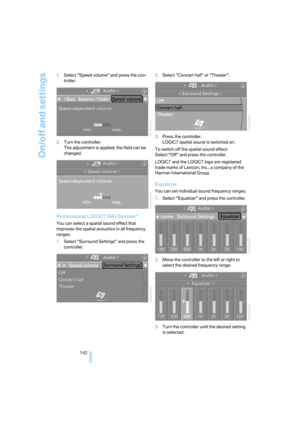 144
144 145
145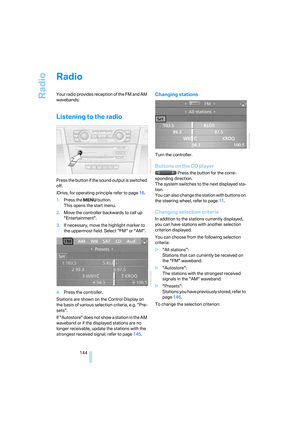 146
146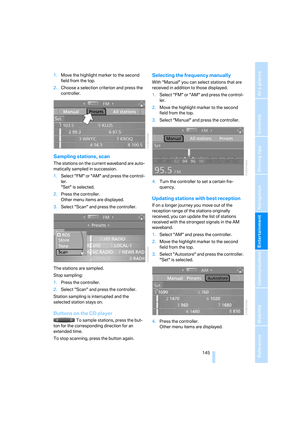 147
147 148
148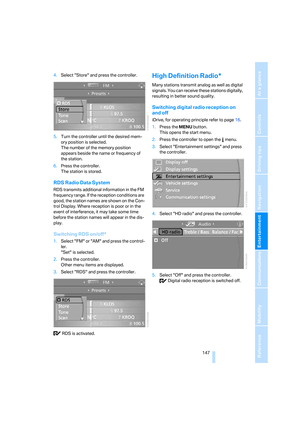 149
149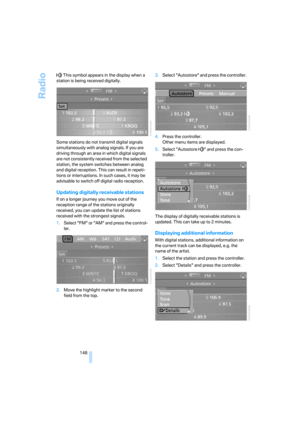 150
150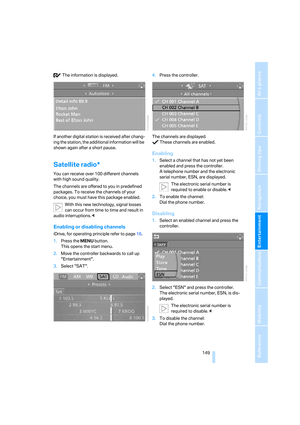 151
151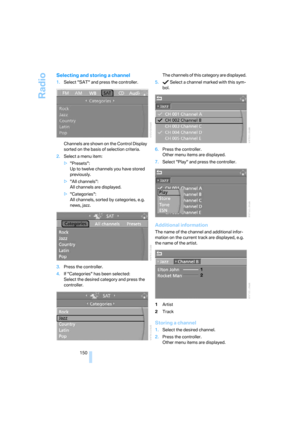 152
152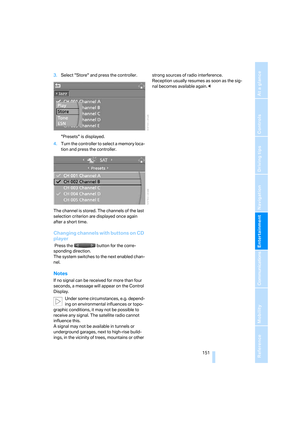 153
153 154
154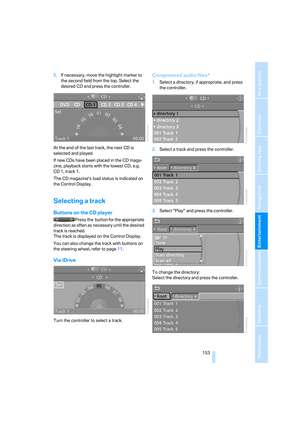 155
155 156
156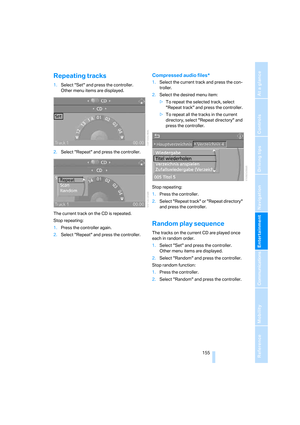 157
157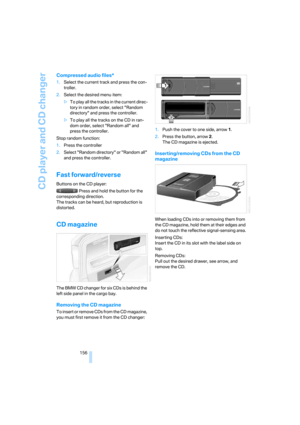 158
158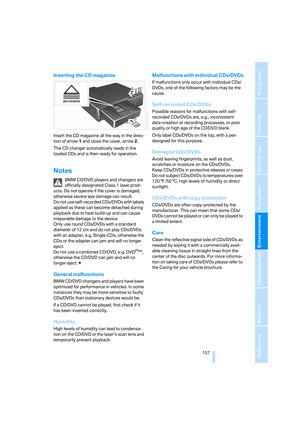 159
159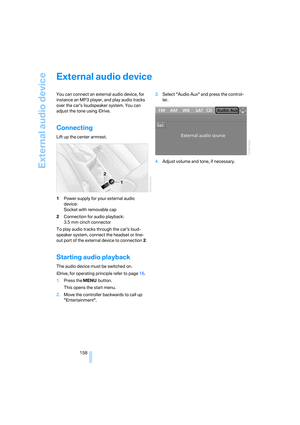 160
160 161
161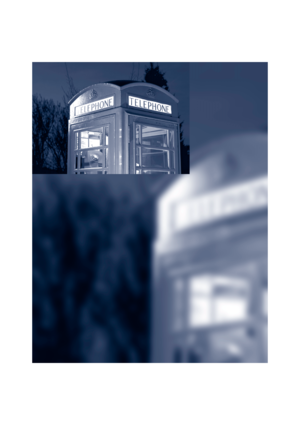 162
162 163
163 164
164 165
165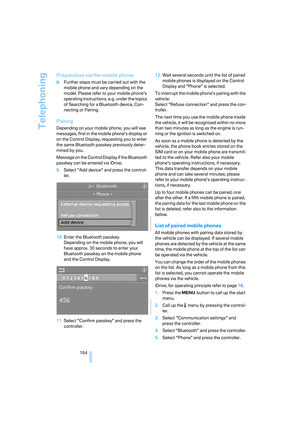 166
166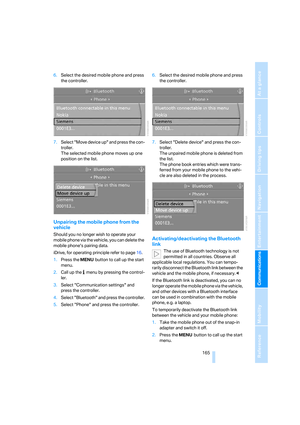 167
167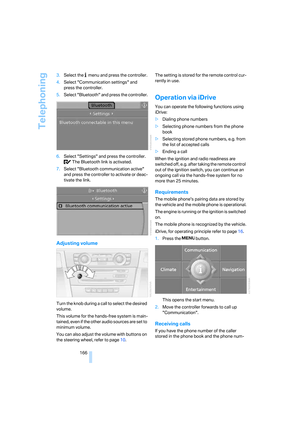 168
168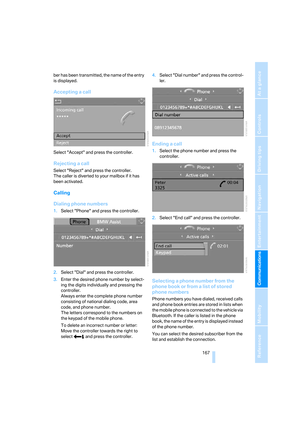 169
169 170
170 171
171 172
172 173
173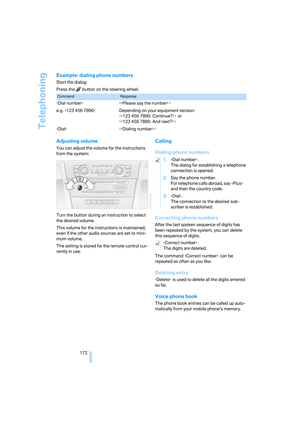 174
174 175
175 176
176 177
177 178
178 179
179 180
180 181
181 182
182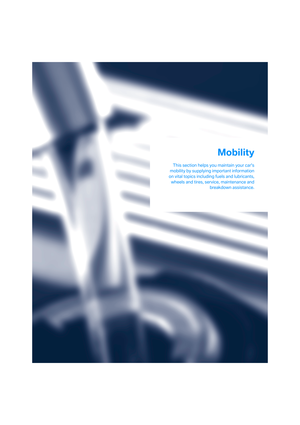 183
183 184
184 185
185 186
186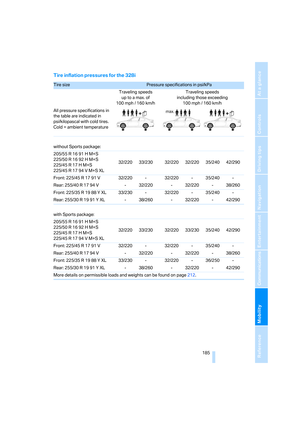 187
187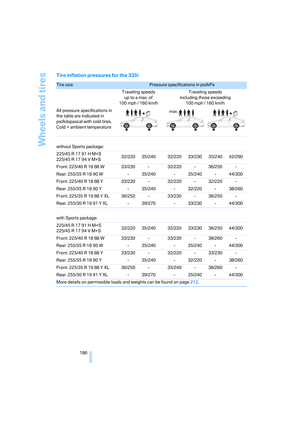 188
188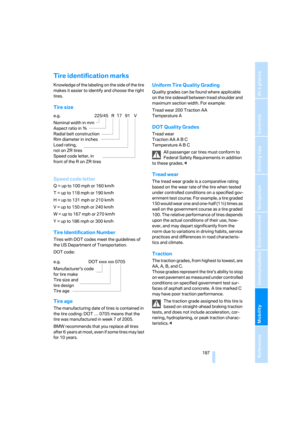 189
189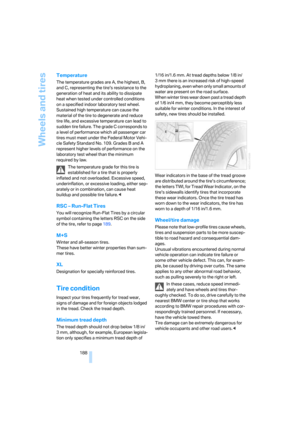 190
190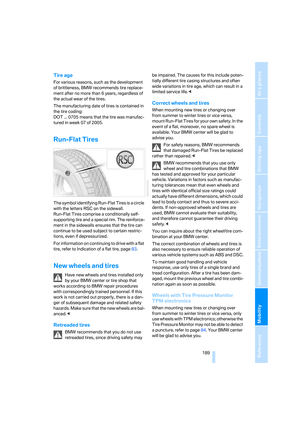 191
191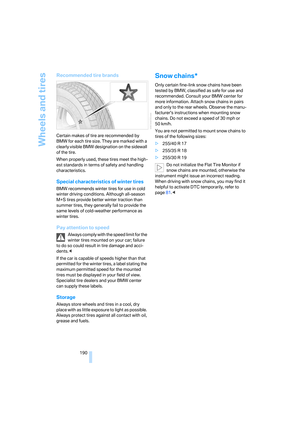 192
192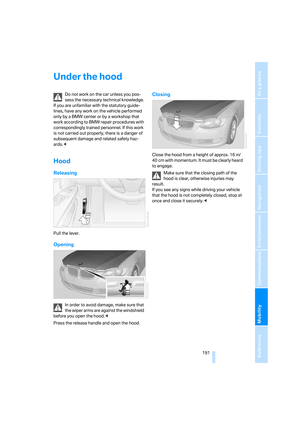 193
193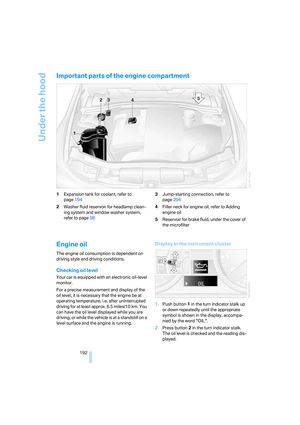 194
194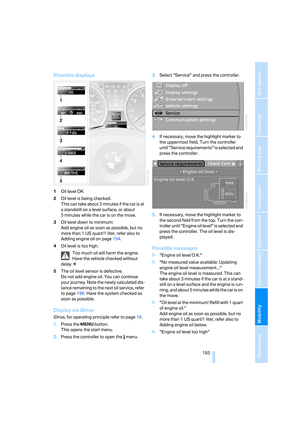 195
195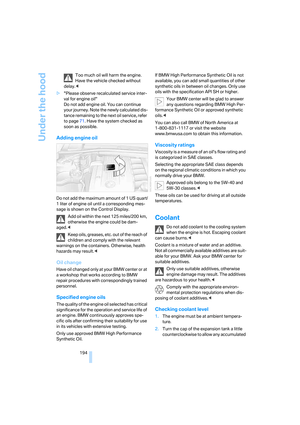 196
196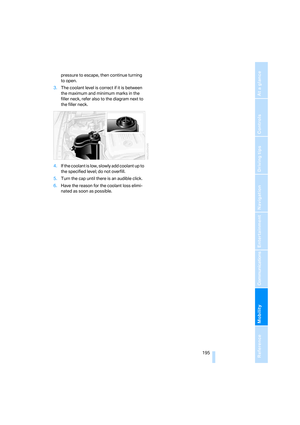 197
197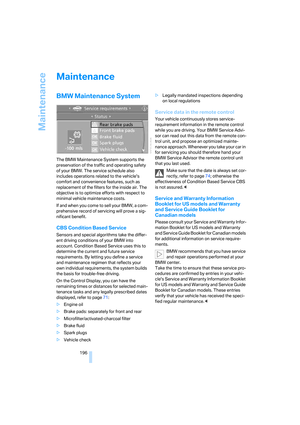 198
198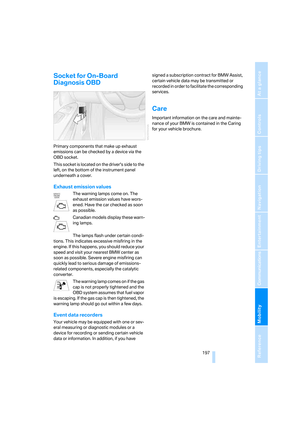 199
199 200
200 201
201 202
202 203
203 204
204 205
205 206
206 207
207 208
208 209
209 210
210 211
211 212
212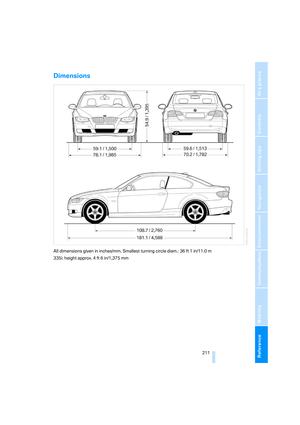 213
213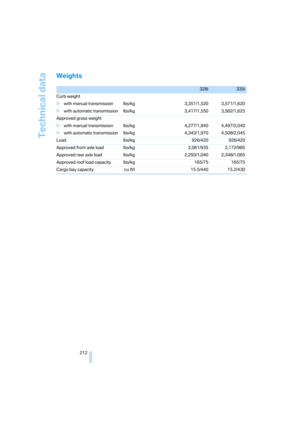 214
214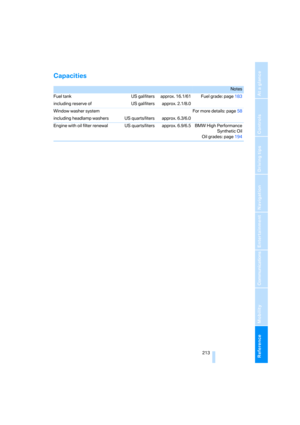 215
215 216
216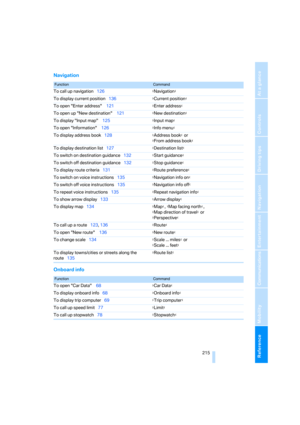 217
217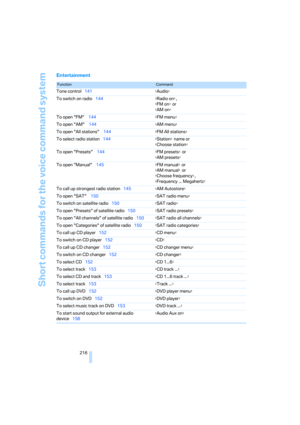 218
218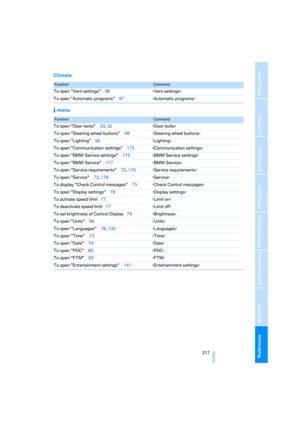 219
219 220
220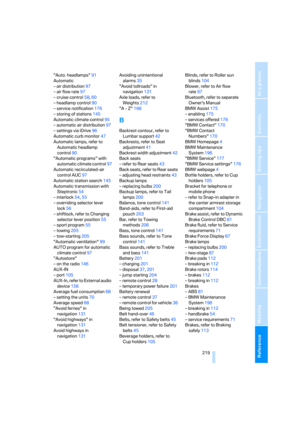 221
221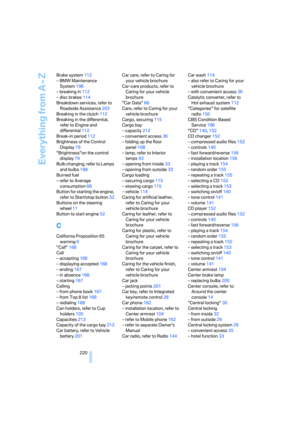 222
222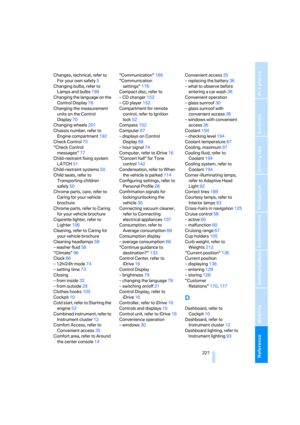 223
223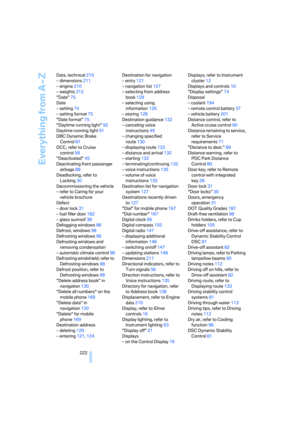 224
224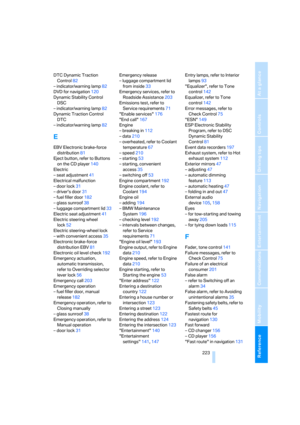 225
225 226
226 227
227 228
228 229
229 230
230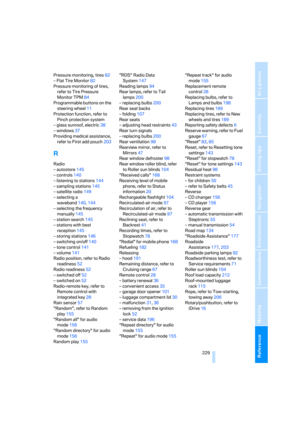 231
231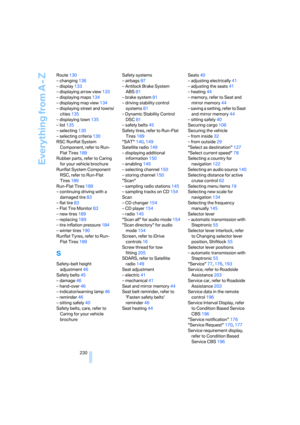 232
232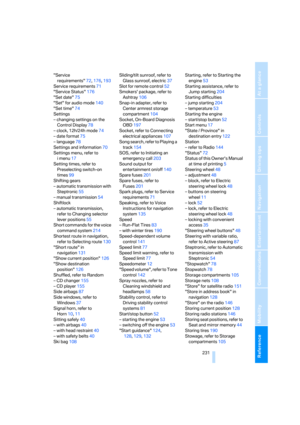 233
233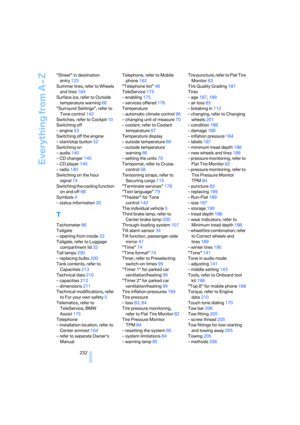 234
234 235
235 236
236 237
237 238
238