2006 BMW 328I COUPE window
[x] Cancel search: windowPage 39 of 239
Controls
37Reference
At a glance
Driving tips
Communications
Navigation
Entertainment
Mobility
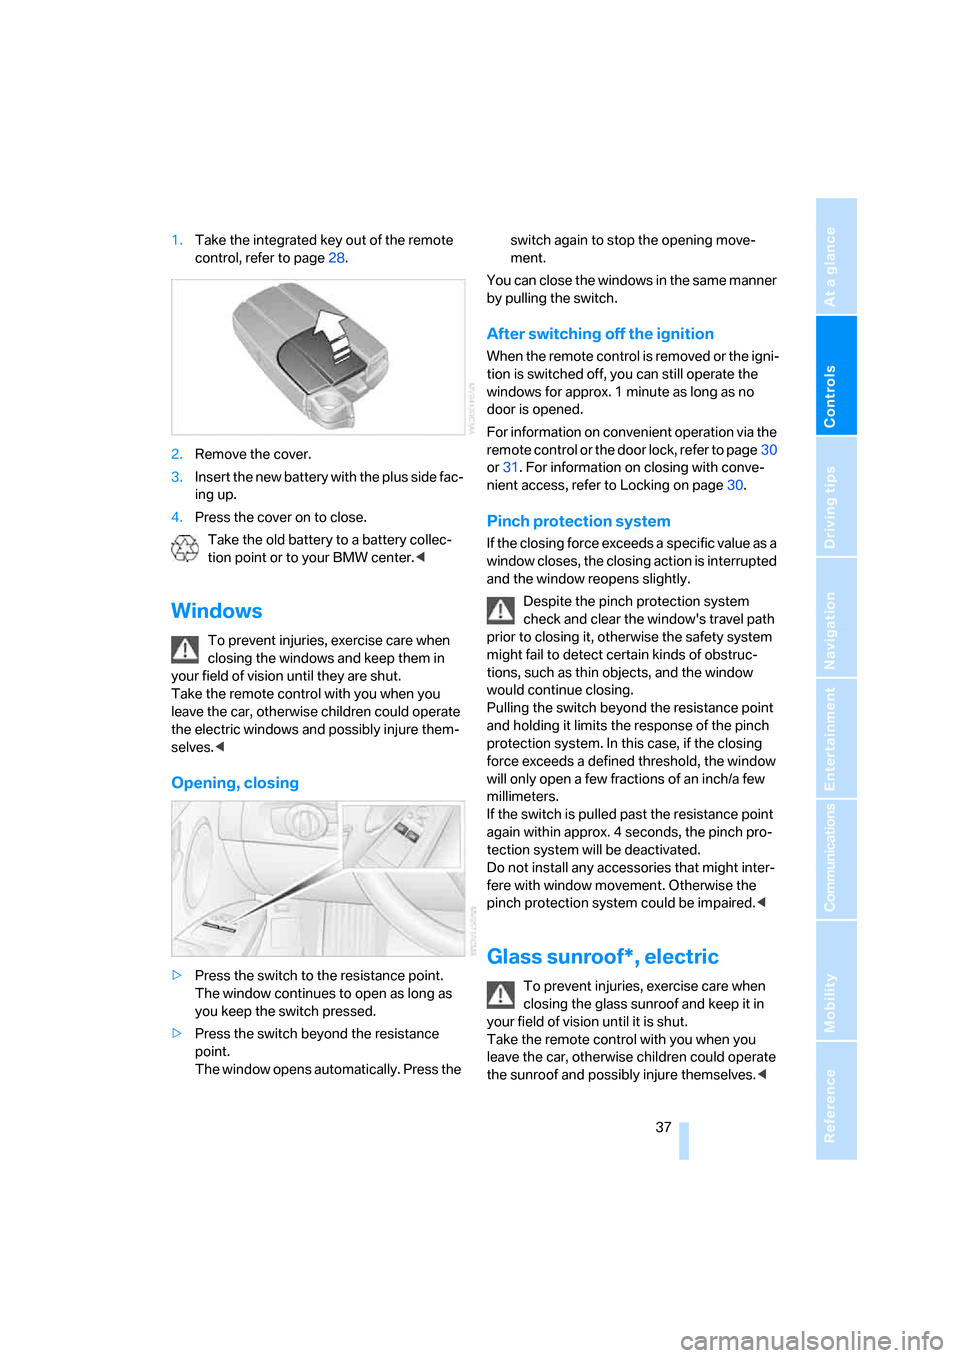
1.Take the integrated key out of the remote
control, refer to page28.
2.Remove the cover.
3.Insert the new battery with the plus side fac-
ing up.
4.Press the cover on to close.
Take the old battery to a battery collec-
tion point or to your BMW center.<
Windows
To prevent injuries, exercise care when
closing the windows and keep them in
your field of vision until they are shut.
Take the remote control with you when you
leave the car, otherwise children could operate
the electric windows and possibly injure them-
selves.<
Opening, closing
>Press the switch to the resistance point.
The window continues to open as long as
you keep the switch pressed.
>Press the switch beyond the resistance
point.
The window opens automatically. Press the switch again to stop the opening move-
ment.
You can close the windows in the same manner
by pulling the switch.
After switching off the ignition
When the remote control is removed or the igni-
tion is switched off, you can still operate the
windows for approx. 1 minute as long as no
door is opened.
For information on convenient operation via the
remote control or the door lock, refer to page30
or31. For information on closing with conve-
nient access, refer to Locking on page30.
Pinch protection system
If the closing force exceeds a specific value as a
window closes, the closing action is interrupted
and the window reopens slightly.
Despite the pinch protection system
check and clear the window's travel path
prior to closing it, otherwise the safety system
might fail to detect certain kinds of obstruc-
tions, such as thin objects, and the window
would continue closing.
Pulling the switch beyond the resistance point
and holding it limits the response of the pinch
protection system. In this case, if the closing
force exceeds a defined threshold, the window
will only open a few fractions of an inch/a few
millimeters.
If the switch is pulled past the resistance point
again within approx. 4 seconds, the pinch pro-
tection system will be deactivated.
Do not install any accessories that might inter-
fere with window movement. Otherwise the
pinch protection system could be impaired.<
Glass sunroof*, electric
To prevent injuries, exercise care when
closing the glass sunroof and keep it in
your field of vision until it is shut.
Take the remote control with you when you
leave the car, otherwise children could operate
the sunroof and possibly injure themselves.<
ba8_E9293_US.book Seite 37 Freitag, 5. Mai 2006 1:02 13
Page 53 of 239
Controls
51Reference
At a glance
Driving tips
Communications
Navigation
Entertainment
Mobility
To unlock the safety belt
1.Open the belt buckle
2.Remove the child-restraint system.
3.Allow the safety belt strap to retract all the
way.
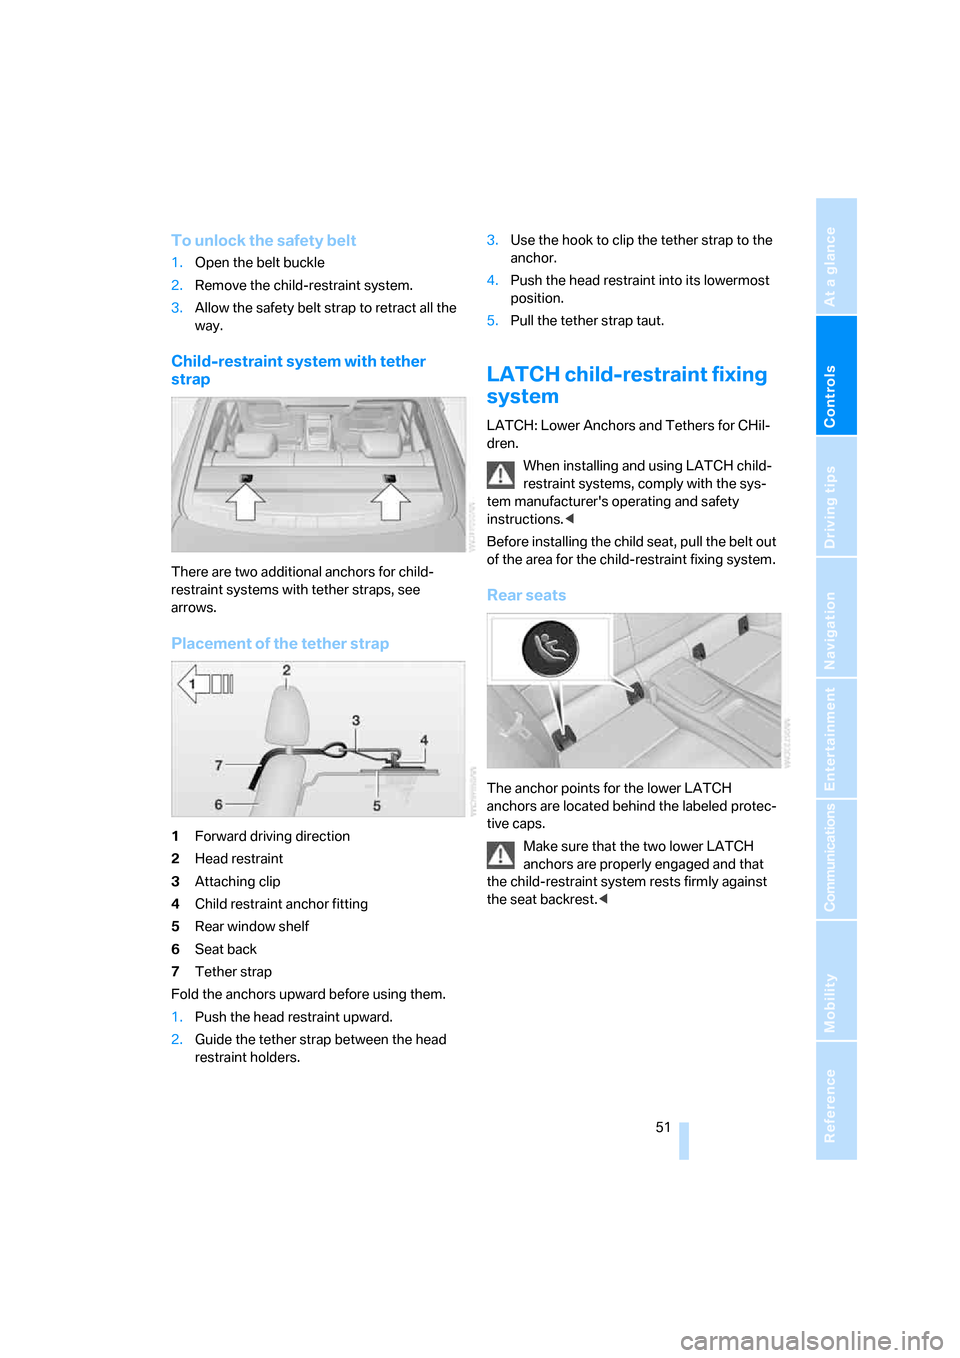
Child-restraint system with tether
strap
There are two additional anchors for child-
restraint systems with tether straps, see
arrows.
Placement of the tether strap
1Forward driving direction
2Head restraint
3Attaching clip
4Child restraint anchor fitting
5Rear window shelf
6Seat back
7Tether strap
Fold the anchors upward before using them.
1.Push the head restraint upward.
2.Guide the tether strap between the head
restraint holders.3.Use the hook to clip the tether strap to the
anchor.
4.Push the head restraint into its lowermost
position.
5.Pull the tether strap taut.
LATCH child-restraint fixing
system
LATCH: Lower Anchors and Tethers for CHil-
dren.
When installing and using LATCH child-
restraint systems, comply with the sys-
tem manufacturer's operating and safety
instructions.<
Before installing the child seat, pull the belt out
of the area for the child-restraint fixing system.
Rear seats
The anchor points for the lower LATCH
anchors are located behind the labeled protec-
tive caps.
Make sure that the two lower LATCH
anchors are properly engaged and that
the child-restraint system rests firmly against
the seat backrest.<
ba8_E9293_US.book Seite 51 Freitag, 5. Mai 2006 1:02 13
Page 71 of 239
Controls
69Reference
At a glance
Driving tips
Communications
Navigation
Entertainment
Mobility
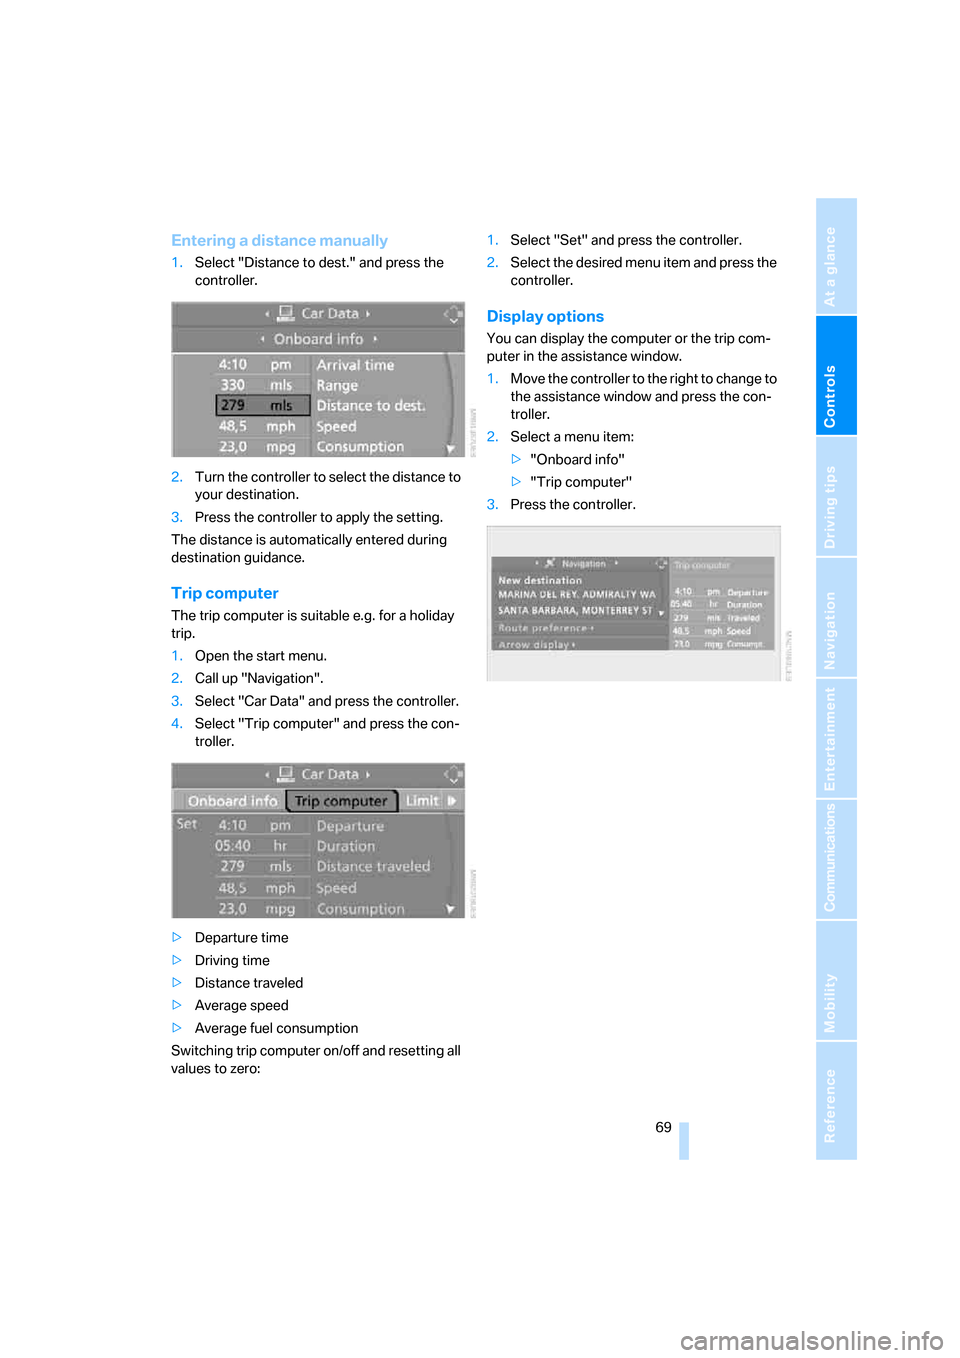
Entering a distance manually
1.Select "Distance to dest." and press the
controller.
2.Turn the controller to select the distance to
your destination.
3.Press the controller to apply the setting.
The distance is automatically entered during
destination guidance.
Trip computer
The trip computer is suitable e.g. for a holiday
trip.
1.Open the start menu.
2.Call up "Navigation".
3.Select "Car Data" and press the controller.
4.Select "Trip computer" and press the con-
troller.
>Departure time
>Driving time
>Distance traveled
>Average speed
>Average fuel consumption
Switching trip computer on/off and resetting all
values to zero:1.Select "Set" and press the controller.
2.Select the desired menu item and press the
controller.
Display options
You can display the computer or the trip com-
puter in the assistance window.
1.Move the controller to the right to change to
the assistance window and press the con-
troller.
2.Select a menu item:
>"Onboard info"
>"Trip computer"
3.Press the controller.
ba8_E9293_US.book Seite 69 Freitag, 5. Mai 2006 1:02 13
Page 97 of 239

Controls
95Reference
At a glance
Driving tips
Communications
Navigation
Entertainment
Mobility
Climate
1Airflow directed toward the windshield and
side windows
2Air to the upper body area
Draft-free ventilation98
3Air to the footwell
4Air distribution, manual
5Temperature adjustment, left-hand side of
passenger compartment
6Maximum cooling
7AUTO program
8Air flow rate, manual
9AUC Automatic recirculated-air control/
Recirculated-air mode10Temperature adjustment, right-hand side
of passenger compartment
11Residual heat
12Defrosting windows and removing conden-
sation
13Switching cooling function on/off manually
14Rear window defroster
15Air grill for interior temperature sensor –
please keep clear and unobstructed
The current setting for the air distribution is dis-
played on the Control Display, refer to page96.
ba8_E9293_US.book Seite 95 Freitag, 5. Mai 2006 1:02 13
Page 98 of 239
Climate
96
Automatic climate control
Comfortable interior climate
AUTO program7 offers the ideal air distribution
and air flow rate for almost all conditions, refer
to AUTO program below. All you need to do is
select an interior temperature which is comfort-
able for you.
The following sections inform you in detail
about how to adjust the settings.
Most settings are stored for the remote control
currently in use, refer also to Personal Profile
settings on page28.
Adjusting air distribution manually
The air distribution can be
switched on and off manually. The
air is directed to the windshield, to
the upper body area and to the
footwell. Automatic air distribution adjustment
is deactivated.
You can switch the automatic air distribution
back on by pressing the AUTO button. This
automatically switches on the cooling function
as well.
Fine adjustments to manual air
distribution
You can set the rate of incoming airflow for
manual air distribution.
iDrive, for operating principle refer to page16.
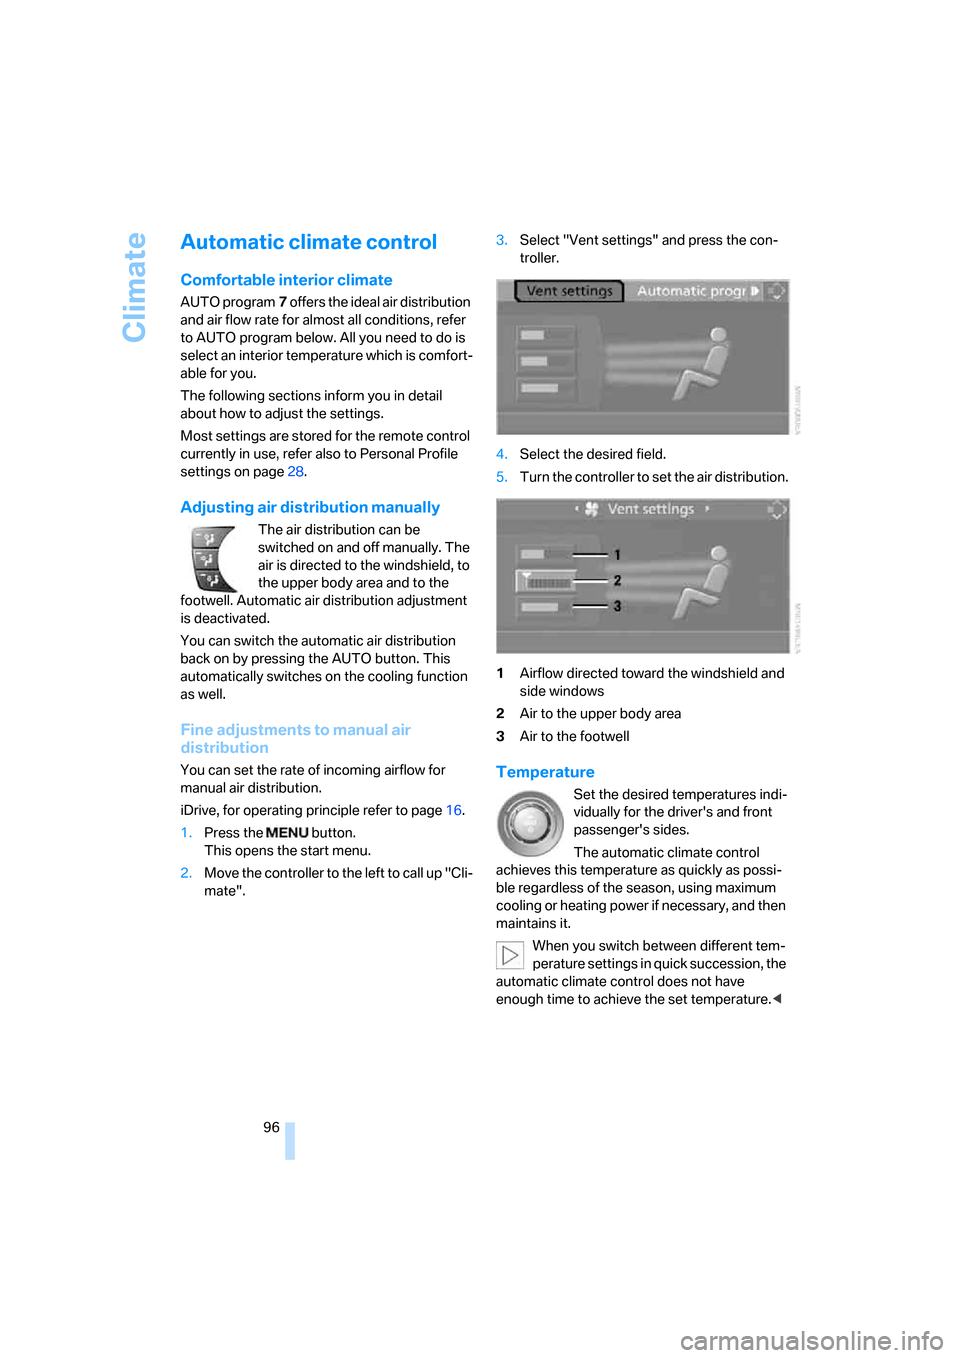
1.Press the button.
This opens the start menu.
2.Move the controller to the left to call up "Cli-
mate".3.Select "Vent settings" and press the con-
troller.
4.Select the desired field.
5.Turn the controller to set the air distribution.
1Airflow directed toward the windshield and
side windows
2Air to the upper body area
3Air to the footwellTemperature
Set the desired temperatures indi-
vidually for the driver's and front
passenger's sides.
The automatic climate control
achieves this temperature as quickly as possi-
ble regardless of the season, using maximum
cooling or heating power if necessary, and then
maintains it.
When you switch between different tem-
perature settings in quick succession, the
automatic climate control does not have
enough time to achieve the set temperature.<
ba8_E9293_US.book Seite 96 Freitag, 5. Mai 2006 1:02 13
Page 99 of 239

Controls
97Reference
At a glance
Driving tips
Communications
Navigation
Entertainment
Mobility
Maximum cooling
At outside temperatures above
327/06 and when the engine is
running, you obtain a maximum
cooling effect as soon as possible.
The automatic climate control switches to the
lowest temperature and operates in recircu-
lated-air mode. Air flows at maximum rate only
from the vents for the upper body area. You
should therefore open them for maximum cool-
ing.
AUTO program
The AUTO program adjusts the air
distribution to the windshield and
side windows, towards the upper
body area and into the footwell for you. The air
flow rate and your temperature specifications
will be adapted to outside influences as a result
of seasonal changes, e.g. sunlight or window
condensation.
The cooling is switched on automatically with
the AUTO program.
Intensity of the AUTO program
You can set the intensity of the air supply in the
AUTO program. This changes the duration of
time during which the vehicle interior is heated
or cooled.
1.Open the start menu.
2.Call up "Climate".
3.Select "Automatic programs" and press the
controller.
4.Select the desired field.
5.Press the controller to set the desired inten-
sity. The selected intensity level of the auto-
matic program is switched on.
Adjusting air flow rate manually
Press the left side of the button to
reduce airflow. Press the right side
of the button to increase it.
You can reactivate the automatic mode for the
air flow rate with the AUTO button.
Switching the system on/off
With the blower at its lowest setting, press the
left side of the button to switch off the auto-
matic climate control. All indicators go out.
Press any button except REST to reactivate the
automatic climate control.
AUC Automatic recirculated-air
control/Recirculated-air mode
Switch on the desired operating
mode by pressing this button
repeatedly:
>LEDs off: outside air flows in continuously.
>Left-hand LED on, AUC mode: a sensor
detects pollutants in the outside air. If nec-
essary, the system blocks the supply of out-
side air and recirculates the inside air. As
soon as the concentration of pollutants in
the outside air has decreased sufficiently,
the system automatically switches back to
outside air supply.
>Right-hand LED on, recirculated-air mode:
the supply of outside air is permanently
shut off. The system then recirculates the
air currently within the vehicle.
If condensation starts to form on the
inside window surfaces during operation
in the recirculated-air mode, you should switch
it off while also increasing the air flow rate as
required.
The recirculated-air mode should not be used
over an extended period of time, otherwise the
air quality inside the car will deteriorate contin-
uously.<
ba8_E9293_US.book Seite 97 Freitag, 5. Mai 2006 1:02 13
Page 100 of 239
Climate
98
Via the button* on the steering wheel
You can switch quickly between the recircu-
lated-air mode and the previous mode using an
individually programmable button
on the steer-
ing wheel, refer to page11.
Residual heat
The heat stored in the engine is
used to heat the passenger com-
partment, e.g. while stopped at a
school to pick up a child.
The function can be switched on when the fol-
lowing conditions are met:
>Up to 15 minutes after the engine has been
switched off
>While the engine is at operating tempera-
ture
>As long as battery voltage is sufficient
>At an outside temperature below 777/
256
The LED is lit when the function is on.
As of radio readiness, you can set the interior
temperature, the air flow rate and the air distri-
bution.
Defrosting windows and removing
condensation
Quickly removes ice and conden-
sation from the windshield and
front side windows.
Switching cooling function on/off
The cooling function cools and
dehumidifies the incoming air
before also reheating it as
required, according to the temperature setting.
Depending on the weather, the windshield may
fog over briefly when the engine is started.
The cooling function is automatically switched
on along with the AUTO program. The passen-
ger compartment can only be cooled while the
engine is running.
Rear window defroster
The defroster switches off auto-
matically after a certain time.
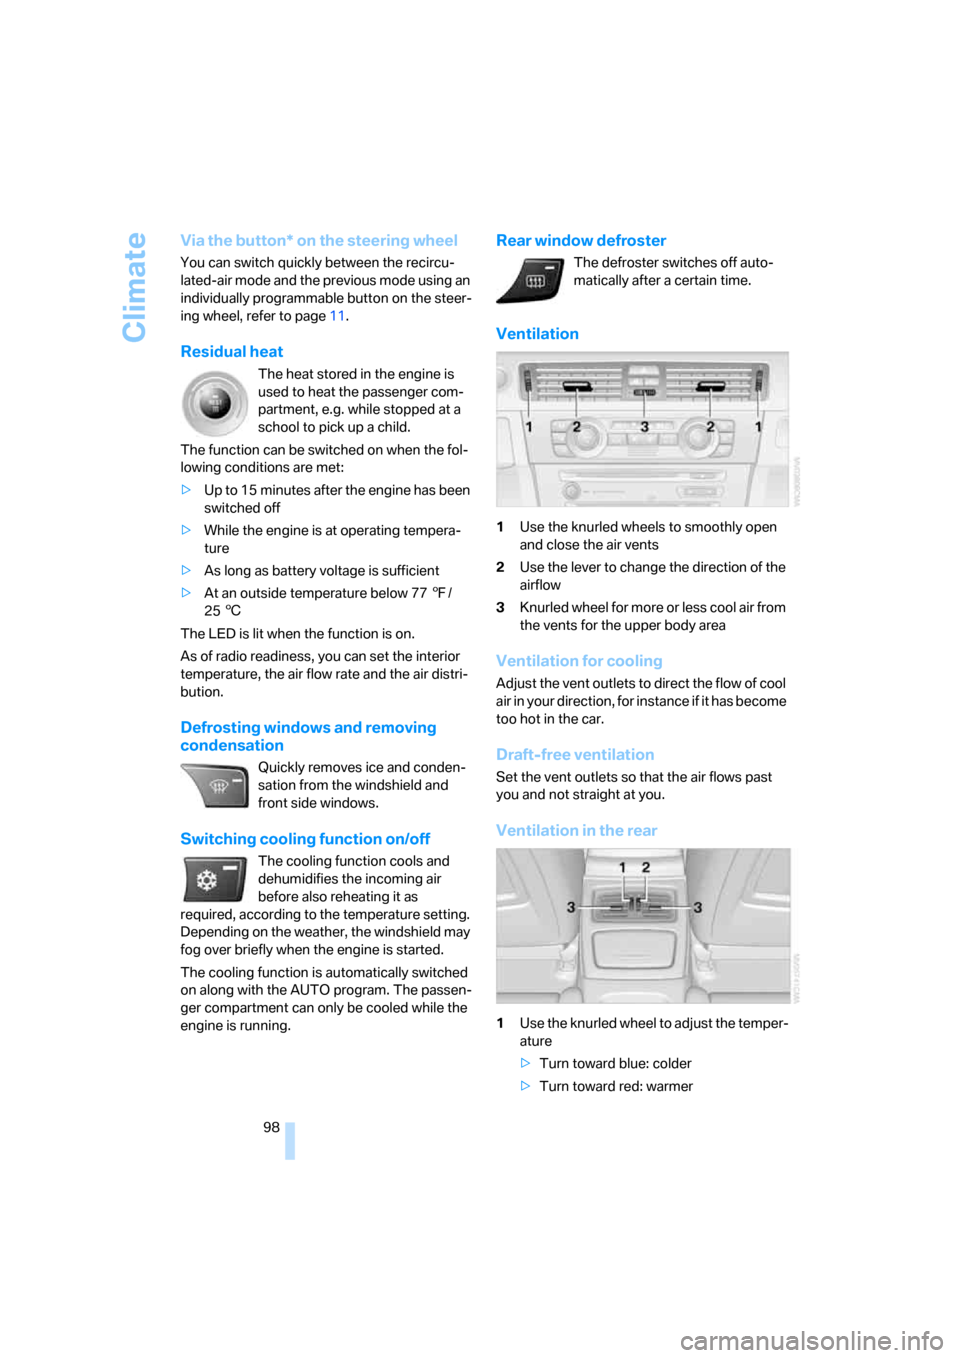
Ventilation
1Use the knurled wheels to smoothly open
and close the air vents
2Use the lever to change the direction of the
airflow
3Knurled wheel for more or less cool air from
the vents for the upper body area
Ventilation for cooling
Adjust the vent outlets to direct the flow of cool
air in your direction, for instance if it has become
too hot in the car.
Draft-free ventilation
Set the vent outlets so that the air flows past
you and not straight at you.
Ventilation in the rear
1Use the knurled wheel to adjust the temper-
ature
>Turn toward blue: colder
>Turn toward red: warmer
ba8_E9293_US.book Seite 98 Freitag, 5. Mai 2006 1:02 13
Page 114 of 239
Things to remember when driving
112
Things to remember when driving
Break-in period
Moving parts need breaking-in time to adjust to
each other. Please follow the instructions below
in order to achieve the optimal service life and
economy of operation for your vehicle.
Engine and differential
Always obey all official speed limits.
Up to 1,200 miles/2,000 km
Drive at varying engine and road speeds, but do
not exceed an engine speed of 4,500 rpm or a
road speed of 100 mph/160 km/h.
Avoid full-throttle operation and use of the
transmission's kick-down mode.
After driving 1,200 miles/2,000 km
Engine and vehicle speeds can be gradually
increased.
Tires
Due to technical factors associated with their
manufacture, tires do not achieve their full trac-
tion potential until after an initial break-in
period. Therefore, drive cautiously during the
first 200 miles/300 km.
Brake system
Brakes require an initial break-in period of
approx. 300 miles/500 km to achieve optimized
contact and wear patterns between brake pads
and rotors. Drive cautiously during this break-in
period.
Clutch
The function of the clutch reaches its optimal
level only after a distance driven of approx.
300 miles/500 km. During this break-in period,
engage the clutch gently.
Following part replacement
The same break-in procedures should be
observed if any of the components mentioned
above have to be renewed in the course of the
vehicle's operating life.
General driving notes
Close the luggage compartment lid
Operate the vehicle only when the lug-
gage compartment lid is closed. Other-
wise, exhaust fumes could enter the interior of
the vehicle.<
If special circumstances make it absolutely nec-
essary to drive with the luggage compartment
lid open:
1.Close all windows and the glass sunroof.
2.Increase the air flow rate of the automatic
climate control considerably, refer to
page97.
Hot exhaust system
In all vehicles, extremely high tempera-
tures are generated in the exhaust sys-
tem. Do not remove the heat shields installed
adjacent to various sections of the exhaust sys-
tem, and never apply undercoating to them.
When driving, standing at idle and while park-
ing, take care to avoid possible contact
between the hot exhaust system and any highly
flammable materials such as hay, leaves, grass,
etc. Such contact could lead to a fire, with the
risk of serious personal injuries and property
damage. Do not touch hot exhaust tail pipes.
Otherwise there is a risk of burns.<
Mobile phone in the vehicle
BMW discourages the use of mobile
communications devices, e.g. mobile
phones, inside the vehicle without a direct con-
nection to an outside antenna. Otherwise, the
vehicle electronics and mobile communication
ba8_E9293_US.book Seite 112 Freitag, 5. Mai 2006 1:02 13