2006 BMW 325XI TOURING turn signal
[x] Cancel search: turn signalPage 13 of 160

At a glance
Controls
Driving tips
Mobility Reference
11
7Instrument cluster12
10Ignition lock42
11Buttons
* on the steering wheel12Horn: the entire surface
13Steering wheel adjustment38
15Releasing the hood112
16Opening the tailgate
*
6
Turn signals46
High beams, headlamp flasher76
Roadside parking lamps
*76
Computer58
Settings and information about the
vehicle59
Instrument lighting76
8
Windshield wipers47
Rain sensor
*47
Rear window wiper48
9Switching the ignition on/off and
starting/stopping the engine42
Telephone
*:
>Press: accepting and ending a
call, starting dialing
* for a
selected phone number and
redialing if no phone number is
selected
>Press longer: redialing
Volume
Changing radio station
Selecting music track
Scrolling through phone book and
lists with stored phone numbers
Next entertainment source
Recirculated-air mode79
14
Cruise control
*48
Active cruise control
*50
Page 14 of 160

Cockpit
12
Instrument cluster
1Speedometer
2Indicator lamps for turn signals
3Indicator and warning lamps13
4Displays for active cruise control
*50
5Tachometer57
6Energy Control58
7Display for
>Clock57
>Outside temperature57
>Indicator and warning lamps638Display for
>Position of automatic transmission
*44
>Computer58
>Date of next scheduled service, and
remaining distance to be driven61
>Odometer and trip odometer57
>Initializing Flat Tire Monitor69
>Checking engine oil level
*113
>Settings and information59
9Fuel gauge58
10Resetting trip odometer57
Page 23 of 160

Reference
At a glance
Controls
Driving tips
Mobility
21
Unlocking the tailgate
Press the button for a longer period.
The tailgate opens a short distance, regardless
of whether it was locked or unlocked.
If you press the button on the remote
control a second time for a longer period
within three seconds, the cargo area cover is
raised
*. Before closing the tailgate, press the
cover downward until it engages.<
In order to avoid damage, make sure there
is sufficient clearance in all directions
before opening the tailgate.
A previously locked tailgate is locked again after
closing.
Before and after each trip, check that the tail-
gate has not been inadvertently unlocked.<
Setting confirmation signals
You can program the vehicle to confirm when it
has been locked or unlocked.
1.Lightly push button1 in the turn indicator
stalk up or down repeatedly until the symbol
appears in the display accompanied by the
word "SET".
2.Press button 2.3.Lightly push button1 in the turn indicator
stalk down repeatedly until the desired
symbol appears in the display.
> Confirmation signal during unlocking
> Confirmation signal during locking
4.Press button 2.
5.Use button 1 to select:
>
The hazard warning flashers light up
during unlocking/locking.
>
An acoustic signal sounds during
unlocking/locking.
>
The hazard warning flashers light up and
an acoustic signal sounds during
unlocking/locking.
>
The function is deactivated.
6.Press button 2.
The setting is stored.
Malfunctions
The remote control may malfunction due to
local radio waves. If this occurs, unlock and lock
the car at the door lock with the integrated key.
If the car can no longer be locked with a remote
control, the battery in the remote control is dis-
charged. Use this remote control during an
extended drive; this will recharge the battery,
refer to page18.
For US owners only
The transmitter and receiver units comply with
part 15 of the FCC/Federal Communications
Page 48 of 160

Driving
46 gear selected appears briefly in the instrument
cluster, followed by the gear actually in use.
To use the automatic function again, move the
selector lever to the right into position D.
Overriding selector lever lock
Should the selector lever refuse to move out of
position P although the button on the selector
lever is pressed, the selector lever lock can be
overridden:
1.Unclip the sleeve of the selector lever.
2.Pull the sleeve up over the selector lever
until the sleeve is inside out.
3.Using the screwdriver from the onboard
tool kit, refer to page119, press the red
lever while moving the selector lever to the
desired position.
Turn signals/
headlamp flasher
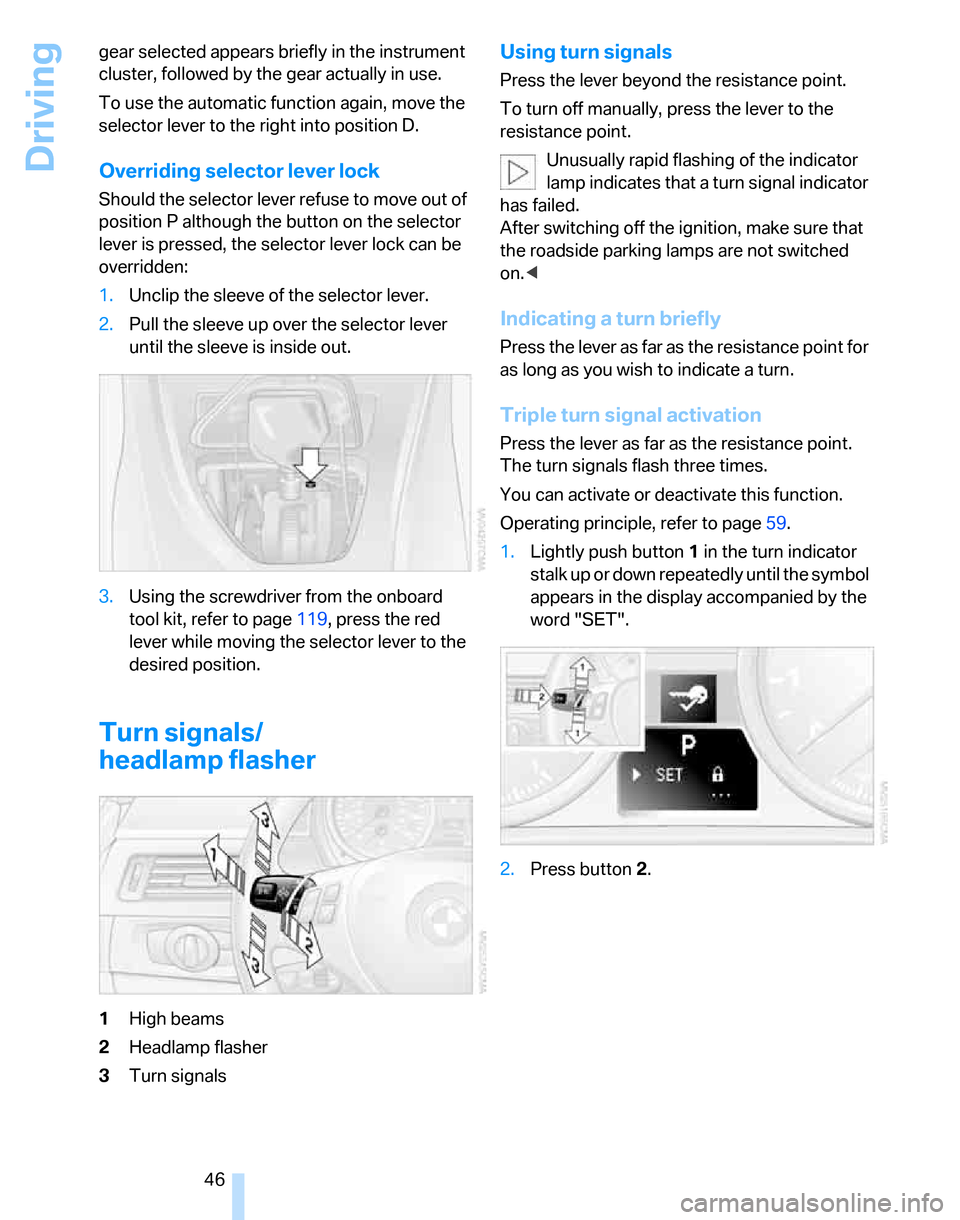
1High beams
2Headlamp flasher
3Turn signals
Using turn signals
Press the lever beyond the resistance point.
To turn off manually, press the lever to the
resistance point.
Unusually rapid flashing of the indicator
lamp indicates that a turn signal indicator
has failed.
After switching off the ignition, make sure that
the roadside parking lamps are not switched
on.<
Indicating a turn briefly
Press the lever as far as the resistance point for
as long as you wish to indicate a turn.
Triple turn signal activation
Press the lever as far as the resistance point.
The turn signals flash three times.
You can activate or deactivate this function.
Operating principle, refer to page59.
1.Lightly push button1 in the turn indicator
stalk up or down repeatedly until the symbol
appears in the display accompanied by the
word "SET".
2.Press button 2.
Page 49 of 160

Reference
At a glance
Controls
Driving tips
Mobility
47
3.Lightly push button1 in the turn indicator
stalk down repeatedly until the symbol
appears in the display.
4.Press button 2.
5.Use button 1 to select:
>
Brief indication of a turn.
>
Triple turn signal.
6.Press button 2.
The setting is stored.
Wiper system
1Switching on wipers
2Switching off wipers or brief wipe
3Activating/deactivating intermittent wipe or
rain sensor
*
4Cleaning windshield and headlamps*
5Setting speed for intermittent wipe, or sen-
sitivity of the rain sensor
Switching on wipers
The lever automatically returns to its initial posi-
tion when released.
Normal wiper speed
Press once.
The system switches to operation in the inter-
mittent mode when the vehicle is stationary.
Fast wiper speed
Press twice or press beyond the resistance
point.
The system switches to normal speed when the
vehicle is stationary.
Intermittent wipe or rain sensor*
If the car is not equipped with a rain sensor, the
intermittent-wipe time is a preset.
If the car is equipped with a rain sensor, the time
between wipes is controlled automatically and
depends on the intensity of the rainfall. The
sensor is mounted on the windshield, directly in
front of the interior rearview mirror.
Activating intermittent wipe or rain
sensor
Press button 3. The LED in the button lights up.
Setting speed for intermittent wipe or
sensitivity of the rain sensor
Slide switch5 up or down.
Deactivating intermittent wipe or rain
sensor
Press button 3 again. The LED goes out.
Deactivate the rain sensor before enter-
ing an automatic car wash. Failure to do
so could result in damage caused by undesired
wiper activation.<
Page 61 of 160

Reference
At a glance
Controls
Driving tips
Mobility
59
To reset average fuel consumption: press the
button in the turn indicator stalk for approx.
2seconds.
Settings and information
Operating principle
1Button for:
>Selecting display
>Setting values
2Button for:
>Confirming selected display or set val-
ues
>Calling up computer information58
3When the lights are switched on: instrument
lighting brightness76
4Calling up Check Control63
5Checking engine oil level*113
6Initializing the Flat Tire Monitor69
7Setting the time628Setting the date63
9Viewing service requirement display61
10Setting formats and units of measure,
resetting to factory settings60
11Adjusting settings
>Confirmation signals when locking and
unlocking the vehicle21
>Response during unlocking
procedure20
>Automatic locking22
>Pathway lighting74
>Daytime driving lamps75
>Triple turn signal activation46
>Seat and mirror memory35
Page 65 of 160

Reference
At a glance
Controls
Driving tips
Mobility
63
Date
Setting the date
To set the dd/mm or mm/dd date format, refer
to Formats and units of measure on page60.
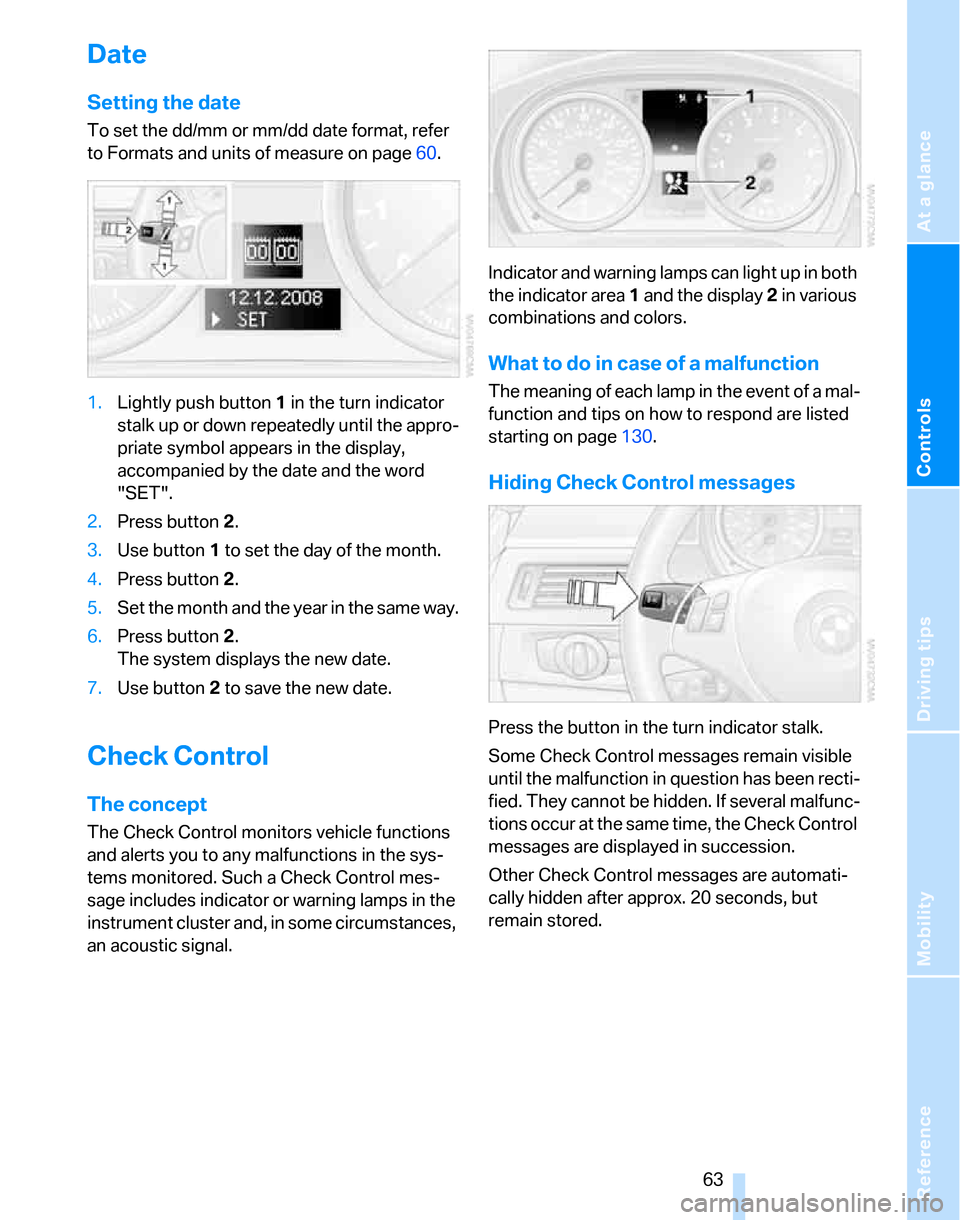
1.Lightly push button 1 in the turn indicator
stalk up or down repeatedly until the appro-
priate symbol appears in the display,
accompanied by the date and the word
"SET".
2.Press button 2.
3.Use button 1 to set the day of the month.
4.Press button 2.
5.Set the month and the yea r i n t h e s a m e w a y .
6.Press button 2.
The system displays the new date.
7.Use button 2 to save the new date.
Check Control
The concept
The Check Control monitors vehicle functions
and alerts you to any malfunctions in the sys-
tems monitored. Such a Check Control mes-
sage includes indicator or warning lamps in the
instrument cluster and, in some circumstances,
an acoustic signal.Indicator and warning lamps can light up in both
the indicator area 1 and the display 2 in various
combinations and colors.
What to do in case of a malfunction
The meaning of each lamp in the event of a mal-
function and tips on how to respond are listed
starting on page130.
Hiding Check Control messages
Press the button in the turn indicator stalk.
Some Check Control messages remain visible
until the malfunction in question has been recti-
fied. They cannot be hidden. If several malfunc-
tions occur at the same time, the Check Control
messages are displayed in succession.
Other Check Control messages are automati-
cally hidden after approx. 20 seconds, but
remain stored.
Page 122 of 160

Replacing components
120 any instructions provided by the bulb manufac-
turer.<
For care and maintenance of the headlamps,
please follow the instructions in the separate
Caring for your vehicle brochure.
If the routine for changing a particular
bulb is not described here, please contact
your BMW Center or a workshop that works
according to BMW repair procedures with cor-
respondingly trained personnel.<
Light-emitting diodes LEDs
Light-emitting diodes installed behind translu-
cent lenses serve as the light source for many of
the controls and displays in your vehicle. These
light-emitting diodes, which operate using a
concept similar to that applied in conventional
lasers, are officially designated as Class 1 light-
emitting diodes.
Do not remove the covers or expose the
eyes directly to the unfiltered light source
for several hours at a time, otherwise this could
cause irritation to the retina.<
Xenon lamps*
The service life of these bulbs is very long and
the probability of a failure is very low, provided
that they are not switched on and off an unusual
number of times. If a xenon lamp fails neverthe-
less, switch on the fog lamps and continue the
journey with great care, provided that local leg-
islation does not prohibit this.
Have work on the xenon lighting system
performed only by your BMW Center or a
workshop that works according to BMW repair
procedures with correspondingly trained per-
sonnel. Due to the high electrical voltages
present, there is a risk of potentially fatal acci-
dents if work is performed inappropriate.<
Parking lamps, roadside parking lamps
In the event of a malfunction, please contact
your BMW Center or a workshop that works
according to BMW repair procedures with cor-
respondingly trained personnel.
Halogen lamps
H7 bulb, 55 watts
Always wear gloves and eye protection;
the atmosphere within the H7 bulb is
pressurized. Otherwise there is a risk of injury if
the bulb is damaged.<
There are separate headlamp covers for low-
beam headlamps and high-beam headlamps.
Be careful when installing the covers, oth-
erwise leaks could occur and cause dam-
age to the headlamp system.<
For checking and adjusting headlamp
aim, please contact your BMW Center.<
Access to the lamps
The high-beam headlamp can be accessed
from the engine compartment, whereas the
low-beam headlamp is accessed through a flap
in the wheel well.
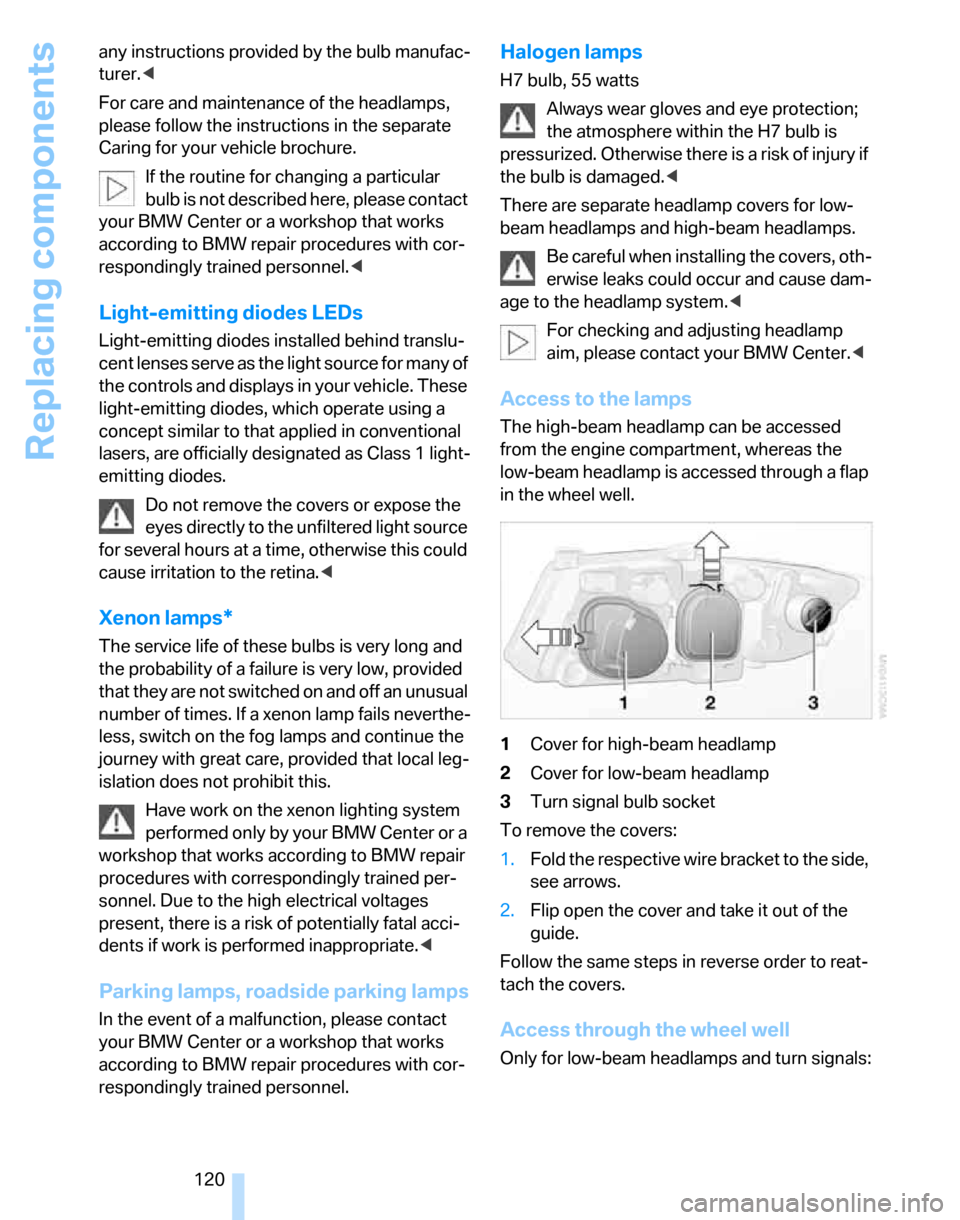
1Cover for high-beam headlamp
2Cover for low-beam headlamp
3Turn signal bulb socket
To remove the covers:
1.Fold the respective wire bracket to the side,
see arrows.
2.Flip open the cover and take it out of the
guide.
Follow the same steps in reverse order to reat-
tach the covers.
Access through the wheel well
Only for low-beam headlamps and turn signals: