2006 BMW 325XI TOURING length
[x] Cancel search: lengthPage 44 of 160

Driving
42
Driving
Ignition lock
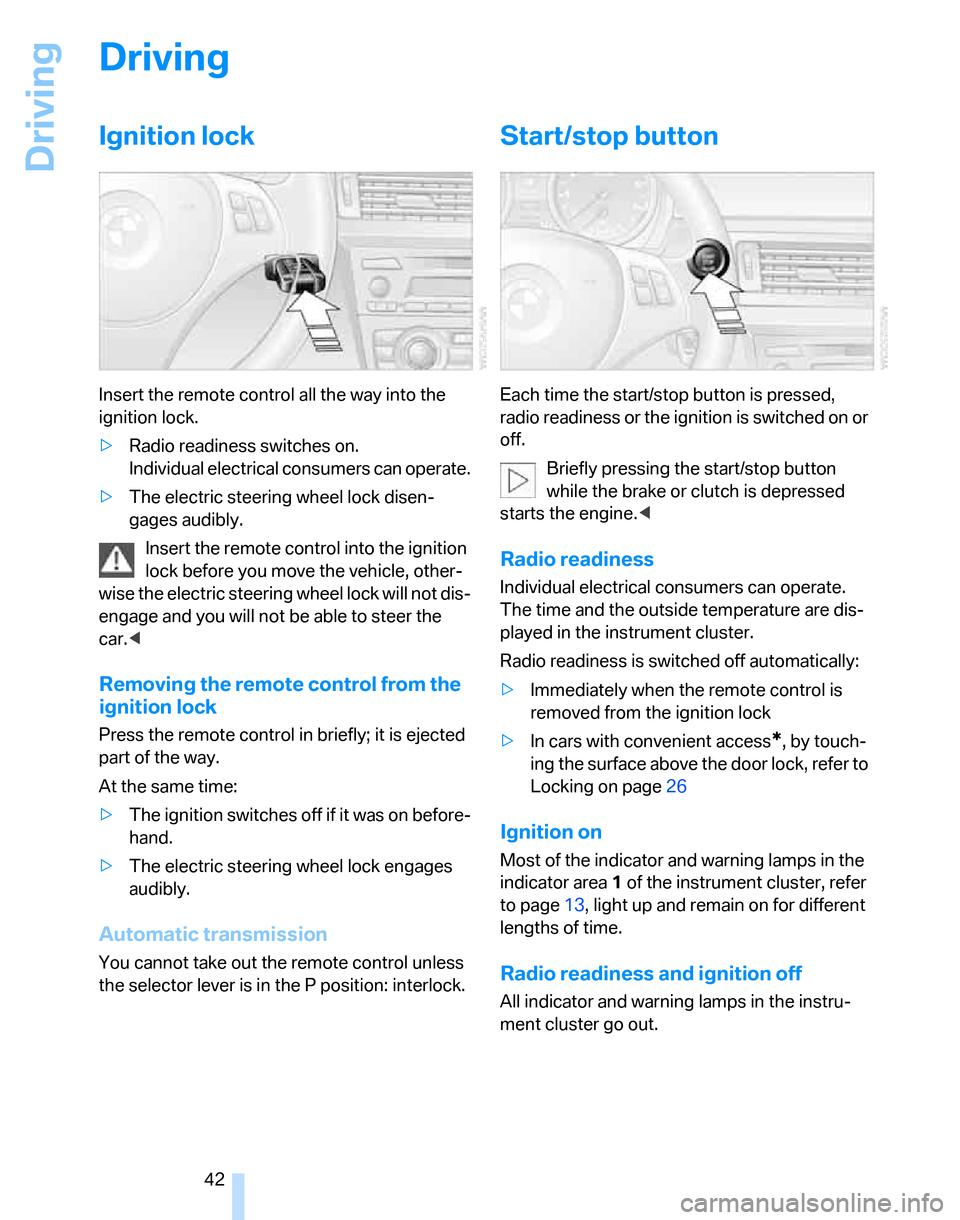
Insert the remote control all the way into the
ignition lock.
>Radio readiness switches on.
Individual electrical consumers can operate.
>The electric steering wheel lock disen-
gages audibly.
Insert the remote control into the ignition
lock before you move the vehicle, other-
wise the electric steering wheel lock will not dis-
engage and you will not be able to steer the
car.<
Removing the remote control from the
ignition lock
Press the remote control in briefly; it is ejected
part of the way.
At the same time:
>The ignition switches off if it was on before-
hand.
>The electric steering wheel lock engages
audibly.
Automatic transmission
You cannot take out the remote control unless
the selector lever is in the P position: interlock.
Start/stop button
Each time the start/stop button is pressed,
radio readiness or the ignition is switched on or
off.
Briefly pressing the start/stop button
while the brake or clutch is depressed
starts the engine.<
Radio readiness
Individual electrical consumers can operate.
The time and the outside temperature are dis-
played in the instrument cluster.
Radio readiness is switched off automatically:
>Immediately when the remote control is
removed from the ignition lock
>In cars with convenient access
*, by touch-
ing the surface above the door lock, refer to
Locking on page26
Ignition on
Most of the indicator and warning lamps in the
indicator area1 of the instrument cluster, refer
to page13, light up and remain on for different
lengths of time.
Radio readiness and ignition off
All indicator and warning lamps in the instru-
ment cluster go out.
Page 71 of 160

Reference
At a glance
Controls
Driving tips
Mobility
69
Drive-off assistant
The drive-off assistant enables you to drive off
smoothly on uphill gradients. It is not necessary
to use the handbrake for this.
1.Hold the car in place by depressing the
brake.
2.Release the brake and drive off without
delay.
The drive-off assistant holds the car in
place for approx. 2 seconds after the
brake is released. Depending on vehicle load,
the car may roll backwards a little during this
time span. Drive off without delay after releas-
ing the brake. Otherwise, the drive-off assistant
will no longer hold the car in place after approx.
2 seconds and the car will start to roll back-
wards.<
Malfunction
The warning lamps for the brake sys-
tem light up in yellow. The drive-off
assistant has failed. The car will not
be held in place after the brake is
released. Have the system checked as soon as
possible.
Canadian models display these warn-
ing lamps.
Flat Tire Monitor FTM
The concept
The Flat Tire Monitor monitors tire pressures
while the car is being driven. The system
reports any significant loss of pressure in one
tire in relation to another.
If a tire loses pressure, its rolling radius
changes, and this in turn alters the speed of
rotation. This change is detected and is
reported as a flat tire.
Functional requirement
In order to assure the reliable reporting of a flat
tire, the system must be initialized for the cor-
rect tire inflation pressure.The system must be reinitialized each
time a tire inflation pressure has been cor-
rected or a wheel or tire has been changed.<
System limitations
The Flat Tire Monitor is unable to warn
the driver of sudden, severe tire damage
caused by external factors, nor can it identify
the gradual loss of pressure that will inevitably
occur in all four tires over a lengthy period of
time.<
In the following situations, the system could be
delayed or malfunction:
>System has not been initialized
>Driving on snowy or slippery road surface
>Performance-oriented style of driving: slip
in the drive wheels, high lateral acceleration
>If snow chains are attached
Initializing the system
The initialization is completed during driv-
ing, which can be interrupted at any time.
When driving resumes, the initialization is con-
tinued automatically.
Do not initialize the system while snow chains
are attached.<
Operating principle, refer to page59.
1.Start the engine immediately before pulling
away, but do not drive off yet.
2.Lightly push button 1 in the turn indicator
stalk up or down repeatedly until the appro-
priate symbol appears in the display,
accompanied by the word "INIT".
3.Press button 2 t o c o n f i r m y o u r c h o i c e o f t h e
Flat Tire Monitor.
Page 81 of 160

Reference
At a glance
Controls
Driving tips
Mobility
79
Air conditioner
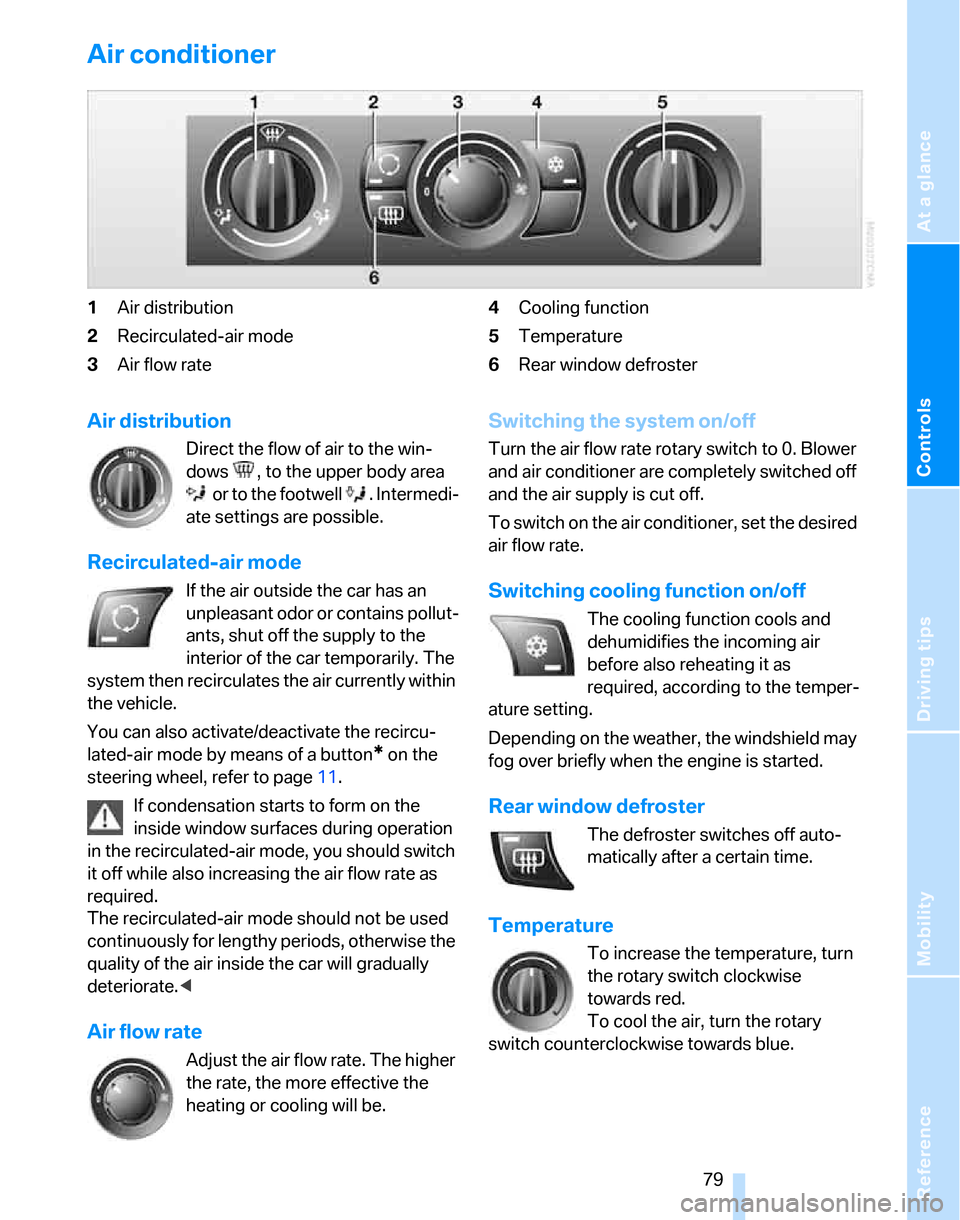
1Air distribution
2Recirculated-air mode
3Air flow rate4Cooling function
5Temperature
6Rear window defroster
Air distribution
Direct the flow of air to the win-
dows , to the upper body area
or to the footwell . Intermedi-
ate settings are possible.
Recirculated-air mode
If the air outside the car has an
unpleasant odor or contains pollut-
ants, shut off the supply to the
interior of the car temporarily. The
system then recirculates the air currently within
the vehicle.
You can also activate/deactivate the recircu-
lated-air mode by means of a button
* on the
steering wheel, refer to page11.
If condensation starts to form on the
inside window surfaces during operation
in the recirculated-air mode, you should switch
it off while also increasing the air flow rate as
required.
The recirculated-air mode should not be used
continuously for lengthy periods, otherwise the
quality of the air inside the car will gradually
deteriorate.<
Air flow rate
Adjust the air flow rate. The higher
the rate, the more effective the
heating or cooling will be.
Switching the system on/off
Turn the air flow rate rotary switch to 0. Blower
and air conditioner are completely switched off
and the air supply is cut off.
To switch on the air conditioner, set the desired
air flow rate.
Switching cooling function on/off
The cooling function cools and
dehumidifies the incoming air
before also reheating it as
required, according to the temper-
ature setting.
Depending on the weather, the windshield may
fog over briefly when the engine is started.
Rear window defroster
The defroster switches off auto-
matically after a certain time.
Temperature
To increase the temperature, turn
the rotary switch clockwise
towards red.
To cool the air, turn the rotary
switch counterclockwise towards blue.
Page 94 of 160

Practical interior accessories
92
Folding up the cargo area floor panel
Fold up the cargo area floor panel and take it out
or lean it forward.
Do not exceed the maximum permissible
load of 55 lbs/25 kg for the storage com-
partment under the floor panel, otherwise dam-
age could result.<
Lashing eyes
You will find lashing eyes in the cargo area for
securing luggage items with nets or tensioning
straps, refer to page99.
Ski bag*
Designed for safe, clean transport of up to
4 pairs of standard skis or up to 2 snowboards.
With the ski bag you can stow skis with a length
of up to 6 ft 10 in/2.10 m. When skis of 6 ft 10 in/
2.10 m length are loaded, the overall capacity of
the ski bag is reduced due to its tapered design.
Loading
1.Fold down the center armrest.
2.Press the button, reach into the recess and
fold down the cover.3.Open the Velcro fastener, spread the ski
bag between the front seats and insert the
skis or snowboards.
The zip fastener makes objects in the ski
bag easier to reach.
4.Insert the latch plate of the ski bag's retain-
ing strap in the center belt buckle.
Make sure to load only clean skis into the ski
bag. Wrap sharp edges to prevent damage.
Securing cargo
After loading, secure the ski bag and its con-
tents. Tighten the retaining strap on the ten-
sioning buckle for this purpose.
Secure the ski bag in the manner
described, otherwise it could endanger
the car's occupants, e.g. in case of heavy brak-
ing or sudden swerving.<
To store the ski bag, perform the steps
described for loading in reverse order.
Removing the ski bag
The ski bag can be completely removed, e.g. for
faste r drying or to allow you to use other inserts.
Page 153 of 160

Reference
At a glance
Controls
Driving tips
Mobility
151
I
Ice warning57
Ignition42
– switched off42
– switched on42
Ignition key, refer to
Integrated key/remote
control18
Ignition key position 1, refer to
Radio readiness42
Ignition key position 2, refer to
Ignition on42
Ignition lock42
Indicator and warning
lamps13,130
Individual air distribution79
Individual settings, refer to
Personal Profile19
Initializing
– compass, refer to
Calibrating86
– Flat Tire Monitor FTM69
– panorama glass roof30
Instrument cluster12
Instrument lighting76
Instrument panel, refer to
Cockpit10
Integrated key18
Integrated universal remote
control84
Interior lamps77
– remote control20
Interior motion sensor25
Interior rearview mirror37
– automatic dimming
feature97
Interior rearview mirror with
digital compass85
Interlock45
Intermittent mode of the
wipers47
J
Jacking points123
Jumpering, refer to Jump
starting126
Jump starting126
K
Key, refer to Integrated key/
remote control18
Keyless Go, refer to
Convenient access26
Keyless opening and closing,
refer to Convenient
access26
Key Memory, refer to Personal
Profile19
Kick-down45
– automatic transmission with
Steptronic45
Knock control105
L
Lamps, refer to Parking lamps/
low beams74
Lamps and bulbs, replacing
bulbs119
Lap-and-shoulder safety
belt36
Lashing eyes, refer to
Securing cargo99
LATCH child-restraint fixing
system40
LEDs light-emitting
diodes120
Length, refer to
Dimensions143
License plate lamp, replacing
bulbs123
Light-emitting diodes
LEDs120
Lighter89
Lighting
– instruments76
– lamps and bulbs119
– of the vehicle, refer to
Lamps74
Light switch74
Limit138
Loading
– securing cargo99
Load securing equipment,
refer to Securing cargo99Lock buttons in the doors,
refer to Locking23
Locking
– adjusting confirmation
signal21
– from inside23
– from outside20
– without remote control, refer
to Convenient access26
Locking and unlocking doors
– from inside22
– from outside20
Low beams74
– automatic74
– replacing bulbs120
Lower back support, refer to
Lumbar support32
Luggage compartment
– capacity144
– opening from inside23
Luggage compartment, refer
to Cargo area23
Luggage compartment net,
refer to Cargo area net90
Luggage compartment net,
refer to Securing cargo99
Luggage rack, refer to Roof-
mounted luggage rack99
Lumbar support32
M
M+S tires, refer to Winter
tires111
Maintenance, refer to Service
Booklet
Maintenance system117
Malfunction warnings, refer to
Check Control63
Manual air distribution79
Manual mode
– automatic transmission with
Steptronic45