2006 BMW 325XI TOURING Rear light
[x] Cancel search: Rear lightPage 79 of 160
Reference
At a glance
Controls
Driving tips
Mobility
77
the display, accompanied by the brightness
and the word "SET".
2.Press button 2.
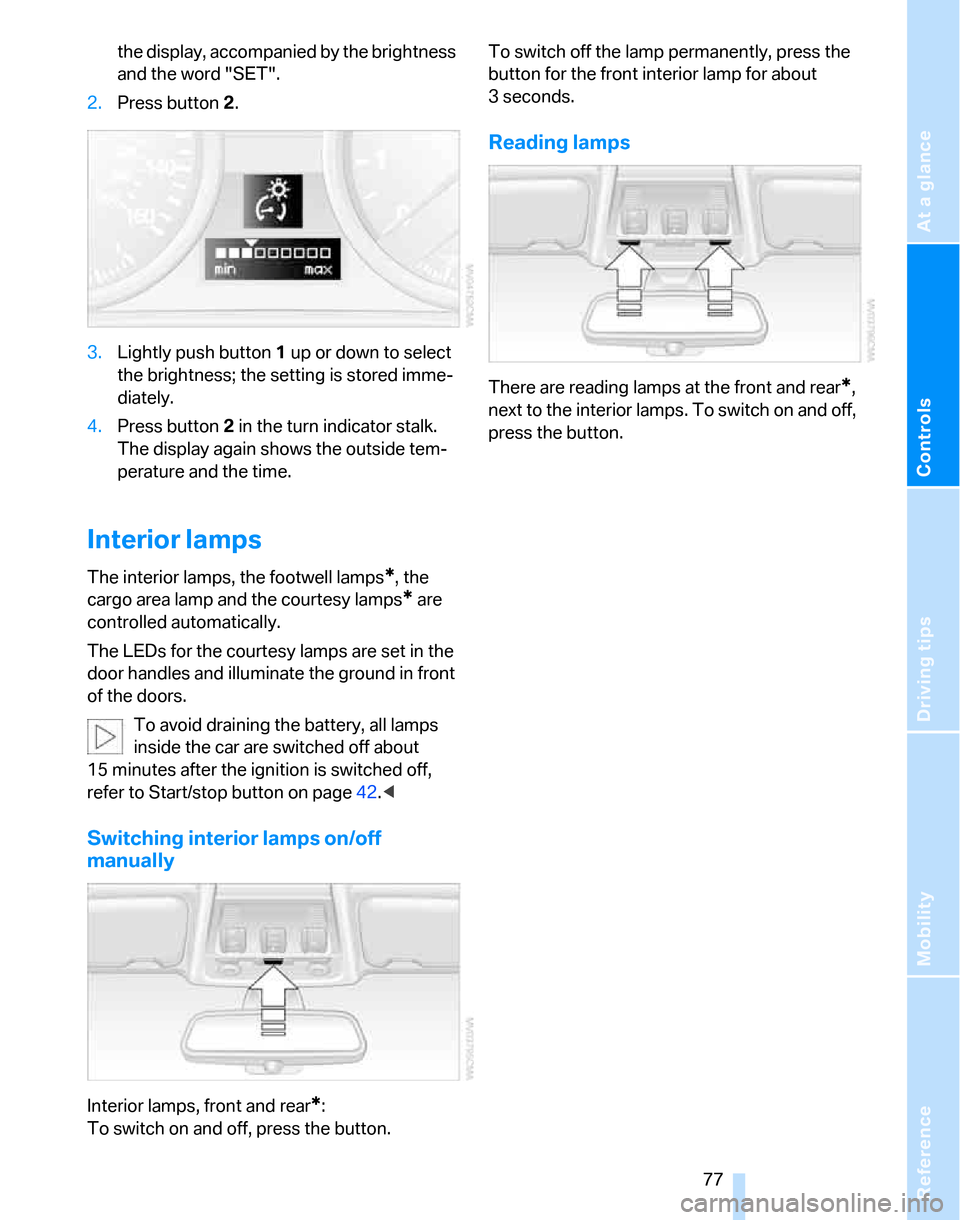
3.Lightly push button 1 up or down to select
the brightness; the setting is stored imme-
diately.
4.Press button 2 in the turn indicator stalk.
The display again shows the outside tem-
perature and the time.
Interior lamps
The interior lamps, the footwell lamps*, the
cargo area lamp and the courtesy lamps
* are
controlled automatically.
The LEDs for the courtesy lamps
are set in the
door handles and illuminate the ground in front
of the doors.
To avoid draining the battery, all lamps
inside the car are switched off about
15 minutes after the ignition is switched off,
refer to Start/stop button on page42.<
Switching interior lamps on/off
manually
Interior lamps, front and rear*:
To switch on and off, press the button.To switch off the lamp permanently, press the
button for the front interior lamp for about
3seconds.
Reading lamps
There are reading lamps at the front and rear*,
next to the interior lamps. To switch on and off,
press the button.
Page 89 of 160

Reference
At a glance
Controls
Driving tips
Mobility
87
Glove compartment
Opening
Pull the handle.
The light in the glove compartment switches
on.
Closing
Fold the cover up.
To prevent injury in the event of an acci-
dent while the vehicle is being driven,
close the glove compartment immediately after
use.<
Locking
To lock the glove compartment, use the inte-
grated key of the remote control or the spare
key, refer to page18.
Rechargeable flashlight*
It is on the left-hand side of the glove compart-
ment. The flashlight can remain plugged in.
Whenever required, pull the flashlight out of its
socket.
Only insert the flashlight back into the
socket when it is switched off, otherwise
there is a risk of damage.<
Center armrest
Storage compartment
The center armrest between the front seats
contains either a compartment or the cover for
the snap-in adapter
*, depending on the equip-
ment version.
Opening
Press the button, see arrow.
The lid opens.
Ventilated storage compartment
The storage compartment in the center armrest
can be ventilated: slide the switch backwards.
The temperature is controlled via the knurled
wheel for adjusting the temperature of air venti-
lating the rear of the passenger compartment,
refer to page83.
Connection for external audio device
You can connect an external audio device such
as a CD or MP3 player and play audio tracks
over the car's loudspeaker system. You can set
the volume and tone by means of the car radio,
refer to the separate Owner's Manual for Radio.
Page 91 of 160

Reference
At a glance
Controls
Driving tips
Mobility
89
Emptying
Lift out the insert.
Lighter
With the engine running or the ignition switched
on, press in the cigarette lighter.
The lighter can be removed as soon as it pops
back out.
Hold or touch the hot cigarette lighter by
the knob only. Holding or touching it in
other areas could result in burns.
When leaving the car, always remove the
remote control so that children cannot operate
the cigarette lighter and possibly burn them-
selves.<
Ashtray, rear
Opening
Push the ridge on the cover.
Emptying
Lift out the insert.
Connecting electrical
appliances
In your BMW, you can use electrical devices
such as a flashlight, car vacuum cleaner, etc., up
to approx. 200 watts at 12 volts, as long as one
of the following sockets is available. Avoid dam-
aging the sockets by attempting to insert plugs
of unsuitable shape or size.
Cigarette lighter socket*
Pull the cigarette lighter out of the socket, refer
to page89.
Socket in the center armrest
External audio device, refer to page87.
Sockets in the rear center console*
Remove corresponding cover.
Page 99 of 160
Reference
At a glance
Controls
Driving tips
Mobility
97
there is no assurance that the radiation which
results from transmission will be dissipated
from the vehicle interior.<
Interior and exterior mirrors, automatic
dimming feature*
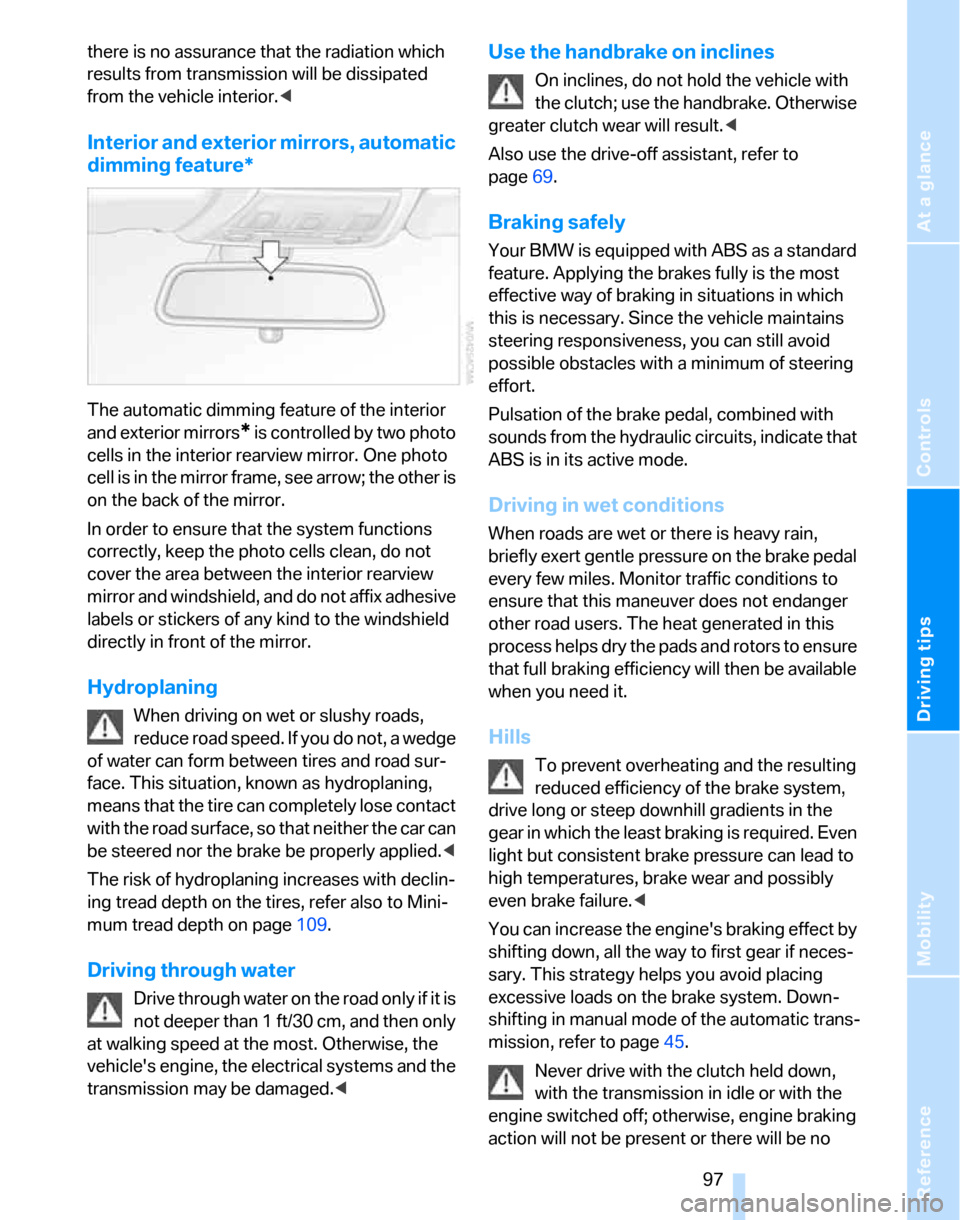
The automatic dimming feature of the interior
and exterior mirrors
* is controlled by two photo
cells in the interior rearview mirror. One photo
cell is in the mirror frame, see arrow; the other is
on the back of the mirror.
In order to ensure that the system functions
correctly, keep the photo cells clean, do not
cover the area between the interior rearview
mirror and windshield, and do not affix adhesive
labels or stickers of any kind to the windshield
directly in front of the mirror.
Hydroplaning
When driving on wet or slushy roads,
reduce road speed. If you do not, a wedge
of water can form between tires and road sur-
face. This situation, known as hydroplaning,
means that the tire can completely lose contact
with the road surface, so that neither the car can
be steered nor the brake be properly applied.<
The risk of hydroplaning increases with declin-
ing tread depth on the tires, refer also to Mini-
mum tread depth on page109.
Driving through water
Drive through water on the road only if it is
not deeper than 1 ft/30 cm, and then only
at walking speed at the most. Otherwise, the
vehicle's engine, the electrical systems and the
transmission may be damaged.<
Use the handbrake on inclines
On inclines, do not hold the vehicle with
the clutch; use the handbrake. Otherwise
greater clutch wear will result.<
Also use the drive-off assistant, refer to
page69.
Braking safely
Your BMW is equipped with ABS as a standard
feature. Applying the brakes fully is the most
effective way of braking in situations in which
this is necessary. Since the vehicle maintains
steering responsiveness, you can still avoid
possible obstacles with a minimum of steering
effort.
Pulsation of the brake pedal, combined with
sounds from the hydraulic circuits, indicate that
ABS is in its active mode.
Driving in wet conditions
When roads are wet or there is heavy rain,
briefly exert gentle pressure on the brake pedal
every few miles. Monitor traffic conditions to
ensure that this maneuver does not endanger
other road users. The heat generated in this
process helps dry the pads and rotors to ensure
that full braking efficiency will then be available
when you need it.
Hills
To prevent overheating and the resulting
reduced efficiency of the brake system,
drive long or steep downhill gradients in the
gear in which the least braking is required. Even
light but consistent brake pressure can lead to
high temperatures, brake wear and possibly
even brake failure.<
You can increase the engine's braking effect by
shifting down, all the way to first gear if neces-
sary. This strategy helps you avoid placing
excessive loads on the brake system. Down-
shifting in manual mode of the automatic trans-
mission, refer to page45.
Never drive with the clutch held down,
with the transmission in idle or with the
engine switched off; otherwise, engine braking
action will not be present or there will be no
Page 101 of 160
Reference
At a glance
Controls
Driving tips
Mobility
99
Load
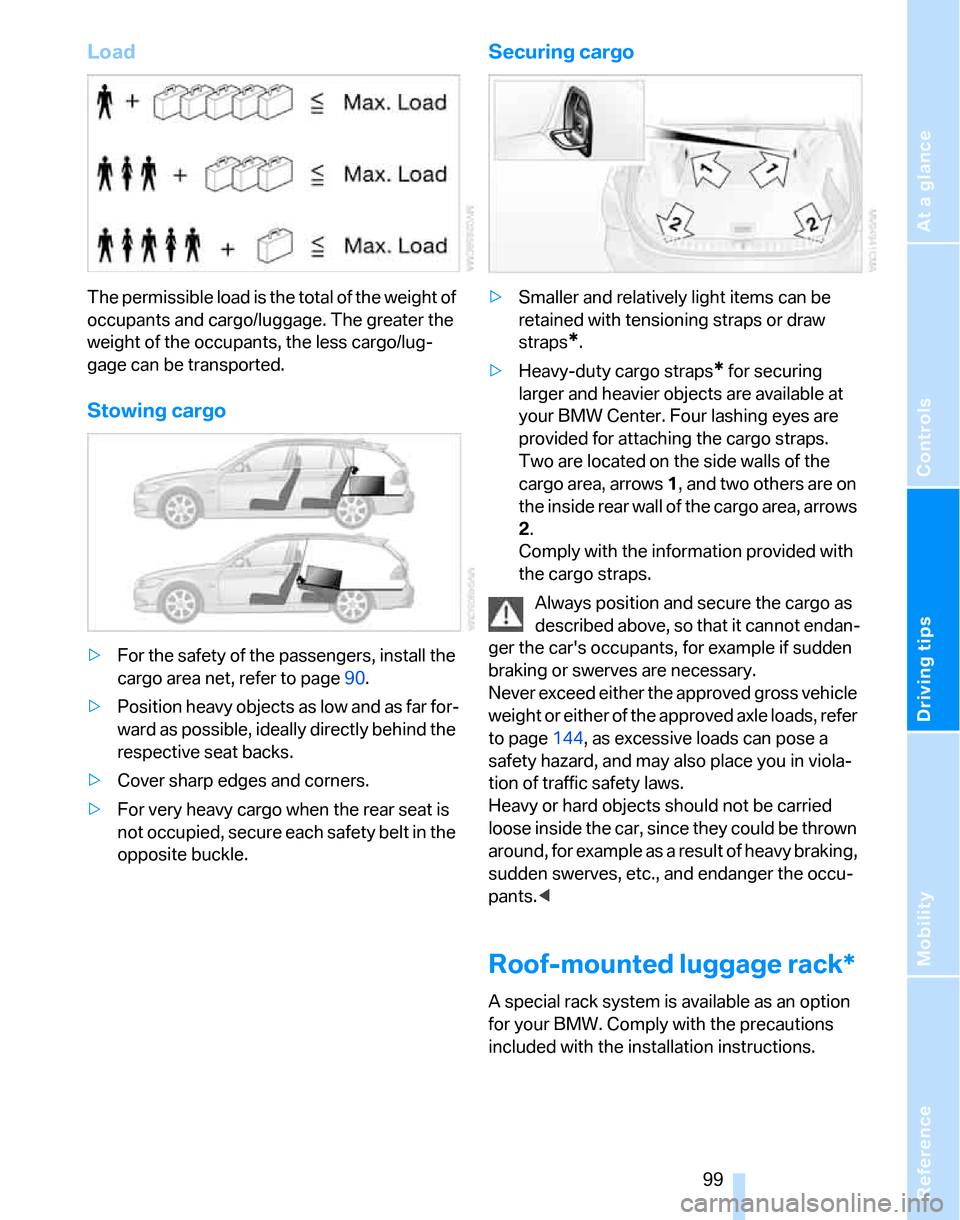
The permissible load is the total of the weight of
occupants and cargo/luggage. The greater the
weight of the occupants, the less cargo/lug-
gage can be transported.
Stowing cargo
>For the safety of the passengers, install the
cargo area net, refer to page90.
>Position heavy objects as low and as far for-
ward as possible, ideally directly behind the
respective seat backs.
>Cover sharp edges and corners.
>For very heavy cargo when the rear seat is
not occupied, secure each safety belt in the
opposite buckle.
Securing cargo
>Smaller and relatively light items can be
retained with tensioning straps or draw
straps
*.
>Heavy-duty cargo straps
* for securing
larger and heavier objects are available at
your BMW Center. Four lashing eyes are
provided for attaching the cargo straps.
Two are located on the side walls of the
cargo area, arrows 1, and two others are on
the inside rear wall of the cargo area, arrows
2.
Comply with the information provided with
the cargo straps.
Always position and secure the cargo as
described above, so that it cannot endan-
ger the car's occupants, for example if sudden
braking or swerves are necessary.
Never exceed either the approved gross vehicle
weight or either of the approved axle loads, refer
to page144, as excessive loads can pose a
safety hazard, and may also place you in viola-
tion of traffic safety laws.
Heavy or hard objects should not be carried
loose inside the car, since they could be thrown
around, for example as a result of heavy braking,
sudden swerves, etc., and endanger the occu-
pants.<
Roof-mounted luggage rack*
A special rack system is available as an option
for your BMW. Comply with the precautions
included with the installation instructions.
Page 106 of 160
Refueling
104
Refueling
Always switch off the engine before refu-
eling, otherwise, fuel cannot be added to
the tank and a message will be displayed.<
Take all precautionary measures and
observe all applicable regulations when
handling fuel. Do not carry any spare fuel con-
tainers in your vehicle. They can develop a leak
and cause an explosion or cause a fire in the
event of an accident.<
Gas cap
Opening
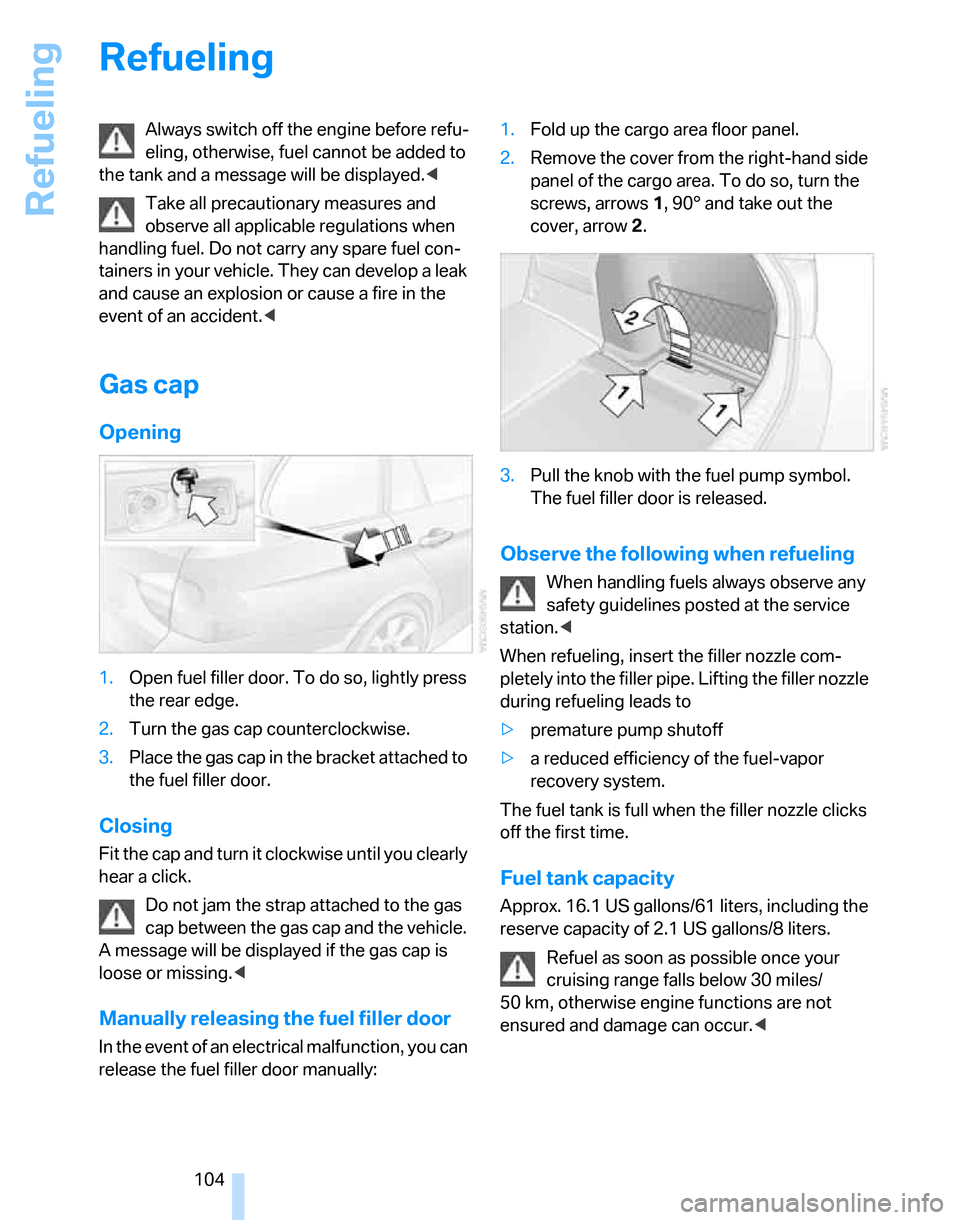
1.Open fuel filler door. To do so, lightly press
the rear edge.
2.Turn the gas cap counterclockwise.
3.Place the gas cap in the bracket attached to
the fuel filler door.
Closing
Fit the cap and turn it clockwise until you clearly
hear a click.
Do not jam the strap attached to the gas
cap between the gas cap and the vehicle.
A message will be displayed if the gas cap is
loose or missing.<
Manually releasing the fuel filler door
In the event of an electrical malfunction, you can
release the fuel filler door manually:1.Fold up the cargo area floor panel.
2.Remove the cover from the right-hand side
panel of the cargo area. To do so, turn the
screws, arrows 1, 90° and take out the
cover, arrow 2.
3.Pull the knob with the fuel pump symbol.
The fuel filler door is released.
Observe the following when refueling
When handling fuels always observe any
safety guidelines posted at the service
station.<
When refueling, insert the filler nozzle com-
pletely into the filler pipe. Lifting the filler nozzle
during refueling leads to
>premature pump shutoff
>a reduced efficiency of the fuel-vapor
recovery system.
The fuel tank is full when the filler nozzle clicks
off the first time.
Fuel tank capacity
Approx. 16.1 US gallons/61 liters, including the
reserve capacity of 2.1 US gallons/8 liters.
Refuel as soon as possible once your
cruising range falls below 30 miles/
50 km, otherwise engine functions are not
ensured and damage can occur.<
Page 113 of 160
Reference
At a glance
Controls
Driving tips
Mobility
111
Run-Flat Tires
When mounting new tires or changing over
from summer to winter tires and vice versa,
mount Run-Flat Tires for your own safety. In the
event of a flat, moreover, no spare wheel is
available. Your BMW Center will be glad to
advise you.
For safety reasons, BMW recommends
that damaged Run-Flat Tires be replaced
rather than repaired.<
Special characteristics of winter tires
BMW recommends winter tires for use in cold
winter driving conditions. Although all-season
M+S tires provide better winter traction than
summer tires, they generally fail to provide the
same levels of cold-weather performance as
winter tires.
Pay attention to speed
Always comply with the speed limit for the
winter tires mounted on your car; failure
to do so could result in tire damage and acci-
dents.<
If the car is capable of speeds higher than that
permitted for the winter tires, a label stating the
maximum permitted speed for the mounted
tires must be displayed in your field of view.
Specialist tire dealers and your BMW Center
can supply these labels.
Storage
Always store wheels and tires in a cool, dry
place with as little exposure to light as possible.
Always protect tires against all contact with oil,
grease and fuels. Do not exceed the maximum
tire inflation pressure indicated on the sidewall
of the tire.
Snow chains*
Only certain fine-link snow chains have been
tested by BMW, classified as safe for use and
recommended. Consult your BMW Center for
more information. Attach snow chains in pairs
and only to the rear wheels. Observe the manu-facturer's instructions when mounting snow
chains. Do not exceed a speed of 30 mph or
50 km/h.
You are not permitted to mount snow chains to
tires of the following sizes:
>255/40 R 17
>255/35 R 18
>255/30 R 19
Do not initialize the Flat Tire Monitor if
snow chains are mounted, otherwise the
instrument might issue an incorrect reading.
When driving with snow chains, you may find it
helpful to activate DTC temporarily, refer to
page66.<
Page 129 of 160
Reference
At a glance
Controls
Driving tips
Mobility
127
Your BMW has a special nut as body ground
or negative pole.
5.Attach the second terminal clamp of the
minus/– jumper cable to the negative termi-
nal of the battery or to the engine or body
ground of the vehicle to be started.
Starting the engine
1.Start the engine of the donor vehicle and
allow it to run for a few minutes at slightly
increased idle speed.
2.Start the engine on the other vehicle in the
usual way.
If the first start attempt is not successful,
wait a few minutes before another attempt
in order to allow the discharged battery to
recharge.
3.Let the engines run for a few minutes.
4.Disconnect the jumper cables by reversing
the above connecting sequence.
If necessary, have the battery checked and
recharged.
Never use spray fluids to start the
engine.<
Tow-starting, towing away
Observe the applicable laws and regula-
tions for tow-starting and towing vehi-
cles.<
Do not transport any occupants other
than the driver in a vehicle that is being
towed.<
Using a tow fitting
The screw-in tow fitting must always be carried
in the car. It can be screwed in at the front or
rear of the BMW.
It is stored in the onboard tool kit underneath
the cover on the right-hand side of the cargo
area, refer to page119.
Use only the tow fitting provided with the
vehicle and screw it all the way in. Use the
tow fitting for towing on paved roads only. Avoid
lateral loading of the tow fitting, e.g. do not lift
the vehicle by the tow fitting. Otherwise the tow
fitting and the vehicle could be damaged.<
Access to screw thread
Rectangular cover panel in bumper:
Press on the upper edges of the cover panel.
Front
Rear
Being towed
Check that the car is radio-ready and that
the electric steering wheel lock is not
engaged, otherwise the car would not be steer-
able. If the electrical system fails, do not
attempt to tow-start or tow away the car. The
electric steering wheel lock cannot be disen-