2006 BMW 325XI TOURING Rear light
[x] Cancel search: Rear lightPage 49 of 160

Reference
At a glance
Controls
Driving tips
Mobility
47
3.Lightly push button1 in the turn indicator
stalk down repeatedly until the symbol
appears in the display.
4.Press button 2.
5.Use button 1 to select:
>
Brief indication of a turn.
>
Triple turn signal.
6.Press button 2.
The setting is stored.
Wiper system
1Switching on wipers
2Switching off wipers or brief wipe
3Activating/deactivating intermittent wipe or
rain sensor
*
4Cleaning windshield and headlamps*
5Setting speed for intermittent wipe, or sen-
sitivity of the rain sensor
Switching on wipers
The lever automatically returns to its initial posi-
tion when released.
Normal wiper speed
Press once.
The system switches to operation in the inter-
mittent mode when the vehicle is stationary.
Fast wiper speed
Press twice or press beyond the resistance
point.
The system switches to normal speed when the
vehicle is stationary.
Intermittent wipe or rain sensor*
If the car is not equipped with a rain sensor, the
intermittent-wipe time is a preset.
If the car is equipped with a rain sensor, the time
between wipes is controlled automatically and
depends on the intensity of the rainfall. The
sensor is mounted on the windshield, directly in
front of the interior rearview mirror.
Activating intermittent wipe or rain
sensor
Press button 3. The LED in the button lights up.
Setting speed for intermittent wipe or
sensitivity of the rain sensor
Slide switch5 up or down.
Deactivating intermittent wipe or rain
sensor
Press button 3 again. The LED goes out.
Deactivate the rain sensor before enter-
ing an automatic car wash. Failure to do
so could result in damage caused by undesired
wiper activation.<
Page 50 of 160

Driving
48
Cleaning windshield and headlamps*
Pull lever 4.
Washer fluid is sprayed onto the windshield and
the wipers are operated for a short time.
When the vehicle lighting system is switched
on, the headlamps are cleaned at regular and
appropriate intervals.
Do not use the washers if there is any
danger that the fluid will freeze on the
windshield. If you do, your vision could be
obscured. Antifreeze should therefore be
added to the fluid, refer to Washer fluid.
Do not use the washers when the washer fluid
reservoir is empty, otherwise you will damage
the washer pump.<
Windshield washer nozzles
The windshield washer nozzles are heated
automatically while the engine is running or the
ignition switched on.
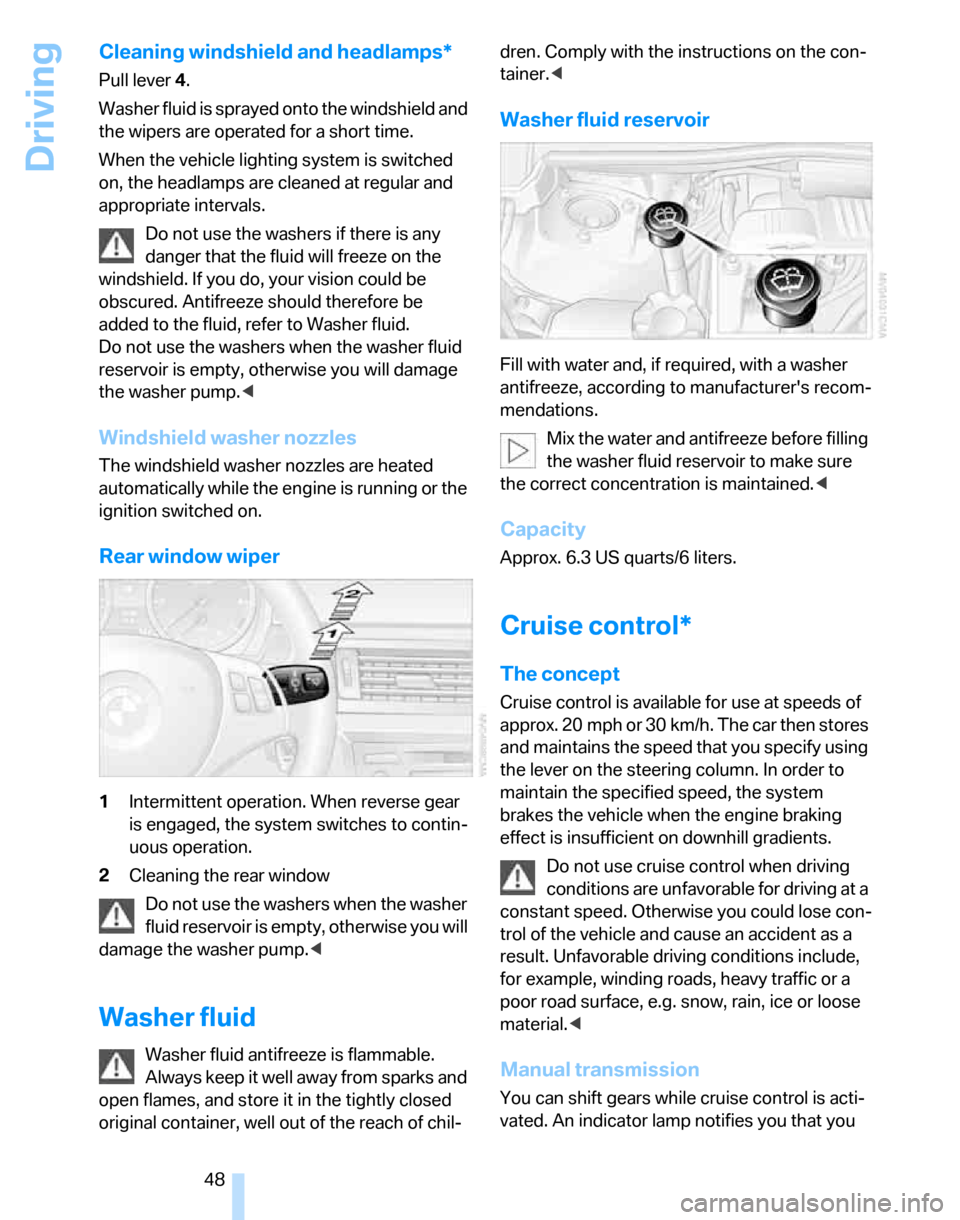
Rear window wiper
1Intermittent operation. When reverse gear
is engaged, the system switches to contin-
uous operation.
2Cleaning the rear window
Do not use the washers when the washer
fluid reservoir is empty, otherwise you will
damage the washer pump.<
Washer fluid
Washer fluid antifreeze is flammable.
Always keep it well away from sparks and
open flames, and store it in the tightly closed
original container, well out of the reach of chil-dren. Comply with the instructions on the con-
tainer.<
Washer fluid reservoir
Fill with water and, if required, with a washer
antifreeze, according to manufacturer's recom-
mendations.
Mix the water and antifreeze before filling
the washer fluid reservoir to make sure
the correct concentration is maintained.<
Capacity
Approx. 6.3 US quarts/6 liters.
Cruise control*
The concept
Cruise control is available for use at speeds of
approx. 20 mph or 30 km/h. The car then stores
and maintains the speed that you specify using
the lever on the steering column. In order to
maintain the specified speed, the system
brakes the vehicle when the engine braking
effect is insufficient on downhill gradients.
Do not use cruise control when driving
conditions are unfavorable for driving at a
constant speed. Otherwise you could lose con-
trol of the vehicle and cause an accident as a
result. Unfavorable driving conditions include,
for example, winding roads, heavy traffic or a
poor road surface, e.g. snow, rain, ice or loose
material.<
Manual transmission
You can shift gears while cruise control is acti-
vated. An indicator lamp notifies you that you
Page 64 of 160

Everything under control
62
Possible displays
1Button for selecting functions
2Service requirements
3Engine oil
4Exhaust emissions test
*
5Roadworthiness test*
6Microfilter7Spark plugs
8Brakes, front
9Brakes, rear
10Brake fluid
More information on the BMW Maintenance
System can be found on page117.
Clock
Setting the time
To set the 12h/24h mode, refer to Formats and
units of measure on page60.
1.Lightly push button 1 in the turn indicator
stalk up or down repeatedly until the appro-priate symbol appears in the display,
accompanied by the time and the word
"SET".
2.Press button 2.
3.Use button 1 to set the hours.
4.Press button 2.
5.Use button 1 to set the minutes.
6.Press button 2.
The system displays the new time.
7.Use button 2 to save the new time.
Page 67 of 160

Reference
At a glance
Controls
Driving tips
Mobility
65
Technology for driving comfort and safety
PDC Park Distance Control*
The concept
The PDC assists you with maneuvering in tight
parking spaces. Acoustic signals warn you of
the presence of an object in front of
* or behind
your car. To measure the distance, there are
four ultrasonic sensors in each bumper.
An acoustic warning sounds once an object is
closer than approx. 2 ft/60 cm to the front sen-
sors
* or both rear corner sensors, or closer than
approx. 5 ft/1.50 m to the rear center sensors.
PDC is a parking aid that can indicate
objects when they are approached
slowly, as is usually the case when parking.
Avoid approaching an objec t a t h i g h s p e e d , o t h -
erwise physical circumstances may lead to the
system warning being issued too late.<
Automatic mode
With the engine running or the ignition switched
on, the system is activated automatically after
approx. 1 second when you engage reverse
gear or move the automatic transmission selec-
tor lever to position R. Wait this short period
before driving.
Switching on manually
Press the button, the LED lights up.
Switching off manually
Press the button again; the LED goes out.The system is automatically deactivated once
the vehicle travels approx. 165 ft/50 m or
exceeds a speed of approx. 20 mph or 30 km/h;
the LED goes out. You can reactivate the sys-
tem as needed.
Signal tones
When nearing an object, its position is indicated
correspondingly by an interval tone. For exam-
ple, the tone sounds at the rear if the system
detects an object behind the car. As the dis-
tance between vehicle and object decreases,
the intervals between the tones become
shorter. If the distance to the nearest object
falls to below roughly 1 ft/30 cm, then a contin-
uous tone sounds.
The warning signal is canceled after approx.
3 seconds, if you are moving parallel to a wall.
Malfunction
The indicator lamp in the instrument
cluster comes on. PDC is malfunc-
tioning. Have the system checked.
To avoid this problem, keep the sensors clean
and free of ice or snow in order to ensure that
they will continue to operate effectively. When
using a high-pressure cleaner, do not spray the
sensors for extended periods of time and only
from a distance of at least 4 in/10 cm.
Manual mode
The LED above the button flashes in addition.
System limitations
Even with PDC, final responsibility for
estimating the distance between the
vehicle and any obstructions always remains
with the driver. Even when sensors are pro-
vided, there is a blind spot in which objects can
no longer be detected. The system is also sub-
ject to the physical limits that apply to all forms
of ultrasonic measurement, such as those
encountered with trailer towbars and couplings,
Page 68 of 160

Technology for driving comfort and safety
66 thin and wedge-shaped objects, etc. Low
objects already indicated, such as a curb, may
enter the sensors' dead areas before a continu-
ous audible signal is given. Higher, protruding
objects, such as ledges, may not be detectable.
Loud sound sources outside or inside the car
can drown out the PDC signal.<
Driving stability control
systems
Your BMW has a number of systems that help
to maintain the vehicle's stability even in
adverse driving conditions.
ABS Antilock Brake System
ABS prevents locking of the wheels during
braking. Safe steering response is maintained
even during full braking. Active safety is thus
increased.
The ABS is operational every time you start the
engine. Braking safely, refer to page97.
Electronic brake-force distribution
The system controls the brake pressure in the
rear wheels to ensure stable braking behavior.
DBC Dynamic Brake Control
When you apply the brakes rapidly, this system
automatically produces the maximum braking
force boost and thus helps to achieve the short-
est possible braking distance during full brak-
ing. This system exploits all of the benefits pro-
vided by ABS.
Do not reduce the pressure on the brake for the
duration of the brake application. If the brake is
released, DBC will be switched off.
DSC Dynamic Stability Control
DSC prevents the driving wheels from losing
traction when you pull away from rest or accel-
erate. DSC also recognizes unstable driving
conditions, for example if the rear of the car is
about to swerve or if momentum is acting at an
angle past the front wheels. In these cases,
DSC helps the vehicle maintain a safe course within physical limits by reducing engine output
and through braking actions at the individual
wheels.
The laws of physics cannot be repealed,
even with DSC. An appropriate driving
style always remains the responsibility of the
driver. Therefore, do not reduce the additional
safety margin again by taking risks.<
Deactivating DSC
Press the button for at least 3 seconds; the indi-
cator lamps for DSC in the instrument cluster
light up. Dynamic Traction Control DTC and
DSC have been simultaneously deactivated.
Stabilizing and drive-output promoting actions
are no longer executed.
To increase vehicle stability, activate DSC again
as soon as possible.
Activating DSC
Press the button again; the indicator lamps in
the instrument cluster go out.
To control
If the indicator lamp flashes:
DSC controls the drive forces and
brake forces.
If the indicator lamps are on:
DSC has been completely deacti-
vated.
DTC Dynamic Traction Control
DTC is a version of DSC in which the drive out-
put is optimized for particular road conditions,
e.g. unplowed snow-covered roads. The sys-
tem assures the maximal drive output, but with
Page 69 of 160

Reference
At a glance
Controls
Driving tips
Mobility
67
reduced driving stability. It is therefore neces-
sary to drive with appropriate caution.
You may find it useful to briefly activate DTC
under the following special circumstances:
>When driving uphill on snow-covered roads,
in slush or on unplowed, snow-covered
roads
>When rocking a stuck vehicle free or start-
ing off in deep snow or on loose ground
>When driving with snow chains
Activating DTC
Briefly press the button; the DTC indicator
lamps in the instrument cluster come on.
To control
If the indicator lamp flashes:
DTC controls the drive forces and
brake forces.
If the indicator lamps are on:
DTC has been activated.
Deactivating DTC
Press the button again; the DTC indicator
lamps in the instrument cluster go out.
xDrive 325xi
xDrive is your BMW's four-wheel-drive system.
The combined efforts of xDrive and DSC help to
further optimize traction and driving dynamics.
The xDrive four-wheel-drive system distributes
driving power variably to the front and rear axles
depending on the driving situation and road
conditions.
Malfunction
In case of any of the malfunctions
described below, drive cautiously and
think well ahead. Avoid driving on rough tracks
and pressing the accelerator pedal down to full
throttle or kick-down position, otherwise the
drive system could be damaged or accidents
could result.
Have the system checked as soon as
possible.
The warning lamps come on. xDrive
and DSC have failed.
Have the system checked as soon as
possible.
Hill Descent Control HDC 325xi
HDC is a downhill driving assistant that reduces
your speed on steep downhill gradients and
makes it even easier to control your BMW's
handling under these conditions. The vehicle
then moves slightly faster than double walking
speed without the driver needing to intervene.
HDC can be activated as long as you are driving
under approx. 20 mph or 35 km/h. When driving
downhill at a speed of under approx. 20 mph or
35 km/h, the vehicle's speed is automatically
reduced to slightly more than double walking
speed and maintained.
Increasing or decreasing speed
By accelerating or braking you can change the
speed within a range from approx. 3 to 15 mph,
approx. 5 to 25 km/h.
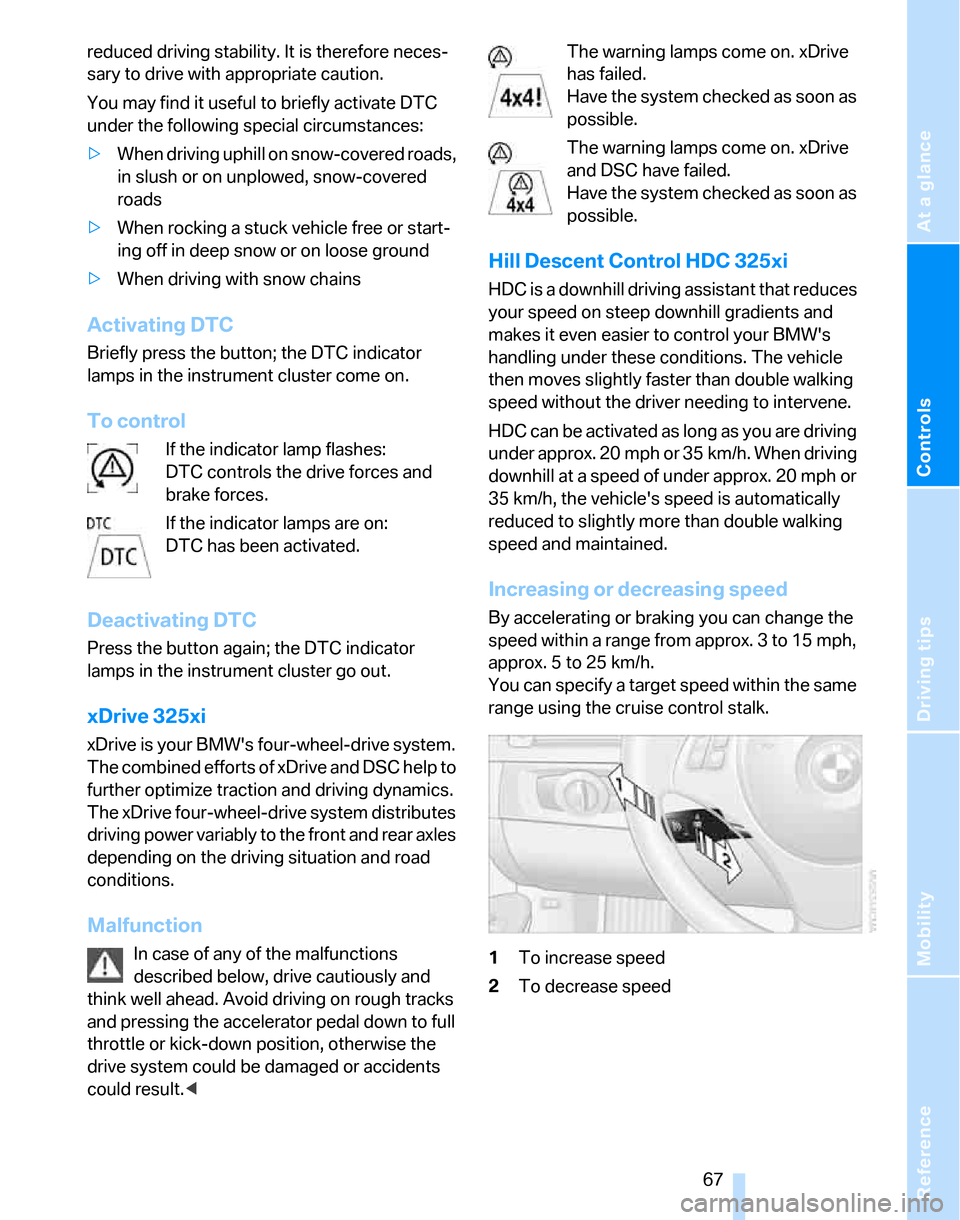
You can specify a target speed within the same
range using the cruise control stalk.
1To increase speed
2To decrease speed
Page 73 of 160

Reference
At a glance
Controls
Driving tips
Mobility
71
intervention is simultaneously deactivated
when DSC is switched off, refer to page66.
Malfunction
The warning lamps come on. Active
steering is no longer operational. At
low speeds, greater steering wheel
movements are required, whereas at
higher speeds the vehicle reacts more sensi-
tively to steering wheel movements. Drive cau-
tiously and think well ahead. Have the system
checked.
If the warning lamp lights up during the first
engine starting following a power supply inter-
ruption, the system must be activated by being
initialized.
Brake Force Display*
The brake lamps light up in two stages,
depending on how sharply you apply the
brakes.
>Normal braking:
The brake lamps and the center brake lamp
light up.
>Sharp braking:
The illuminated surface of the brake lamps
is enlarged, as long as the rear fog light is
not switched on.
Airbags
The following airbags are located under the
marked covers:
1Front airbags
2Head airbags
3Side airbags
Protective action
Observe the adjustment instructions on
page31 to ensure the best possible per-
sonal protection.<
The front airbags help protect the driver and
front passenger by responding to frontal impacts in which safety belts alone cannot pro-
vide adequate restraint. When needed, the
head and side airbags help provide protection in
the event of side impact. The relevant side air-
bag supports the side upper body area. The
head air bag supports the head.
The airbags will purposely not be activated by
every collision, e.g. not by more minor acci-
dents, certain roll-over situations and rear-end
collisions.
Do not apply adhesive materials to the
cover panels of the airbags, cover them or
modify them in any other way. Do not attach
Page 76 of 160

Lamps
74
Lamps
Parking lamps/low beams
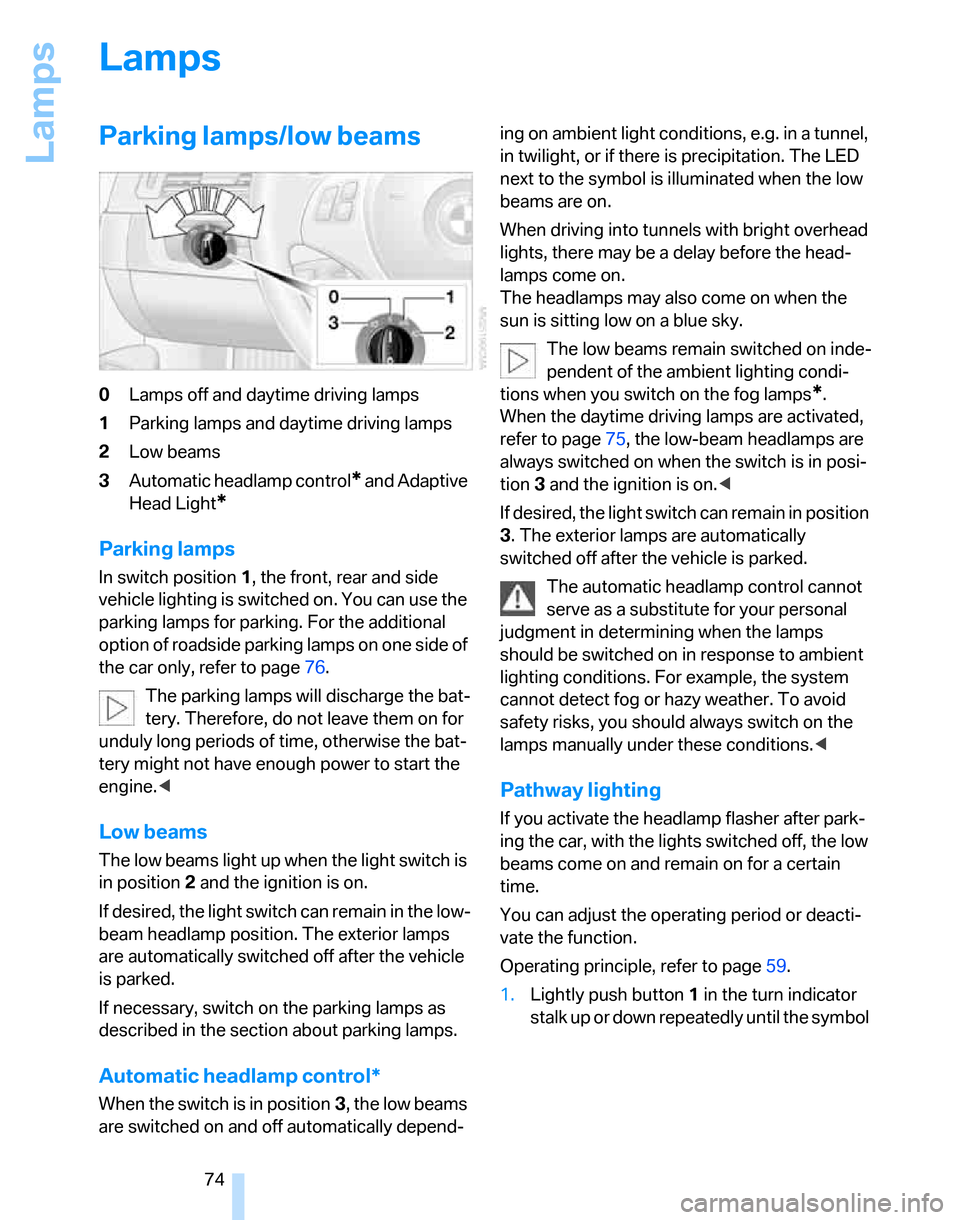
0Lamps off and daytime driving lamps
1Parking lamps and daytime driving lamps
2Low beams
3Automatic headlamp control
* and Adaptive
Head Light
*
Parking lamps
In switch position1, the front, rear and side
vehicle lighting is switched on. You can use the
parking lamps for parking. For the additional
option of roadside parking lamps on one side of
the car only, refer to page76.
The parking lamps will discharge the bat-
tery. Therefore, do not leave them on for
unduly long periods of time, otherwise the bat-
tery might not have enough power to start the
engine.<
Low beams
The low beams light up when the light switch is
in position 2 and the ignition is on.
If desired, the light switch can remain in the low-
beam headlamp position. The exterior lamps
are automatically switched off after the vehicle
is parked.
If necessary, switch on the parking lamps as
described in the section about parking lamps.
Automatic headlamp control*
When the switch is in position3, the low beams
are switched on and off automatically depend-ing on ambient light conditions, e.g. in a tunnel,
in twilight, or if there is precipitation. The LED
next to the symbol is illuminated when the low
beams are on.
When driving into tunnels with bright overhead
lights, there may be a delay before the head-
lamps come on.
The headlamps may also come on when the
sun is sitting low on a blue sky.
The low beams remain switched on inde-
pendent of the ambient lighting condi-
tions when you switch on the fog lamps
*.
When the daytime driving lamps are activated,
refer to page75, the low-beam headlamps are
always switched on when the switch is in posi-
tion 3 and the ignition is on.<
If desired, the light switch can remain in position
3. The exterior lamps are automatically
switched off after the vehicle is parked.
The automatic headlamp control cannot
serve as a substitute for your personal
judgment in determining when the lamps
should be switched on in response to ambient
lighting conditions. For example, the system
cannot detect fog or hazy weather. To avoid
safety risks, you should always switch on the
lamps manually under these conditions.<
Pathway lighting
If you activate the headlamp flasher after park-
ing the car, with the lights switched off, the low
beams come on and remain on for a certain
time.
You can adjust the operating period or deacti-
vate the function.
Operating principle, refer to page59.
1.Lightly push button1 in the turn indicator
stalk up or down repeatedly until the symbol