2006 BMW 325XI SPORTS WAGON tow
[x] Cancel search: towPage 8 of 236

7Reference
At a glance
Controls
Driving tips
Communications
Navigation
Entertainment
Mobility
For Canadian customers
Canadian customers who wish to report a
safety-related defect to Transport Canada,
Defect Investigations and Recalls, may tele-
phone the toll free hotline 1-800-333-0510, or
contact Transport Canada by mail at: Transport
Canada, ASFAD, Place de Ville Tower C,
330 Sparks Street, Ottawa ON K1A 0N5.
Page 35 of 236
Opening and closing
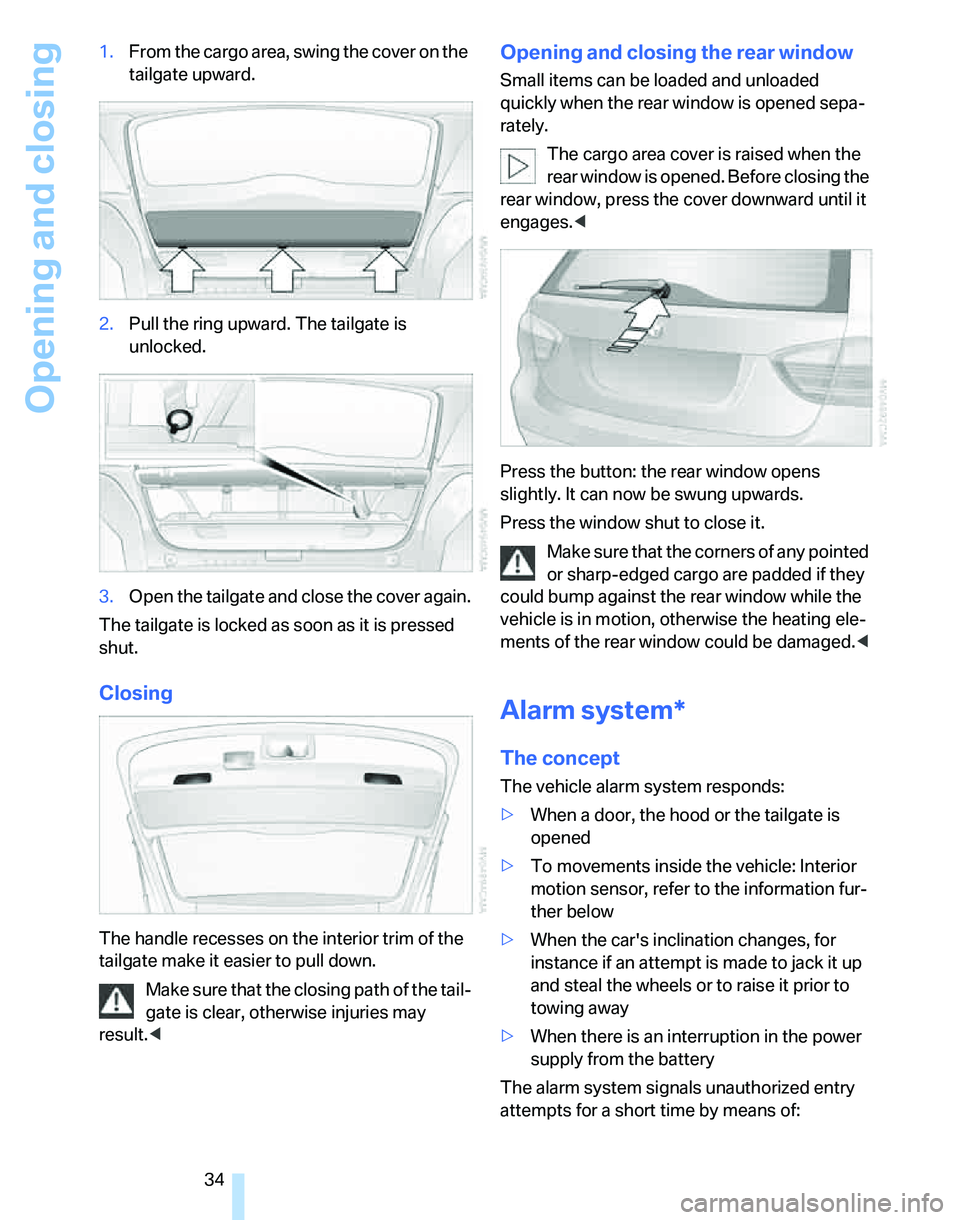
34 1.From the cargo area, swing the cover on the
tailgate upward.
2.Pull the ring upward. The tailgate is
unlocked.
3.Open the tailgate and close the cover again.
The tailgate is locked as soon as it is pressed
shut.
Closing
The handle recesses on the interior trim of the
tailgate make it easier to pull down.
Make sure that the closing path of the tail-
gate is clear, otherwise injuries may
result.<
Opening and closing the rear window
Small items can be loaded and unloaded
quickly when the rear window is opened sepa-
rately.
The cargo area cover is raised when the
rear window is opened. Before closing the
rear window, press the cover downward until it
engages.<
Press the button: the rear window opens
slightly. It can now be swung upwards.
Press the window shut to close it.
Make sure that the corners of any pointed
or sharp-edged cargo are padded if they
could bump against the rear window while the
vehicle is in motion, otherwise the heating ele-
ments of the rear window could be damaged.<
Alarm system*
The concept
The vehicle alarm system responds:
>When a door, the hood or the tailgate is
opened
>To movements inside the vehicle: Interior
motion sensor, refer to the information fur-
ther below
>When the car's inclination changes, for
instance if an attempt is made to jack it up
and steal the wheels or to raise it prior to
towing away
>When there is an interruption in the power
supply from the battery
The alarm system signals unauthorized entry
attempts for a short time by means of:
Page 36 of 236

Controls
35Reference
At a glance
Driving tips
Communications
Navigation
Entertainment
Mobility
>An acoustic alarm
>Switching on the hazard warning flashers
>Flashing the high beams
Arming and disarming
When you lock or unlock the vehicle, either with
the remote control or at the door lock, the alarm
system is armed or disarmed at the same time.
Even when the alarm system is armed, you can
open the tailgate by means of the button on
the remote control, refer to page31. When you
subsequently close the tailgate it is again
locked and monitored.
Switching off an alarm
>Unlock the car with the remote control, refer
to page30, or
>insert the remote control all the way into the
ignition lock.
Indicator lamp displays
>The indicator lamp under the inside rear-
view mirror flashes continuously: the sys-
tem is armed.
>The indicator lamp flashes after locking:
doors, hood or tailgate are not properly
closed. Even if you do not close the alerted
area, the system begins to monitor the
remaining areas, and the indicator lamp
flashes continuously after approx. 10 sec-
onds. However, the interior motion sensor
is not activated.
>The indicator lamp goes out after unlocking:
your vehicle has not been disturbed while
you were away.>If the indicator lamp flashes after unlocking
until the remote control is inserted in the
ignition, but for no longer than approx.
5 minutes: your vehicle has been disturbed
while you were away.
Tilt alarm sensor
The tilt of the vehicle is monitored. The alarm
system reacts, e.g. to attempts to steal a wheel
or tow the vehicle.
Interior motion sensor
In order for the interior motion sensor to func-
tion properly, the windows and glass sunroof
must be completely closed.
Avoiding unintentional alarms
The tilt alarm sensor and interior motion sensor
may be switched off at the same time. This pre-
vents unintentional alarms, e.g. in the following
situations:
>In duplex garages
>When transporting on car-carrying trains
>When animals are to remain in the vehicle
Switching off tilt alarm sensor and
interior motion sensor
Press the button on the remote control
twice in a row.
The indicator lamp comes on for approx. two
seconds, then begins to flash steadily. The tilt
alarm sensor and the interior motion sensor are
switched off until the next time the vehicle is
unlocked and subsequently locked again.
Convenient access*
Convenient access enables you to enter your
vehicle without needing to hold the remote con-
trol in your hand. All you need to do is wear the
remote control close to your body, e.g. in your
jacket pocket. The vehicle automatically
detects the corresponding remote control
within the immediate vicinity or in the passen-
ger compartment.
Page 57 of 236
Driving
56
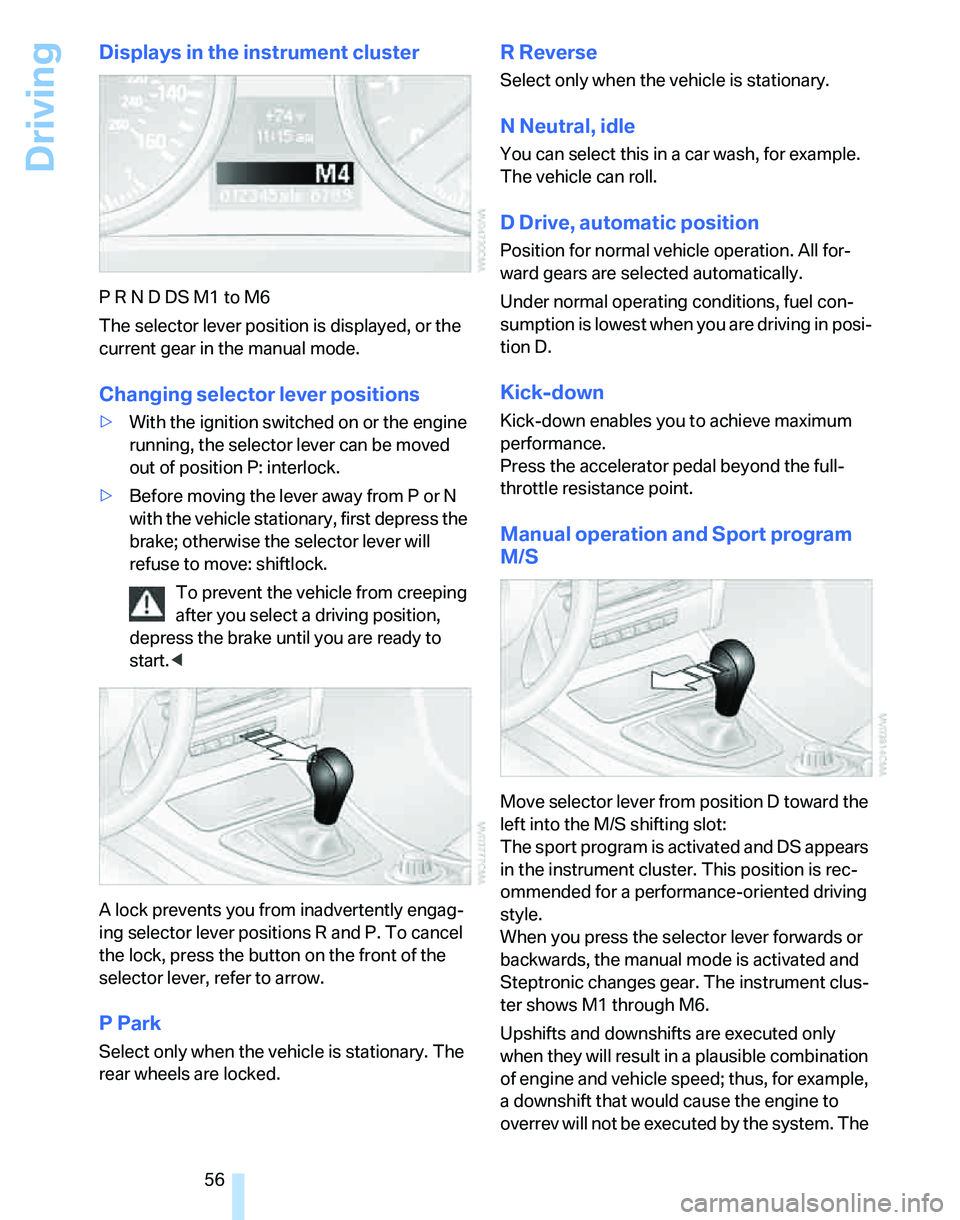
Displays in the instrument cluster
P R N D DS M1 to M6
The selector lever position is displayed, or the
current gear in the manual mode.
Changing selector lever positions
>With the ignition switched on or the engine
running, the selector lever can be moved
out of position P: interlock.
>Before moving the lever away from P or N
with the vehicle stationary, first depress the
brake; otherwise the selector lever will
refuse to move: shiftlock.
To prevent the vehicle from creeping
after you select a driving position,
depress the brake until you are ready to
start.<
A lock prevents you from inadvertently engag-
ing selector lever positions R and P. To cancel
the lock, press the button on the front of the
selector lever, refer to arrow.
P Park
Select only when the vehicle is stationary. The
rear wheels are locked.
R Reverse
Select only when the vehicle is stationary.
N Neutral, idle
You can select this in a car wash, for example.
The vehicle can roll.
D Drive, automatic position
Position for normal vehicle operation. All for-
ward gears are selected automatically.
Under normal operating conditions, fuel con-
sumption is lowest when you are driving in posi-
tion D.
Kick-down
Kick-down enables you to achieve maximum
performance.
Press the accelerator pedal beyond the full-
throttle resistance point.
Manual operation and Sport program
M/S
Move selector lever from position D toward the
left into the M/S shifting slot:
The sport program is activated and DS appears
in the instrument cluster. This position is rec-
ommended for a performance-oriented driving
style.
When you press the selector lever forwards or
backwards, the manual mode is activated and
Steptronic changes gear. The instrument clus-
ter shows M1 through M6.
Upshifts and downshifts are executed only
when they will result in a plausible combination
of engine and vehicle speed; thus, for example,
a downshift that would cause the engine to
overrev will not be executed by the system. The
Page 83 of 236
Technology for driving comfort and safety
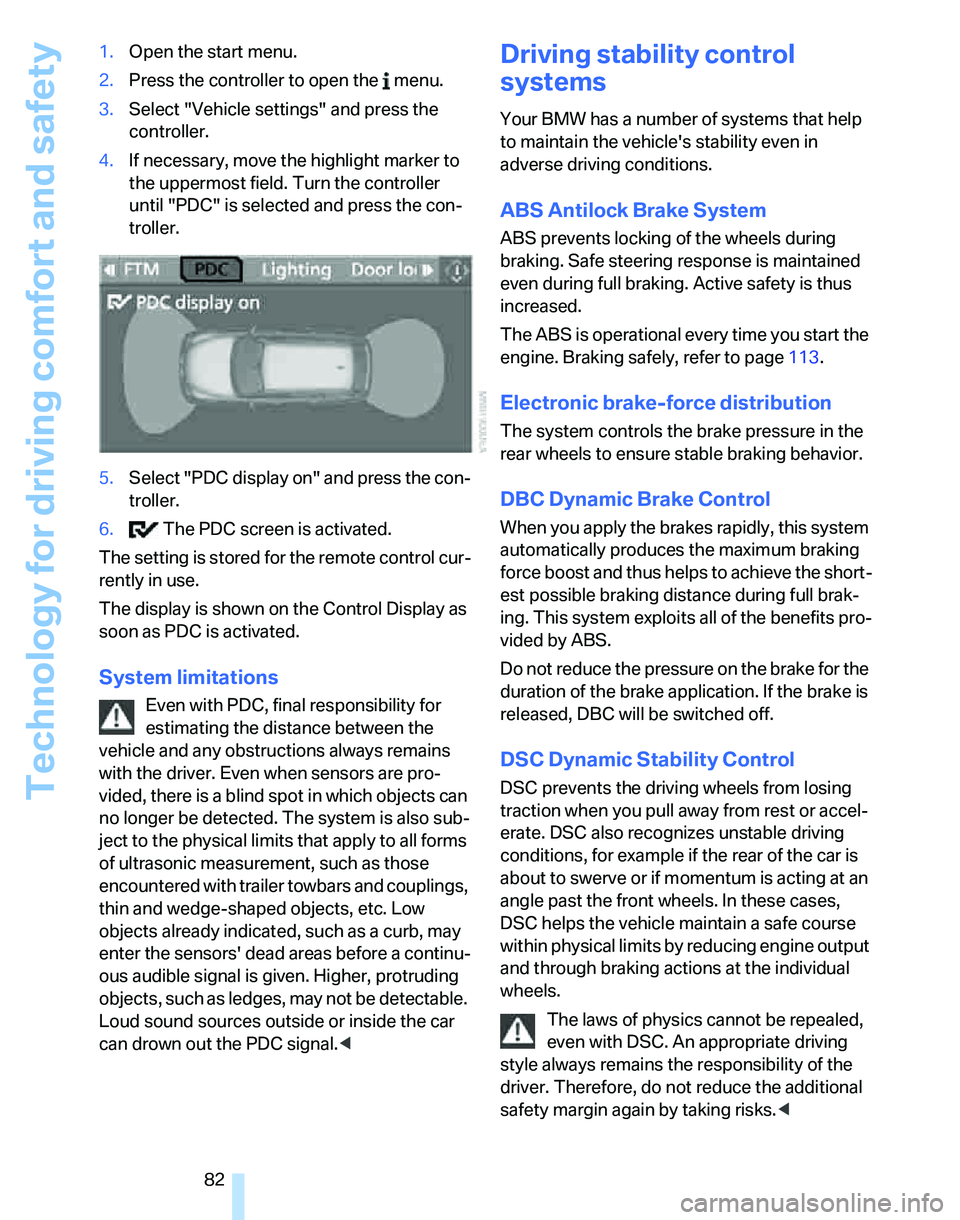
82 1.Open the start menu.
2.Press the controller to open the menu.
3.Select "Vehicle settings" and press the
controller.
4.If necessary, move the highlight marker to
the uppermost field. Turn the controller
until "PDC" is selected and press the con-
troller.
5.Select "PDC display on" and press the con-
troller.
6. The PDC screen is activated.
The setting is stored for the remote control cur-
rently in use.
The display is shown on the Control Display as
soon as PDC is activated.
System limitations
Even with PDC, final responsibility for
estimating the distance between the
vehicle and any obstructions always remains
with the driver. Even when sensors are pro-
vided, there is a blind spot in which objects can
no longer be detected. The system is also sub-
ject to the physical limits that apply to all forms
of ultrasonic measurement, such as those
encountered with trailer towbars and couplings,
thin and wedge-shaped objects, etc. Low
objects already indicated, such as a curb, may
enter the sensors' dead areas before a continu-
ous audible signal is given. Higher, protruding
objects, such as ledges, may not be detectable.
Loud sound sources outside or inside the car
can drown out the PDC signal.<
Driving stability control
systems
Your BMW has a number of systems that help
to maintain the vehicle's stability even in
adverse driving conditions.
ABS Antilock Brake System
ABS prevents locking of the wheels during
braking. Safe steering response is maintained
even during full braking. Active safety is thus
increased.
The ABS is operational every time you start the
engine. Braking safely, refer to page113.
Electronic brake-force distribution
The system controls the brake pressure in the
rear wheels to ensure stable braking behavior.
DBC Dynamic Brake Control
When you apply the brakes rapidly, this system
automatically produces the maximum braking
force boost and thus helps to achieve the short-
est possible braking distance during full brak-
ing. This system exploits all of the benefits pro-
vided by ABS.
Do not reduce the pressure on the brake for the
duration of the brake application. If the brake is
released, DBC will be switched off.
DSC Dynamic Stability Control
DSC prevents the driving wheels from losing
traction when you pull away from rest or accel-
erate. DSC also recognizes unstable driving
conditions, for example if the rear of the car is
about to swerve or if momentum is acting at an
angle past the front wheels. In these cases,
DSC helps the vehicle maintain a safe course
within physical limits by reducing engine output
and through braking actions at the individual
wheels.
The laws of physics cannot be repealed,
even with DSC. An appropriate driving
style always remains the responsibility of the
driver. Therefore, do not reduce the additional
safety margin again by taking risks.<
Page 88 of 236
Controls
87Reference
At a glance
Driving tips
Communications
Navigation
Entertainment
Mobility
without luggage:
approx. 90 miles/150 km
>With a full load:
4 or more persons, cargo area full:
approx. 30 miles/50 km
Drive cautiously and do not exceed a
speed of 50 mph or 80 km/h. In the event
of pressure loss, vehicle handling changes. This
includes reduced tracking stability in braking,
extended braking distance and altered natural
steering characteristics.
If unusual vibration or loud noises occur during
the journey, this may be an indication that the
damaged tire has finally failed. Reduce your
speed and pull over to the side of the road at the
earliest opportunity. Otherwise, parts of the tire
could come loose and cause an accident. Do
not continue driving. Contact your BMW Cen-
ter.<
Malfunction
The warning lamps come on in yel-
low. A message appears on the Con-
trol Display. The Flat Tire Monitor has
a malfunction or has failed. Have the
system checked as soon as possible.
Active steering*
The concept
Active steering varies the turning angle of the
front wheels in relation to steering wheel move-
ments. It also varies the steering force required
to turn the wheels depending on the speed at
which you are driving.
When you are driving in the low road-speed
range, e.g. in a town or when parking, the steer-
ing angle increases, i.e. the steering becomes
very direct, and less effort is required to turn the
wheels. In the higher speed range, on the other
hand, the steering angle is reduced more and
more. This improves the handling capability of
your BMW over the entire speed range.
In critical situations, the system can make tar-
geted corrections to the steering angle pro-
vided by the driver and thus stabilize the vehicle before the driver intervenes. This stabilizing
intervention is simultaneously deactivated
when DSC is switched off, refer to page83.
Malfunction
The warning lamps come on. Active
steering is no longer operational. At
low speeds, greater steering wheel
movements are required, whereas at
higher speeds the vehicle reacts more sensi-
tively to steering wheel movements. Drive cau-
tiously and think well ahead. Have the system
checked.
If the warning lamp lights up during the first
engine starting following a power supply inter-
ruption, the system must be activated by being
initialized.
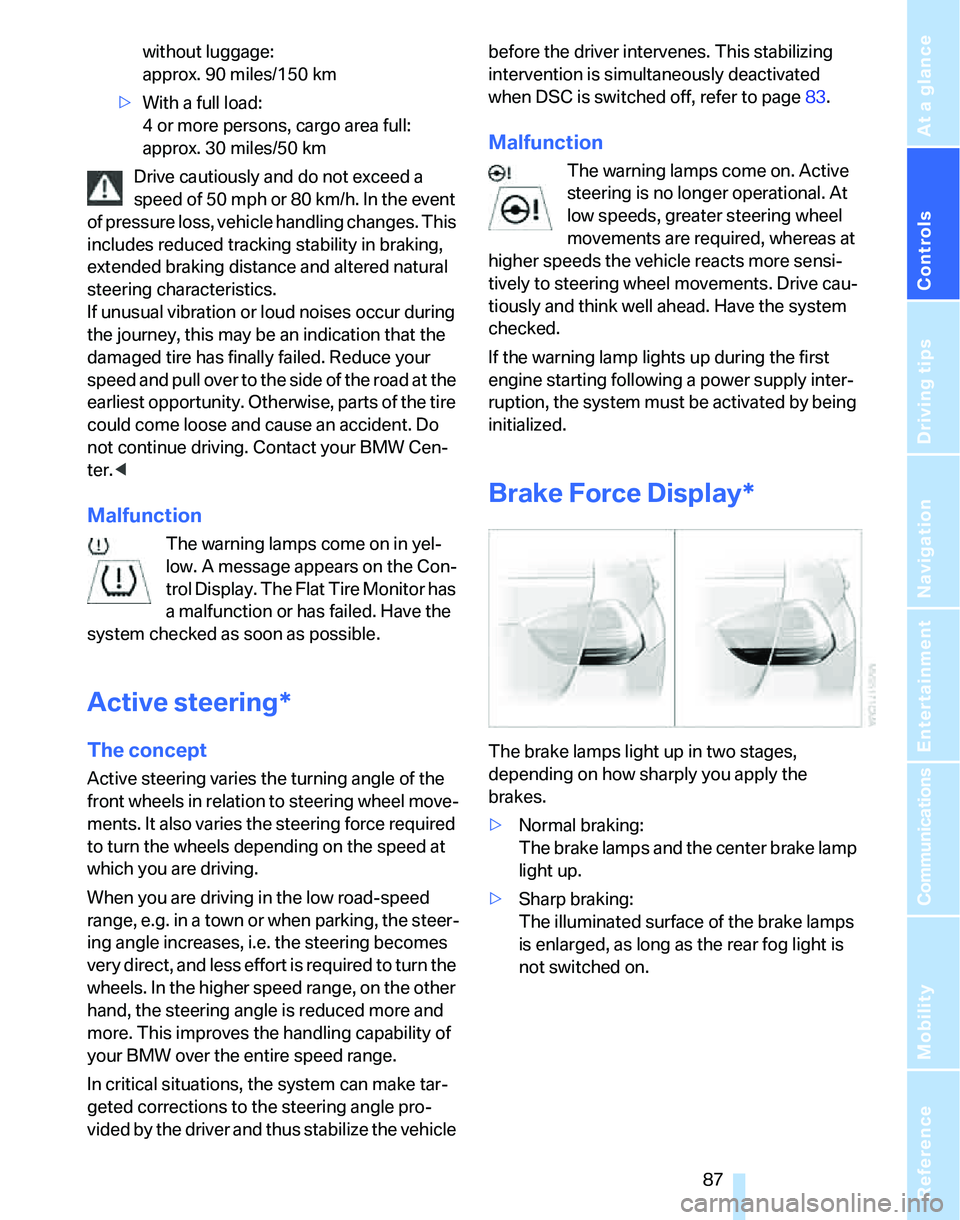
Brake Force Display*
The brake lamps light up in two stages,
depending on how sharply you apply the
brakes.
>Normal braking:
The brake lamps and the center brake lamp
light up.
>Sharp braking:
The illuminated surface of the brake lamps
is enlarged, as long as the rear fog light is
not switched on.
Page 95 of 236
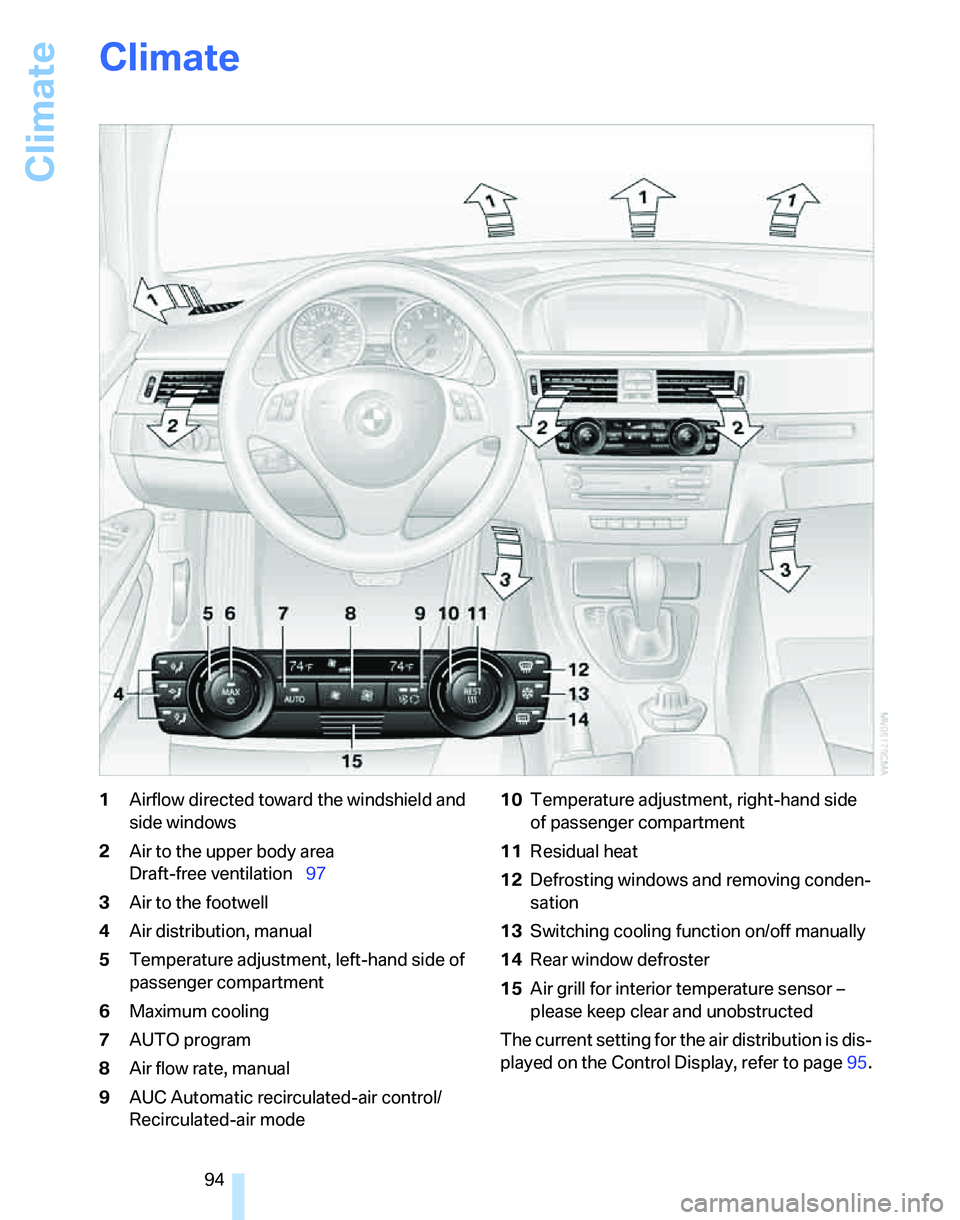
Climate
94
Climate
1Airflow directed toward the windshield and
side windows
2Air to the upper body area
Draft-free ventilation97
3Air to the footwell
4Air distribution, manual
5Temperature adjustment, left-hand side of
passenger compartment
6Maximum cooling
7AUTO program
8Air flow rate, manual
9AUC Automatic recirculated-air control/
Recirculated-air mode10Temperature adjustment, right-hand side
of passenger compartment
11Residual heat
12Defrosting windows and removing conden-
sation
13Switching cooling function on/off manually
14Rear window defroster
15Air grill for interior temperature sensor –
please keep clear and unobstructed
The current setting for the air distribution is dis-
played on the Control Display, refer to page95.
Page 96 of 236
Controls
95Reference
At a glance
Driving tips
Communications
Navigation
Entertainment
Mobility
Automatic climate control
Comfortable interior climate
AUTO program7 offers the ideal air distribution
and air flow rate for almost all conditions, refer
to AUTO program below. All you need to do is
select an interior temperature which is comfort-
able for you.
The following sections inform you in detail
about how to adjust the settings.
Most settings are stored for the remote control
currently in use, refer also to Personal Profile
settings on page29.
Switching manual air distribution on/
off
The emerging air is directed to the
windows, to the upper body area or
to the footwell.
You can switch the automatic air
distribution back on by pressing the AUTO but-
ton.
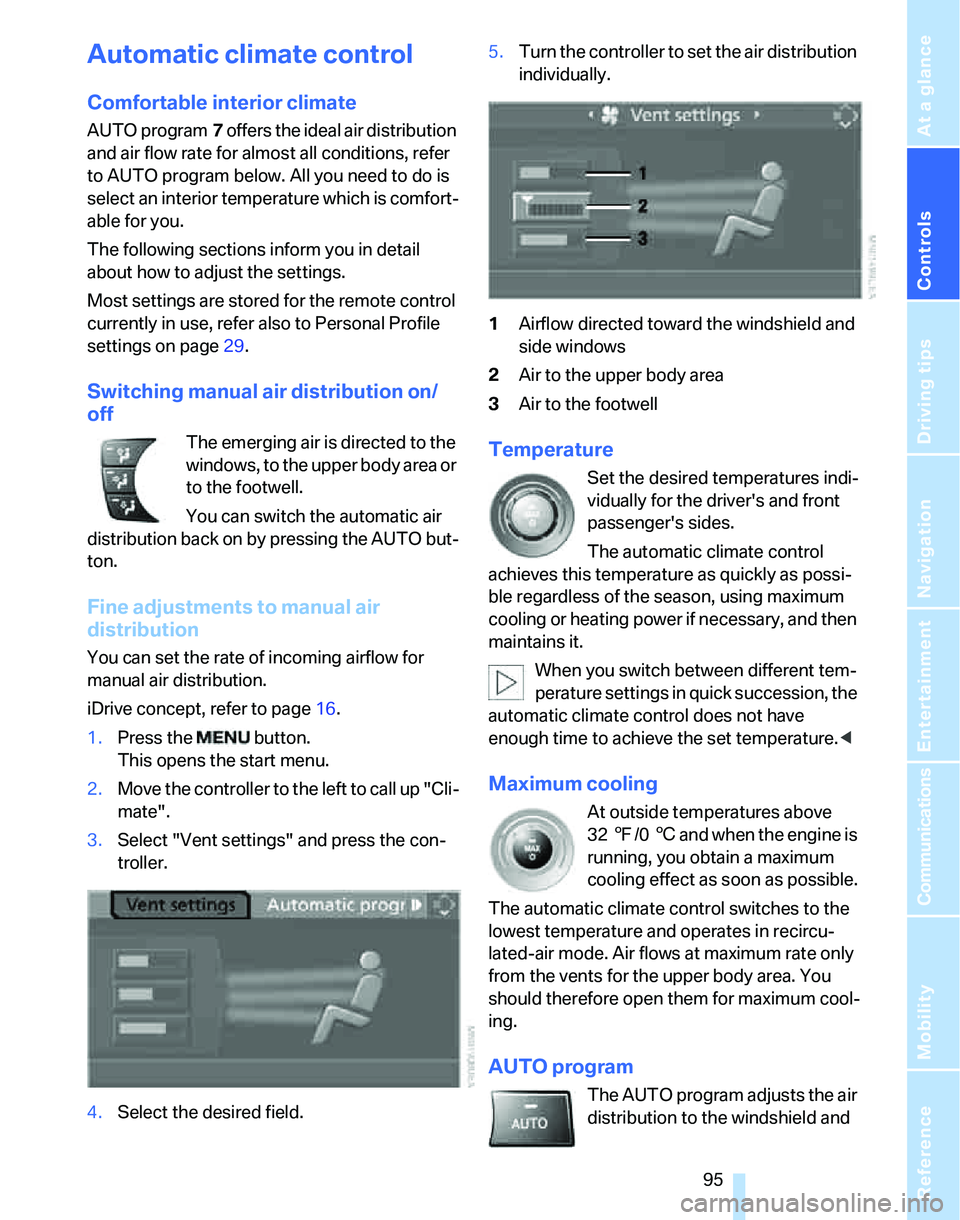
Fine adjustments to manual air
distribution
You can set the rate of incoming airflow for
manual air distribution.
iDrive concept, refer to page16.
1.Press the button.
This opens the start menu.
2.Move the controller to the left to call up "Cli-
mate".
3.Select "Vent settings" and press the con-
troller.
4.Select the desired field.5.Turn the controller to set the air distribution
individually.
1Airflow directed toward the windshield and
side windows
2Air to the upper body area
3Air to the footwell
Temperature
Set the desired temperatures indi-
vidually for the driver's and front
passenger's sides.
The automatic climate control
achieves this temperature as quickly as possi-
ble regardless of the season, using maximum
cooling or heating power if necessary, and then
maintains it.
When you switch between different tem-
perature settings in quick succession, the
automatic climate control does not have
enough time to achieve the set temperature.<
Maximum cooling
At outside temperatures above
327/06 and when the engine is
running, you obtain a maximum
cooling effect as soon as possible.
The automatic climate control switches to the
lowest temperature and operates in recircu-
lated-air mode. Air flows at maximum rate only
from the vents for the upper body area. You
should therefore open them for maximum cool-
ing.
AUTO program
The AUTO program adjusts the air
distribution to the windshield and