2006 BMW 325XI SPORTS WAGON lock
[x] Cancel search: lockPage 58 of 236
Controls
57Reference
At a glance
Driving tips
Communications
Navigation
Entertainment
Mobility
gear selected appears briefly in the instrument
cluster, followed by the gear actually in use.
To use the automatic function again, move the
selector lever to the right into position D.
Overriding selector lever lock
Should the selector lever refuse to move out of
position P although the button on the selector
lever is pressed, the selector lever lock can be
overridden:
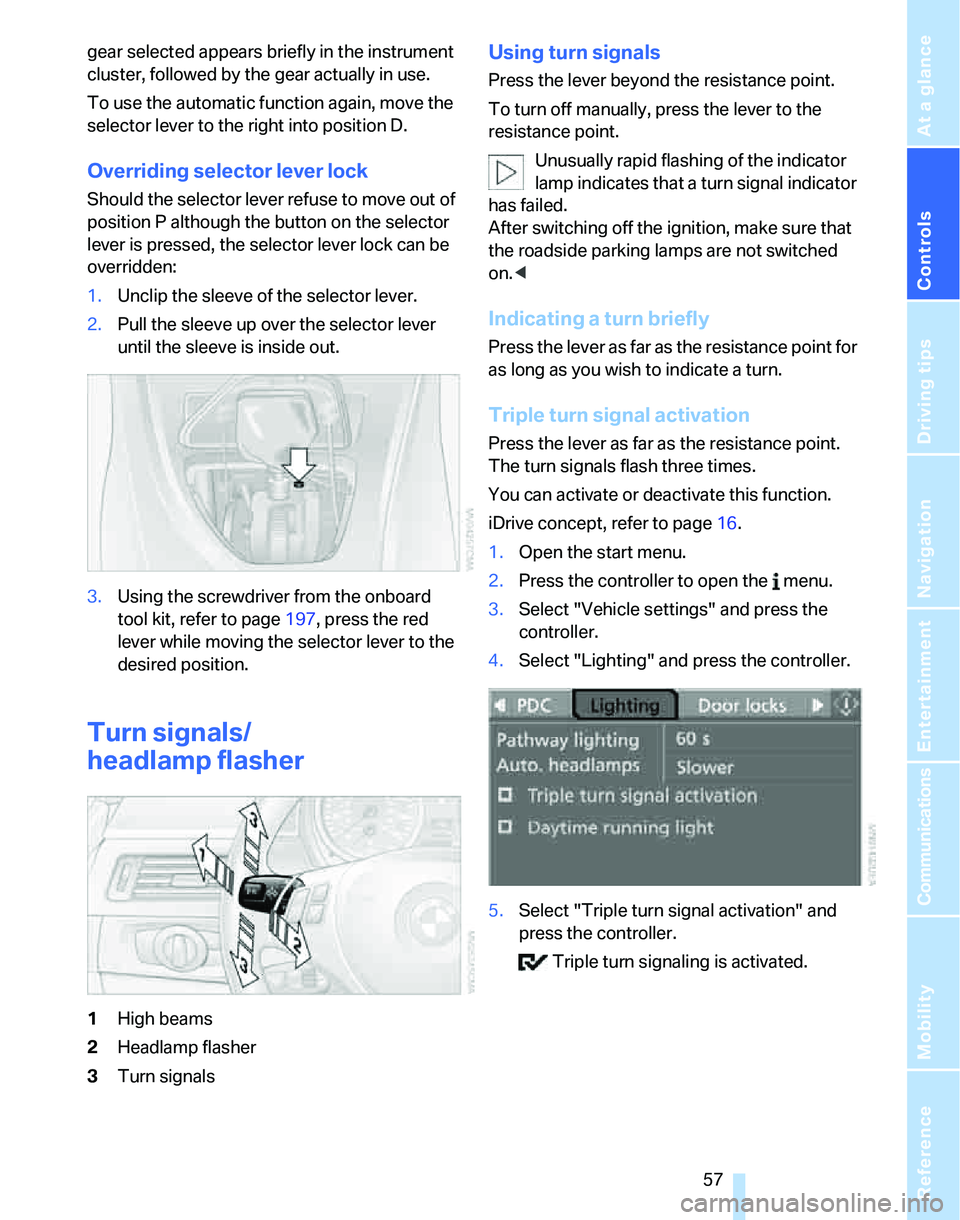
1.Unclip the sleeve of the selector lever.
2.Pull the sleeve up over the selector lever
until the sleeve is inside out.
3.Using the screwdriver from the onboard
tool kit, refer to page197, press the red
lever while moving the selector lever to the
desired position.
Turn signals/
headlamp flasher
1High beams
2Headlamp flasher
3Turn signals
Using turn signals
Press the lever beyond the resistance point.
To turn off manually, press the lever to the
resistance point.
Unusually rapid flashing of the indicator
lamp indicates that a turn signal indicator
has failed.
After switching off the ignition, make sure that
the roadside parking lamps are not switched
on.<
Indicating a turn briefly
Press the lever as far as the resistance point for
as long as you wish to indicate a turn.
Triple turn signal activation
Press the lever as far as the resistance point.
The turn signals flash three times.
You can activate or deactivate this function.
iDrive concept, refer to page16.
1.Open the start menu.
2.Press the controller to open the menu.
3.Select "Vehicle settings" and press the
controller.
4.Select "Lighting" and press the controller.
5.Select "Triple turn signal activation" and
press the controller.
Triple turn signaling is activated.
Page 68 of 236
Controls
67Reference
At a glance
Driving tips
Communications
Navigation
Entertainment
Mobility
Everything under control
Odometer, outside
temperature display, clock
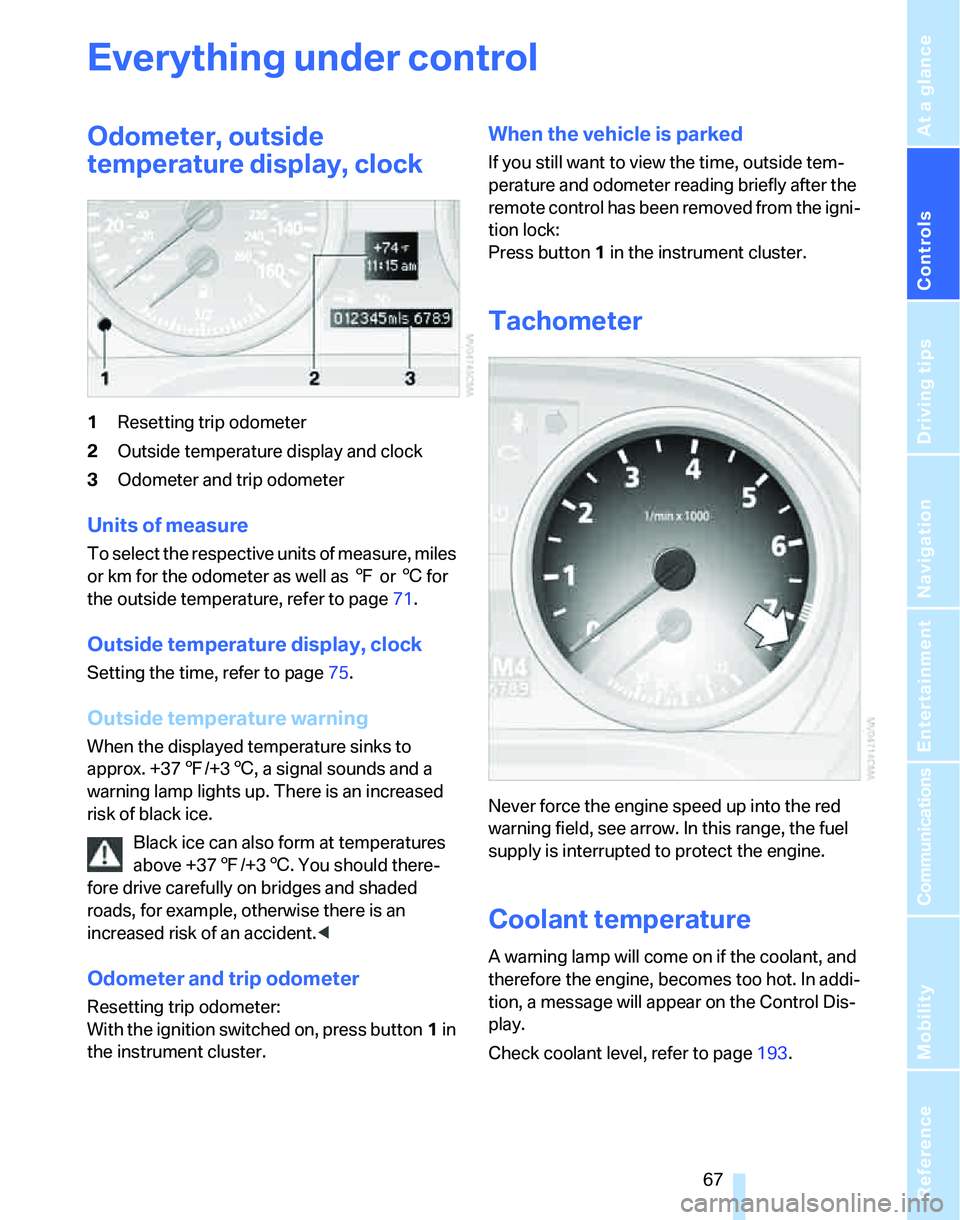
1Resetting trip odometer
2Outside temperature display and clock
3Odometer and trip odometer
Units of measure
T o s e l e c t t h e r e s p e c t i v e u n i t s o f m e a s u r e , m i l e s
or km for the odometer as well as 7 or 6 for
the outside temperature, refer to page71.
Outside temperature display, clock
Setting the time, refer to page75.
Outside temperature warning
When the displayed temperature sinks to
approx. +377/+36, a signal sounds and a
warning lamp lights up. There is an increased
risk of black ice.
Black ice can also form at temperatures
above +377/+36. You should there-
fore drive carefully on bridges and shaded
roads, for example, otherwise there is an
increased risk of an accident.<
Odometer and trip odometer
Resetting trip odometer:
With the ignition switched on, press button1 in
the instrument cluster.
When the vehicle is parked
If you still want to view the time, outside tem-
perature and odometer reading briefly after the
remote control has been removed from the igni-
tion lock:
Press button 1 in the instrument cluster.
Tachometer
Never force the engine speed up into the red
warning field, see arrow. In this range, the fuel
supply is interrupted to protect the engine.
Coolant temperature
A warning lamp will come on if the coolant, and
therefore the engine, becomes too hot. In addi-
tion, a message will appear on the Control Dis-
play.
Check coolant level, refer to page193.
Page 76 of 236
Controls
75Reference
At a glance
Driving tips
Communications
Navigation
Entertainment
Mobility
Clock
The settings are stored for the remote control
currently in use, refer also to Personal Profile on
page29.
Setting the time
In the instrument cluster
To set the 12h/24h mode, refer to Setting the
time format below.
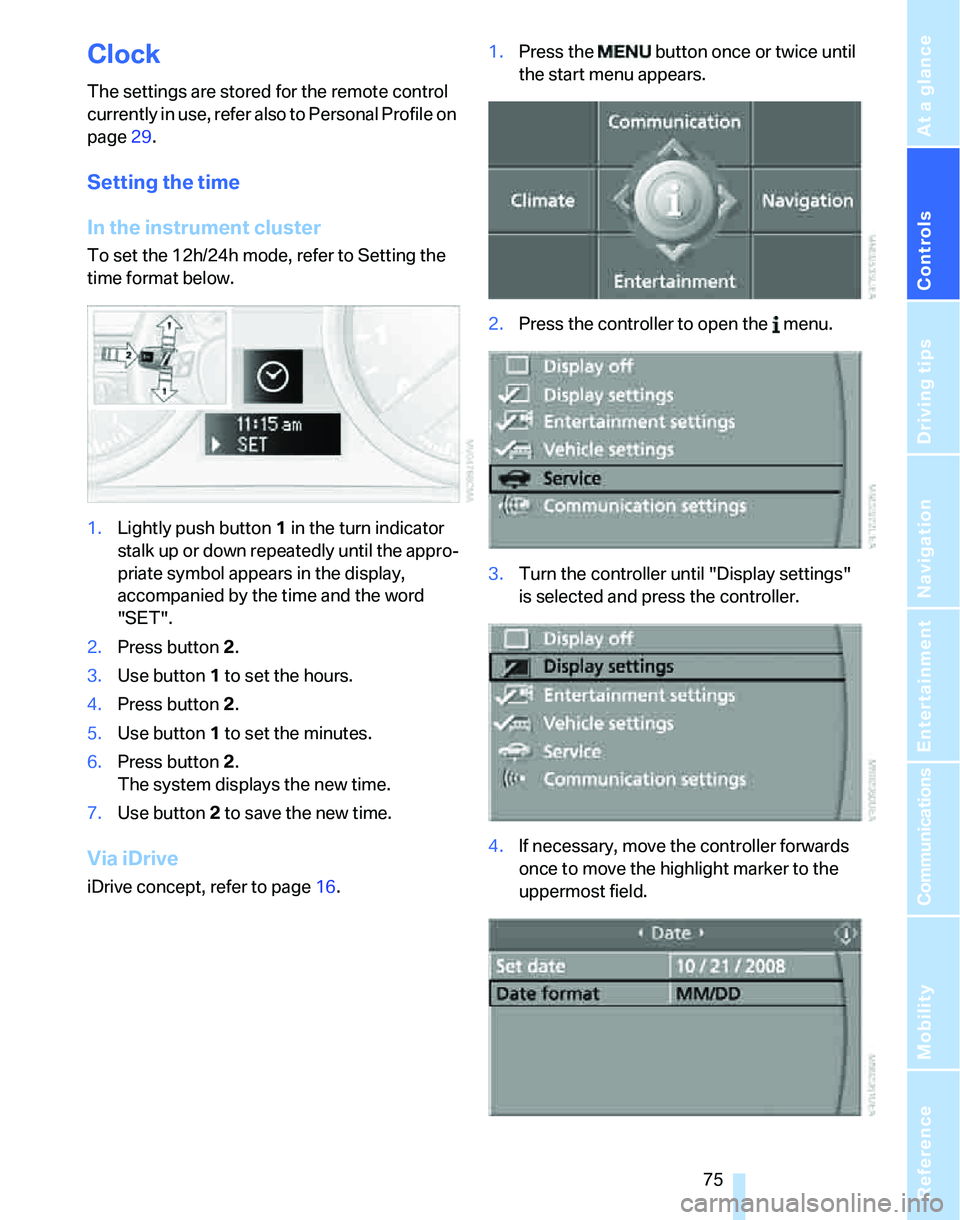
1.Lightly push button 1 in the turn indicator
stalk up or down repeatedly until the appro-
priate symbol appears in the display,
accompanied by the time and the word
"SET".
2.Press button 2.
3.Use button 1 to set the hours.
4.Press button 2.
5.Use button 1 to set the minutes.
6.Press button 2.
The system displays the new time.
7.Use button 2 to save the new time.
Via iDrive
iDrive concept, refer to page16.1.Press the button once or twice until
the start menu appears.
2.Press the controller to open the menu.
3.Turn the controller until "Display settings"
is selected and press the controller.
4.If necessary, move the controller forwards
once to move the highlight marker to the
uppermost field.
Page 83 of 236
Technology for driving comfort and safety
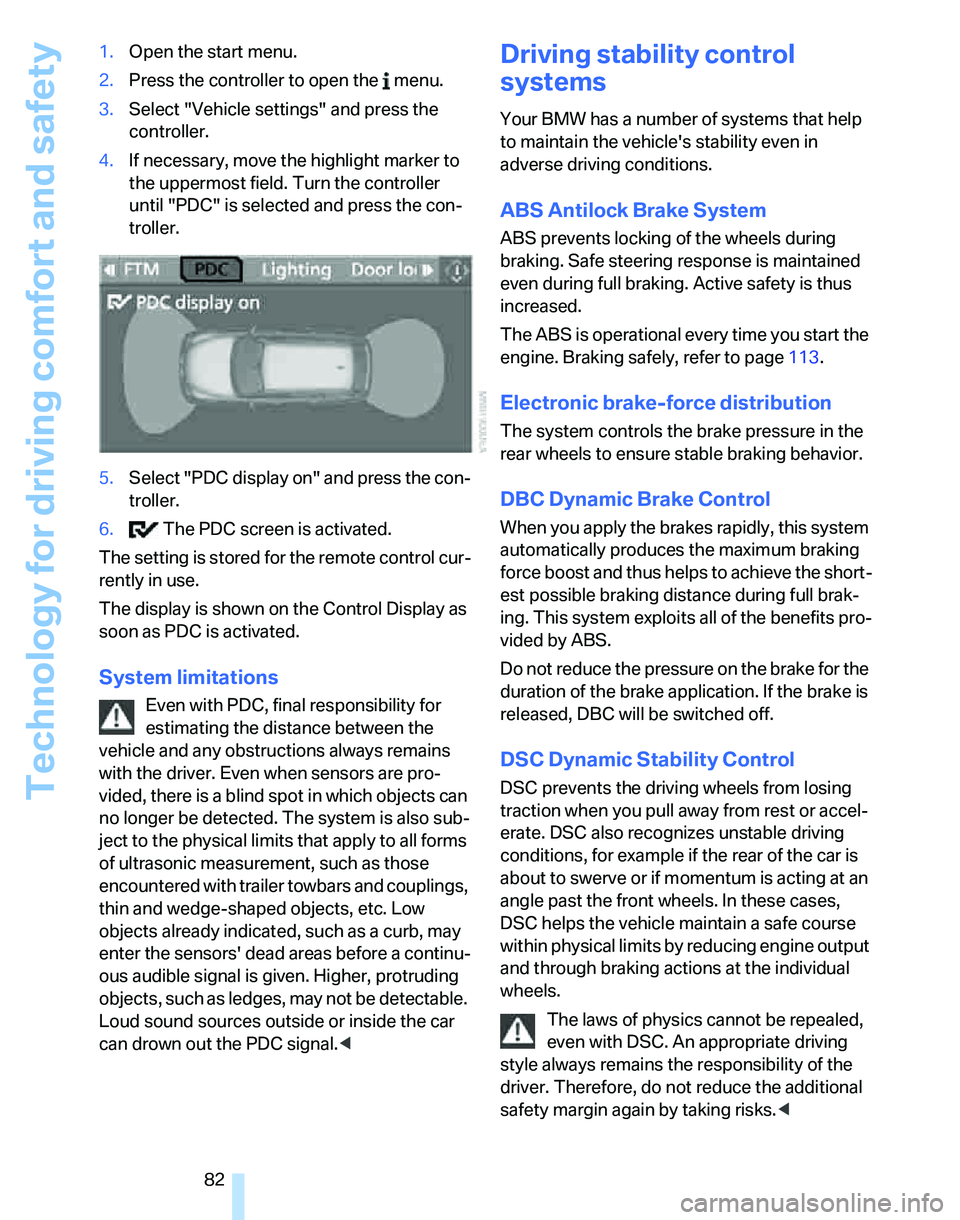
82 1.Open the start menu.
2.Press the controller to open the menu.
3.Select "Vehicle settings" and press the
controller.
4.If necessary, move the highlight marker to
the uppermost field. Turn the controller
until "PDC" is selected and press the con-
troller.
5.Select "PDC display on" and press the con-
troller.
6. The PDC screen is activated.
The setting is stored for the remote control cur-
rently in use.
The display is shown on the Control Display as
soon as PDC is activated.
System limitations
Even with PDC, final responsibility for
estimating the distance between the
vehicle and any obstructions always remains
with the driver. Even when sensors are pro-
vided, there is a blind spot in which objects can
no longer be detected. The system is also sub-
ject to the physical limits that apply to all forms
of ultrasonic measurement, such as those
encountered with trailer towbars and couplings,
thin and wedge-shaped objects, etc. Low
objects already indicated, such as a curb, may
enter the sensors' dead areas before a continu-
ous audible signal is given. Higher, protruding
objects, such as ledges, may not be detectable.
Loud sound sources outside or inside the car
can drown out the PDC signal.<
Driving stability control
systems
Your BMW has a number of systems that help
to maintain the vehicle's stability even in
adverse driving conditions.
ABS Antilock Brake System
ABS prevents locking of the wheels during
braking. Safe steering response is maintained
even during full braking. Active safety is thus
increased.
The ABS is operational every time you start the
engine. Braking safely, refer to page113.
Electronic brake-force distribution
The system controls the brake pressure in the
rear wheels to ensure stable braking behavior.
DBC Dynamic Brake Control
When you apply the brakes rapidly, this system
automatically produces the maximum braking
force boost and thus helps to achieve the short-
est possible braking distance during full brak-
ing. This system exploits all of the benefits pro-
vided by ABS.
Do not reduce the pressure on the brake for the
duration of the brake application. If the brake is
released, DBC will be switched off.
DSC Dynamic Stability Control
DSC prevents the driving wheels from losing
traction when you pull away from rest or accel-
erate. DSC also recognizes unstable driving
conditions, for example if the rear of the car is
about to swerve or if momentum is acting at an
angle past the front wheels. In these cases,
DSC helps the vehicle maintain a safe course
within physical limits by reducing engine output
and through braking actions at the individual
wheels.
The laws of physics cannot be repealed,
even with DSC. An appropriate driving
style always remains the responsibility of the
driver. Therefore, do not reduce the additional
safety margin again by taking risks.<
Page 97 of 236
Climate
96 side windows, towards the upper body area and
into the footwell for you. The air flow rate and
your temperature specifications will be adapted
to outside influences as a result of seasonal
changes, e.g. sunlight or window condensation.
The cooling is switched on automatically with
the AUTO program.
Intensity of the AUTO program
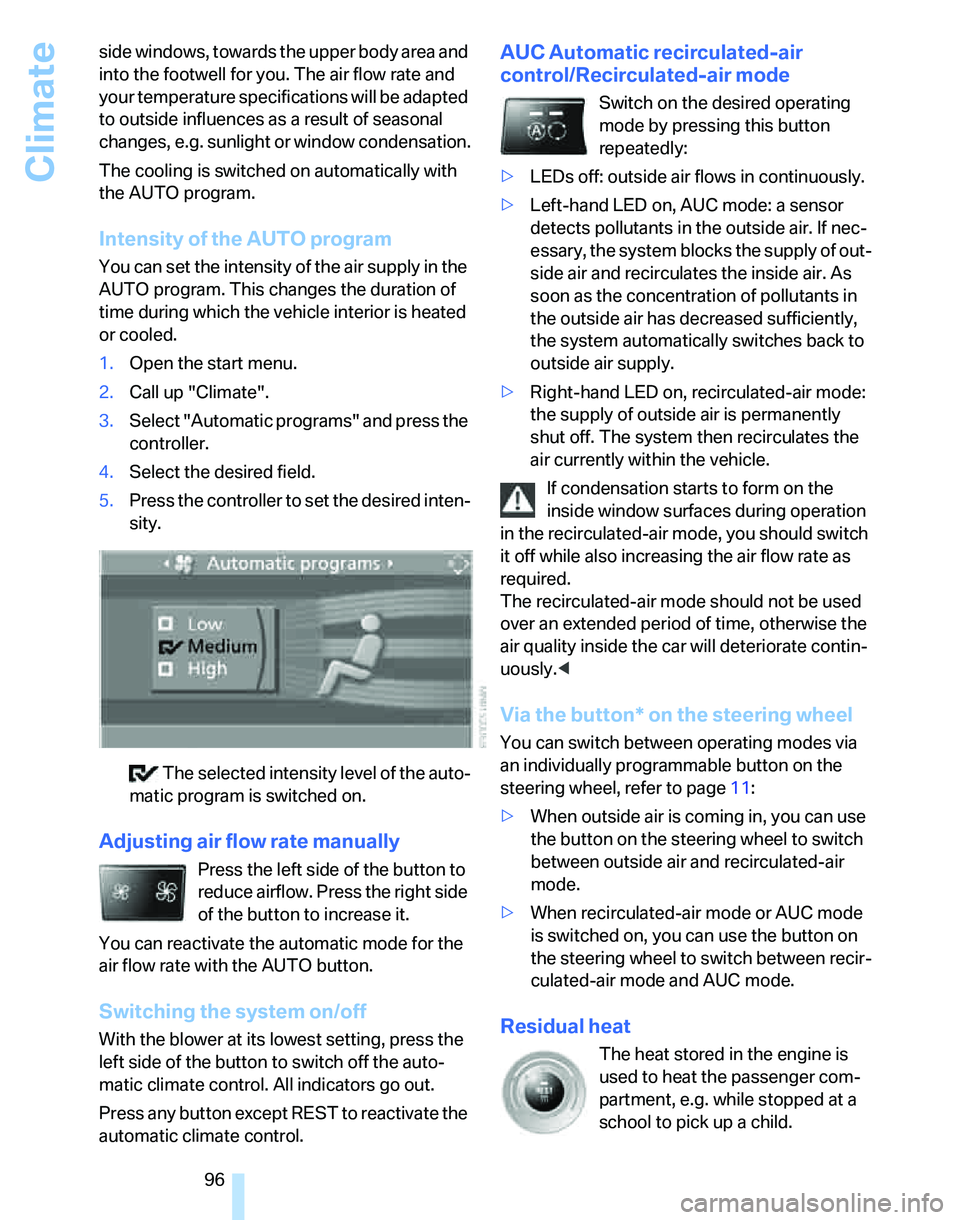
You can set the intensity of the air supply in the
AUTO program. This changes the duration of
time during which the vehicle interior is heated
or cooled.
1.Open the start menu.
2.Call up "Climate".
3.Select "Automatic programs" and press the
controller.
4.Select the desired field.
5.Press the controller to set the desired inten-
sity.
The selected intensity level of the auto-
matic program is switched on.
Adjusting air flow rate manually
Press the left side of the button to
reduce airflow. Press the right side
of the button to increase it.
You can reactivate the automatic mode for the
air flow rate with the AUTO button.
Switching the system on/off
With the blower at its lowest setting, press the
left side of the button to switch off the auto-
matic climate control. All indicators go out.
Press any button except REST to reactivate the
automatic climate control.
AUC Automatic recirculated-air
control/Recirculated-air mode
Switch on the desired operating
mode by pressing this button
repeatedly:
>LEDs off: outside air flows in continuously.
>Left-hand LED on, AUC mode: a sensor
detects pollutants in the outside air. If nec-
essary, the system blocks the supply of out-
side air and recirculates the inside air. As
soon as the concentration of pollutants in
the outside air has decreased sufficiently,
the system automatically switches back to
outside air supply.
>Right-hand LED on, recirculated-air mode:
the supply of outside air is permanently
shut off. The system then recirculates the
air currently within the vehicle.
If condensation starts to form on the
inside window surfaces during operation
in the recirculated-air mode, you should switch
it off while also increasing the air flow rate as
required.
The recirculated-air mode should not be used
over an extended period of time, otherwise the
air quality inside the car will deteriorate contin-
uously.<
Via the button* on the steering wheel
You can switch between operating modes via
an individually programmable button
on the
steering wheel, refer to page11:
>When outside air is coming in, you can use
the button on the steering wheel to switch
between outside air and recirculated-air
mode.
>When recirculated-air mode or AUC mode
is switched on, you can use the button on
the steering wheel to switch between recir-
culated-air mode and AUC mode.
Residual heat
The heat stored in the engine is
used to heat the passenger com-
partment, e.g. while stopped at a
school to pick up a child.
Page 104 of 236
Controls
103Reference
At a glance
Driving tips
Communications
Navigation
Entertainment
Mobility
Glove compartment
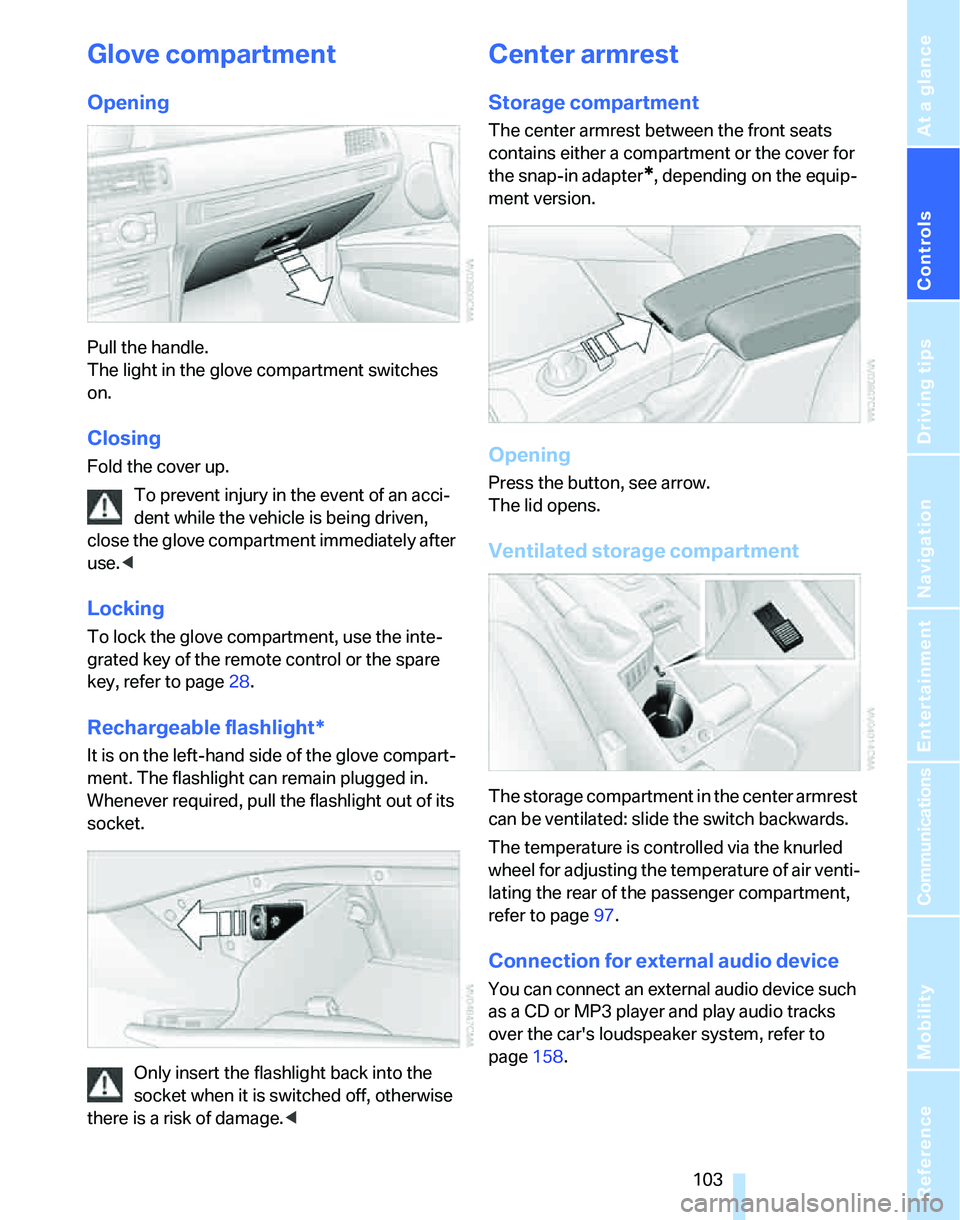
Opening
Pull the handle.
The light in the glove compartment switches
on.
Closing
Fold the cover up.
To prevent injury in the event of an acci-
dent while the vehicle is being driven,
close the glove compartment immediately after
use.<
Locking
To lock the glove compartment, use the inte-
grated key of the remote control or the spare
key, refer to page28.
Rechargeable flashlight*
It is on the left-hand side of the glove compart-
ment. The flashlight can remain plugged in.
Whenever required, pull the flashlight out of its
socket.
Only insert the flashlight back into the
socket when it is switched off, otherwise
there is a risk of damage.<
Center armrest
Storage compartment
The center armrest between the front seats
contains either a compartment or the cover for
the snap-in adapter
*, depending on the equip-
ment version.
Opening
Press the button, see arrow.
The lid opens.
Ventilated storage compartment
The storage compartment in the center armrest
can be ventilated: slide the switch backwards.
The temperature is controlled via the knurled
wheel for adjusting the temperature of air venti-
lating the rear of the passenger compartment,
refer to page97.
Connection for external audio device
You can connect an external audio device such
as a CD or MP3 player and play audio tracks
over the car's loudspeaker system, refer to
page158.
Page 107 of 236
Practical interior accessories
106 The cargo area cover is raised when the
rear window or tailgate is opened
*.
Before closing the rear window or tailgate,
press the cover downward until it engages.<
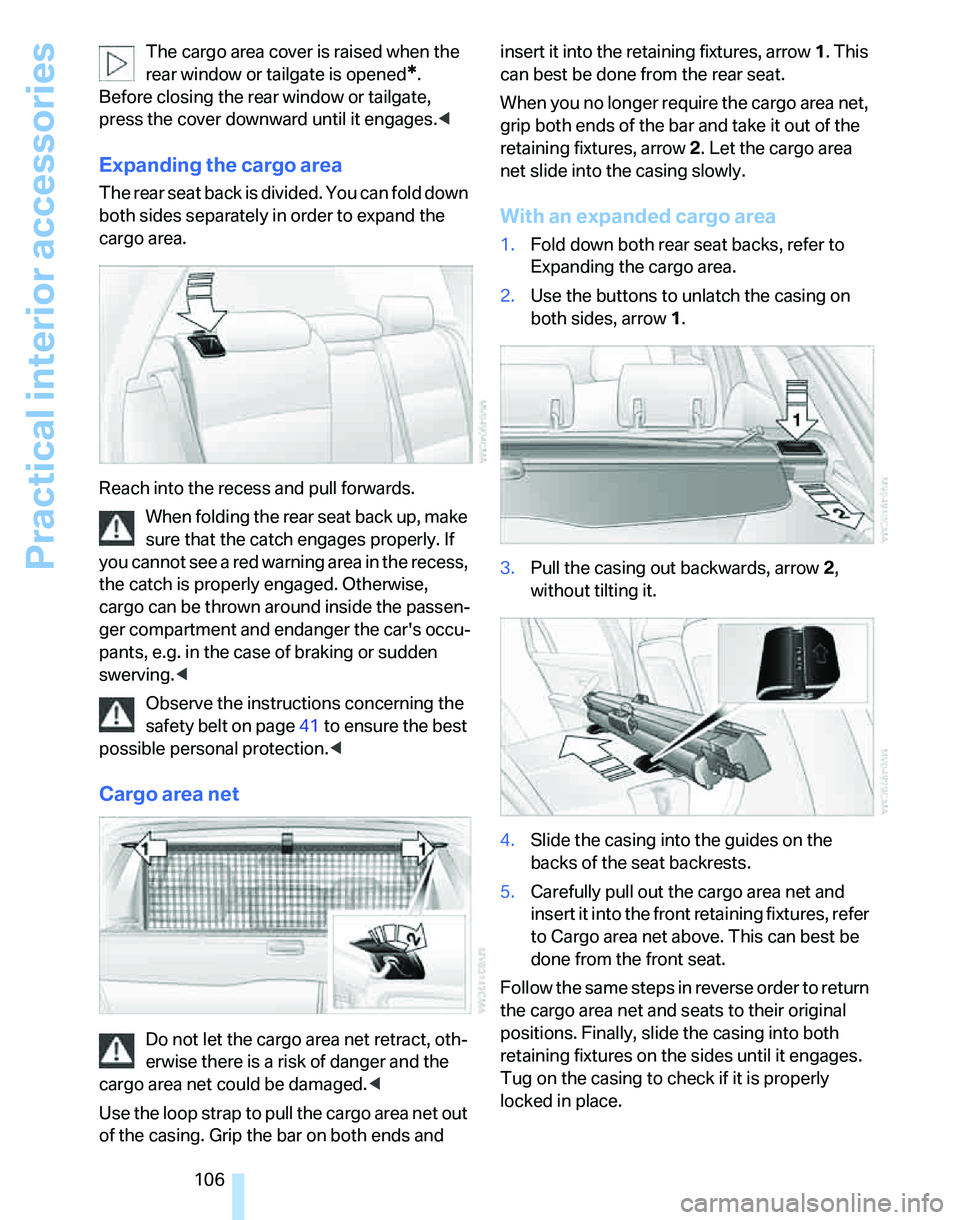
Expanding the cargo area
The rear seat back is divided. You can fold down
both sides separately in order to expand the
cargo area.
Reach into the recess and pull forwards.
When folding the rear seat back up, make
sure that the catch engages properly. If
you cannot see a red warning area in the recess,
the catch is properly engaged. Otherwise,
cargo can be thrown around inside the passen-
ger compartment and endanger the car's occu-
pants, e.g. in the case of braking or sudden
swerving.<
Observe the instructions concerning the
safety belt on page41 to ensure the best
possible personal protection.<
Cargo area net
Do not let the cargo area net retract, oth-
erwise there is a risk of danger and the
cargo area net could be damaged.<
Use the loop strap to pull the cargo area net out
of the casing. Grip the bar on both ends and insert it into the retaining fixtures, arrow 1. This
can best be done from the rear seat.
When you no longer require the cargo area net,
grip both ends of the bar and take it out of the
retaining fixtures, arrow 2. Let the cargo area
net slide into the casing slowly.
With an expanded cargo area
1.Fold down both rear seat backs, refer to
Expanding the cargo area.
2.Use the buttons to unlatch the casing on
both sides, arrow 1.
3.Pull the casing out backwards, arrow 2,
without tilting it.
4.Slide the casing into the guides on the
backs of the seat backrests.
5.Carefully pull out the cargo area net and
insert it into the front retaining fixtures, refer
to Cargo area net above. This can best be
done from the front seat.
Follow the same steps in reverse order to return
the cargo area net and seats to their original
positions. Finally, slide the casing into both
retaining fixtures on the sides until it engages.
Tug on the casing to check if it is properly
locked in place.
Page 121 of 236
Starting the navigation system
120
Starting the navigation system
Your navigation system can use satellites to
ascertain the precise position of your vehicle
and guide you reliably to any destination you
enter.
Navigation DVD
The navigation system requires a special navi-
gation DVD. You can obtain the latest version at
your BMW Center.
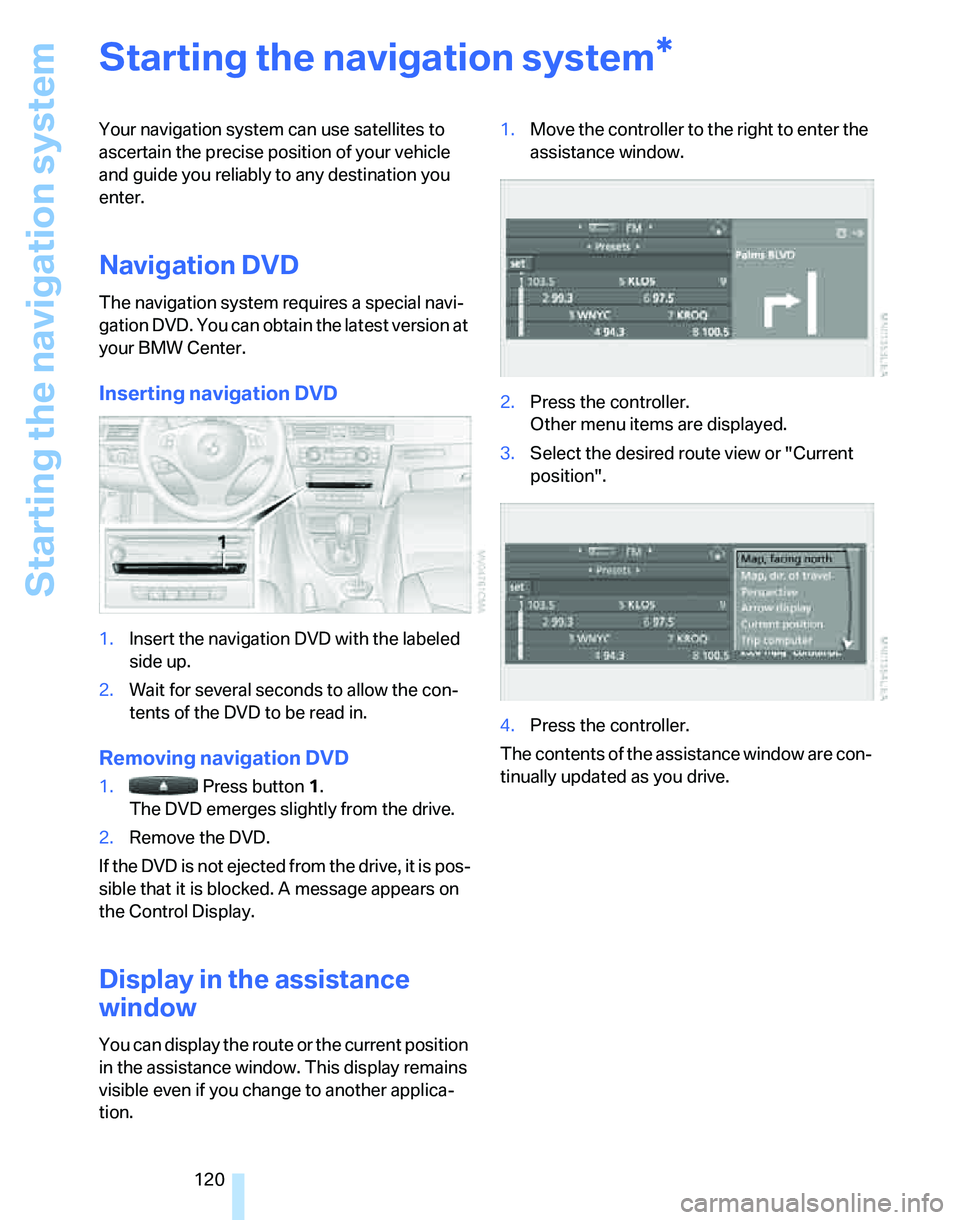
Inserting navigation DVD
1.Insert the navigation DVD with the labeled
side up.
2.Wait for several seconds to allow the con-
tents of the DVD to be read in.
Removing navigation DVD
1. Press button 1.
The DVD emerges slightly from the drive.
2.Remove the DVD.
If the DVD is not ejected from the drive, it is pos-
sible that it is blocked. A message appears on
the Control Display.
Display in the assistance
window
You can display the route or the current position
in the assistance window. This display remains
visible even if you change to another applica-
tion.1.Move the controller to the right to enter the
assistance window.
2.Press the controller.
Other menu items are displayed.
3.Select the desired route view or "Current
position".
4.Press the controller.
The contents of the assistance window are con-
tinually updated as you drive.
*