2006 BMW 325I SEDAN menu
[x] Cancel search: menuPage 101 of 245

Controls
99Reference
At a glance
Driving tips
Communications
Navigation
Entertainment
Mobility
side windows, towards the upper body area and
into the footwell for you. The air flow rate and
your temperature specifications will be adapted
to outside influences as a result of seasonal
changes, e.g. sunlight or window condensation.
The cooling is switched on automatically with
the AUTO program.
Intensity of the AUTO program
You can set the intensity of the air supply in the
AUTO program. This changes the duration of
time during which the vehicle interior is heated
or cooled.
1.Open the start menu.
2.Call up "Climate".
3.Select "Automatic programs" and press the
controller.
4.Select the desired field.
5.Press the controller to set the desired inten-
sity.
The selected intensity level of the auto-
matic program is switched on.
Adjusting air flow rate manually
Press the left side of the button to
reduce airflow. Press the right side
of the button to increase it.
You can reactivate the automatic mode for the
air flow rate with the AUTO button.
Switching the system on/off
With the blower at its lowest setting, press the
left side of the button to switch off the auto-
matic climate control. All indicators go out.
Press any button except REST to reactivate the
automatic climate control.
AUC Automatic recirculated-air
control/Recirculated-air mode
Switch on the desired operating
mode by pressing this button
repeatedly:
>LEDs off: outside air flows in continuously.
>Left-hand LED on, AUC mode: a sensor
detects pollutants in the outside air. If nec-
essary, the system blocks the supply of out-
side air and recirculates the inside air. As
soon as the concentration of pollutants in
the outside air has decreased sufficiently,
the system automatically switches back to
outside air supply.
>Right-hand LED on, recirculated-air mode:
the supply of outside air is permanently
shut off. The system then recirculates the
air currently within the vehicle.
If condensation starts to form on the
inside window surfaces during operation
in the recirculated-air mode, you should switch
it off while also increasing the air flow rate as
required.
The recirculated-air mode should not be used
over an extended period of time, otherwise the
air quality inside the car will deteriorate contin-
uously.<
Via the button* on the steering wheel
You can switch between operating modes via
an individually programmable button
on the
steering wheel, refer to page11:
>When outside air is coming in, you can use
the button on the steering wheel to switch
between outside air and recirculated-air
mode.
>When recirculated-air mode or AUC mode
is switched on, you can use the button on
the steering wheel to switch between recir-
culated-air mode and AUC mode.
Residual heat
The heat stored in the engine is
used to heat the passenger com-
partment, e.g. while stopped at a
school to pick up a child.
Page 103 of 245

Controls
101Reference
At a glance
Driving tips
Communications
Navigation
Entertainment
Mobility
Microfilter/activated-charcoal filter
The microfilter traps dust and pollen in the
incoming air. The activated-charcoal filter pro-
vides additional protection by filtering gaseous
pollutants from the outside air. Your BMW Cen-
ter replaces this combined filter during routine
maintenance.
You can call up further information in the service
requirements display, refer to page74.
Parked car ventilation
Concept
The parked car ventilation/heating provides
ventilation to the passenger compartment and
lowers its temperature, if necessary. It is ready
for use at any outside temperature, as of radio
readiness.
The parked car ventilation/heating remains
switched on for 30 minutes. Two different
switch-on times can be preselected. The sys-
tem can also be switched on and off directly.
Due to its high power consumption, it should
not be switched on twice in a row without driv-
ing in between to allow the battery to recharge.
The air emerges from the air vents for the upper
body area in the instrument panel. The air vents
must therefore be open.
The parked car ventilation system is operated
via iDrive.
Switching on/off directly
iDrive concept, refer to page16.
1.Open the start menu.
2.Move the controller to the left to call up "Cli-
mate".
3.Select "Parked car operation" and press the
controller.
4.Select "Automatic ventilation" and press
the controller.5.Select "Parked car ventilation" and press
the controller.
The parked car ventilation/heating is
switched on.
The symbol on the automatic climate control
display flashes.
Preselecting switch-on times
iDrive concept, refer to page16.
1.Open the start menu.
2.Move the controller to the left to call up "Cli-
mate".
3.Select "Parked car operation" and press the
controller.
4.Select "Activation time" and press the con-
troller.
5.Move the controller to the left or right to
select "Timer 1" or "Timer 2".
Page 126 of 245

Starting the navigation system
124
Starting the navigation system
Your navigation system can use satellites to
ascertain the precise position of your vehicle
and guide you reliably to any destination you
enter.
Navigation DVD
The navigation system requires a special navi-
gation DVD. You can obtain the latest version at
your BMW Center.
Inserting navigation DVD
1.Insert the navigation DVD with the labeled
side up.
2.Wait for several seconds to allow the con-
tents of the DVD to be read in.
Removing navigation DVD
1. Press button 1.
The DVD emerges slightly from the drive.
2.Remove the DVD.
If the DVD is not ejected from the drive, it is pos-
sible that it is blocked. A message appears on
the Control Display.
Display in the assistance
window
You can display the route or the current position
in the assistance window. This display remains
visible even if you change to another applica-
tion.1.Move the controller to the right to enter the
assistance window.
2.Press the controller.
Other menu items are displayed.
3.Select the desired route view or "Current
position".
4.Press the controller.
The contents of the assistance window are con-
tinually updated as you drive.
*
Page 127 of 245

Navigation
Driving tips
125Reference
At a glance
Controls
Communications
Entertainment
Mobility
Destination entry
In entering your destination you can select from
the following options:
>Entering a destination manually, see below
>Entering a destination by voice com-
mands*, refer to page128
>Selecting destination using information,
refer to page130
>Selecting destination from a list, refer to
Destination list, page131
>Selecting destination from address book,
refer to page132
>Selecting home address, refer to page134
After selecting your destination you can pro-
ceed to start the destination guidance, refer to
page136.
Operating navigation system
Enter data only when the vehicle is sta-
tionary, and always give priority to the
applicable traffic regulations in the event of any
contradiction between traffic and road condi-
tions and the instructions issued by the naviga-
tion system. If you do not observe this precau-
tion, you may be in violation of the law, and can
endanger vehicle occupants and other road
users.<
iDrive concept, refer to page16.
1.Press the button.
This opens the start menu.
2.Move the controller to the right to call up
"Navigation".3.Select "Navigation" and press the control-
ler.
Entering a destination
manually
The system's word-matching principle makes it
easier for you to enter the names of streets or
towns, refer to page135. This allows you to
enter different spellings and completes your
entry automatically so that stored names can be
called up quickly.
1.If necessary, move the highlight marker to
the uppermost field. Turn the controller
until "Navigation" is selected and press the
controller.
"New destination" is selected.
2.Press the controller.
Page 132 of 245

Destination entry
130 3.Select "Input map" and press the controller.
A section of a map is displayed on the Con-
trol Display:
>During destination guidance, around the
current destination
>With the destination guidance deacti-
vated, around the last destination
entered
4.Turn the controller to adjust the scale.
To move the map, move the controller in the
desired direction.
The controller can be moved to the left,
right, forwards, backwards and also diago-
nally.
5.Press the controller to adopt it for destina-
tion guidance or to store it.
The selected destination and other menu
items are displayed.6.Select the desired menu item:
>"Start route guidance" starts destination
guidance.
>"Show current position" places your
current position at the center of the map.
>"Show destination position" places the
current destination at the center of the
map.
>"Return to map" changes back to the
"Input map".
> Exit the menu.
7.Press the controller.
The map for destination entry can also be called
up in the map display:
Select the symbol and press the controller.
Selecting destination using
information
You can obtain a display of selected destina-
tions, e.g. hotels, sights or hospitals, and adopt
them for destination guidance.
1.Select "Navigation" and press the control-
ler.
"New destination" is selected.
2.Press the controller.
Page 133 of 245

Navigation
Driving tips
131Reference
At a glance
Controls
Communications
Entertainment
Mobility
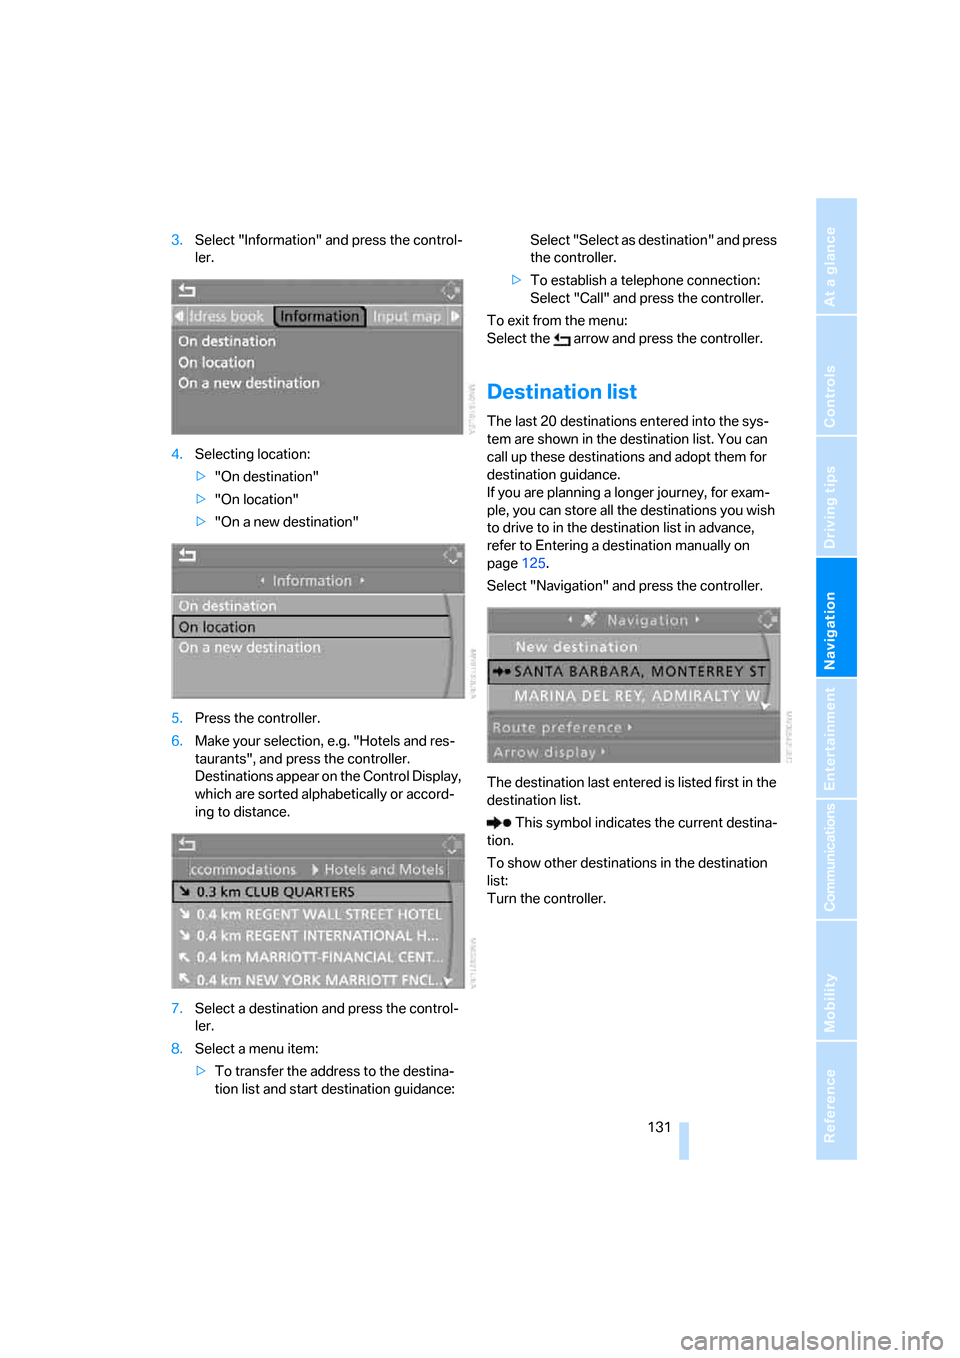
3.Select "Information" and press the control-
ler.
4.Selecting location:
>"On destination"
>"On location"
>"On a new destination"
5.Press the controller.
6.Make your selection, e.g. "Hotels and res-
taurants", and press the controller.
Destinations appear on the Control Display,
which are sorted alphabetically or accord-
ing to distance.
7.Select a destination and press the control-
ler.
8.Select a menu item:
>To transfer the address to the destina-
tion list and start destination guidance:Select "Select as destination" and press
the controller.
>To establish a telephone connection:
Select "Call" and press the controller.
To exit from the menu:
Select the arrow and press the controller.
Destination list
The last 20 destinations entered into the sys-
tem are shown in the destination list. You can
call up these destinations and adopt them for
destination guidance.
If you are planning a longer journey, for exam-
ple, you can store all the destinations you wish
to drive to in the destination list in advance,
refer to Entering a destination manually on
page125.
Select "Navigation" and press the controller.
The destination last entered is listed first in the
destination list.
This symbol indicates the current destina-
tion.
To show other destinations in the destination
list:
Turn the controller.
Page 136 of 245

Destination entry
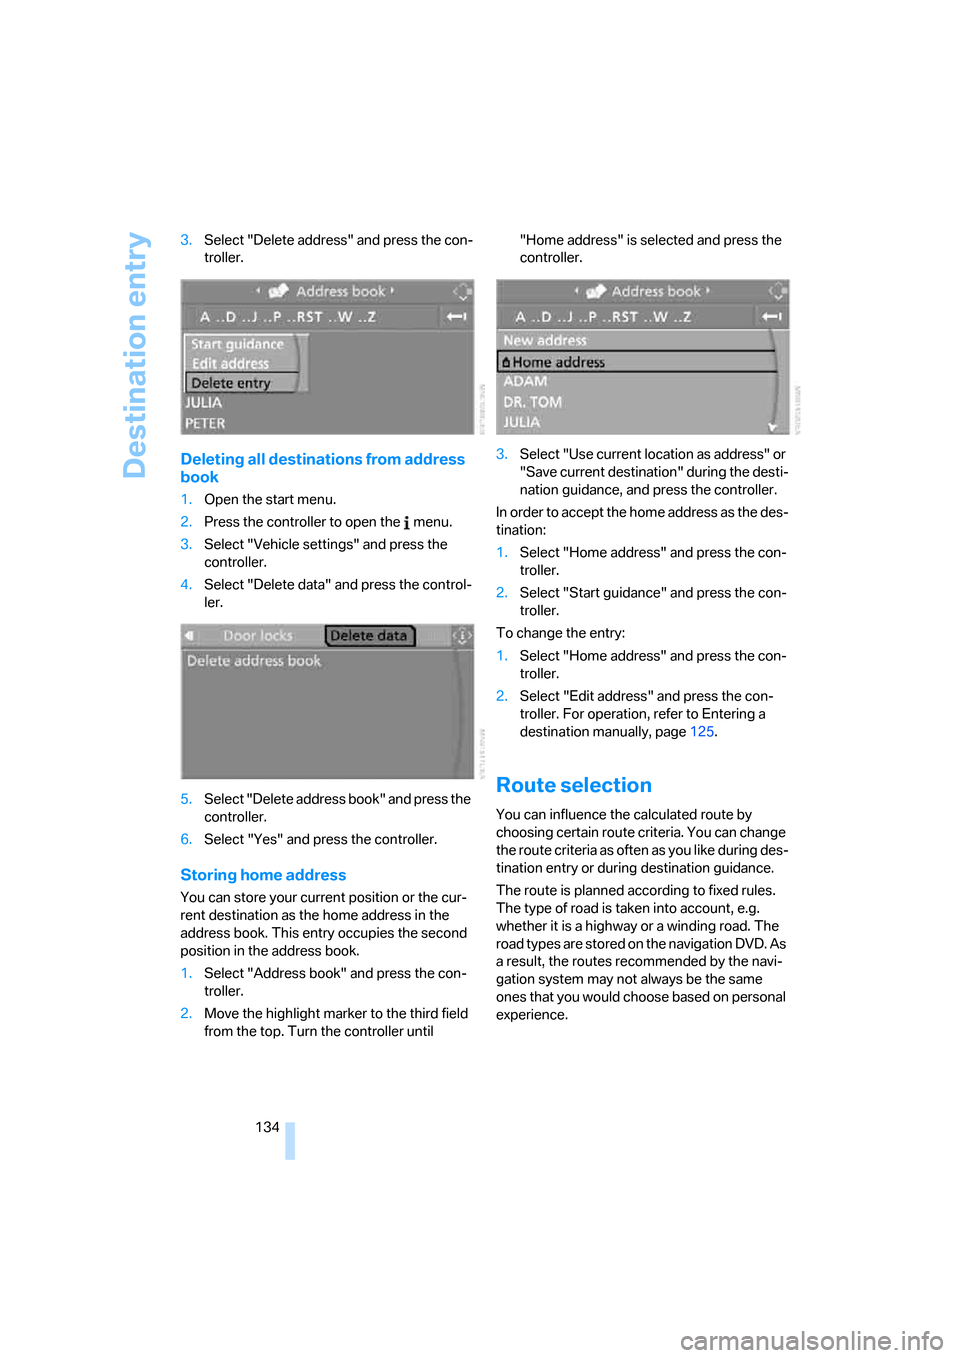
134 3.Select "Delete address" and press the con-
troller.
Deleting all destinations from address
book
1.Open the start menu.
2.Press the controller to open the menu.
3.Select "Vehicle settings" and press the
controller.
4.Select "Delete data" and press the control-
ler.
5.Select "Delete address book" and press the
controller.
6.Select "Yes" and press the controller.
Storing home address
You can store your current position or the cur-
rent destination as the home address in the
address book. This entry occupies the second
position in the address book.
1.Select "Address book" and press the con-
troller.
2.Move the highlight marker to the third field
from the top. Turn the controller until "Home address" is selected and press the
controller.
3.Select "Use current location as address" or
"Save current destination" during the desti-
nation guidance, and press the controller.
In order to accept the home address as the des-
tination:
1.Select "Home address" and press the con-
troller.
2.Select "Start guidance" and press the con-
troller.
To change the entry:
1.Select "Home address" and press the con-
troller.
2.Select "Edit address" and press the con-
troller. For operation, refer to Entering a
destination manually, page125.
Route selection
You can influence the calculated route by
choosing certain route criteria. You can change
the route criteria as often as you like during des-
tination entry or during destination guidance.
The route is planned according to fixed rules.
The type of road is taken into account, e.g.
whether it is a highway or a winding road. The
road types are stored on the navigation DVD. As
a result, the routes recommended by the navi-
gation system may not always be the same
ones that you would choose based on personal
experience.
Page 137 of 245

Navigation
Driving tips
135Reference
At a glance
Controls
Communications
Entertainment
Mobility
Changing route criteria
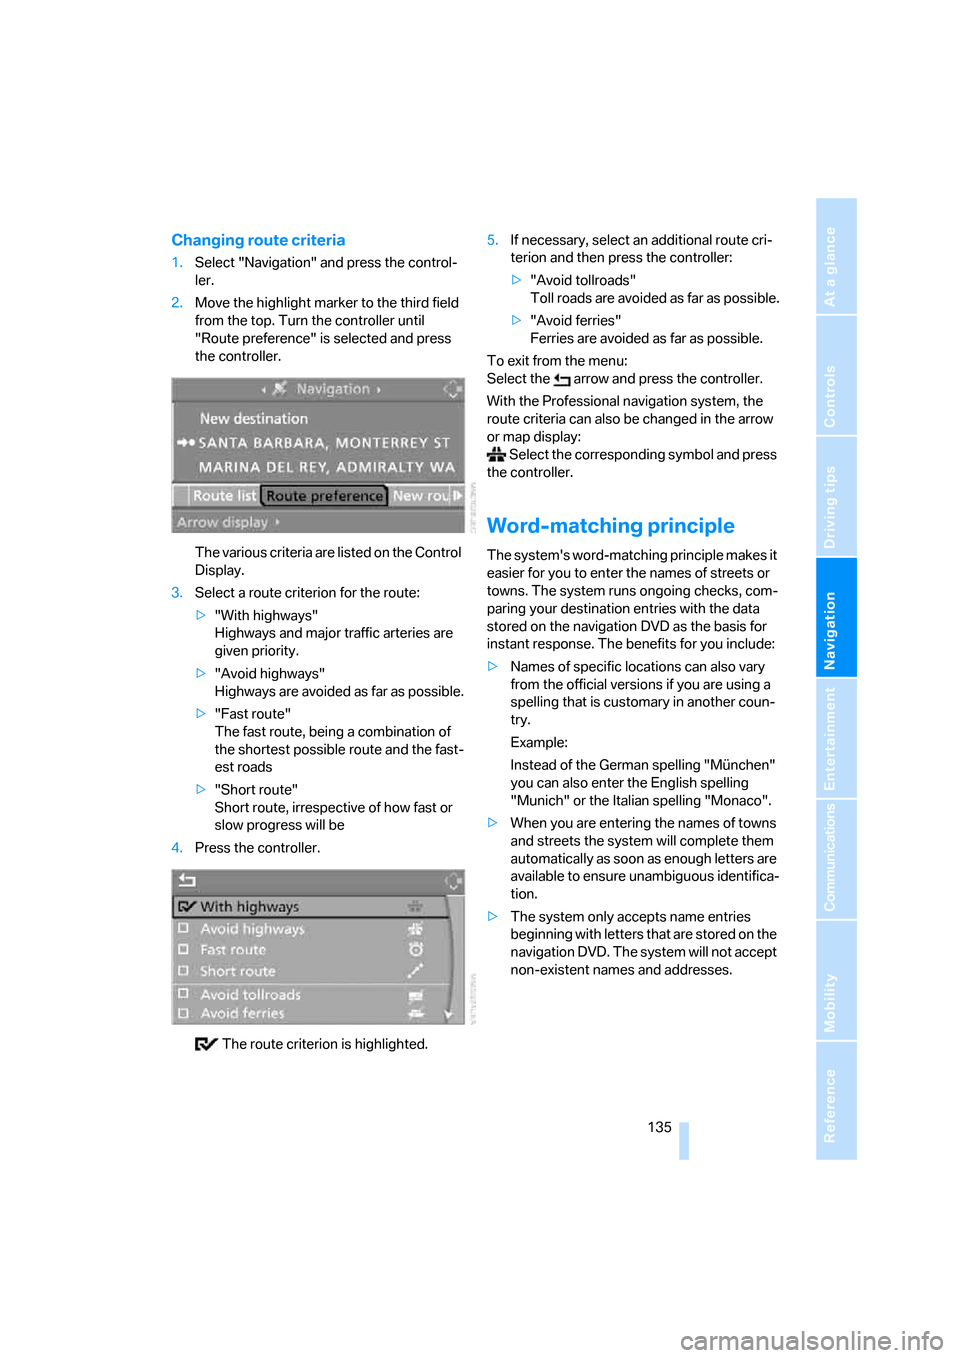
1.Select "Navigation" and press the control-
ler.
2.Move the highlight marker to the third field
from the top. Turn the controller until
"Route preference" is selected and press
the controller.
The various criteria are listed on the Control
Display.
3.Select a route criterion for the route:
>"With highways"
Highways and major traffic arteries are
given priority.
>"Avoid highways"
Highways are avoided as far as possible.
>"Fast route"
The fast route, being a combination of
the shortest possible route and the fast-
est roads
>"Short route"
Short route, irrespective of how fast or
slow progress will be
4.Press the controller.
The route criterion is highlighted.5.If necessary, select an additional route cri-
terion and then press the controller:
>"Avoid tollroads"
Toll roads are avoided as far as possible.
>"Avoid ferries"
Ferries are avoided as far as possible.
To exit from the menu:
Select the arrow and press the controller.
With the Professional navigation system, the
route criteria can also be changed in the arrow
or map display:
Select the corresponding symbol and press
the controller.
Word-matching principle
The system's word-matching principle makes it
easier for you to enter the names of streets or
towns. The system runs ongoing checks, com-
paring your destination entries with the data
stored on the navigation DVD as the basis for
instant response. The benefits for you include:
>Names of specific locations can also vary
from the official versions if you are using a
spelling that is customary in another coun-
try.
Example:
Instead of the German spelling "München"
you can also enter the English spelling
"Munich" or the Italian spelling "Monaco".
>When you are entering the names of towns
and streets the system will complete them
automatically as soon as enough letters are
available to ensure unambiguous identifica-
tion.
>The system only accepts name entries
beginning with letters that are stored on the
navigation DVD. The system will not accept
non-existent names and addresses.