Page 184 of 366
Depending on where you drive, you
may experience reception problems.
Interf erence can be caused by any of
these conditions:Drivingonaneast/westroadwith
a mountain on the south side of
the road.
There may be other geographic
situations that could af f ect satellite
radio reception. Driving on a single lane road
alongside dense trees taller than
50 ft. (15 m) to the south of you. Driving on the lower level of a
multi-tiered road. Driving on a road beside a vertical
wall, steep clif f , or hill to the south
of you. Driving in tunnels.
Driving on the north side of a
large commercial truck on an
east/west road.
If your XM Radio service has expired
or you purchased your vehicle f rom
a previous owner, you can listen to a
sampling of the broadcasts available
on XM Satellite Radio. With the
ignition switch in the ACCESSORY
(I) or ON (II) position, push the
PWR/VOL knob to turn on the audio
system and press the CD/AUX XM
button. A variety of music types and
styles will play.
If you decide to purchase XM
satellite radio service, contact XM
Radio at
, or at
1-800-852-9696. You will need to give
them your radio I.D. number and
your credit card number. Turn the TUNE knob until ‘‘0’’
appears in the display. Your I.D. will
appear in the display.
Af ter you have registered with XM
Radio, keep your audio system in the
SAT Radio mode while you await
activation. This should take about 30
minutes.
While awaiting activation, make sure
your vehicle remains in an open area
with good reception. Once your
audio system is activated, ‘‘category’’
or ‘‘CH’’ will appear in the display
and you will be able to listen to XM
Radio broadcasts. XM Radio will
continue to send an activation signal
to your vehicle for at least 12 hours
from activation request. If the
service has not been activated after
36 hours, contact XM Radio.As required by the FCC:
Changes or modif ications not expresslyapproved by the party responsible f orcompliance could void the user’sauthority to operate the equipment.
www.xmradio.com
CONT INUED
Playing the XMSatellite Radio (U.S. Models)
Receiving Satellite Radio Service To get your XM Satellite radio ID
number:Features
183
�����—�����—�����y���������������y���
�(�����������y���
�����y
Page 185 of 366
Your audio system will accept
auxiliary inputs f rom a portable
cassette player, MP3 player, etc.To use the jack, turn down the
volume of the portable unit, and
pivot the cover up, then plug in a
mini-jack cable between the portable
unit and the jack. You will see AUX
in the display and the system
automatically switches to AUX mode.
To adjust the volume, turn the PWR/
VOL knob.
To take the system out of AUX mode,
press the AM/FM, or CD/AUX or
CD/AUX/XM (U.S. models only)
button. To return to AUX mode
while the jack is connected, press the
CD/AUX or CD/AUX/XM button.
Auxiliary Input Jack
Auxiliary Input Jack
184
�����—�����—�����y���������������y���
�(�����������y���
�����y
Page 187 of 366
Playing Discs
186
CD SLOT
CD LOAD INDICATOR
LOAD BUTTON
SEEK/SKIP BARSCAN BUTTON
CD/AUX BUTTON CH DISC BAR
AUDIO DISPLAY BUTTON
UPPER DISPLAY
DISC SCAN ICON TRACK REPEAT ICON
TRACK SCAN ICON CH DISC ICONS
SOUND ICON
TRACK RANDOM ICON
DISC REPEAT ICON
With navigation system
TRACK ICON DISC ICON
U.S. model is shown.
�����—�����—�����y���������������y���
�(�����������y���
�����y
Page 188 of 366
CONT INUED
To load multiple discs in one
operation:Press the LOAD button until you
hear a beep and see ‘‘LOAD’’ in
the display.
To load only one CD, press and
release the LOAD button.
The disc number f or an empty
position is highlighted and the red
light starts blinking.
Insert the disc into the CD slot
when the green CD load indicator
comes on. Insert it only about
half way; the drive will pull it in the
rest of the way. You will see
‘‘BUSY’’ in the display as the CD
load indicator turns red and blinks
as the CD is loaded. You cannot load and play 3-inch
(8-cm)discsinthissystem.
When the CD load indicator turns
green and ‘‘LOAD’’ appears in the
display again, insert the next CD
in the slot.
Do not try to insert a disc until
‘‘LOAD’’ appears. You could
damage the audio unit.
Repeat steps 1 through 3 until all
six positions are loaded. If you are
not loading all six positions, the
system begins playing the last CD
loaded.
Your audio system has an in-dash
CD changer that holds up to six CDs,
providing several hours of
continuous entertainment. You
operate this CD changer with the
same controls used f or the radio.
To load CDs or operate the CD
changer, the ignition switch must be
in the ACCESSORY (I) or ON (II)
position.
For best results when using CD-R or
CD-RW discs, use only high quality
discs labeled f or audio use. When
recording a CD-R or CD-RW, the
recordingmustbeclosedinorder
f or the disc to be used by CD player. 1.
2.
3.
4.
5.
L oading CDs in the Changer
Operating the CD Changer
Playing Discs
Features
187
Do not use CDs with adhesive labels.
The label can curl up and cause the CD
to jam in the unit.
�����—�����—�����y��������
������y���
�(�����������y���
�����y
Page 191 of 366
�µ�µ
This f eature, when
activated, samples each first track of
all the discs in the CD changer in the
order they are stored. To activate
the DISC SCAN feature, press and
hold the SCAN button. You will see
D-SCAN in the display as a reminder.
The system will then play the first
track of the first CD for
approximately 10 seconds. If you do
nothing, the system will then play
the next CD’s first track. When it
plays a disc that you want to
continue listening to, press the
SCAN button again. To use the f unctions described as
f ollows, press the AUDIO DISPLAY
button to view the CD control icons
in the display.
This f unction
samples all the tracks on the
selected disc in the order they are
recorded on the CD. To activate it,
touch the TRACK SCAN icon or
press and release the SCAN button.
You will see SCAN on the lef t side of
TRACKicononthedisplayasa
reminder. Also, it appears on the
upper display. The system will then
play the f irst track f or approximately
10 seconds. If you do nothing, the
system will then play the f ollowing
tracks f or 10 seconds each. When it
plays a track that you want to
continue listening to, touch the
TRACK SCAN icon or press the
SCAN button again.On vehicles with navigation system
Playing Discs
DISC SCAN T RACK SCAN
190
�����—�����—�����y��������
������y���
�(�����������y���
�����y
Page 193 of 366
If you turn of f the system while a CD
is playing, either by pushing the
PWR/VOL knob or by turning of f
the ignition, the CD will stay in the
drive. When you turn the system
back on, it will begin at the same disc
and track.
To take the system out of CD mode,
press the AM/FM or CD/AUX, or
CD/AUX/XM button to switch to
the radio or satellite radio (U.S.
models only), or optional tape player
(if the tape is in it) while a CD is
playing. When you return to CD
mode by pressing the CD/AUX or
CD/AUX/XM button, play will
continue at the same point that it lef t
off.To remove the disc that is currently
playing, press and release the eject
( ) button. You will see EJECT
in the display. When you remove the
disc from the slot, the system begins
the load sequence so you can load
another disc in that position. If you
do not load another CD within 15
seconds, the system selects the
previous mode [AM, FM1, FM2, or
XM Radio (U.S. models)].
If you do not remove the CD f rom
the slot, the system will reload the
CD af ter 15 seconds and put the CD
changer in pause mode. To begin
playing the CD, press the CD button.
To remove a different CD from the
changer,firstselectitwiththe
appropriate preset button, or the
appropriate icon or CH/DISC bar.
When that CD begins playing, press
the eject button.Af ter that disc is ejected, pressing
the eject button again will eject the
next disc in numerical order. By
doing this six times, you can remove
all the CDs f rom the changer.
If you press the eject button while
listening to the radio, or with the
audio system turned of f , the disc
that was last selected is ejected.
In any mode, if you press the eject
button and hold it until you hear a
beep, the system will eject all of the
discs in the changer.
You can also eject discs when the
ignition switch is of f by pressing the
eject button. The disc that was last
selected is ejected f irst. You can
eject up to 5 discs, one at a time.
Playing Discs
T o Stop Playing a CD
Removing CDs f rom the Changer
192
�����—�����—�����y��������
������y���
�(�����������y���
�����y
Page 195 of 366
When using CD-R discs, use only
high quality CDs labeled f or audio
use.
When recording a CD-R, the
recording must be closed f or it to
be used by the system.When a CD is not being played, store
it in its case to protect it f rom dust
and other contamination. To prevent
warpage, keep CDs out of direct
sunlight and extreme heat.
To clean a CD, use a clean sof t cloth.
Wipe across the CD f rom the center
to the outside edge.
AnewCDmayberoughonthe
inner and outer edges. The small
plastic pieces causing this roughness
can f lake of f and f all on the re-
cording surf ace of the CD, causing
skipping or other problems. Remove
these pieces by rubbing the inner
and outer edges with the side of a
pencil or pen.
Never try to insert f oreign objects in
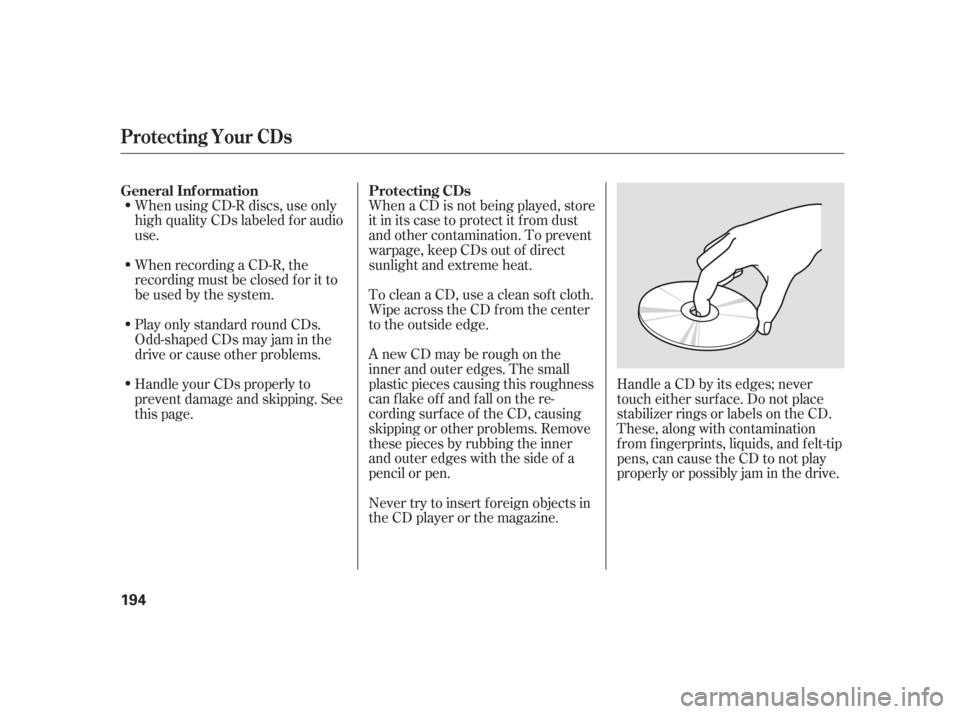
the CD player or the magazine. Handle a CD by its edges; never
touch either surf ace. Do not place
stabilizer rings or labels on the CD.
These, along with contamination
f rom f ingerprints, liquids, and f elt-tip
pens, can cause the CD to not play
properly or possibly jam in the drive.
Play only standard round CDs.
Odd-shaped CDs may jam in the
driveorcauseotherproblems.
Handle your CDs properly to
prevent damage and skipping. See
this page.
General Inf ormation
Protecting CDs
Protecting Your CDs
194
�����—�����—�����y���������������y���
�(�����������y���
�����y
Page 197 of 366
Playing a T ape (Optional)
196
TAPE DIRECTION INDICATORAUDIO DISPLAY BUTTON
PWR/VOL KNOB
SEEK/SKIP BAR
With Navigation System
UPPER DISPLAY
AM/FM BUTTON
CD/AUX BUTTON
REPEAT ICON
REW ICON
NR ICON
FF ICON
U.S. model is shown.
�����—�����—�����y�����������
���y���
�(�����������y���
�����y