Page 196 of 454

Many climate control f unctions can
still be controlled by standard
buttons, dials, and knobs, but some
f unctions can only be accessed using
the interf ace dial. The interf ace dial
has two parts, a knob and a selector.
The knob turns lef t and right. Use it
to make selections or adjustments to
a list or menu on the screen.The selector can be pushed lef t,
right, up, down, and in. Use the
selector to scroll through lists, to
select menus, and to highlight menu
items. When you make a selection,
push the center of the selector
(ENTER)togotothatselection.
When you unlock the doors with
your remote, the driver’s ID (Driver
1orDriver2)isdetected,andthe
climate control settings are turned to
the respective mode automatically
when the ignition is turned to the
ON (II) position.
The climate control system can also
be operated by voice control. See the
Navi section in your quick start
guide f or an overview of this system,
and the navigation system manual
f or complete details.
Interf ace Dial
Personalization Setting
Voice Control System
Vents, Heating, A/C, and Climate Control
Features
195
ENTER
SELECTOR
KNOB
Page 203 of 454
Theclimatecontrolsystemhastwo
sensors. A sunlight sensor is in the
top of the dashboard, and a
temperature sensor is next to the
steering column. Do not cover the
sensors or spill any liquid on them. Sunlight and T emperature
Sensors
Climat e Cont rol Sensors
202
SUNLIGHT SENSORTEMPERATURE SENSOR
Page 204 of 454

Most audio system f unctions can still
be controlled by standard buttons,
dials, and knobs, but some f unctions
can only be accessed using the
interf ace dial. The interf ace dial has
two parts, a knob and a selector.The selector can be pushed lef t,
right, up, down, and in. Use the
selector to scroll through lists, to
select menus, and to highlight menu
items. When you make a selection,
push the center of the selector
(ENTER)togotothatselection. The knob turns lef t and right. Use it
to make selections or adjustments to
a list or menu on the screen.
When you unlock the doors with
your remote and turn the audio
system on, the driver’s ID (Driver 1
or Driver 2) is detected, and the
radio preset memory (see page ),
the auto select preset memory (see
page ), and the volume and
sound level settings (see page )
are turned to the respective
memorized mode automatically.
The audio system can also be
operated by voice control. See the
Navi section in your quick start
guide f or an overview of this system,
and the navigation system manual
f or complete details.206
207 210
Interf ace Dial
Personalization Setting
Voice Control System
Audio System
Features
203
KNOB
ENTER
SELECTOR
Page 208 of 454

�µIf you are
traveling far from home and can no
longer receive your preset stations,
you can use the auto select feature to
find stations in the local area.
Push the interf ace selector down to
scroll down the screen, highlight
A.SEL, then press ENTER on the
interf ace selector. You will see
AUTO SEL on the screen, and the system goes into scan mode f or
several seconds.
Press the A.SEL button. You will see
AUTO SEL on the screen, and the
system goes into scan mode f or
several seconds. The system stores
the f requencies of six AM and
twelve FM stations in the preset
buttons.
You will see a ‘‘0’’ displayed if auto
select cannot f ind a strong station f or
every preset button.
If you do not like the stations auto
select has stored, you can store
other f requencies on the preset
buttons (icons) as previously
described.
To turn of f auto select, press
ENTER on the interf ace selector
(press the A.SEL button) again. This
restores the presets you originally
set.
U.S. models (except Alaskan and
Hawaiian) Canadian, Alaskan, and Hawaiian
models
AUTO SELECT
Playing the AM/FM Radio
Features
207
AUTO SEL ICON
Page 223 of 454

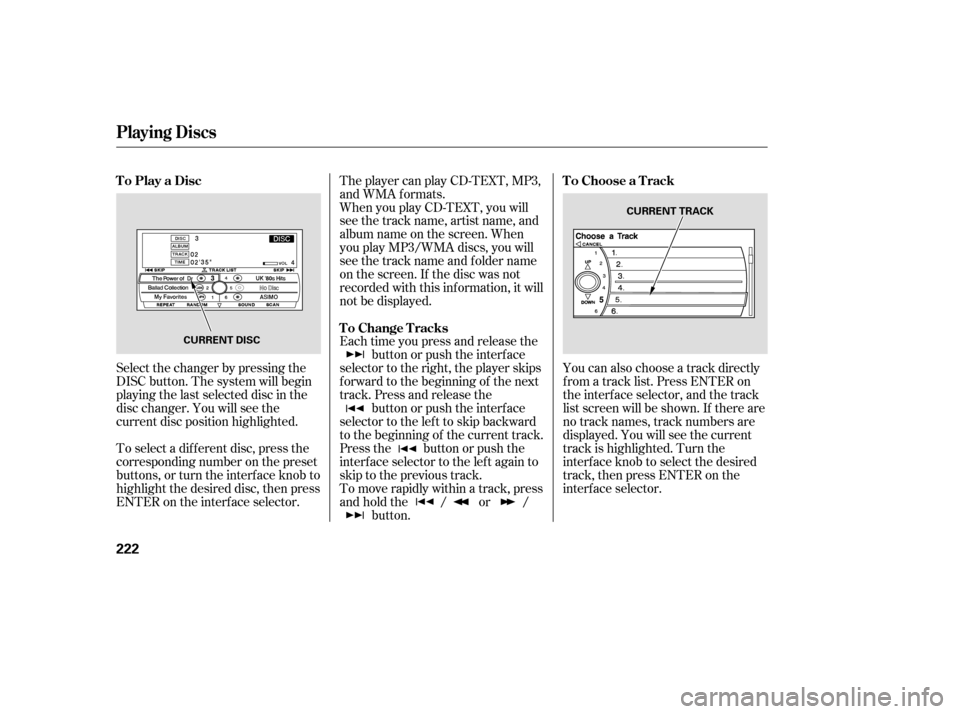
Select the changer by pressing the
DISC button. The system will begin
playing the last selected disc in the
disc changer. You will see the
current disc position highlighted.
To select a dif f erent disc, press the
corresponding number on the preset
buttons, or turn the interf ace knob to
highlight the desired disc, then press
ENTER on the interf ace selector.The player can play CD-TEXT, MP3,
and WMA formats.
When you play CD-TEXT, you will
see the track name, artist name, and
album name on the screen. When
you play MP3/WMA discs, you will
see the track name and folder name
on the screen. If the disc was not
recorded with this inf ormation, it will
not be displayed.
Each time you press and release the
button or push the interface
selector to the right, the player skips
f orward to the beginning of the next
track. Press and release the button or push the interface
selector to the left to skip backward
to the beginning of the current track.
Press the button or push the
interface selector to the left again to
skip to the previous track.
To move rapidly within a track, press
andholdthe / or / button. You can also choose a track directly
f rom a track list. Press ENTER on
the interf ace selector, and the track
list screen will be shown. If there are
no track names, track numbers are
displayed. You will see the current
track is highlighted. Turn the
interf ace knob to select the desired
track, then press ENTER on the
interf ace selector.
To Play a Disc
To Change TracksTo Choose a Track
Playing Discs
222
CURRENT DISC CURRENT TRACK
Page 225 of 454

To replay the current track
continuously, use the interf ace
selector to scroll down, select
TRACK REPEAT, and press ENTER
on the interf ace selector. As a
reminder, you will see REPEAT next
to TRACK on the screen. To turn
this feature off, highlight TRACK
REPEAT (if not already highlighted),
andpressENTERontheinterface
selector again.To replay the current disc
continuously, use the interf ace
selector to scroll down, select DISC
REPEAT, and press ENTER on the
interf ace selector. As a reminder,
you will see REPEAT next to DISC
on the screen. To turn this f eature
of f , highlight DISC REPEAT (if not
already highlighted), and press
ENTER on the interf ace selector
again.To play the tracks of the current disc
in random order, use the interf ace
selector to scroll down, select
TRACK RANDOM, and press
ENTER on the interf ace selector. As
a reminder, you will see RANDOM
next to TRACK on the screen. To
turn this f eature of f , highlight
TRACK RANDOM (if not already
highlighted), and press ENTER on
the interf ace selector again.
T rack Repeat
Disc Repeat Random Play
Playing Discs
224
REPEAT ICON REPEAT ICON
RANDOM ICON
TRACK REPEAT ICON DISC REPEAT ICON
TRACK RANDOM ICON
Page 227 of 454

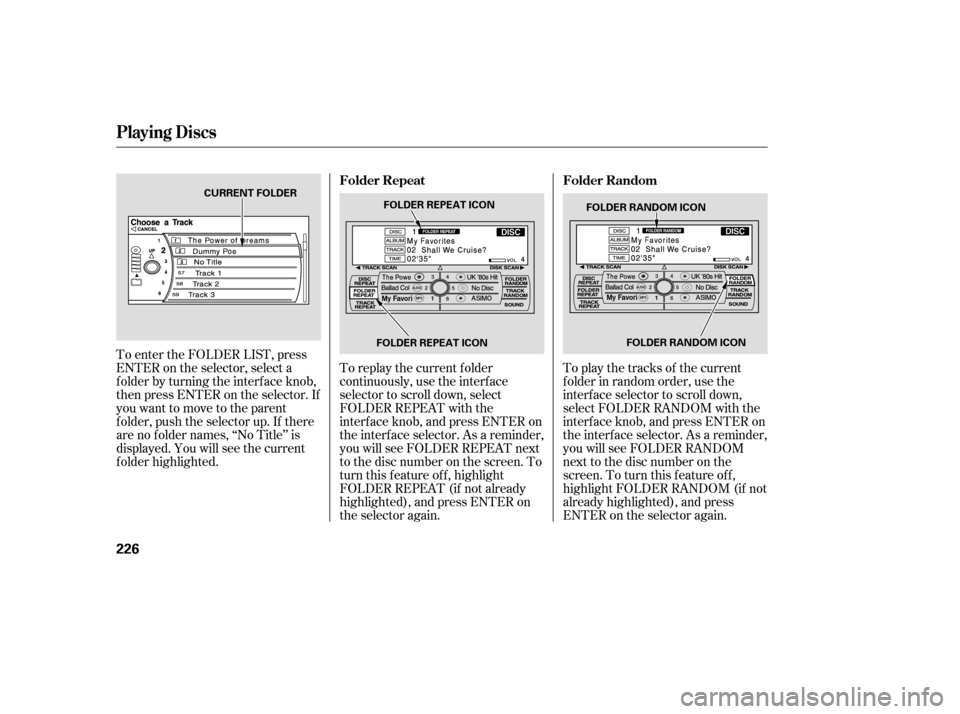
To play the tracks of the current
f older in random order, use the
interf ace selector to scroll down,
select FOLDER RANDOM with the
interf ace knob, and press ENTER on
the interf ace selector. As a reminder,
you will see FOLDER RANDOM
next to the disc number on the
screen. To turn this f eature of f ,
highlight FOLDER RANDOM (if not
already highlighted), and press
ENTER on the selector again.
To replay the current f older
continuously, use the interf ace
selector to scroll down, select
FOLDER REPEAT with the
interf ace knob, and press ENTER on
the interf ace selector. As a reminder,
you will see FOLDER REPEAT next
to the disc number on the screen. To
turn this f eature of f , highlight
FOLDER REPEAT (if not already
highlighted), and press ENTER on
the selector again.
To enter the FOLDER LIST, press
ENTER on the selector, select a
f older by turning the interf ace knob,
then press ENTER on the selector. If
youwanttomovetotheparent
f older, push the selector up. If there
are no f older names, ‘‘No Title’’ is
displayed. You will see the current
f older highlighted.
Playing Discs
Folder Random
Folder Repeat
226
FOLDER RANDOM ICON
FOLDER RANDOM ICON
CURRENT FOLDER
FOLDER REPEAT ICONFOLDER REPEAT ICON
Page 229 of 454

When using CD-R or CD-RW discs,
use only high quality discs labeled
f or audio use.
When recording a CD-R or
CD-RW, the recording must be
closedforittobeusedbythedisc
changer.When a disc is not being played,
store it in its case to protect it f rom
dust and other contamination. To
prevent warpage, keep discs out of
direct sunlight and extreme heat.
A new disc may be rough on the
inner and outer edges. The small
plastic pieces causing this roughness
can f lake of f and f all on the
recording surf ace of the disc,
causing skipping or other problems.
Remove these pieces by rubbing the
inner and outer edges with the side
of a pencil or pen.
Never try to insert f oreign objects in
the disc changer. Handle a disc by its edges; never
touch either surf ace. Do not place
stabilizer rings or labels on the disc.
These, along with contamination
f rom f inger prints, liquids, and f elt-
tip pens, can cause the disc to not
play properly, or possibly jam in the
drive.
To clean a disc, use a clean sof t cloth.
Wipe across the disc f rom the center
to the outside edge.
Play only standard, round, 5-inch
(12 cm) discs. Smaller or odd-
shaped discs may jam in the drive
or cause other problems.
Handle your discs properly to
prevent damage and skipping.
General Inf ormation
Protecting Discs
Protecting Your Discs
228