Page 174 of 408
6-11
5. Connect the negative lead of the jumper ca-
ble to the negative terminal of the charged
battery and the other end of the negative lead
to an unpainted metal surface of the vehicle.
WARNING
Do not connect the negative lead of the jumper
cable to the negative terminal of the battery in
the vehicle. �
Be especially careful not to:
touch the positive lead of the jumper
cable to the negative lead.
reverse the polarity of the jumper ca-
bles when connecting to the batteries -
battery explosion and/or serious dam-
age to the electrical system may occur.
_6. Start the engine. (Refer to “Starting a cold en-
gine” on pages 6-3–6-7.)
U5UG61.book Page 11 Monday, September 6, 2004 9:00 AM
Page 176 of 408
6-13
7. After the engine starts, disconnect the nega-
tive lead of the jumper cable from the vehicle
and charged battery, and then disconnect the
positive lead of the jumper cable from the
charged battery and the battery in the vehi-
cle.
8. Install the battery compartment cover.
9. Close the hood.
EVU00570
Warming up
To get maximum engine life, always warm up the
engine before starting off. Never accelerate hard
with a cold engine! To see whether or not the en-
gine is warm, check if it responds to the throttle
normally with the starter (choke) turned off.
U5UG61.book Page 13 Monday, September 6, 2004 9:00 AM
Page 180 of 408

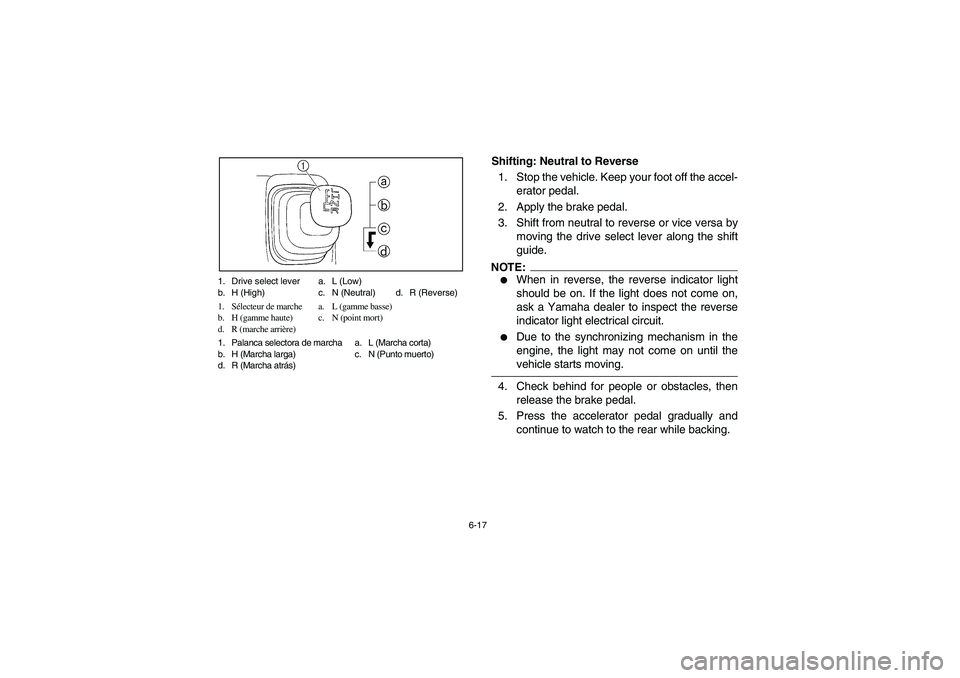
6-17 1. Drive select lever a. L (Low)
b. H (High) c. N (Neutral) d. R (Reverse)
1. Sélecteur de marche a. L (gamme basse)
b. H (gamme haute) c. N (point mort)
d. R (marche arrière)
1. Palanca selectora de marcha a. L (Marcha corta)
b. H (Marcha larga) c. N (Punto muerto)
d. R (Marcha atrás)
Shifting: Neutral to Reverse
1. Stop the vehicle. Keep your foot off the accel-
erator pedal.
2. Apply the brake pedal.
3. Shift from neutral to reverse or vice versa by
moving the drive select lever along the shift
guide.NOTE:_ �
When in reverse, the reverse indicator light
should be on. If the light does not come on,
ask a Yamaha dealer to inspect the reverse
indicator light electrical circuit.
�
Due to the synchronizing mechanism in the
engine, the light may not come on until the
vehicle starts moving.
_ 4. Check behind for people or obstacles, then
release the brake pedal.
5. Press the accelerator pedal gradually and
continue to watch to the rear while backing.
U5UG61.book Page 17 Monday, September 6, 2004 9:00 AM
Page 184 of 408

6-21
EVU00590
Engine break-in
There is never a more important period in the life of
your vehicle than the period between zero and 20
hours.
For this reason, we ask that you carefully read the
following material. Because the engine is brand
new, you must not put an excessive load on it for
the first several hours of running. During the first
20 hours, the various parts in the engine wear and
polish themselves to the correct operating clear-
ances.
During this period, prolonged full throttle operation
or any condition which might result in excessive
engine heating must be avoided. However, mo-
mentary (2–3 seconds maximum) full throttle oper-
ation under load does not harm the engine.
Each full throttle acceleration sequence should be
followed with a substantial rest period for the en-
gine by cruising at lower r/min so the engine can
rid itself of the temporary build up of heat. If any
abnormality is noticed during this period, consult a
Yamaha dealer.
U5UG61.book Page 21 Monday, September 6, 2004 9:00 AM
Page 188 of 408
6-25
EVU01210
Parking
When parking, stop the engine and shift the drive
select lever into the neutral position. Apply the
parking brake to help prevent the vehicle from roll-
ing.
EVU01420
Parking on a slope
WARNING
Avoid parking on hills or other inclines. Park-
ing on a hill or other incline could cause the ve-
hicle to roll out of control, increasing the
chance of an accident. If you must park on an
incline, apply the parking brake, and block the
front and rear wheels with rocks or other ob-
jects.
Do not park the vehicle at all on hills that are so
steep you could not walk up them easily.
U5UG61.book Page 25 Monday, September 6, 2004 9:00 AM
Page 190 of 408
6-27
1. Bring the vehicle to a stop by applying the
brakes.
2. Stop the engine.
3. With the brakes applied, set the parking
brake.NOTE:Like many other vehicles, the parking brake acts
on the rear wheels. For the parking brake to have
the effect of braking all four wheels, shift to 4WD
before stopping the engine.
U5UG61.book Page 27 Monday, September 6, 2004 9:00 AM
Page 212 of 408
7-11
Perform the Pre-Operation Checks on pages 5-1–
5-35. Set the parking brake, shift to neutral, and
follow the instructions on page 6-3 to start the en-
gine. Once it has warmed up and you have turned
the choke off, you are ready to begin driving your
vehicle. With the engine idling, shift the drive se-
lect lever into low or high. Then release the parking
brake. Press the accelerator pedal slowly and
smoothly. The centrifugal clutch will engage and
you will start to accelerate. Avoid higher speeds
until you are thoroughly familiar with the operation
of your vehicle.
When slowing down or stopping, take your foot off
the accelerator pedal and smoothly press the
brake pedal. Improper use of the brakes can
cause the tires to lose traction, reducing control
and increasing the possibility of an accident.
U5UG61.book Page 11 Monday, September 6, 2004 9:00 AM
Page 214 of 408
7-13
CAUTION:_ Do not shift from low to high or vice versa with-
out coming to a complete stop and waiting for
the engine to return to normal idle speed. Dam-
age to the engine or drive train may occur. _TURNING YOUR VEHICLE
The vehicle is easier to steer in two-wheel drive
(2WD) than four-wheel drive (4WD). Steering
takes the most effort in 4WD with the differential
locked (DIFF. LOCK).
It is possible for the vehicle to roll over or go out of
control if you attempt sharp, high-speed turns. You
should also be careful making sharp turns on
rough terrain. Do not attempt to turn around or
make abrupt maneuvers on slopes.
U5UG61.book Page 13 Monday, September 6, 2004 9:00 AM