Page 89 of 122

4-6
E
NOTE:@ The condition of the battery can be known
by checking the specific gravity of the elec-
trolyte. However, you can also know the con-
dition of the battery by measuring the
voltage at both battery terminals. Charge
the battery if the voltage is less than
12 volts.
It is recommended to have a Yamaha dealer
check the specific gravity and to charge the
battery. If you maintain the battery yourself,
be sure to read and follow the instructions
provided with the battery tester and charger
you use.
@
EJU18800
Cleaning the watercraft
Clean the watercraft before storing it for a
long period.
WARNING@ Do not spray flammable rust inhibitor
products on engine surfaces while the
engine is hot. The sprayed substance or
propellants could catch fire.
@
1. Wash down the hull, handlebars, and
drive unit with fresh water.
2. Rinse the engine and bilge area with
fresh water. Drain off all water and wipe
up remaining moisture with clean, dry
rags.
3. Spray the engine’s exterior with a rust
inhibitor or lubricant.
4. Wax the hull with a non-abrasive wax.
5. Wipe all vinyl and rubber components,
such as the seat and engine compart-
ment seals, with a vinyl protectant. Specific gravity (for reference):
1.28 at 20 °C (68 °F)
UF1G72.book Page 6 Thursday, September 30, 2004 2:28 PM
Page 90 of 122

4-7
E
EJU10940
Maintenance and
adjustments
Periodic inspection, adjustment and lubri-
cation will keep your watercraft in the safest
and most efficient condition possible. Safety
is an obligation of the watercraft owner. The
most important points of watercraft inspec-
tion, adjustment and lubrication are
explained on the following pages.
See your Yamaha dealer for genuine
Yamaha replacement parts and optional
accessories designed for your watercraft.
Remember that failures that are the result
of the installation of parts or accessories
which are not qualitatively equivalent to gen-
uine Yamaha parts are not covered by the
limited warranty.
WARNING@ �Be sure to turn off the engine when
you perform maintenance unless oth-
erwise specified, otherwise an acci-
dent or injury could result from
unexpected operation, moving parts,
or electric shock. If the owner is not
familiar with watercraft servicing, this
work should be done by a Yamaha
dealer. Improperly serviced compo-
nents could fail or stop operating cor-
rectly, which could result in an
accident.
�Modifications to this watercraft not
approved by Yamaha may cause loss
of performance or excessive noise, or
render it unsafe for use. Consult a
Yamaha dealer before attempting any
changes.
@
UF1G72.book Page 7 Thursday, September 30, 2004 2:28 PM
Page 91 of 122
4-8
E
EJU18750
Owner’s/Operator’s Manual
and tool kit
It is advisable always to carry the
Owner’s/Operator’s Manual and tool kit 2
with you whenever you use the watercraft.
For your convenience, a storage compart-
ment 1 is provided on the watercraft for the
manual and tool kit.
NOTE:@ To protect these materials from water dam-
age, it would be a good idea to put them in a
waterproof bag.
@
The service information included in this
manual is intended to provide you with the
necessary information for completing your
own preventive maintenance and minor
repairs. The tools provided in the tool kit are
sufficient for this purpose.
UF1G72.book Page 8 Thursday, September 30, 2004 2:28 PM
Page 92 of 122

4-9
E
EJU13550
Periodic maintenance chart
The following chart gives general guidelines for periodic maintenance. However, depend-
ing on your operating conditions maintenance may need to be performed more frequently.
PMC-*** (�) This mark indicates maintenance that you may do yourself.
(
❍) This mark indicates work to be done by a Yamaha dealer.
MAINTENANCE INTERVAL
INITIALTHEREAFTER
EVERYPA G E
10
hours50
hours100
hours100
hours200
hours
ITEM
6
months12
months12
months24
months
Spark plug Inspect, clean, adjust����
4-13
Lubrication points Lubricate��
4-15
Intermediate housing Lubricate❍
*1�
*2�
*2 4-16
Fuel system Inspect❍❍
4-10
Fuel tank Inspect, clean❍❍
4-10
Oil injection system Inspect, clean❍❍
4-11
Throttle shaft Inspect❍❍
—
Cooling water passages Flush �
*3 4-1
Water inlet strainer Inspect, clean❍❍
—
Bilge strainer Clean❍❍
—
Electric bilge pump strainer Inspect, clean❍❍
—
Impeller Inspect❍❍
—
Jet thrust nozzle angle Inspect, adjust�
/❍�
/❍
4-12
QSTS mechanism Inspect, adjust❍❍❍
—
Throttle cable Inspect, adjust❍❍❍
4-12
Stern drain plugs Inspect, replace❍❍
3-9
Battery Inspect ❍❍
4-18
Rubber coupling Inspect❍
—
Engine mount Inspect❍
—
Nuts and bolts Inspect❍❍❍
—
*1: Grease quantity: 33.0–35.0 cm3 (1.11–1.18 oz)
*2: Grease quantity: 6.0–8.0 cm3 (0.20–0.27 oz)
*3: After every use
UF1G72.book Page 9 Thursday, September 30, 2004 2:28 PM
Page 93 of 122

4-10
E
EJU18160
Inspecting the fuel system
WARNING@ Gasoline is highly flammable and explo-
sive. Failure to check for and repair any
fuel leakage could result in fire or explo-
sion. A fire or explosion can cause
severe injury or death. Shut off the
engine. Do not smoke. Avoid spilling
gasoline.
Fuel in hose is pressurized.
Fuel can spray out and cause injury or a
fire hazard if fuel line is disconnected.
Do not attempt to run engine with fuel
line disconnected.
@
Check the fuel system for leaks, cracks,
or malfunctions. If any problem is found,
consult a Yamaha dealer.
Check:
�Fuel tank for water or dirt.
�Fuel tank cap (seal) for damage.
�Fuel tank for damage, cracks or leakage.
�Fuel hose joint for leakage.
�Fuel hose for cracks or other damage.
�Air bleeding passages for leakage.
EJU18410
Fuel tank
Check the fuel tank 1 for leakage or
water in the tank. If water is found in the fuel
system or if the fuel tank needs to be
cleaned, have a Yamaha dealer service the
watercraft.
UF1G72.book Page 10 Thursday, September 30, 2004 2:28 PM
Page 94 of 122
4-11
E
EJU11000
Inspecting the oil injection
system
Check the oil injection system for leakage,
cracks, or malfunctions. If necessary, have a
Yamaha dealer repair the oil injection sys-
tem.
Check:
�Oil tank for damage, cracks or leakage.
�Oil tank for water or dirt.
�Oil hose and joint for damage or cracks.
�Oil filter for dirt.
�Oil pump for leakage.
EJU11010
Oil tank
Check the oil tank for leakage or water in
the tank. If water is found in the oil injection
system or if the oil tank needs to be cleaned
have a Yamaha dealer service the water-
craft.
EJU20230
Oil filter
Have a Yamaha dealer check the oil filter
for dirt and clogs.
UF1G72.book Page 11 Thursday, September 30, 2004 2:28 PM
Page 95 of 122
4-12
E
EJU18890
Inspecting the jet thrust nozzle
angle
Check for smooth operation of the handle-
bars and jet thrust nozzle.
Turn the handlebars as far as possible to
the right and left and check that the differ-
ence of distance A and B between the jet
thrust nozzle and the nozzle is within 5 mm.
If steering is stiff or misadjusted, have a
Yamaha dealer service it. Difference of A and B:
Maximum 5 mm (0.20 in)
EJU11040
Inspecting and adjusting the
throttle cable
Check that the throttle cable moves back
to the set position smoothly and that free
play is within specification.
1. Squeeze and release the throttle lever. If
the lever does not return smoothly, have
a Yamaha dealer service it.
2. Adjust free play a by loosening the lock-
nut 1 and turning the adjuster 2.
Throttle lever free play:
4–7 mm (0.16–0.28 in)
UF1G72.book Page 12 Thursday, September 30, 2004 2:28 PM
Page 96 of 122

4-13
E
EJU11062
Cleaning and adjusting the
spark plugs
The spark plug is an important engine
component and is easy to inspect. The con-
dition of the spark plug can indicate some-
thing about the condition of the engine. For
example, if the center electrode porcelain is
very white, this could indicate an intake air
leak or carburetion problem in that cylinder.
Do not attempt to diagnose any problems
yourself. Have a Yamaha dealer service the
watercraft.
Remove and inspect the spark plugs peri-
odically; heat and deposits will cause the
spark plugs to slowly break down and erode.
If electrode erosion becomes excessive, or if
carbon and other deposits are excessive,
replace the spark plug with the specified
plug.
Measure the spark plug gap a with a
wire thickness gauge. Replace the spark
plugs or adjust the gap to specification if
necessary.
To install the spark plug:
1. Clean the gasket surface.
2. Wipe any dirt from the threads of the
spark plug.
3. Install the spark plug, and then tighten it
to the specified torque.
4. Install the spark plug cap.Standard spark plug: BR8ES-11
Spark plug gap:
1.0–1.1 mm (0.039–0.043 in)
Spark plug tightening torque:
25 N·m (2.5 kgf·m, 18 ft·lb)
UF1G72.book Page 13 Thursday, September 30, 2004 2:28 PM
 1
1 2
2 3
3 4
4 5
5 6
6 7
7 8
8 9
9 10
10 11
11 12
12 13
13 14
14 15
15 16
16 17
17 18
18 19
19 20
20 21
21 22
22 23
23 24
24 25
25 26
26 27
27 28
28 29
29 30
30 31
31 32
32 33
33 34
34 35
35 36
36 37
37 38
38 39
39 40
40 41
41 42
42 43
43 44
44 45
45 46
46 47
47 48
48 49
49 50
50 51
51 52
52 53
53 54
54 55
55 56
56 57
57 58
58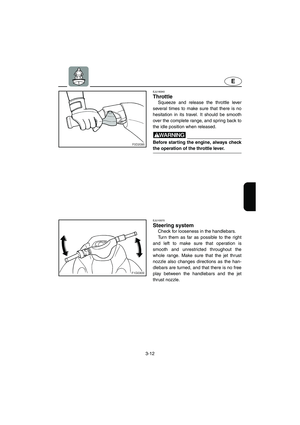 59
59 60
60 61
61 62
62 63
63 64
64 65
65 66
66 67
67 68
68 69
69 70
70 71
71 72
72 73
73 74
74 75
75 76
76 77
77 78
78 79
79 80
80 81
81 82
82 83
83 84
84 85
85 86
86 87
87 88
88 89
89 90
90 91
91 92
92 93
93 94
94 95
95 96
96 97
97 98
98 99
99 100
100 101
101 102
102 103
103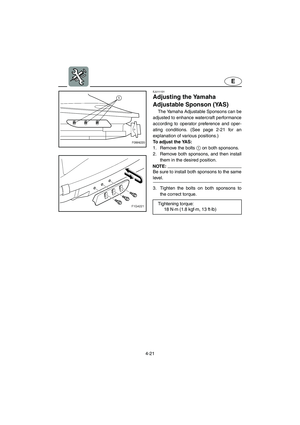 104
104 105
105 106
106 107
107 108
108 109
109 110
110 111
111 112
112 113
113 114
114 115
115 116
116 117
117 118
118 119
119 120
120 121
121

