2005 VOLVO XC90 change time
[x] Cancel search: change timePage 3 of 263

2005 VOLVO XC90
Fuel filler cap
After refueling, close the fuel filler cap by turning it clockwise until\
it clicks into place. If this cap is not closed
tightly or if the engine is running when the vehicle is refueled, the Ma\
lfunction Indicator Lamp ("Check
Engine" light) will illuminate.
Important information
Before you operate your vehicle for the first time, please familiarize y\
ourself with the new engine oil
consumption information on
page 86. You should also be familiar with the information in chapters one, two \
and eight of this manual.
Information contained in the balance of the manual is extremely useful a\
nd should be read after operating the
vehicle for the first time.
The manual is structured so that it can be used for reference. For this \
reason, it should be kept in the vehicle for
ready access.
Do not export your Volvo to another country before investigating that co\
untry's applicable safety and exhaust
emission requirements. In some cases it may be difficult or impossible t\
o comply with these requirements.
Modifications to the emission control system(s) may render your Volvo \
not certifiable for legal operation in the
U.S., Canada and other countries.
All information, illustrations and specifications contained in this manu\
al are based on the latest product
information available at the time of publication. Please note that some \
vehicles may be equipped differently,
depending on special legal requirements. Optional equipment described in\
this manual may not be available in
all markets.
Volvo reserves the right to make model changes at any time, or to change\
specifications or design without
notice and without incurring obligation.
CALIFORNIA Proposition 65 Warning
Engine exhaust, some of its constituents, and certain vehicle components\
contain or emit chemicals known
to the state of California to cause cancer, and birth defects or other r\
eproductive harm. In addition, certain
fluids contained in vehicles and certain products of component wear cont\
ain or emit chemicals known to the
State of California to cause cancer, and birth defects or other reproduc\
tive harm.
Volvo and the environment
Volvo is committed to the well being of its customers. As a natural part\
of this commitment, we care about the
environment in which we all live. Caring for the environment means an ev\
eryday involvement in reducing our
environmental impact.
Volvo's environmental activities are based on a holistic view, which mea\
ns we consider the overall
file:///K|/ownersdocs/2005/2005_XC90/05xc90_00.htm (3 of 7)12/30/2006 \
4:42:22 PM
Page 44 of 263

2005 VOLVO XC90
See page 116 for more information on this function.
PARKING BRAKE
This light will be on when the parking brake is applied. The parking bra\
ke pedal is located on the left
side of the driver's footwell.
Canadian models are equipped with this symbol.
Rear fog light
This light indicates that the fog light is on.
Turn signal indicator - trailer (certain models)
If you are towing a trailer, this light will flash simultaneously with t\
he turn signals on the trailer. If the
light does not flash when signaling, neither the trailer's turn signals \
nor the vehicle's turn signals are
functioning.
Oil pressure warning light
If the light comes on while driving, stop the vehicle and then stop the \
engine immediately and
check the engine oil level See
page 142. If the light stays on after restart, have the vehicle towed to the
nearest authorized Volvo retailer. After hard driving, the light may com\
e on occasionally when the
engine is idling. This is normal, provided it goes off when the engine s\
peed is increased.
CHECK ENGINE Malfunction indicator light
On-Board Diagnostics II (OBDII): As you drive, a computer called "OBDI\
I" monitors your vehicle's
engine, transmission, electrical and emission systems. The CHECK ENGINE \
light will light up if the
computer senses a condition that potentially may need correcting. When t\
his happens, please have your
vehicle checked by a Volvo retailer as soon as possible.
A CHECK ENGINE light may have many causes. Sometimes, you may not notice\
a change in your
vehicle's behavior. Even so, an uncorrected condition could hurt fuel ec\
onomy, emission cleanliness, and
driveability. Extended driving without correcting the cause could even d\
amage other components in
your vehicle.
Canadian models are equipped with this warning light.
pg. 30 Instruments and controls
file:///K|/ownersdocs/2005/2005_XC90/05xc90_02a.htm (6 of 17)12/30/200\
6 4:42:27 PM
Page 53 of 263

2005 VOLVO XC90
Move the lever towards the steering wheel and release it.
Headlight flasher (headlights off).
Move the lever towards the steering wheel. The headlight high beam will \
be on until the lever is
released.
NOTE: If the turn signal indicator flashes faster than normal, check for a bur\
ned-out turn signal bulb.
4. Exterior courtesy lights.
Home safe lighting
When you leave your vehicle at night, you can make use of the courtesy l\
ighting function:
l Remove the key from the ignition switch.
l Pull the turn signal lever towards the steering wheel (as when using th\
e headlight flasher function).
l Exit the vehicle and lock the doors.
The headlights, parking lights, license plate lights and the lights in t\
he sideview mirrors will now come
on and remain on for 30, 60 or 90 seconds (the time interval is at your\
discretion and can be changed by
an authorized Volvo retailer).
Approach lighting
When approaching the vehicle at night, press the yellow button in the ce\
ntral locking remote control (see
illustration on
page 77). This lights up the interior courtesy lights, parking lights, license\
plate lights and
the lights in the sideview mirrors.
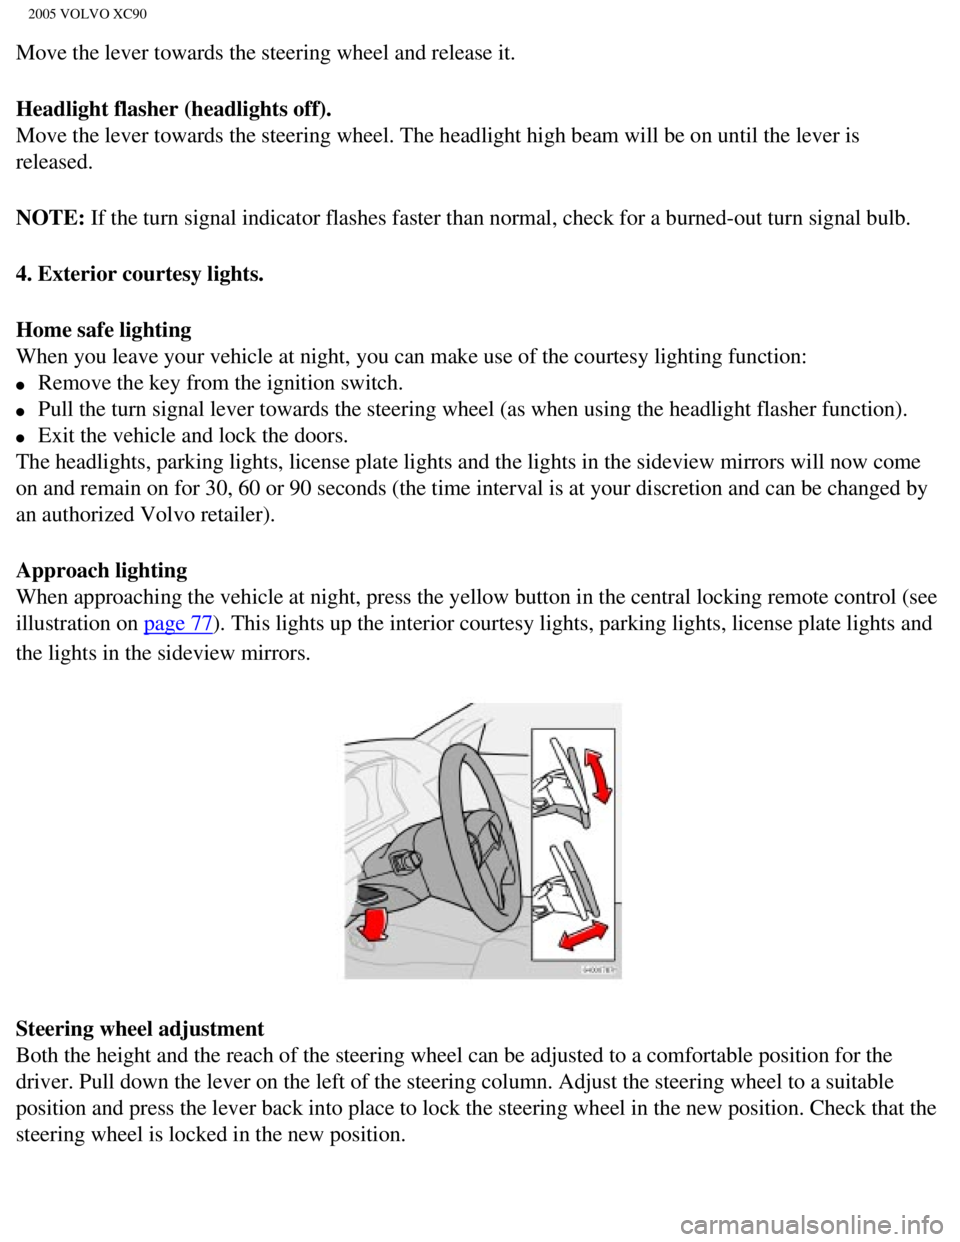
Steering wheel adjustment
Both the height and the reach of the steering wheel can be adjusted to a\
comfortable position for the
driver. Pull down the lever on the left of the steering column. Adjust t\
he steering wheel to a suitable
position and press the lever back into place to lock the steering wheel \
in the new position. Check that the
steering wheel is locked in the new position.
file:///K|/ownersdocs/2005/2005_XC90/05xc90_02a.htm (15 of 17)12/30/20\
06 4:42:27 PM
Page 81 of 263

2005 VOLVO XC90
climate.
3. The MAN LED lights. Recirculation is now activated.
Keep in mind the following:
l Make it a rule to have the Air Quality sensor activated at all times.
l Recirculation is limited in cold climates to avoid fogging.
l If window fogging occurs, you should deactivate the Air Quality sensor. \
l If fogging occurs, use the defroster functions for the windshield, side \
windows and rear window. See page
53.
l The filter should be changed at the intervals recommended in the mainten\
ance schedule. However, if the
vehicle is used in a severely contaminated environment, it may be necess\
ary to change the filter more
frequently.
pg. 56 Climate control
This page intentionally left blank
Contents | Top of Page
file:///K|/ownersdocs/2005/2005_XC90/05xc90_03.htm (9 of 9)12/30/2006 \
4:42:29 PM
Page 91 of 263

2005 VOLVO XC90
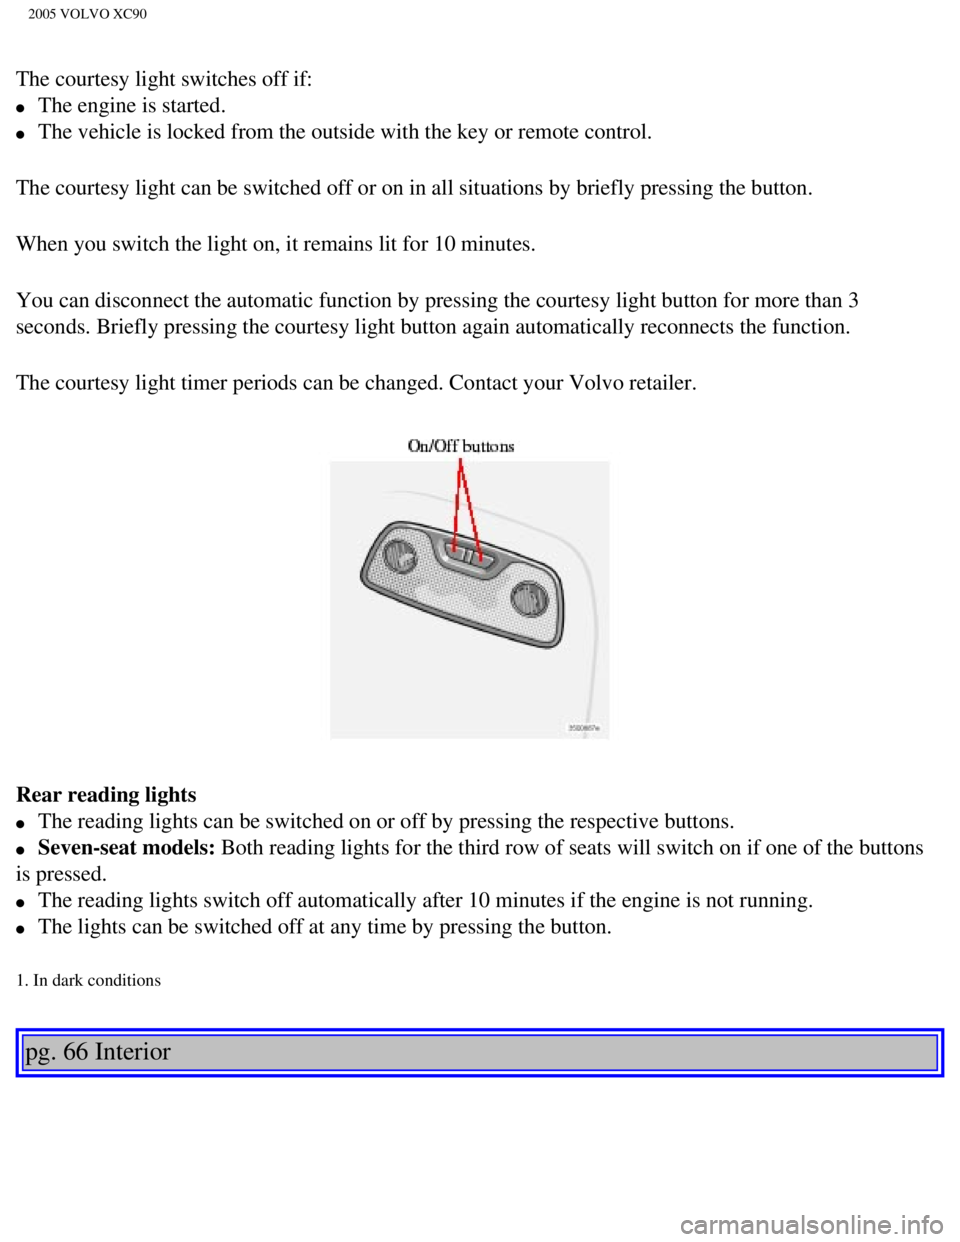
The courtesy light switches off if:
l The engine is started.
l The vehicle is locked from the outside with the key or remote control.
The courtesy light can be switched off or on in all situations by briefl\
y pressing the button.
When you switch the light on, it remains lit for 10 minutes.
You can disconnect the automatic function by pressing the courtesy light\
button for more than 3
seconds. Briefly pressing the courtesy light button again automatically \
reconnects the function.
The courtesy light timer periods can be changed. Contact your Volvo reta\
iler.
Rear reading lights
l The reading lights can be switched on or off by pressing the respective \
buttons.
l Seven-seat models: Both reading lights for the third row of seats will switch on if one of \
the buttons
is pressed.
l The reading lights switch off automatically after 10 minutes if the engi\
ne is not running.
l The lights can be switched off at any time by pressing the button.
1. In dark conditions
pg. 66 Interior
file:///K|/ownersdocs/2005/2005_XC90/05xc90_04a.htm (10 of 11)12/30/20\
06 4:42:30 PM
Page 134 of 263

2005 VOLVO XC90
improve tractive force.
Under certain circumstances, such as when driving with snow chains, or d\
riving in deep snow or loose
sand, it may be advisable to temporarily switch off this function for ma\
ximum tractive force. This is
done by pressing the DSTC button on the center control panel for at leas\
t a half a second.
When the SC function has been switched off:
l The text window will briefly display "DSTC SPIN CONTROL OFF"
l The LED in the DSTC button will be off.
3. Active Yaw Control (AYC)
This function helps maintain directional stability, for example when cor\
nering, by braking one or more
of the wheels if the vehicle shows a tendency to skid or slide laterally\
. This is done by activating the
Anti-lock Braking System. A pulsating sound will be audible when the fun\
ction is active, which is quite
normal. If you apply the brakes while this function is active, the brake\
pedal will feel stiffer than usual.
This is also one of the DSTC system's permanent functions and is not aff\
ected when the DSTC button on
the center control panel is pressed.
4. Roll Stability Control (RSC)
RSC utilizes a gyro-sensor to monitor the vehicle's angle of inclination\
, and the rate at which this angle
changes. If necessary, RSC activates the Anti-lock Brake System to brake\
one or more of the wheels to
help maintain stability. A pulsating sound will be audible when the func\
tion is active, which is quite
normal. If you apply the brakes while this function is active, the brake\
pedal will feel stiffer than usual.
This is one of the DSTC system's permanent functions and is not affected\
when the DSTC button on the
center control panel is pressed.
The DSTC button
The DSTC button in the center control panel is used to switch the Spin C\
ontrol (SC) function on or off.
The button must be pressed for at least a half second to prevent SC from\
being switched off
inadvertently.
When the system has been switched off, the green indicator lamp in the b\
utton will go out and "DSTC
SPIN CONTROL OFF" will be displayed in the text window.
All DSTC functions are (re)activated each time the engine is started.
pg. 100 Starting and driving
file:///K|/ownersdocs/2005/2005_XC90/05xc90_06b.htm (4 of 18)12/30/200\
6 4:42:35 PM
Page 224 of 263

2005 VOLVO XC90
menu alternatives are shown in the display.
Press the menu button (2) to enter menu mode. Use the menus as follows\
:
l Use the menu keys (3) to navigate up or down in the menus. Dots in the\
display indicated that there
are more menu selections from which to choose.
l One long press on EXIT/CLEAR exits menu mode.
l A short press on the EXIT/CLEAR enables you to cancel, undo, or answer n\
o to a menu selection, or
to go back in the menu structure.
l Pressing ENTER confirms a menu selection, or takes you to the next subme\
nu.
pg. 178 Audio
Audio system controls (contd)
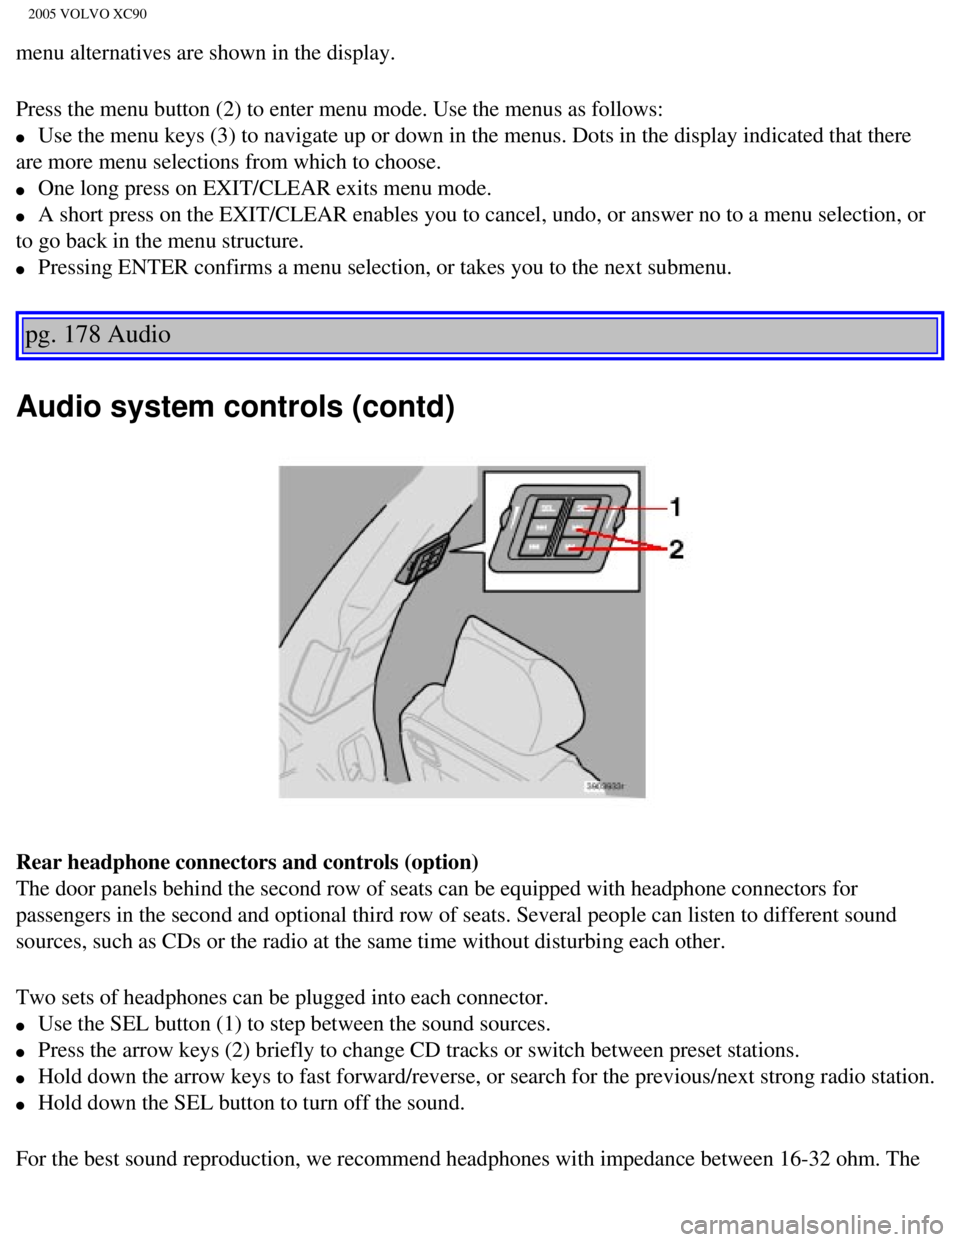
Rear headphone connectors and controls (option)
The door panels behind the second row of seats can be equipped with head\
phone connectors for
passengers in the second and optional third row of seats. Several people\
can listen to different sound
sources, such as CDs or the radio at the same time without disturbing ea\
ch other.
Two sets of headphones can be plugged into each connector.
l Use the SEL button (1) to step between the sound sources.
l Press the arrow keys (2) briefly to change CD tracks or switch between\
preset stations.
l Hold down the arrow keys to fast forward/reverse, or search for the prev\
ious/next strong radio station.
l Hold down the SEL button to turn off the sound.
For the best sound reproduction, we recommend headphones with impedance \
between 16-32 ohm. The
file:///K|/ownersdocs/2005/2005_XC90/05xc90_11a.htm (4 of 18)12/30/200\
6 4:42:43 PM
Page 225 of 263

2005 VOLVO XC90
sensitivity of these should be equal to or greater than 102 dB. The head\
phone connections are intended
for 3.5 mm contacts and are located under the lower edge of the socket.
All headphones are automatically turned off when the ignition is switche\
d off. They must be manually
restarted when the ignition is switched on again.
Headphones - limitations
l The headphones will only work when the ignition key is in position I or \
higher.
l If a set of headphones is connected to the same source that is being sen\
t through the speakers, the
headphone controls cannot be used to change track or station. This is to\
prevent the driver from being
distracted by an unexpected change in music.
l If the driver selects the same sound source as someone listening to this\
source through headphones,
the driver takes control of the sound source.
l Only one disc in the optional CD changer, and one track on the CD can be\
played at a time.
l Headphone users can choose from among the preset radio stations (AM, FM\
1, FM2) previously set by
the driver.
l If FM is played in the speakers, AM is not available and vice versa.
pg. 179 Audio
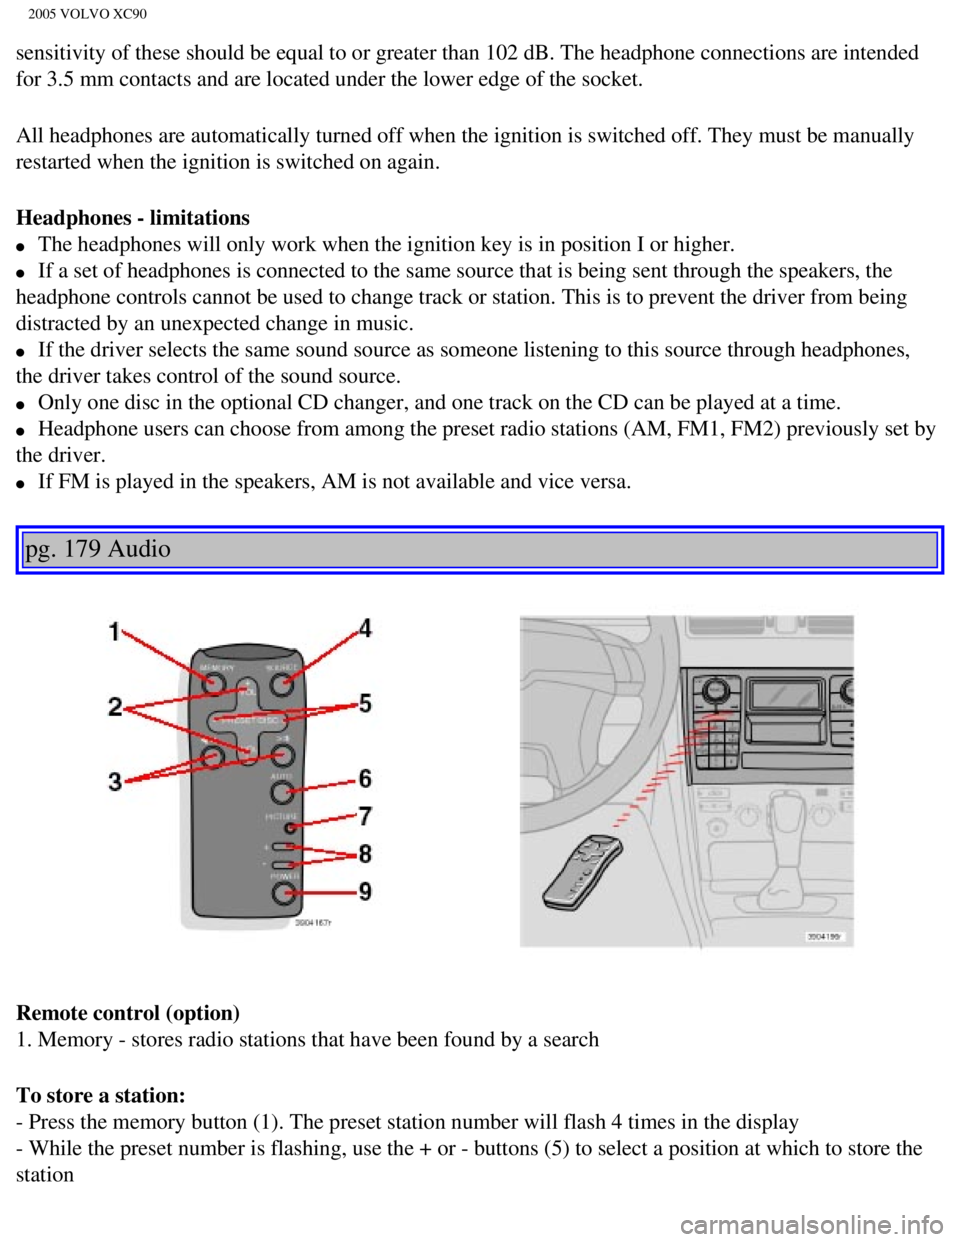
Remote control (option)
1. Memory - stores radio stations that have been found by a search
To store a station:
- Press the memory button (1). The preset station number will flash 4 \
times in the display
- While the preset number is flashing, use the + or - buttons (5) to s\
elect a position at which to store the
station
file:///K|/ownersdocs/2005/2005_XC90/05xc90_11a.htm (5 of 18)12/30/200\
6 4:42:43 PM