2005 VOLVO S40 change wheel
[x] Cancel search: change wheelPage 27 of 127

The front fog lights will only function with the ignition key in at least position II. These lights can only be used in
combination with the low beam headlights or the parking lights. These lights will be automatically switched off the
next time the car is started.
An LED in the switch indicates when the front fog lights are on.
4. Unlocking the fuel filler door
With the ignition switched off, press this button to unlock the fuel filler door. Please note that the fuel filler door will
remain unlocked until the car begins to move
pg. 46 Lighting panel
forward. An audible click will be heard when the fuel filler door re-locks.
Manually releasing the fuel filler door
If it should be necessary, the fuel filler door can be opened manually from the inside the trunk.
To do so:
1. Move the cover panel to one side.
2. This exposes a handle, located near the fuel filler door locking mechanism.
Pull the handle rearward to release the fuel filler door.
5. Rear fog light
The single rear fog light is located in the driver's side tail light cluster. The ignition key must be in at least position II
for the rear fog light to function. This light is considerably brighter than the normal tail lights and should be used only
when conditions such as fog, rain, snow, smoke or dust reduce visibility for other vehicles to less than 500 ft. (150
meters). An LED in the switch indicates when the rear fog light is on. The rear fog light will only function in
combination with the high/ low beam headlights or the optional front fog lights.
pg. 47 Left-side steering wheel lever
Turn signals, high/low beams, headlight flasher, exterior courtesy lights
Lane change position (1)
When changing lanes, the driver can flash the turn signals by moving the turn signal lever to the first stop and
releasing it. This will cause the turn signal to flash three times.
Position for normal turns (2)
NOTE: If the turn signal indicator flashes faster than normal, check for a burned-out turn signal bulb.
With the headlights on: high/low beams (3)
ProCarManuals.com
Page 28 of 127

Move the lever toward the steering wheel and release it to switch between high and low beams.
With the headlights off: headlight flasher (3)
With the headlights switched off (the switch on the lighting panel in position 0), move the lever toward the steering
wheel. The high beams will remain on until the lever is released.
Home safe lighting (3)
When you leave your car at night, you can make use of the home safe lighting function to illuminate the area in front
of the car:
1. Remove the key from the ignition switch.
2. Pull the direction indicator lever towards the steering wheel (as when using the headlight flasher function).
3. Exit the car and lock the doors.
The headlights, parking lights, license plate lights will now come on and remain on for 30, 60 or 90 seconds. The time
interval can be changed according to your preferences by using the Personal Settings function, described at the end of
this chapter.
Trip computer (option)
The trip computer stores information gathered from several systems in your car and has four menus (five on Canadian
models) that can be shown in the information display.
Driving distance on current fuel reserve
Average fuel consumption
Current fuel consumption
Average speed
Current speed in m.p.h. (Canadian models only)
pg. 48 Left-side steering wheel lever
NOTE: Warning messages from the car's monitoring systems will override the trip computer function. If a warning
message is shown in the information display while you are using the trip computer, you must acknowledge the
message by pressing the READ button (A). Press button A again to return to the trip computer function.
Controls
The four trip computer functions (five on Canadian models) can be accessed by twisting INFO (B) one step at a time
in either direction. Twisting a fifth time (sixth time on Canadian models) returns you to the original function.
The trip computer can be reset (average fuel consumption and average speed will be erased from system memory) by
pressing RESET (C) for at least five seconds.
Driving distance on current fuel reserve
This function shows the approximate distance that can be driven on the fuel remaining in the tank. This calculation is
ProCarManuals.com
Page 61 of 127

Try to keep the fuel tank well filled - this prevents the formation of condensation in the tank. In addition, in
extremely cold weather conditions it is worthwhile to add fuel line de -icer before refueling.
The viscosity of the engine oil is important. Oil with low viscosity (thinner oil) improves cold-weather starting as
well as decreasing fuel consumption while the engine is warming up. For winter use, 5W -30 oil, particularly the
synthetic type
1 , is recommended. Be sure to use good quality oil but do not use cold-weather oil for hard driving or in
warm weather. See page 187
for more information.
The load placed on the battery is greater during the winter since the windshield wipers, lighting, etc. are used more
often. Moreover, the capacity of the battery decreases as the temperature drops. In very cold weather, a poorly charged
battery can freeze and be damaged. It is therefore advisable to check the state of charge more frequently and spray an
anti-rust oil on the battery posts.
Volvo recommends the use of snow tires on all four wheels for winter driving - see the chapter "Wheels and tires."
To prevent the washer fluid reservoir from freezing, add washer solvents containing antifreeze (see page 148 for the
location of the washer fluid reservoir). This is important since dirt is often splashed on the windshield during winter
driving, requiring the frequent use of the washers and wipers. Volvo Washer Solvent should be diluted as follows:
Down to 14° F (-10° C): 1 part washer solvent and 4 parts water, Down to 5° F (-15° C): 1 part washer solvent and 3
parts water, Down to 0° F (-18° C): 1 part washer solvent and 2 parts water, Down to -18° F (-28° C): 1 part washer
solvent and 1 part water.
Use Volvo Teflon Lock Spray in the locks.
NOTE: Avoid using de -icing sprays as they can cause damage to the locks.
1. Synthetic oil is not used when the oil is changed at the normal maintenance intervals except at owner request and at
additional charge. Please consult your Volvo retailer.
Conserving electrical current
Keep the following in mind to help minimize battery drain:
When the engine is not running, avoid turning the ignition key to position II. Many electrical systems (the audio
pg. 100 General information
system, the optional navigation system, power windows, etc) will function with the ignition key in position I. This
position reduces drain on the battery.
Please keep in mind that using systems, accessories, etc that consume a great deal of current when the engine is not
running could result in the battery being completely drained.
The optional 12 volt socket in the trunk provides electrical current even with the ignition switched off, which drains
the battery.
NOTE: If the ignition is switched on, a warning message will be displayed in the text window in the instrument panel
when the battery charge is low.
An energy conserving function designed into the vehicle's electrical system will switch off certain functions or reduce
the load on the battery by, e.g., reducing the audio system's volume.
W Winter/Wet driving mode- enhanced vehicle traction
Mode W will only function if the gear selector is in the (D)rive position.
Press the button at the base of the gear selector to engage/disengage this driving mode.
An LED in the button will light up to indicate that W is engaged.
This mode may be selected for starting/moving off on slippery roads.
Before a long distance trip
It is always worthwhile to have your vehicle checked at a Volvo retailer before driving long distances. Your retailer
will also be able to supply you with bulbs, fuses, spark plugs and wiper blades for your use in the event that problems
ProCarManuals.com
Page 81 of 127

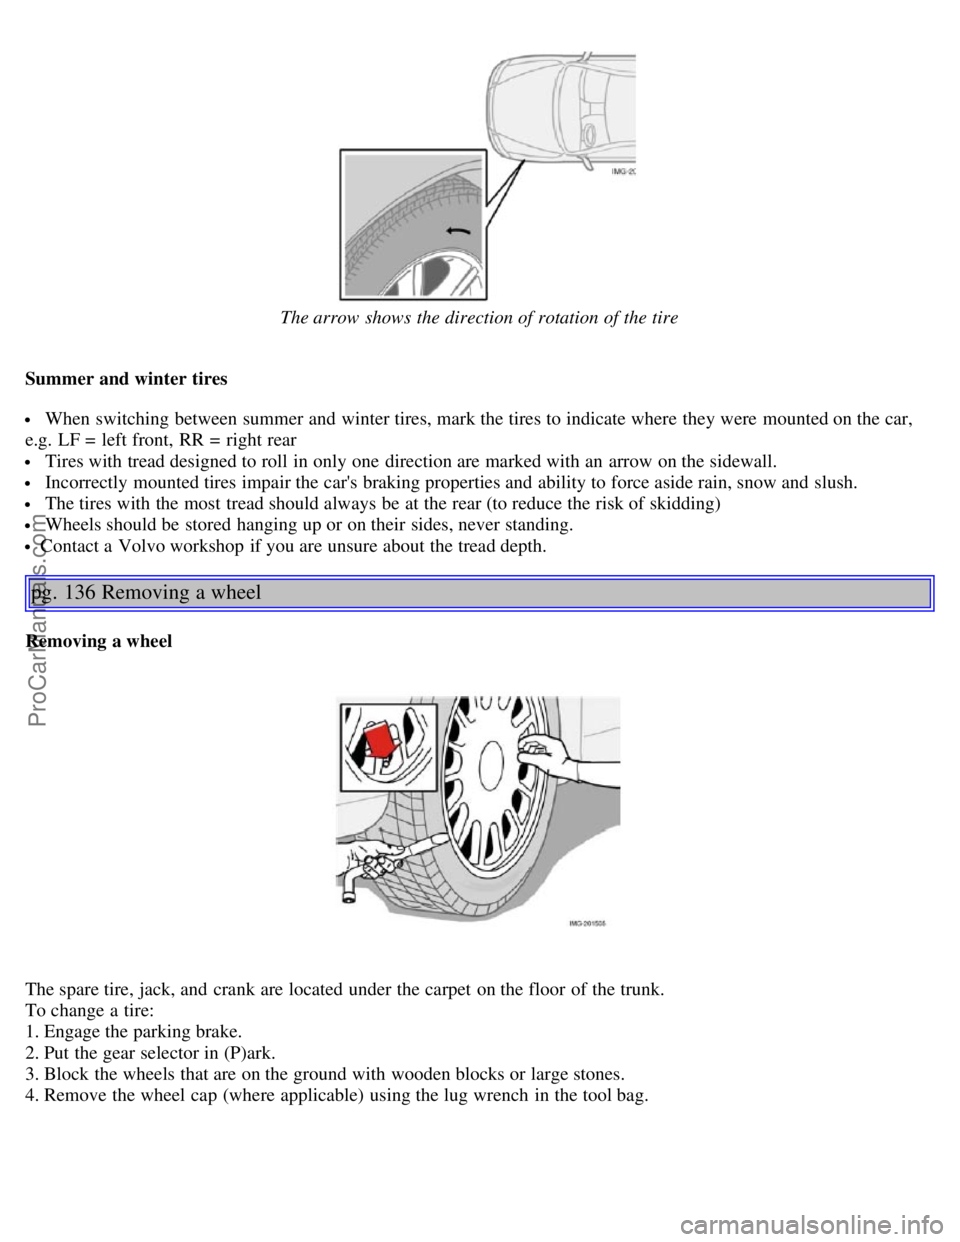
The arrow shows the direction of rotation of the tire
Summer and winter tires
When switching between summer and winter tires, mark the tires to indicate where they were mounted on the car,
e.g. LF = left front, RR = right rear
Tires with tread designed to roll in only one direction are marked with an arrow on the sidewall.
Incorrectly mounted tires impair the car's braking properties and ability to force aside rain, snow and slush.
The tires with the most tread should always be at the rear (to reduce the risk of skidding)
Wheels should be stored hanging up or on their sides, never standing.
Contact a Volvo workshop if you are unsure about the tread depth.
pg. 136 Removing a wheel
Removing a wheel
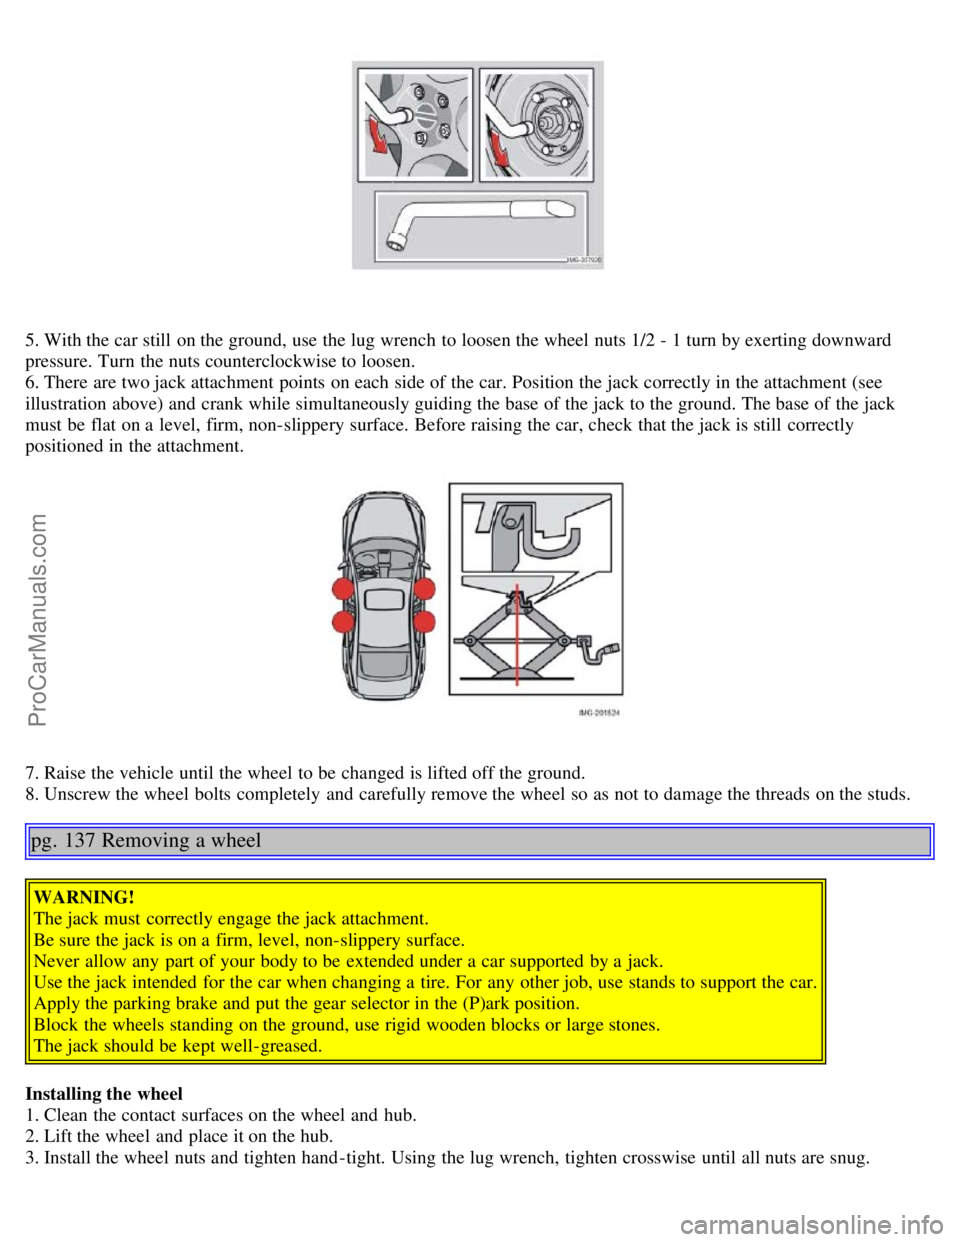
The spare tire, jack, and crank are located under the carpet on the floor of the trunk.
To change a tire:
1. Engage the parking brake.
2. Put the gear selector in (P)ark.
3. Block the wheels that are on the ground with wooden blocks or large stones.
4. Remove the wheel cap (where applicable) using the lug wrench in the tool bag.
ProCarManuals.com
Page 82 of 127

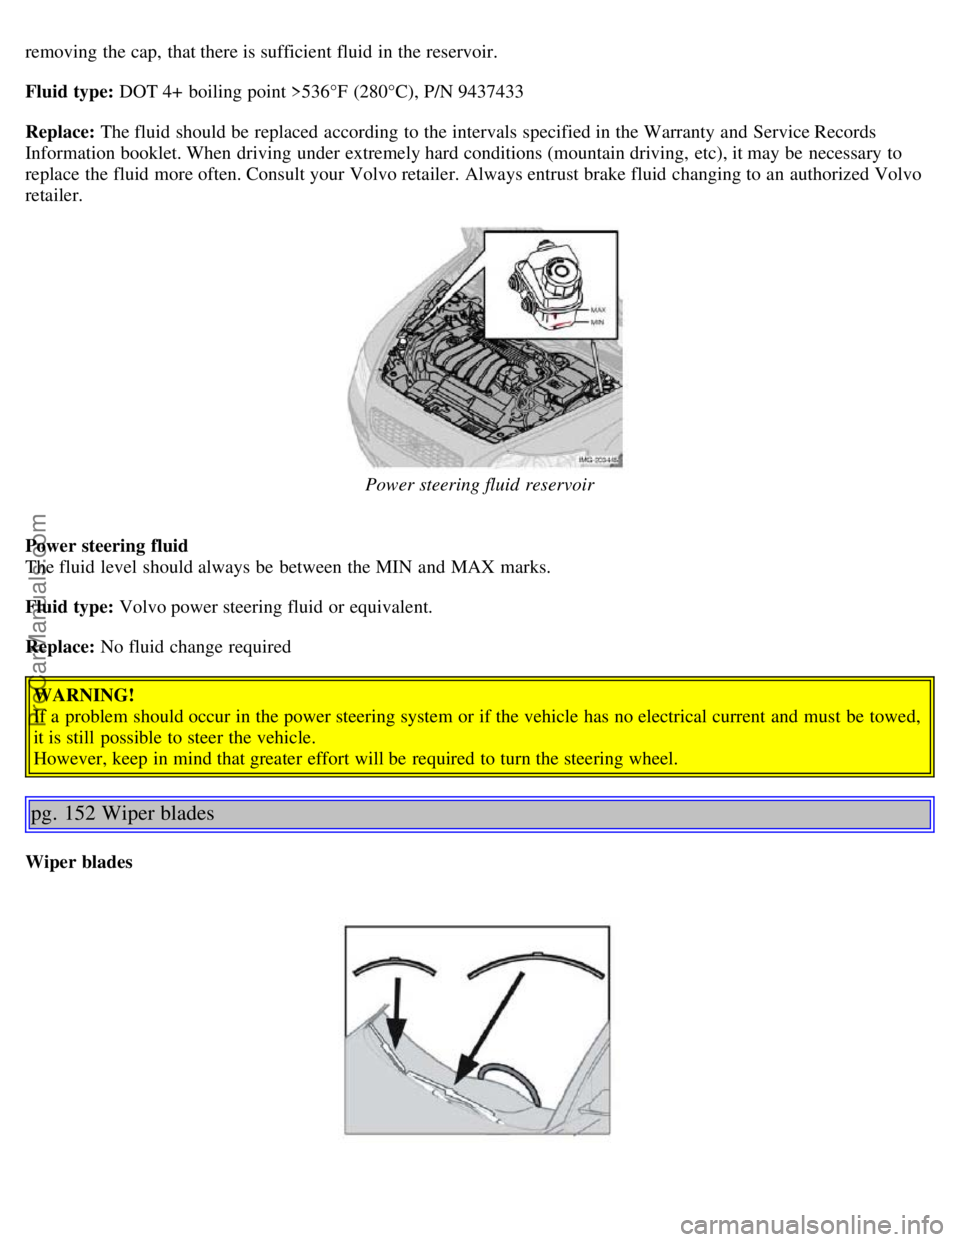
5. With the car still on the ground, use the lug wrench to loosen the wheel nuts 1/2 - 1 turn by exerting downward
pressure. Turn the nuts counterclockwise to loosen.
6. There are two jack attachment points on each side of the car. Position the jack correctly in the attachment (see
illustration above) and crank while simultaneously guiding the base of the jack to the ground. The base of the jack
must be flat on a level, firm, non-slippery surface. Before raising the car, check that the jack is still correctly
positioned in the attachment.
7. Raise the vehicle until the wheel to be changed is lifted off the ground.
8. Unscrew the wheel bolts completely and carefully remove the wheel so as not to damage the threads on the studs.
pg. 137 Removing a wheel
WARNING!
The jack must correctly engage the jack attachment.
Be sure the jack is on a firm, level, non-slippery surface.
Never allow any part of your body to be extended under a car supported by a jack.
Use the jack intended for the car when changing a tire. For any other job, use stands to support the car.
Apply the parking brake and put the gear selector in the (P)ark position.
Block the wheels standing on the ground, use rigid wooden blocks or large stones.
The jack should be kept well-greased.
Installing the wheel
1. Clean the contact surfaces on the wheel and hub.
2. Lift the wheel and place it on the hub.
3. Install the wheel nuts and tighten hand -tight. Using the lug wrench, tighten crosswise until all nuts are snug.
ProCarManuals.com
Page 94 of 127

removing the cap, that there is sufficient fluid in the reservoir.
Fluid type: DOT 4+ boiling point >536°F (280°C), P/N 9437433
Replace: The fluid should be replaced according to the intervals specified in the Warranty and Service Records
Information booklet. When driving under extremely hard conditions (mountain driving, etc), it may be necessary to
replace the fluid more often. Consult your Volvo retailer. Always entrust brake fluid changing to an authorized Volvo
retailer.
Power steering fluid reservoir
Power steering fluid
The fluid level should always be between the MIN and MAX marks.
Fluid type: Volvo power steering fluid or equivalent.
Replace: No fluid change required WARNING!
If a problem should occur in the power steering system or if the vehicle has no electrical current and must be towed,
it is still possible to steer the vehicle.
However, keep in mind that greater effort will be required to turn the steering wheel.
pg. 152 Wiper blades
Wiper blades
ProCarManuals.com
Page 98 of 127

2 0 0 5
VOLVO S40
Chapter 11 - Audio
pg. 167 Audio
Audio system - introduction168
Audio system overview169
Audio functions171
Radio functions174
CD player177
CD changer (certain audio systems only)179
Audio menu settings and selections181
pg. 168 Audio system - introduction
The audio system in your car is operated with the buttons and keys in the front, center control panel. Certain functions,
such as adjusting the volume, changing radio stations or tracks on a CD, etc, can also be controlled with the optional
steering wheel-mounted keypad.
The audio system is available in three
1 versions:
Performance
Features: AM/FM radio, single-disc CD player, 4x25W output, 4 full-range speakers and two treble speakers.
High-performance
Features: AM/FM radio, CD player, 4x40W output, eight speakers (bass and treble speakers in each door).
Premium sound
Features: AM/FM radio, integrated CD changer (6 discs), 4x70W output plus 25W Dolby Pro Logic II, twelve
speakers (bass, mid-range and treble speakers in the front doors, bass and treble speakers in the rear doors, and bass
and treble in the dashboard's center speaker).
A subwoofer mounted under the floor in the trunk is available as an accessory. Consult your Volvo retailer.
1. All three audio systems may not be available in all markets.
pg. 169 Audio system overview
ProCarManuals.com
Page 100 of 127

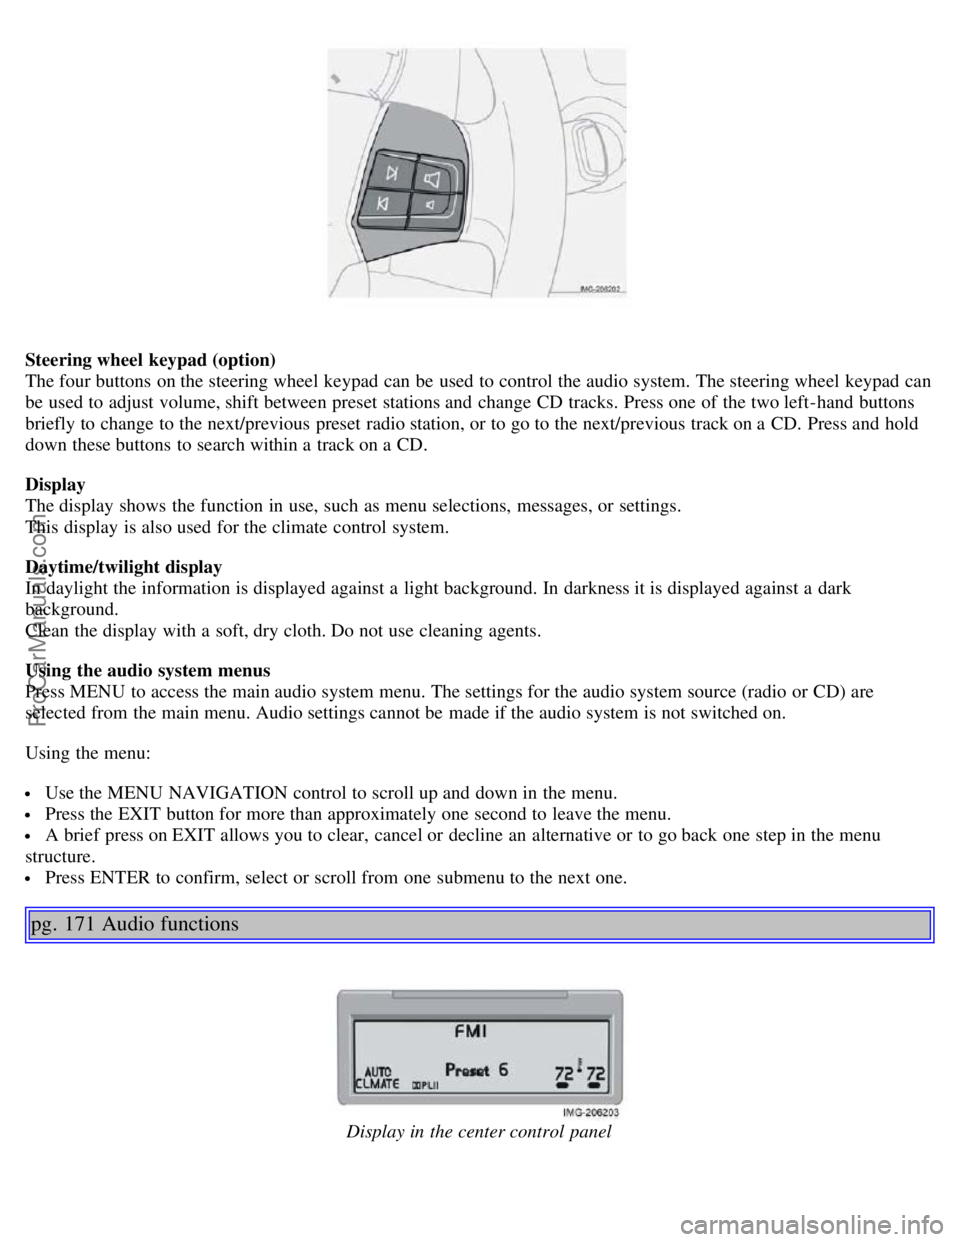
Steering wheel keypad (option)
The four buttons on the steering wheel keypad can be used to control the audio system. The steering wheel keypad can
be used to adjust volume, shift between preset stations and change CD tracks. Press one of the two left-hand buttons
briefly to change to the next/previous preset radio station, or to go to the next/previous track on a CD. Press and hold
down these buttons to search within a track on a CD.
Display
The display shows the function in use, such as menu selections, messages, or settings.
This display is also used for the climate control system.
Daytime/twilight display
In daylight the information is displayed against a light background. In darkness it is displayed against a dark
background.
Clean the display with a soft, dry cloth. Do not use cleaning agents.
Using the audio system menus
Press MENU to access the main audio system menu. The settings for the audio system source (radio or CD) are
selected from the main menu. Audio settings cannot be made if the audio system is not switched on.
Using the menu:
Use the MENU NAVIGATION control to scroll up and down in the menu.
Press the EXIT button for more than approximately one second to leave the menu.
A brief press on EXIT allows you to clear, cancel or decline an alternative or to go back one step in the menu
structure.
Press ENTER to confirm, select or scroll from one submenu to the next one.
pg. 171 Audio functions
Display in the center control panel
ProCarManuals.com