2005 VOLVO S40 lock
[x] Cancel search: lockPage 82 of 127
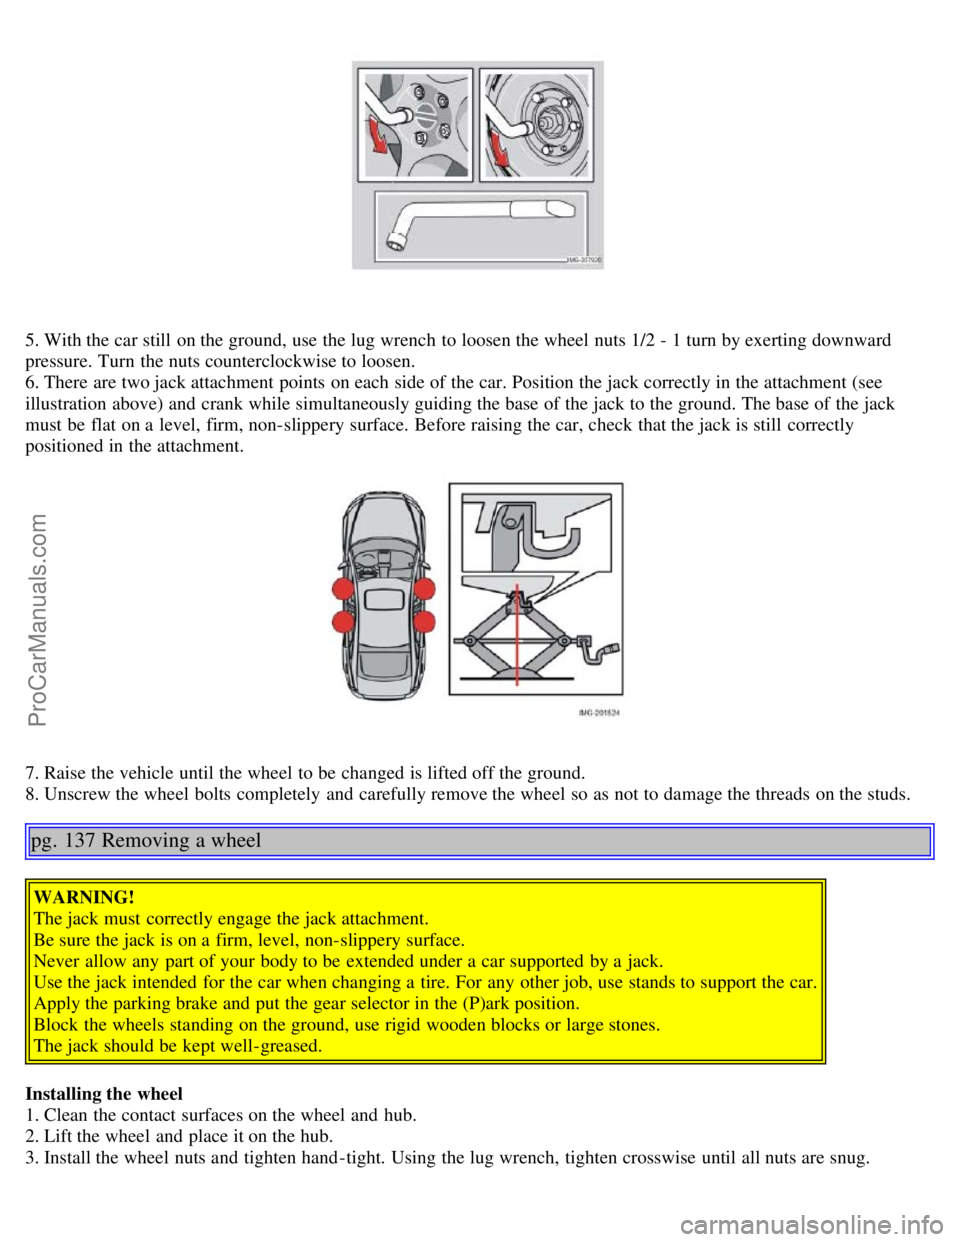
5. With the car still on the ground, use the lug wrench to loosen the wheel nuts 1/2 - 1 turn by exerting downward
pressure. Turn the nuts counterclockwise to loosen.
6. There are two jack attachment points on each side of the car. Position the jack correctly in the attachment (see
illustration above) and crank while simultaneously guiding the base of the jack to the ground. The base of the jack
must be flat on a level, firm, non-slippery surface. Before raising the car, check that the jack is still correctly
positioned in the attachment.
7. Raise the vehicle until the wheel to be changed is lifted off the ground.
8. Unscrew the wheel bolts completely and carefully remove the wheel so as not to damage the threads on the studs.
pg. 137 Removing a wheel
WARNING!
The jack must correctly engage the jack attachment.
Be sure the jack is on a firm, level, non-slippery surface.
Never allow any part of your body to be extended under a car supported by a jack.
Use the jack intended for the car when changing a tire. For any other job, use stands to support the car.
Apply the parking brake and put the gear selector in the (P)ark position.
Block the wheels standing on the ground, use rigid wooden blocks or large stones.
The jack should be kept well-greased.
Installing the wheel
1. Clean the contact surfaces on the wheel and hub.
2. Lift the wheel and place it on the hub.
3. Install the wheel nuts and tighten hand -tight. Using the lug wrench, tighten crosswise until all nuts are snug.
ProCarManuals.com
Page 84 of 127
2 0 0 5
VOLVO S40
Chapter 9 - Vehicle care
pg. 139 Vehicle care
Washing and cleaning the car140
Paint touch up143
pg. 140 Washing and cleaning the car
Washing and cleaning the car
Washing the car
The following points should be kept in mind when washing and cleaning the car:
The car should be washed at regular intervals since dirt, dust, insects and tar spots adhere to the paint and may cause
damage. To help prevent corrosion, it is particularly important to wash the car frequently in the wintertime.
Avoid washing your car in direct sunlight. Doing so may cause detergents and wax to dry out and become abrasive.
To avoid scratching, use lukewarm water to soften the dirt before you wash with a soft sponge, and plenty of sudsy
water.
Bird droppings : Remove from paint work as soon as possible. Otherwise the finish may be permanently damaged.
A detergent can be used to facilitate the softening of dirt and oil.
A water-soluble grease solvent may be used in cases of sticky dirt. However, use a wash place equipped with a
drainage separator.
Dry the car with a clean chamois and remember to clean the drain holes in the doors and rocker panels.
Tar spots can be removed with kerosene or tar remover after the car has been washed.
A stiff-bristle brush and lukewarm soapy water can be used to clean the wiper blades. Frequent cleaning improves
visibility considerably.
Wash off the dirt from the underside (wheel housings, fenders, etc).
In areas of high industrial fallout, more frequent washing is recommended.
After cleaning the engine, the spark plug wells should be inspected for water and blown dry if necessary.
Bumpers : Wash the bumpers with the same cleaning agent used on the rest of the car. Never clean the bumpers with
gasoline or paint thinner. Difficult spots can be removed with denatured alcohol. To avoid scratches, do not dry the
bumpers with paper.
NOTE: When washing the car, remember to remove dirt from the drain holes in the doors and sills.
CAUTION!
During high pressure washing, the spray mouthpiece must never be closer to the vehicle than 13" (30 cm). Do not
spray into the locks.
When washing or steam cleaning the engine, avoid spraying water or steam directly on the electrical components or
ProCarManuals.com
Page 90 of 127

Wash the car, including the undercarriage, to reduce wear that can be caused by a buildup of dirt, and corrosion that
can be caused by salt residues.
Clean leaves and twigs from air intake vents at the base of the windshield, and from other places where they may
collect.
NOTE:
Complete service information for qualified technicians is available online for purchase or subscription at
www.volvotechinfo.com
.
pg. 148 Hood and engine compartment
Hood and engine compartment
Opening the hood
To open the hood:
Pull the lever located under the left side of the dash to release the hood lock.
Lift the hood slightly.
Press up the release control located under the front edge of the hood (at the center) up to the right, and lift the hood.
WARNING!
Check that the hood locks engage properly when closed.
Engine compartment
1. Cooling system expansion tank
2. Power steering fluid reservoir
3. Dipstick - engine oil
4. Radiator
5. Cooling fan
6. Washer fluid reservoir
7. Engine oil filler cap
8. Brake/clutch fluid reservoir
9. Battery
10. Relay/fuse box
11. Air cleaner
ProCarManuals.com
Page 101 of 127
Audio system On/Off
With the ignition key in position I or higher, press the POWER button to switch the audio system on or off.
If the audio system is active when the ignition is switched off, it will reactivate automatically when the car is restarted.
Selecting a sound source
Use the CD and AM/FM buttons to select the sound source of your choice.
Press the AM/FM button repeatedly to switch between FM1, FM2 and AM.
The selected sound source is shown in the display.
Volume control
Turn the volume knob clockwise or counterclockwise to increase or lower the volume. The volume can also be
increased (+) or lowered (-) using the optional steering wheel keypad.
Pause mode
When the volume is turned all the way down, the CD player switches to pause mode. Reactivate the player by turning
up the volume.
Volume control - ALARM
If a CD is playing when the radio receives an alarm bulletin (available in certain areas only), the CD player enters
pause mode. The bulletin is broadcast at the volume selected for this type of message.
After the bulletin has been completed, the audio system reverts to the originally selected sound source (radio or CD),
which is played at the volume that was selected for that source.
If the bulletin volume is adjusted while the bulletin is being broadcast, this new volume is saved and used for
subsequent bulletins.
Sound settings
1. Press SOUND.
2. Press the SOUND button repeatedly until you come to the setting that you wish to change. Choose BASS, TREBLE,
FADER, BALANCE, SUBWOOFER (option), CENTER or SURROUND
1.
3. Use the TUNING knob to adjust the level. The display will show a scale from the min. to max. settings. The center
of this scale is the default setting.
Display text Sound setting
BASS Bass
TREBLE Treble
BALANCE Balance between the speakers on the left and right sides of the car
FADER Balance between the front and rear speakers
SUBWOOFER Level for the optional subwoofer (bass speaker)
CENTER Setting for the center speaker (Premium sound system only)
SURROUND Setting for surround sound (Premium sound system only)
1. The Center and Surround functions are only available on the Premium sound system.
pg. 172 Audio functions
NOTE:
The settings for the center speaker can only be adjusted if Dolby Pro Logic II (DPL II) or 3-channel stereo (3CH) is
selected in the menu.
The level for the subwoofer can only be set if SUBWOOFER is activated in the menu.
3-channel mode is recommended for AM/FM radio broadcasts.
ProCarManuals.com
Page 108 of 127
NOTE: The TUNING knob (turn clockwise to go to the next track, or counterclockwise to go to the previous track) or
the optional keypad in the steering wheel can also be used for this purpose.
Fast forward/back
Press and hold down the left or right arrows keys in the MENU NAVIGATION control (or the corresponding keys on
the optional steering wheel keypad) to search within a track or the whole disc. The search continues for as long as the
buttons are held in.
Random play
This function makes it possible to play the tracks on a single disc or on all of the discs in the CD changer in random
order (shuffle).
1. Select CD mode and press the MENU button.
2. Press ENTER.
3. Select RANDOM from the menu and press ENTER.
4. Select SINGLE DISC or ALL DISCS for the player to randomly choose from one or all discs in the CD changer.
RND or RND ALL is shown in the display while the function is active. Press EXIT to deactivate this function. Press
the right arrow key on the MENU NAVIGATION control to select the next random track.
NOTE: You can only select the next random track on the current disc.
Scan
This function plays the first ten seconds of each track on the CD.
1. Press SCAN.
2. Press EXIT to stop the scan function and listen to an entire track.
Scan only works on the selected disc.
Disc text
Certain CDs contain information about the disc, such as the titles of the tracks, etc. This information can be shown in
the display by activating the DISCTEXT function.
1. Press MENU. Select the menu for relevant sound source and press ENTER.
2. Select DISCTEXT in the menu and press ENTER.
3. If information is stored on the disc, it will now appear in the display.
pg. 180 CD changer (certain audio systems only)
To deactivate this function, select DISCTEXT in the menu and press ENTER.
CD eject
This function makes it possible to eject a single disc, or to eject all of the discs in the changer.
Press the button (no. 16 in the illustration on page 169) briefly to eject the disc that is currently playing.
A longer press (more than two seconds) starts the process of ejecting all of the discs in the changer.
NOTE:
The EJECT ALL function can only be used while the vehicle is at a standstill and will be cancelled if the vehicle
begins to move.
For reasons of traffic safety, you have 12 seconds in which to remove the ejected disc. After that, the disc
automatically reinserts into the player.
Compact disc care
Before using a new CD for the first time, remove any burrs in the center/outer edge by running the stem of a pen or
similar object around the hole/edge of the disc.
ProCarManuals.com
Page 113 of 127

Codes for color and upholstery, etc. The label is located on the passenger's side center door pillar.
3. Loads and Tire Pressures
(on inside of fuel filler door): Canadian models only.
4. Child safety lock
This information is stamped on the rear inside edges of the doors.
5. Federal Motor Vehicle Safety Standards (FMVSS) specifications (USA) and Ministry of Transport (CMVSS)
standards (Canada)
Your Volvo is designed to meet all applicable safety standards, as evidenced by the certification label on the facing
side of the driver's door. For further information regarding these regulations, please consult your Volvo retailer.
6. Loads and Tire Pressures U.S. models only
Certain models will only have one decal, depending on the specifications of the vehicle.
7. Vehicle Identification Number (VIN)
1
The VIN plate is located on the top left surface of the dashboard. The VIN is also stamped on the right hand door
pillar.
8. Vehicle Emission Control Information
Your Volvo is designed to meet all applicable emission standards, as evidenced by the certification label on the
underside of the hood. For further information regarding these regulations, please consult your Volvo retailer.
1. The Vehicle Identification Number (VIN) should always be quoted in correspondence concerning your vehicle with the retailer and when
ordering parts.
pg. 185 Dimensions and weights
Dimensions and weights
DimensionsLength 175.9 in. (447 cm)
Width 69.7 in. (177 cm)
Height 57.2 in. (145 cm)
Wheelbase 103.9 in. (264 cm)
Front track 60.4/60.9 in. (154/155 cm)
Rear track 60.3/60.8 in. (153/154 cm)
Turning circle 34.9 ft. (10.6 m)
Cargo capacity 15.5 cu. ft. (440 liters)
Category USACanada
Gross vehicle weight FWD
1: 4320 lbs
FWD Turbo: 4320 lbs
AWD
2 Turbo: 4450 lbs 1960 kg
1960 kg
2020 kg
Capacity weight FWD: 800 lbs
AWD: 800 lbs365 kg
365 kg
Permissible axle weight, front FWD: 2380 lbs
FWD Turbo: 2380 lbs
AWD Turbo: 2420 lbs1080 kg
1080 kg
1100 kg
Permissible axle weight, rear FWD: 2130 lbs
FWD Turbo: 2130 lbs
970 kg
970 kg
ProCarManuals.com
Page 116 of 127

driving in mountainous areas.
American Petroleum Institute (API) symbol
The API Service Symbol "donut" is divided into three parts:
The upper section describes the oil's performance level.
The center identifies the oil's viscosity.
The lower section indicates whether the oil has demonstrated energy-conserving properties in a standard test in
comparison to a reference oil.
pg. 188 Engine specifications
Engine designation B5244S4 B5244S7B5254T3
Output
kW/rps 125/100 125/100162/83
hp/rpm 168/6000 168/6000218/5000
Torque
Nm/rps 230/73 230/73320/25-80
ft. lbs./rpm 166/4400 166/4400236/1500-4800
No. of cylinders 5 55
Displacement (liters/cubic
inches) 2.44/148.6
2.44/148.62.52/153.8
Bore (mm/in.) 83/3.27 83/3.2783/3.27
Stroke (mm/in.) 90/3.54 90/3.5493.2/3.67
Compression ratio 10.3:1 10.3:19.0:1
Spark plugs
type Volvo kit no. 30650843 Volvo kit no. 30650843Volvo kit no.
30650379
gap inches/mm (3x) 0.024 ± 0.004 in./0.6 ±
0.1mm (3x) 0.024 ± 0.004 in./0.6 ±
0.1mm
0.027in./0.7mm
tightening torque ft. lbs./Nm 22.5 ft. lbs./30 Nm 22.5 ft. lbs./30 Nm22.5 ft. lbs./30 Nm
Charge air cooler (Intercooler)
Turbocharged engines employ a turbocompressor to force air into the engine inlet manifold and a charge air cooler to
cool the compressed inlet air. The resulting increase in air flow raises pressure in the intake manifold and increases
engine power over that developed by the normally-aspirated engine. The charge air cooler (which resembles a radiator)
is located between the turbo-compressor and inlet manifold.
Fuel system
The engine is equipped with a multiport fuel injection system.
pg. 189 Electrical system
General information
12-volt system with voltage controlled generator. Single wire system in which the chassis and engine block are used as
conductors, grounded on the chassis.
Bulbs
Please refer to page 155
for a list of the bulbs used in your car.
ProCarManuals.com
Page 119 of 127
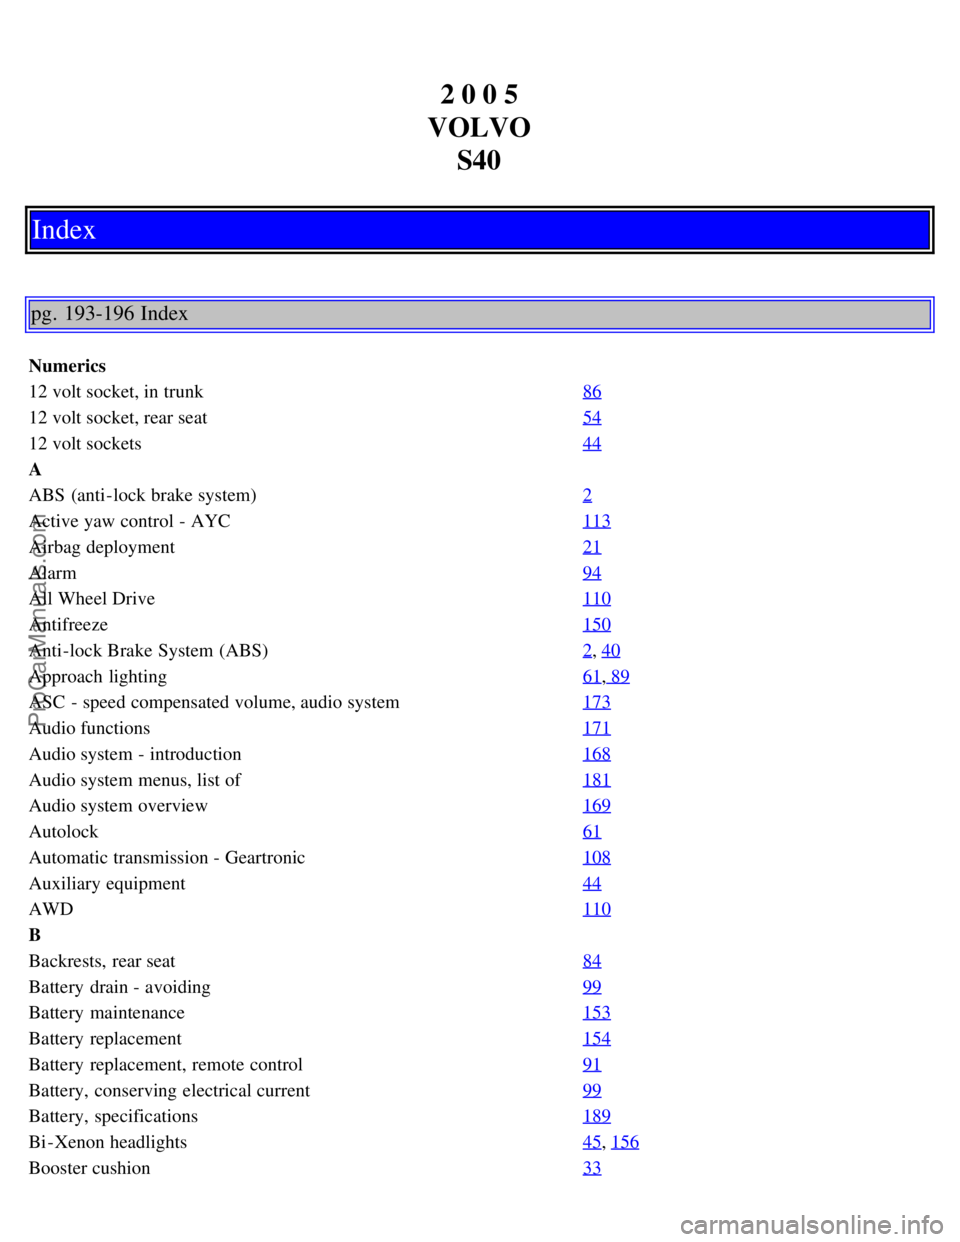
2 0 0 5
VOLVO S40
Index
pg. 193-196 Index
Numerics
12 volt socket, in trunk 86
12 volt socket, rear seat54
12 volt sockets44
A
ABS (anti-lock brake system)2
Active yaw control - AYC113
Airbag deployment21
Alarm94
All Wheel Drive110
Antifreeze150
Anti-lock Brake System (ABS)2, 40
Approach lighting61, 89
ASC - speed compensated volume, audio system173
Audio functions171
Audio system - introduction168
Audio system menus, list of181
Audio system overview169
Autolock61
Automatic transmission - Geartronic108
Auxiliary equipment44
AWD110
B
Backrests, rear seat84
Battery drain - avoiding99
Battery maintenance153
Battery replacement154
Battery replacement, remote control91
Battery, conserving electrical current99
Battery, specifications189
Bi -Xenon headlights45, 156
Booster cushion33
ProCarManuals.com