2005 VOLKSWAGEN GOLF instrument panel
[x] Cancel search: instrument panelPage 10 of 444
Engine coo lant 3.2:47
Add i
tive s 3.2:47
Ca n I
add plain water to the en gi ne coolant ? 3.2 :
Engine data 3.3: 5
Eng ine
hood 3.2: 41
How do unlock the engin e hood? 3.2: 41 Warn ing light 3.2: 41
Engin e management 3.2: 9
E ngin e oi l 3.2: 42
Adding 3.2: 45
Add itives 3.2: 46
Check ing leve l 3.2: 44
Consumption 3.2: 4 3
Dip s
tick 3.2: 44
How do know how much oil m y e ngine is
consuming ? 3.2: 43 c h an ge 3.2: 46
S p ecifica tion s 3.2: 42
Specificatio ns gaso line engine 3.2: 42
Wha t kind of e ngine oil should put in my ve hicle? 3.2: 42
When should check the e n gi ne oi l
l eve l? 3.2 : 4 3
Where is th e oil dip stick 3.2:
44
E ngin e oil pr essure
Warning light 3.2: 45
Eng ine oil
senso r
Warning light 3.2:
44
Environme nt
Avoidi ng pollution 3.2:23,36
C le
aning th e e ngin e compartment 3.2 : 28 Drive economicall y 3.2:
Warni ng ligh t 3.2: 9 also Elec tronic Co ntrol
3.2:6
B utt on 3.2 : 7
Warning
lig ht 3.2: 7
Even t Data Hecorder 3.2:
34
Examples of improper seating
position s 2.1:
Infant seats 2.1: 59
Sa fe ty belt ex te
nder 2.1: 24
Sa fet y belts 2.1:
F loor mat s 2.1: 9
Fog light s 3.1
:43
F r
ont ai rbags
De
scription 2.1:32
Front air b ag sys tem
2.1: 32
A irb ag deploym ent zone 2.1:38
Th e bas ics 2.1: 32
Fronta l
collisions and the laws of
physics
1 5
Fr
ont center armres t 3.1: 65
Front seats 3.1: 58
F u el
fille r cap
Warni ng light 3.2:35
Fuel ga uge
Displa y 3.1:
F ue l level 3.1:
Fuse box
th e in strume nt panel, left 3.2: 92 the instrument panel, rig ht 3.2: 92
Fu ses 3.2:
Page 12 of 444
Installin g the upper te ther strap on the
anchorage 2.1:
Instrument cluster 3.1: 8
Menu structure 3. 1: 14
Instrument cluster illumination 3.1: 3
Instrument cluster lighting 3.1: 44
Instrument panel 3. 1:
K
Access positive an d negative
t
erminal s 3.2:
Light change 3.2: 93
lights
Lights 3.1: 43 interior 3.1:47
Lights & V is ion
Menu 3.1:17
Lock 3 .2: 26
Locking driver's door in an e m erge ncy 3.2: 88
Locks 3.2: 26
Chi .ld safety 3.1: 33
Low beam 3.1: 43
Lower anchorages 2.1: 71
Luggage compartment 2.1: 3.1: 69
Luggage compartment cover 3.1:71
M
Main menu -Mu lt i-Function
In dicator 3.1:
Malfunct ion Indicator Lamp 3.2:
Vehicle Weights 3.3: 6
Menu compass 3.1: 19
Menu for convenience functions 3.1: 16
Menu for Lights & Vision 3.1: 17
Menus Examp le of use 3.1:
Menu sound system 3.1:
MFI 3.1:20
M IL
m irrors, electrical 3.1:53 Simultaneous adjustment 3.1:53
Mirrors lowered function 3.1: 17
Modifications 3.2: 32
Monitoring th e Advanced Air bag System 2.1:
Key words 9
Page 106 of 444
2.1 Safety first
Never strap more than one person, in
cluding c hildren, into any belt.
Never place a safety belt over a child sittin g on your lap.
• Always keep feet in
the footwell in front of the seat while the vehicle is being driven.
Never let any person ride with feet on the instrument panel or sticking out the window or on the seat.
Never remove a safety belt while the ve
hicle is moving. Doing so will increase your
risk of being injured or killed.
Never wear belt s twisted.
Never wear belt s over rigid or breakable
objects in or on your clothing, such as eye
glasses, pens, keys, etc., as these may cause injury.
Never allow safety belts to become damaged by being caught in door or seat hardware.
Never wear the shoulder part of the belt under your arm or othenvise out of position.
Several layers of heavy clothing may inter
fere with correc t positioni11g of belts and reduce the overall effectiveness of the sys tem.
18 Safety
(continu ed)
Always keep belt buckles free of anything
that may preven t the buckle from latch ing se
cure ly.
Neve r use comfort clips or devices that create slack in the sh oulder belt. However,
specia l clips may be required for the correct
use of some c hild restraint systems.
Torn or frayed safety belts can tear and damaged belt hardware can break in an accident.lnspect belts regularly. If webbing, bind
ings, buckles, or retractors are damaged, have
be lts replaced by an authorized Volkswagen
dealer or qualified workshop.
Safety belts that have been worn and loaded in an accident must be replaced with the correc t rep lacement safety belt by an authorized Volkswagen dealer or qualified work
s h op. Replacement may be necessary even if damage cannot be clearly seen. Anchorag es
that were loaded must a lso be inspected.
Never remove, modify, disassem ble, or try
to repair the safety belts yourself.
Alwa ys keep the belts clean. Dirty belts
may not work correct ly and can impair t11e func tion of inertia reel booklet 3.2 and
Page 117 of 444
sion. d am age, repair co sts or eve n the
l ack of damage is no t an of w het her an airb ag s ho uld o r
not.
i s no t po ssible to define cove r every poss ibl e kind and an g le of impact that alway s tri gge r th e bags , s ince th e c ircumstan ces vary era b ly be tw ee n one po rt ant factors include , for examp le, the natur e
( hard or so ft) of th e objec t that the ca r hi ts, th e
angle of imp act, vehicle speed, etc. The front bag s als o no t in side or rear sio ns, orin rollove rs .
Always re m em ber: Airb ags
depl oy only
once, and only in certain kinds of collisions. safety b elts are always th ere to tion in th o se situ ations in w hi ch airb ags are not supposed t o dep loy . o r when they have already
d eployed; for exa mpl e, wh en yo ur
sub stitut e for safe ty bel t. The airba g syste m wor ks mo st
effectivel y w he n u sed with the sa fety belts. Therefore , always properly wear your sa fety
WARNING
S itting too clo se to the stee rin g wheel or strument pa n el will decrease the effec tiv en ess of the airbags and will increase the risk of sonal injury in a co llision.
Ne ver sit clo se r than in ch es (25 em ) to th e steering wheel or instrument panel.
If you cannot sit more than
first
(continued)
to it when it
To redu ce the risk of injury when an airbag inflates, always wear safety belts properly 19,
Always make certain that children age 12 or younge r always rid e in the rear seat. If dren are not properly restrained, they may be sever ely injured or killed when an airb ag flat es.
Never le t childr en ride unrestrained or
Adju st the front seats properly.
Never rid e w ith the backr est
Always sit as far as poss ible from the steerin g whee l or the instrument panel
Alway s sit upright with your back against the backrest of your seat.
Neve r place your feet on the in strument panel or on th e seat . Always keep both feet on the in front of the seat to help preven t rio us in juri es to the legs and hip s if the a irbag
infl ates.
Never reclin e the front passenger 's seat to transport objects. Item s can also move into the area of th e s ide alrbag or the front airbag during braking or in a sudden maneuver. jects b eco me projectiles and caus e injury when an airbag infl ates.
WARNING
Airbags that have deplo yed in a cra sh mus t b e replaced .
onl y o riginal equipment airbags proved by Volkswagen and Installed by a
trained technician who has th e necessary tool s and diagnostic equipment to properly replace any airbag in your
Never permit salvage d or recycled airba gs
to be installed in your vehic le.
Airbag system 29
Page 120 of 444
Have th e a irbag system inspected by you r authorize d Volkswagen deale r or qualified
workshop immediately. Always carefully follow instructions from
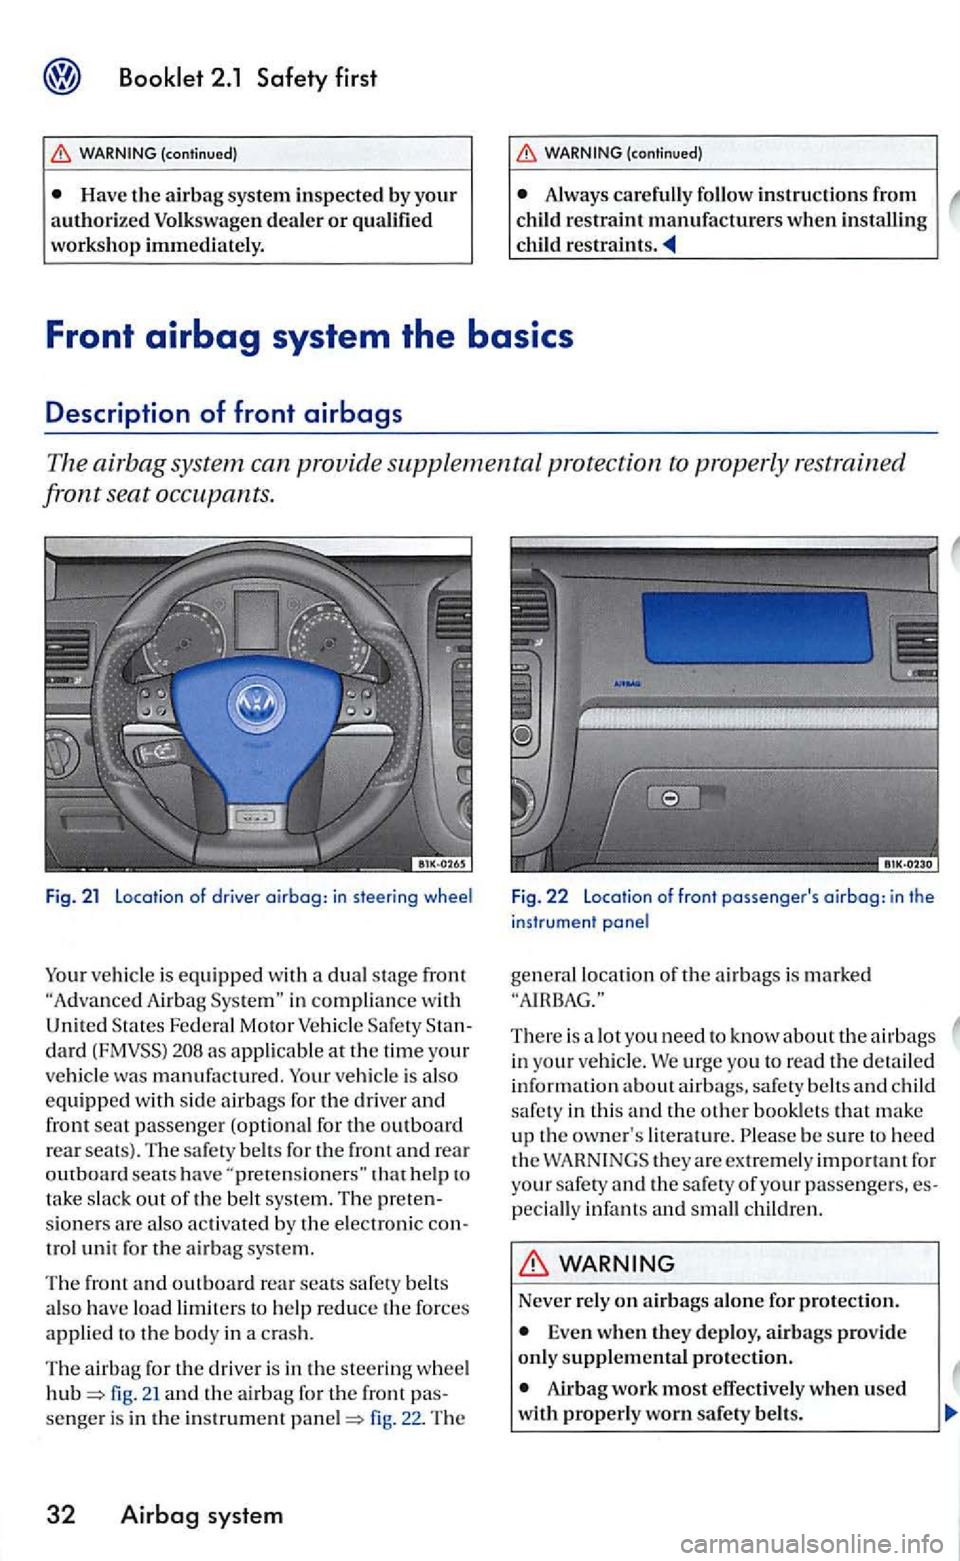
Fig. 21 Location of driver airbag: in steering wheel
ve hicl e is equipped with a dual s tage front A ir bag in compliance w ith
Unit ed Fede ra l Motor Veh icle dard as applicable at th e time your ve hicl e was manufa ctured . vehi cle is also equipped w ith sid e airbags for the driver and fron t se at passenge r (opt io nal for the outboard re a r seats). The sa fety belts for th e front and re a r outboard seats have ''pretensioners"
fig. 21 and th e ai rbag for the front fig. 22. The
32 Airbag system
F ig. 22 Location of front passenger's airbag: in the
instrument panel
gen era l lo ca tion of the a irba gs is marked
There is a lot you need to know about th e airbags in yo ur veh icle . We urg e you to read the detailed
information abo ut airb ags. safety belts and child
safe ty in thi s and the o th er bookle ts th at m ake
up the own er' s literature. be sur e to heed
th e th ey are extrem ely important for
your safet y and t h e s afety of yo ur passe nge rs, pecially infan ts and small c hildr en.
WARNING
Never rely on airb ags alone for protect ion.
Even when they deplo y, airbags provide only supplem ental protection.
Airbag work most effective ly w he n used
with properl y worn safet y belts.
Page 124 of 444
The PASSENGER light in the center of the instrument panel fig. 25) that tells yo u when the front Advanced
Airbag on the passeng er side been turned
orr.
A se nso r in side the safe ty belt latch for the
front seat passenger to measure th e ten sion on th e sa fet y belt. The ten sion on th e safety belt and th e weight regis ter ed by the we ig ht -se nsin g mat help the control unit
page
A senso r in the safety belt lat ch for the driver and for the front seat passenger that senses whether that safe ty belt is latch ed or n ot and tran smit s thi s information to the elec troni c
Damage to the front passenger seat ca n
Never remove the passenge r or driver
scat from the vehicle.
Never re m ove the uphol stery from the front passenger seat.
Never disassemble or remove parts from
th e seat or disconnect wires from it.
Never carry sharp object s in your pockets or place them on the seat. If the sen si ng m at in the passenger scat i s tured it cannot work properly.
36 Airbag system
(continued)
Neve r carry things on you r lap or jects on th e passenger seat. items can the and send the wrong information
to the airbag con trol unit.
Never store items under the front
under the passenger scat could be damaged, pre ve nting them and th e airbag system from working properly.
Never place seat cove rs or r eplace ment ho ls tery on th e front seats that have no t been
specifically approved by Volk swagen .
covers can prevent the Advanced
Airbag from recognizing child straint s or occupants on the front passenger seat and prevent the sid e a irbag in the seat backr es t fr om deploying properly.
Neve r u sc cushions, pillows, blankets or sim ilar items on th e front passenger seat. T he addition al paddi ng w ill prevent the
If yo u must use
BAG light comes on and sta ys on whenever the child restraint is in stalled on the front (>as-senger scat.
If t he BAG stay on, immediatel y in stall
c hil d restrain t in rear seati ng position and have the airbag system inspected by your thorized Volkswagen dealer o r qualifi ed
wor kshop
Page 132 of 444
BAG light does not go off when an adult is sitting on the front
passenger scat after taking the s te p s described
above, make sure the adult i s properl y seated
and r estrai ned at one of the rear seating posi
tions.
Have the a irba g sys te m inspecte d by your authorized Volkswagen dealer or qualified
workshop before transporting anyon e o n th e
front passenger seat.
be turn ed off, and th e BAG light on.
o r th e front passe nger sa fety belt its elf is buckled and th e
f ru nt seat i s not occ upied . th e co me on.
Repair, care and
re moving, servicing or repairing a
Never cover, obstruct, or change the
steeri ng wheel horn pad or airbag cover or the in strument panel or m odify them in any
Never attach any o bj ects such as cup holders or te lephone mountings to the surfaces covering the airbag units.
For cleaning the horn pad or instrument panel, use only a soft, dry cloth or one moi st
e ned w ith plain water. Solvents or cleaners
co uld damage the airbag cover or change the
s tiffn ess or strengt h of the material so that the
a irbag cannot deploy and protect properly.
Never repair, adjust, or change any parts of the a irba g system.
All work on the steering wheel, instrument panel, front seats or ele ctri cal sys tem (in-
44 Airbag system
{ continu ed )
eluding the installation of audio equipment ,
ce llular te lephones and C B radios, etc.) must be performed by a qualified tech nici an who
h as the training and special equipment neces
sary.
For any work on the airbag s ys te m , we strongly recommend that yo u see you r authorized Volkswagen dealer or qualified work
shop.
Never modify the front bumper or parts of the vehicl e body.
Alwa ys make sure that the s ide airbag can inflate witho ut interference:
Neve r scat covers or rep lacement upholstery over the front scat backs that have no t been specifically approved by Volkswagen.
Never use additional seat cushions that cover the areas where t11e sid e a irba gs in
flate .
Damage to the original scat cove rs or to
th o scam in the area of tho side airbag module must always be re p ai red immediate ly by an authorized Volkswagen deale r or qualified workshop.
The airbag sy stem can be activated only
o n ce. After an airba g has inflated, it must be replaced.
trained t echnician who has th e necessary
too ls and diagnostic equipment to properly
Page 188 of 444
Booklet 3 .1 Controls and Equipment
Functio n lights & Vision
Factory setting This menu resets all of these functio ns to the original factory tings.
Back Heturn to the m enu.
Tips
The menus shown in the dis play depends o n ve hicle electronics and the options installed on
Applies to with sound system
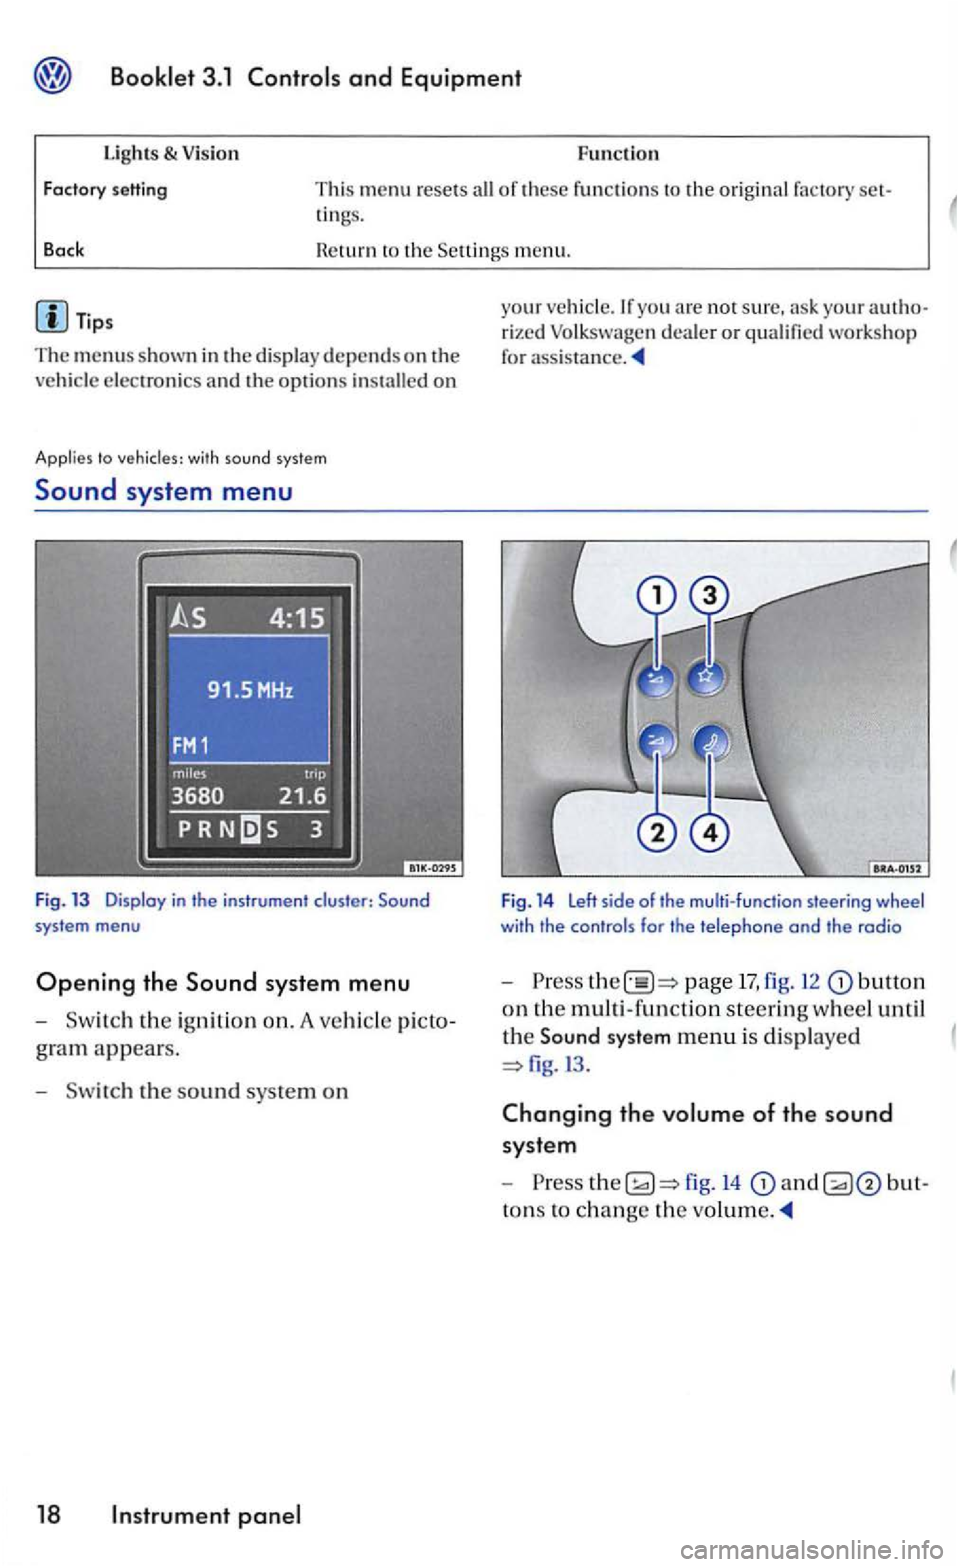
Sound system menu
Fig. 13 Display in the instrument cluster:
gram appears.
- Sw itch the s
ound sys te m on
18 panel
your veh icle.lfyou arc not sure, your rized Volk swage n dea ler or qualified workshop
for
Fig. 14 Left side of the multi-function steering wheel with the controls for the telephone and the radio
-Press page 17, fig. 12 butto n
on th e multi -functio n steerin g wheel until
th e
Sound system menu is di splaye d
fig.l3 .
Changing the volume of the sound
syste m
-
to ns to ch ange the