2005 VOLKSWAGEN GOLF instrument panel
[x] Cancel search: instrument panelPage 213 of 444
and Equipment
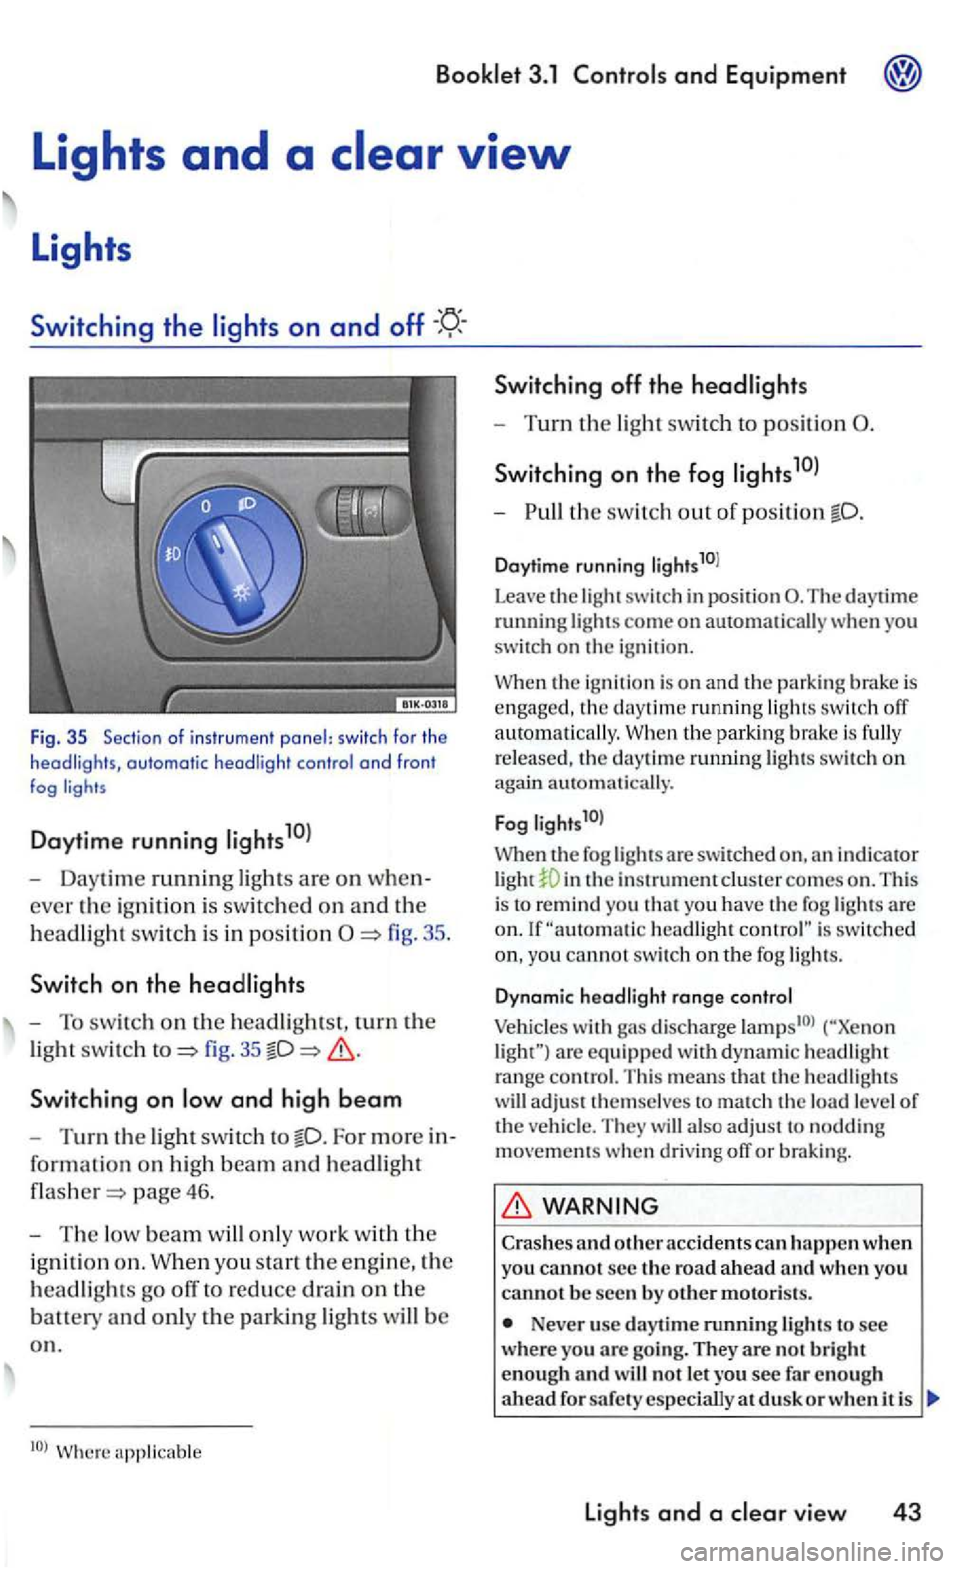
Fig . 35 Sec tio n of i nstr u m ent panel: switc h fo r th e headligh ts, automatic headli ght contro l a nd fron t fog
Daytime running
- Daytime running ligh ts are on when
ever the ig ni tio n i s sw itc hed on an d th e
h
eadlig ht swit c h i s in positi on
fig. 35
Switchin g on
For more in
for ma
tion on hig h beam an d headlight
page 46.
-The low beam w ill only work w it h th e
i g ni
tion o n . W hen you sta rt the e ngin e, the
h
eadlights go off to reduce drain on the
batt ety an d only th e parkin g lights will b e
o n .
Switching off th e headlights
- Turn the light swit ch to position
S wi tch ing on the fog
-th e switch out o f position
Daytime running li g hts10l
Leave
the light switch in posit ion The daytime running lights come on automatically you
switch on the igni tio n.
the ignition is o n and the parking brake is engaged , the daytime running ligh ts switch off
a uto m atically. the park in g bra ke is fully
r e leased , th e daytime ru nning lights swit c h on again automati cally.
F
og l ights1 0l
When th e fog lights a re swit ch ed in th e instrument clus te r comes on . This
i s to remind you t h at yo u have the fog lights are headlight is switc hed
yo u cannot switc h on th e fog ligh ts.
D ynam ic hea d light range co ntrol
Vehicles with gas discharge are eq uip ped w ith d yn am ic headlig h t range contro l. T his means that th e headlig hts
w ill adjust t hemselves to match th e load level of the ve hicl e. They will also ad ju st to noddin g movements when d riving off or braking.
WARNING
Crashes and o ther acc idents can h appen when you cannot s e c the ro a d a head and w hen you canno t b e seen by o th er motoris ts.
Never use day tim e running lights to see wher e you arc goi ng. They are no t b rig h t
enough an d w ill not le t you see fa r en o ug h
a head d usk o r w hen i t is
lights and a vie w 43
Page 225 of 444
Booklet 3.1
passe nger's seat can
b e adju ste d in many ways to suit the physical
need s of the vehicl e occ upants. position is
very important for:
fast and easy operat ion of all control s on the instrument panel,
safe driving ,
optimum prote ction from the s afet y belts
and airb ag booklet 2.1
Driv ers or passengers who are unbelted, out of position or too close to the airb ag can be seri
ously injured or killed by an airbag as it unfolds. To help reduce the risk of serious personal injury:
Always adjust th e driver's seat and the steeri ng whe el so that there are a t lea st in ches (25 em) betwe en you r brea stbone and the ste erin g w heel.
Always hold the steering wheel on the out
s ide of th e s teering wheel rim with your hands at the 9 o'clock and 3 o'clock position s to he lp
reduce the risk of personal inju ry if the driver 's airbag inflates.
Never hold the steering wheel
Passengers must always sit in an upright position and never lean agains t or pl ace an y
(co ntinued)
part of their body too close to the area where the airbags are loca ted.
Alway s make sure there are at least inch es (25 em) between instrument panel.
Eac h passenger must always sit on a sea t of their own and prope rly fasten and wear the safety belt belon ging to that scat.
Before driving, always adjust the front
seats and head r estraints properly.
Never adju st th e sea ts while the vehicle is
moving. sea t may move unexpec tedly and yo u could lose control of the vehicle.
Always keep your feet on the floor in front of the sc at. Never rest on tl1e in strument panel, out of the window, etc. The airbag
s ystem and safety belt will not be able to pro
te ct you properly and can even increase the
ri sk of injury in
Never drive with backres t reclined or tilted far backJ The the backres ts are t ilted back, greater risk of injury due to
incorrect positioning ofthe safety belt and im
proper seating position.
b elts only offer maximu m prot ec
tion when the se atback is securely lat ch ed in
Children must alway s ride in child seats.
Seats and storage 55
Page 229 of 444
Tips
Depen ding on the particu lar model, th ere may be diff ere n ces in the controls. For exa mpl e, on some seats and powe r control s may be combined.
Th e rots fo r the passeng er's seat m ay
differ fro m those of the dri ver's seat.
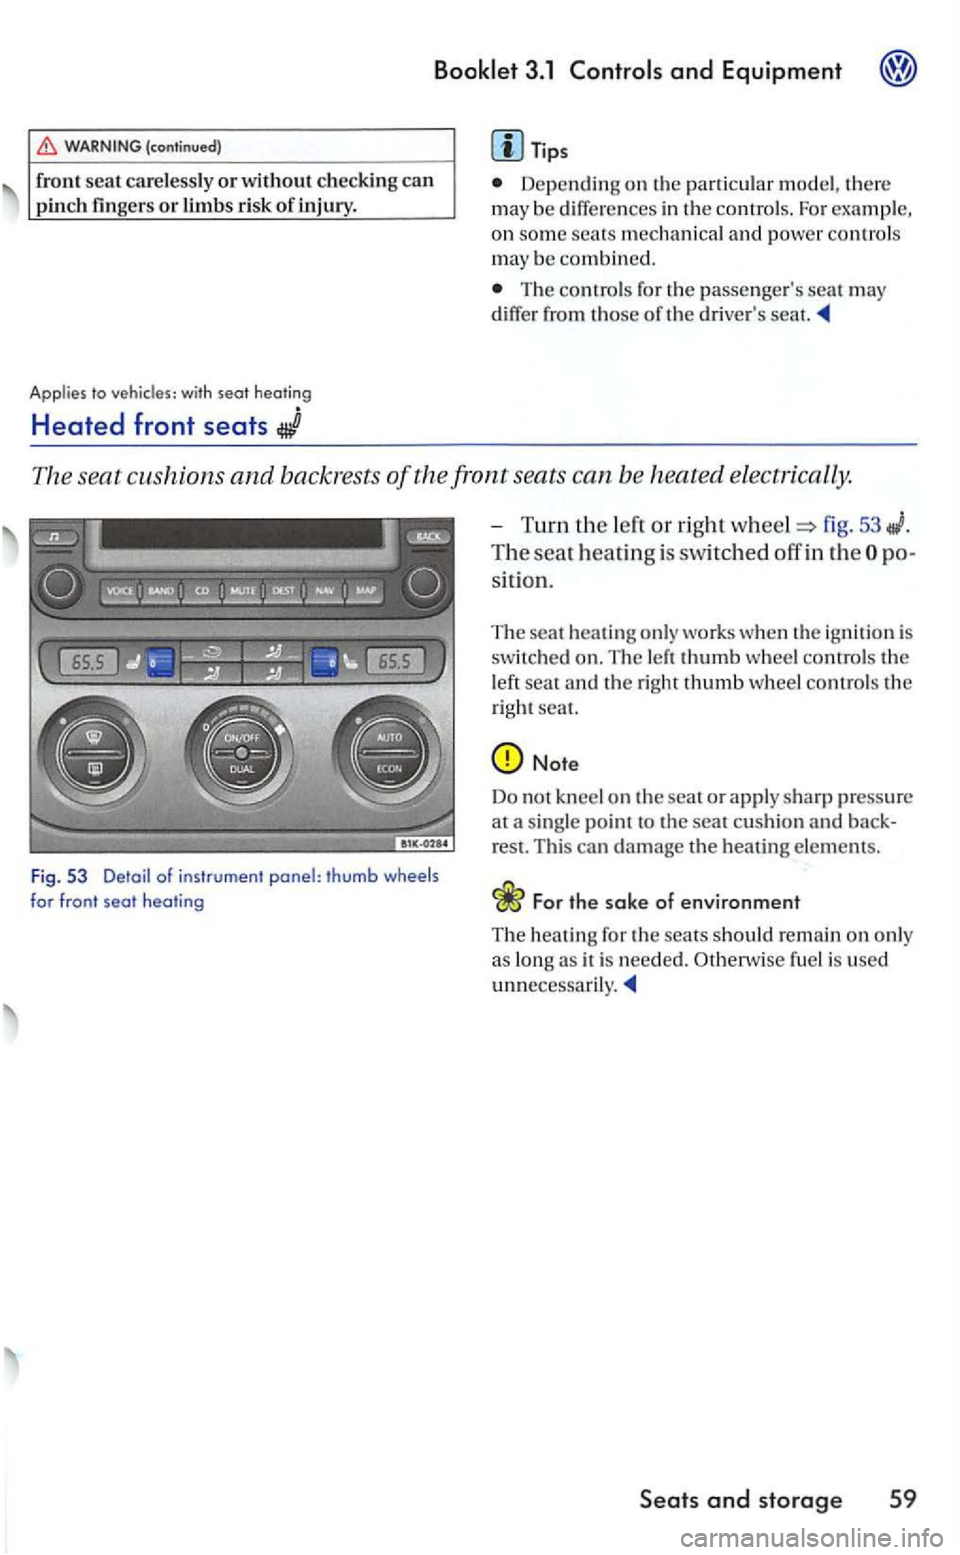
The seat cushions and backrests of the front seats can b e heated electrically.
Fig . 53 Detail of instrument panel: thumb wheels for front seat heating
-Turn the lert o r right wheel=> fig. 53
The seat heatin g is switched off in th e
hea tin g only works when the ig nition is
sw itched o n. The left thumb w hee l co ntrols th e
l eft sea t and th e righ t thumb wheel co ntrol s th e
right seat.
For the sake of environment
T he heati n g for the sears sh o uld remain on only
a s lon g as it is nee ded. Oth erw ise fuel is used
Seats and storage 59
Page 236 of 444
and Equipment
Other storage areas
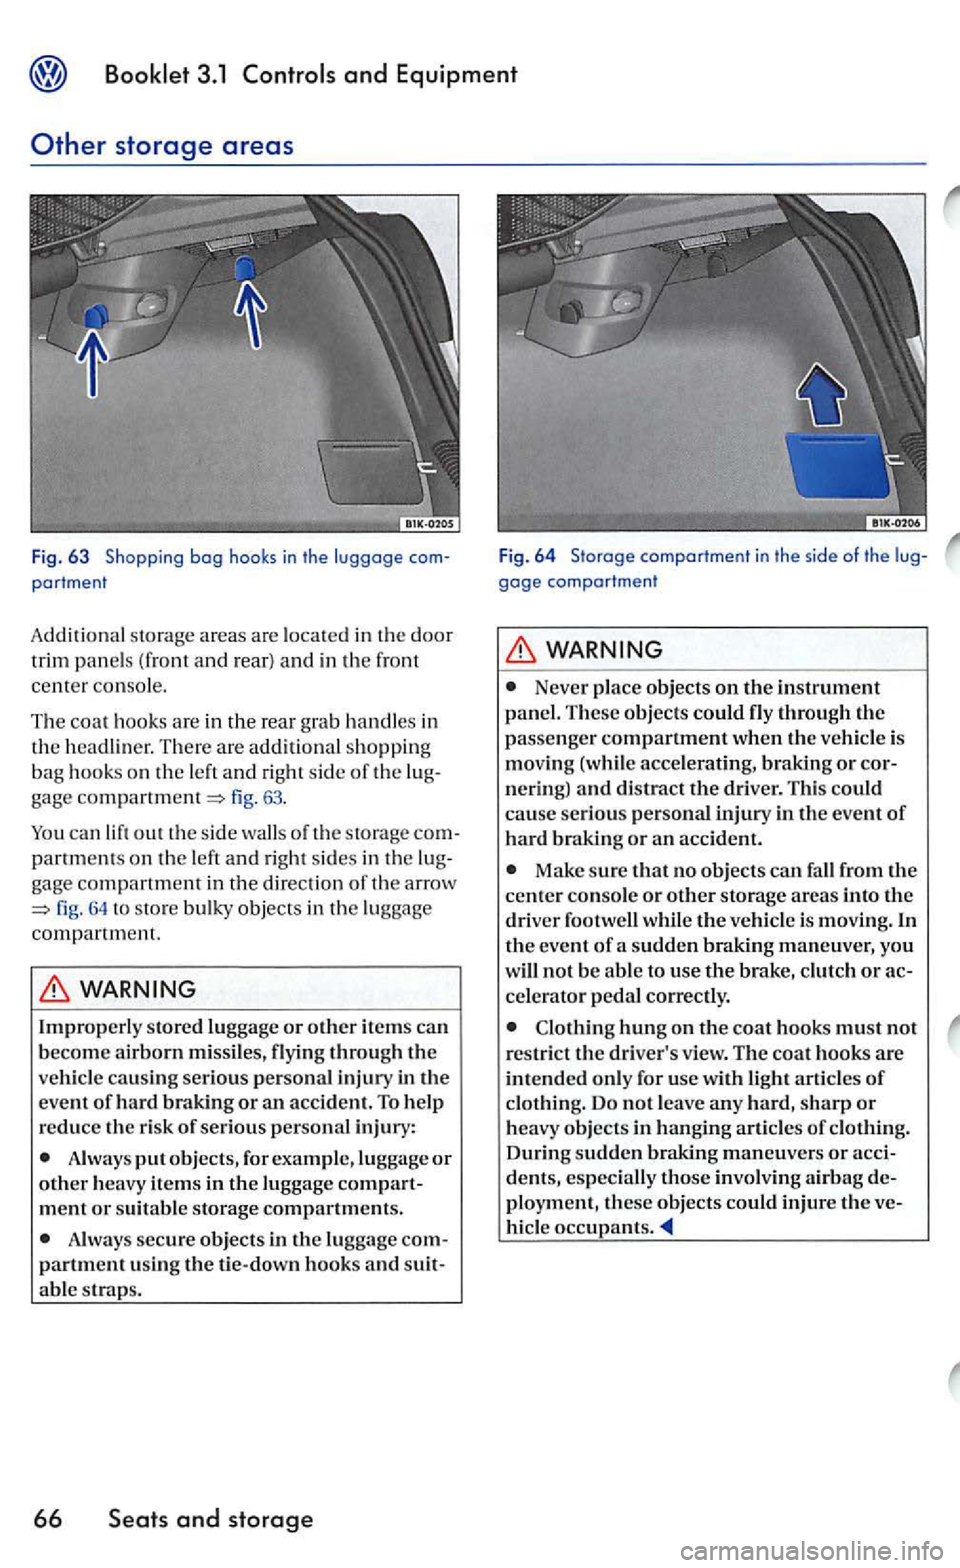
Fig. 63 Shopping bog hooks in the luggage portment
Additiona l s torage areas are located in the door
trim panel s (f ront and rear ) and in the front
center console.
The coat hooks are
in the rear grab hand le s in th e There are add itional shopping
bag hook s on the and right side of the fig. 63.
out the s ide of the storage partm ent s on the and right sides in the
fig. 64 store bulky objects in the luggage
com partm ent.
Always put objects, for example, lug gage or other heavy items in the luggag e compartment or suitabl e storage compartments.
Always secure objects in the lu ggage partment using the tie-down hooks and able straps.
66
gage comportment
Never place objects on the instrument
panel. These objects could fly through the
passeng er compartm ent when th e is mov ing (w hile acce lerating, braking or n ering) and
Make sure that no objects fall from the cente r console o r other sto rage areas into the
dri ver footwell while the is m ov ing. In the event of a sudden brakin g maneuver, you
w ill not be able to usc tl1e brake,
hung on tl1e coat hooks must not rest rict the dri ver's view . The coat hooks arc intended only for usc with light of
of During sudden braking maneuvers or acci-
d e nts, especially those inv olv in g airbag de
ployment , these objects could inj ure the ve-occupants.
Page 304 of 444
WARNING (continued)
partment.
Always le t the engin e cool down ple te ly befor e opening the engine
hood. Hot components will burn skin on
W hen the engine has coo led dow n and you are ready to open the eng in e hood:
- He move
the key from the ignition.
- Appl y th e
parking brak e firml y and put the selector in
-Keep c hildr en and others away from the vehicle.
WARNIN G (cont inued)
Neve r reach into the a rea around or touch
th e radi ator fan. w it h th e blad es can
r es ult in seriou s personal injury. Always
moved from the ign ition.
For the sake of environment
gre a se and oil dep osits can r un off when th e engi ne is was hed. The polluted waste water must pass th rough an oil se pa ra tor before posal. Have the engin e cl ea ned only by an
- Use a cl ean, damp cloth to clean plastic
parts and th e in strument panel.
- If thi s does not work, use a special
WARNING
so lvents on surfaces where airb ags are located can change the way airb ags deploy in
a crash.
with woode n interior ri m
thi s does not provide sa tisfac tory
sults, use a gentle soap solution.
28
(con tinued)
Neve r clean the instrument pan el a nd the
s u rfaces above airbag modul es with cleaning
products containing so lvents.
contain ing solvents will change
the p roperti es of the plas tics and may cause pla stic parts t o break and fly around w he n the
a irbag deploys in a cras h causing injury .
Note
products th at contain so lvents will damage plas tic mate ria ls .
product s that contain solvents will damag e plas tic materia ls .
Page 307 of 444
is des igned to offer a high sta nda rd
of active and passive safety.
an authoriz ed Volkswa gen dea ler for advice before accessories, replace
m ent part s or other equipment.
A uthori zed
deal ers have the lat est
i n for mation from the manufacturer and can recommend accessorie s and parts that are suitable
for your vehicle and persona l requir em ent s.
They can also help answer question s you might
have regarding official regulation s.
recomm end you onl y use approve d swagen accessories and genuine
ability and safety. The d ea le rs h ip s have the neces sary experience and faciliti es to
e nsure that the part s are install ed properly.
Volkswagen cann
ot ass ume responsibilit y for
any after-mark et non-V o lk swagen parts us ed,
ev en if these part s have be en appro ved by testing agency or are covered by an certifi cate or seal of appro val.
In the in teres t of safety, we urge you to use
only authorized accessor ies and genuin e parts® that have been
d es igned to be used on your veh icle.
Neve r place or attach accessories or other objects (such as cup holders, telepho ne
b rackets, note pads, larg e,
on the stee ring wheel, instrument panel , seat back
res ts, roof areas above the doo rs or betwee n
th ose areas an d yourself.
Objects on or near the surfaces where
Be sure to read and heed the in formation a nd booklet2.1 chapter
Acce ssories, new parts, repairs and modifications 31
Page 329 of 444
drive if you have clear vis io n through all the windows.
A defect ive or d irt y w iper blade can scratch
t h e rear glass.
Never clean gla ss panel with fuel. nail polish remove r, p aint thinn er o r similar flu ids.
Thi s ca n damage th e w iper bla d es.
Never move the w iper or the wiper arm your hand can dam age it.
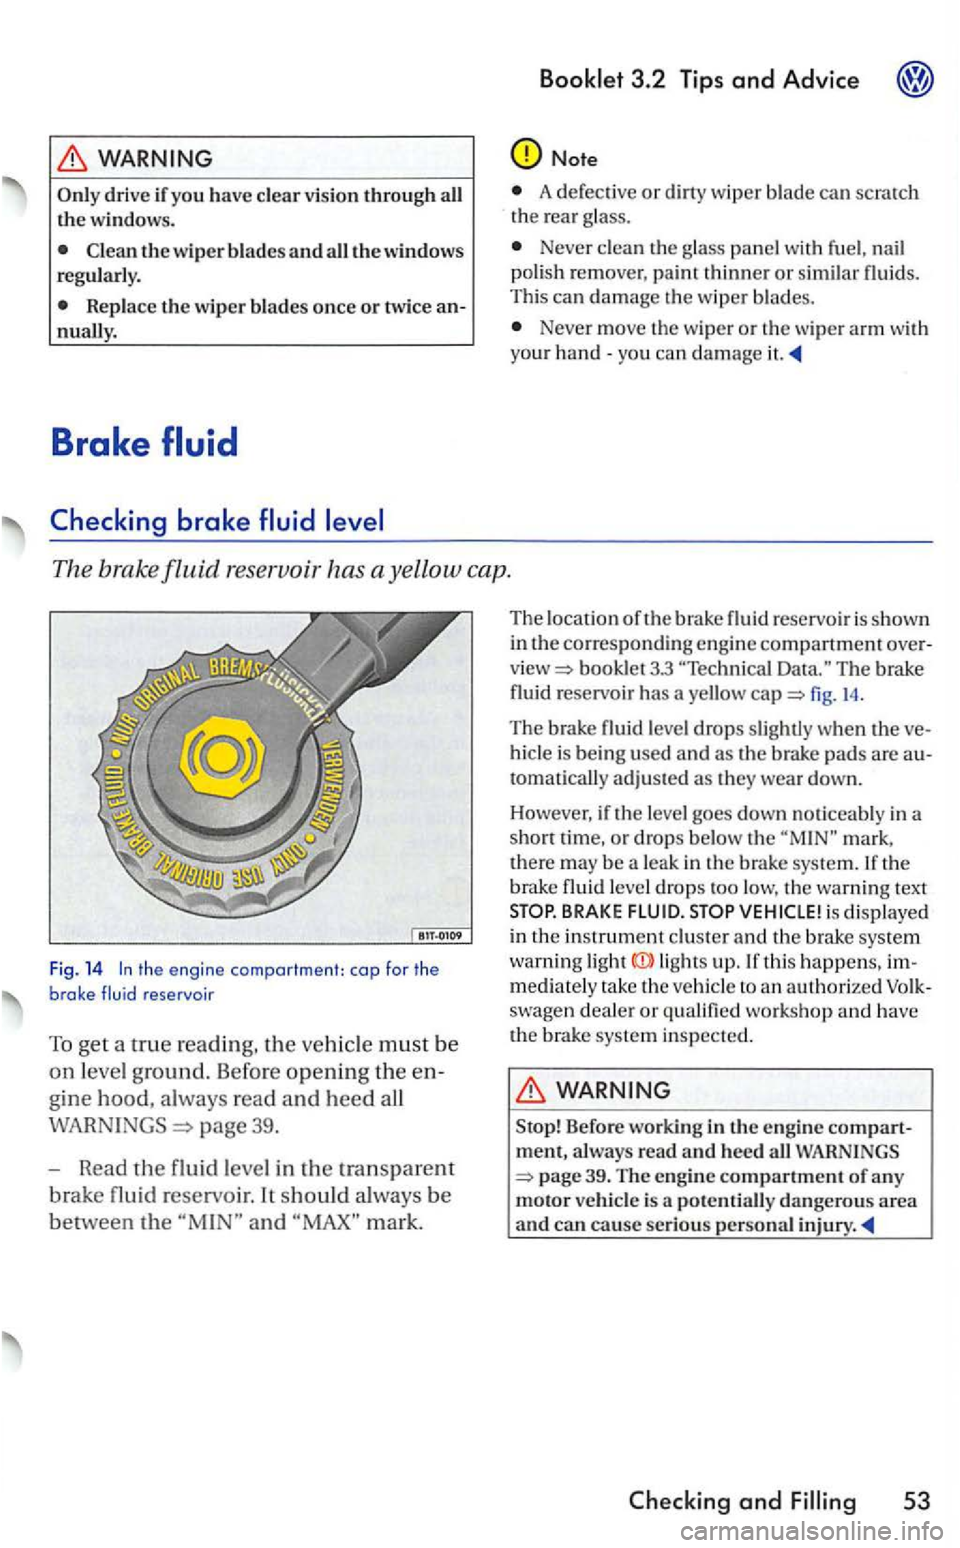
The brak e fluid reservoir has a ye llow cap.
Fig. 14 the engine compartment: cap for the brake fluid reservoir
To get a true reading, the m ust b e
on leve l ground. Before opening th e en
g
ine hood, a lways read and heed all
page 39.
- Read
the fluid leve l in the tra nsparent
bra ke fluid re servoir. It should always be
between the and mark.
Th e lo cation of th e brake fluid reservoi r is shown
in
bookl et 3.3 The brake
fluid reservoir has a yello w fig. 14 .
The brake fluid lev el drops s lightl y when th e ve
hicl e is bein g used and a s th e brake pad s are autom atically adju sted a s they wear down.
Ho wev
er, if th e le ve l goes down noticeably in a
s ho rt time, or drops below th e mark ,
th ere may be a leak in the brake system. If the b rake fluid leve l d rops too low, the wa rnin g text BRAKE FLUID. is displayed
in the instrument clu ste r and th e b rake system warni ng ligh ts up. If t his happens, immediately rake th e ve hicle to an au thorize d swage n deale r or q ualifi ed wo rkshop a nd have
th e brake system inspected.
Stop! Before wo rkin g in th e engin e compartment, a lways read and heed all WARNINGS
53
Page 366 of 444
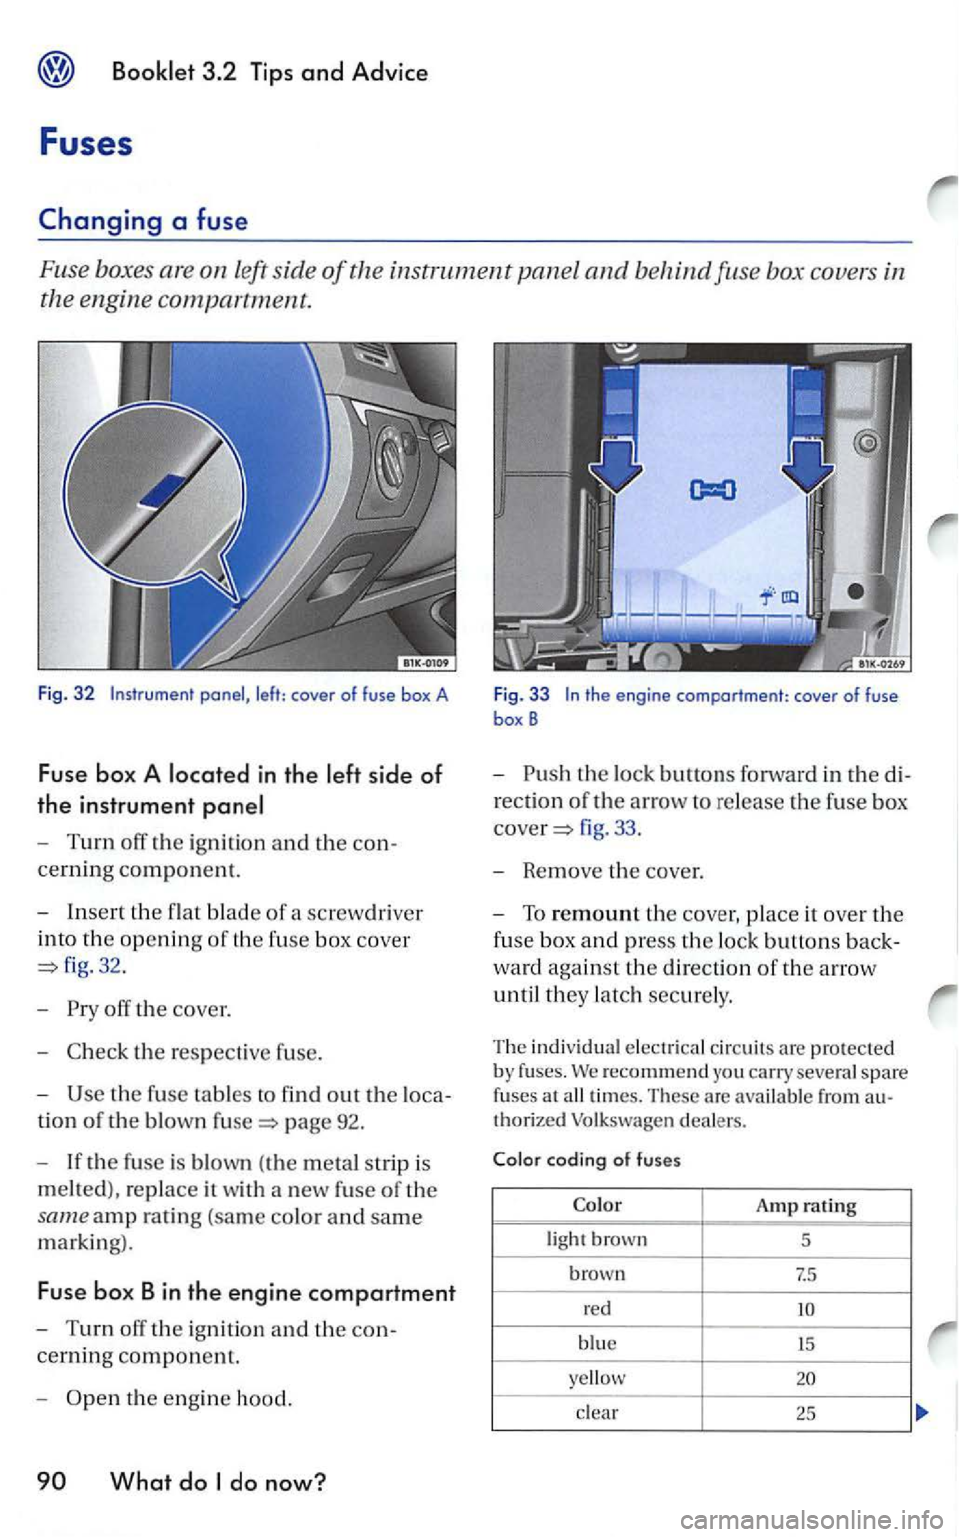
left side of the instrument panel and behind fu se box covers in
the engine
compa rtment.
Fig. 32
- Turn off the igni tion and the con
cerning component.
-
Insert the flat blade of a screwdri ver
into
the openin g of th e fuse box cove r
32.
-
the respeclive fuse.
-
the fuse tables to find out the loca-
tion of the blown page 92.
- If
the fuse is blown (the m etal strip is
melted) , replace it w ith a new fuse of the
same amp ra tin g (sa m e co lo r and sam e
marking).
Fuse bo x Bin the engine compartment
-Turn off the ign ition an d the con
cerning component.
-th e eng in e hood.
fig . 33 .
- Remove
the cover.
-To remount the cover, place it ove r the
fuse box and press th e lock buttons back
ward aga inst the directio n of the arrow
until
they latch securely .
Th e indi vidual electric a l c ir cuit s are pro tected by fuses. recommend you carry severa l spare
f uses at
clear 2 5