Page 243 of 336

243
CAUTION
�Booster battery contains sulfuric
acid which is poisonous and corro-
sive. Wear protective safety glasses
when jump starting, and avoid spil-
ling acid on your skin, clothing, or
vehicle.
�If you should accidentally get acid
on yourself or in your eyes, remove
any contaminated clothing and flush
the affected area with water imme-
diately. Then get immediate medical
attention. If possible, continue to
apply water with a sponge or cloth
while en route to the medical office.
�The gas normally produced by a
battery will explode if a flame or
spark is brought near. Use only
standardized jumper cables and do
not smoke or light a match while
jump starting.
NOTICE
�The battery used for boosting must
be 12 V. Do not jump start unless
you are sure that the booster bat-
tery is correct.
� After jump starting procedure, the
hybrid system may not start by
pushing the “POWER” switch. In
that case, push it once again. If the
“READY” light does not come on,
contact your Toyota dealer.
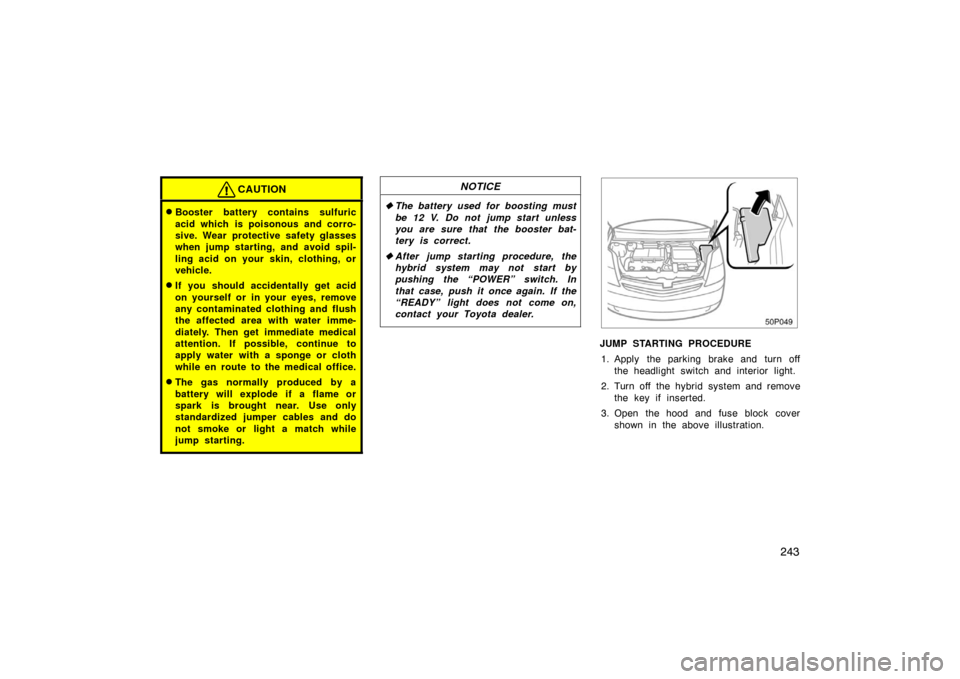
50p049
JUMP STARTING PROCEDURE
1. Apply the parking brake and turn off the headlight switch and interior light.
2. Turn off the hybrid system and remove the key if inserted.
3. Open the hood and fuse block cover shown in the above illustration.
Page 244 of 336

244
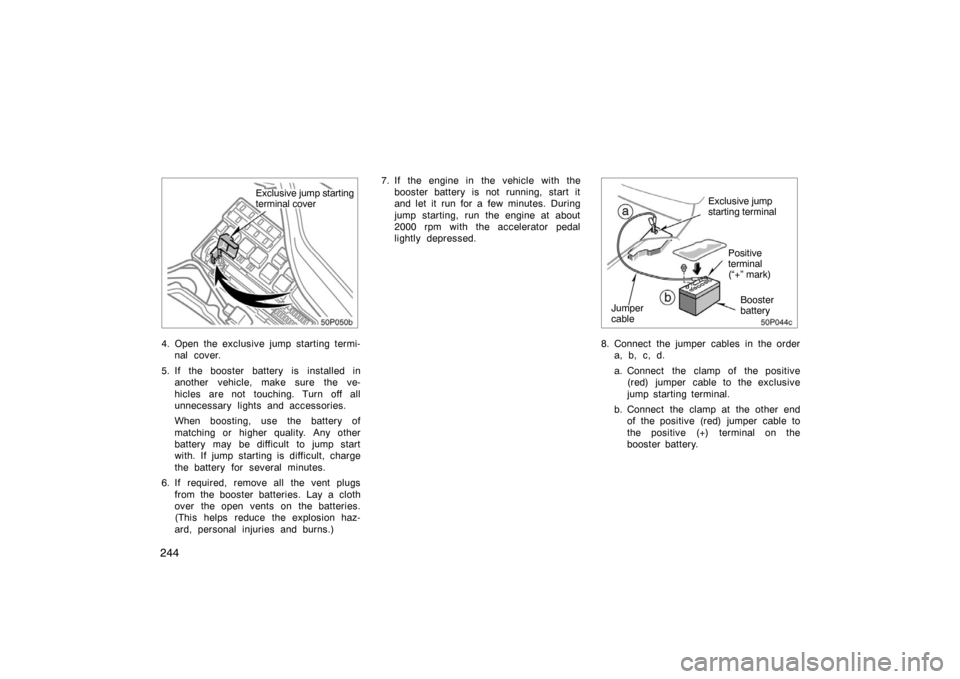
Exclusive jump starting
terminal cover
4. Open the exclusive jump starting termi-nal cover.
5. If the booster battery is installed in another vehicle, make sure the ve-
hicles are not touching. Turn off all
unnecessary lights and accessories.
When boosting, use the battery of
matching or higher quality. Any other
battery may be difficult to jump start
with. If jump starting is difficult, charge
the battery for several minutes.
6. If required, remove all the vent plugs from the booster batteries. Lay a cloth
over the open vents on the batteries.
(This helps reduce the explosion haz-
ard, personal injuries and burns.) 7. If the engine in the vehicle with the
booster battery is not running, start it
and let it run for a few minutes. During
jump starting, run the engine at about
2000 rpm with the accelerator pedal
lightly depressed.
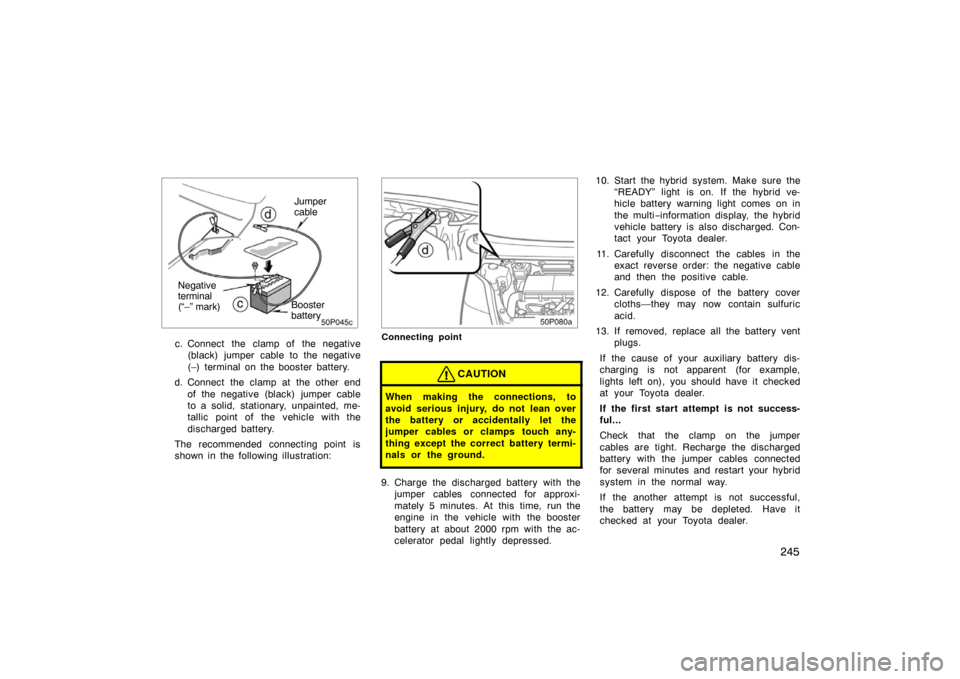
50p044c
Booster
battery
Exclusive jump
starting terminal
Jumper
cable Positive
terminal
(“+” mark)
8. Connect the jumper cables in the order
a, b, c, d.
a. Connect the clamp of the positive(red) jumper cable to the exclusive
jump starting terminal.
b. Connect the clamp at the other end of the positive (red) jumper cable to
the positive (+) terminal on the
booster battery.
Page 245 of 336

245
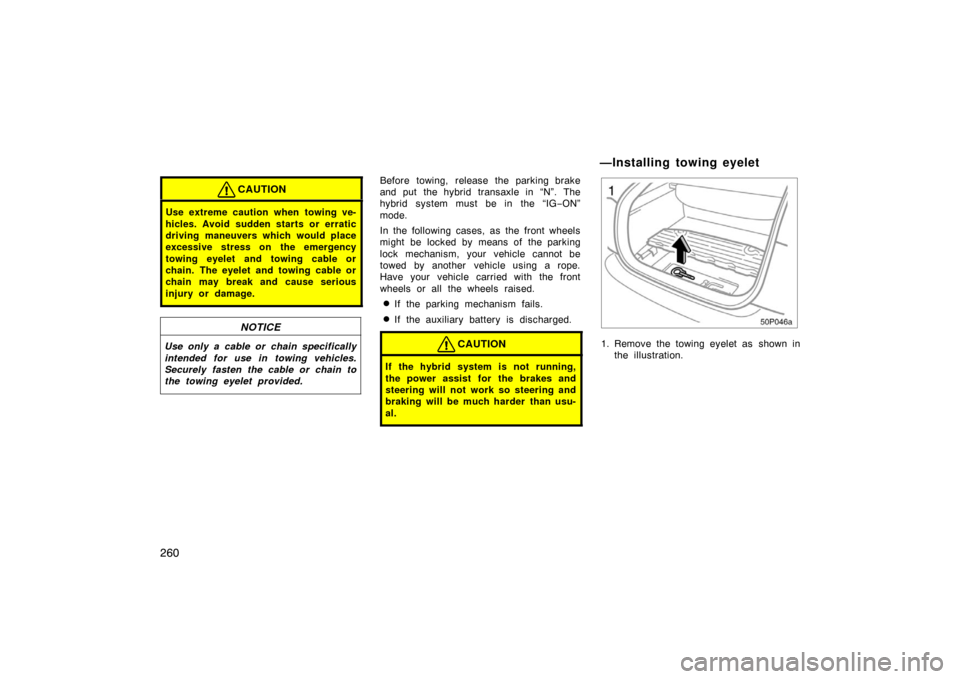
50p045c
Booster
battery
Negative
terminal
(“–” mark) Jumper
cable
c. Connect the clamp of the negative
(black) jumper cable to the negative
(–) terminal on the booster battery.
d. Connect the clamp at the other end of the negative (black) jumper cable
to a solid, stationary, unpainted, me-
tallic point of the vehicle with the
discharged battery.
The recommended connecting point is
shown in the following illustration:
50p080a
Connecting point
CAUTION
When making the connections, to
avoid serious injury, do not lean over
the battery or accidentally let the
jumper cables or clamps touch any-
thing except the correct battery termi-
nals or the ground.
9. Charge the discharged battery with the jumper cables connected for approxi-
mately 5 minutes. At this time, run the
engine in the vehicle with the booster
battery at about 2000 rpm with the ac-
celerator pedal lightly depressed. 10. Start the hybrid system. Make sure the
“READY” light is on. If the hybrid ve-
hicle battery warning light comes on in
the multi −information display, the hybrid
vehicle battery is also discharged. Con-
tact your Toyota dealer.
11. Carefully disconnect the cables in the exact reverse order: the negative cable
and then the positive cable.
12. Carefully dispose of the battery cover cloths—they may now contain sulfuric
acid.
13. If removed, replace all the battery vent plugs.
If the cause of your auxiliary battery dis-
charging is not apparent (for example,
lights left on), you should have it checked
at your Toyota dealer.
If the first start attempt is not success-
ful...
Check that the clamp on the jumper
cables are tight. Recharge the discharged
battery with the jumper cables connected
for several minutes and restart your hybrid
system in the normal way.
If the another attempt is not successful,
the battery may be depleted. Have it
checked at your Toyota dealer.
Page 260 of 336

260
CAUTION
Use extreme caution when towing ve-
hicles. Avoid sudden starts or erratic
driving maneuvers which would place
excessive stress on the emergency
towing eyelet and towing cable or
chain. The eyelet and towing cable or
chain may break and cause serious
injury or damage.
NOTICE
Use only a cable or chain specifically
intended for use in towing vehicles.
Securely fasten the cable or chain to
the towing eyelet provided.
Before towing, release the parking brake
and put the hybrid transaxle in “N”. The
hybrid system must be in the “IG−ON”
mode.
In the following cases, as the front wheels
might be locked by means of the parking
lock mechanism, your vehicle cannot be
towed by another vehicle using a rope.
Have your vehicle carried with the front
wheels or all the wheels raised.
�If the parking mechanism fails.
�If the auxiliary battery is discharged.
CAUTION
If the hybrid system is not running,
the power assist for the brakes and
steering will not work so steering and
braking will be much harder than usu-
al.
50p046a
1. Remove the towing eyelet as shown in the illustration.
—Installing towing eyelet
Page 276 of 336

276
Some states have vehicle emission in-
spection programs which include OBD
(On−Board Diagnostics) che cks.
The OBD system monitors the operation
of the emission control system. When the
OBD system determines that a problem
exists somewhere in the emission control
system, the malfunction indicator lamp
comes on. In this case, your vehicle may
not pass the I/M test and need to be
repaired. Contact your Toyota dealer to
service the vehicle.
Even if the malfunction indicator lamp
does not come on, your vehicle may not
pass the I/M test as readiness codes
have not been set in the OBD system.
Readiness codes are automatically set
during ordinary driving. However, when the
battery is disconnected or run down, the
codes are erased. Also, depending on
your driving habits, the codes may not be
completely set.
Also, if the malfunction indicator lamp had
come on recently due to temporary mal-
function such as a loose fuel tank cap,
your vehicle may not pass the I/M test. The malfunction indicator lamp will go off
after taking several driving trips, but the
error code in the OBD system will not be
cleared unless about 40 trips or more are
taken.
If your vehicle does not pass the I/M test
and the malfunction indicator lamp does
not come on, contact your Toyota dealer
to prepare the vehicle for re
−testing.
Emissions inspection and
maintenance (I/M) programs
Page 278 of 336
278
Engine compartment overview
1. Windshield washer fluid tank
2. Brake fluid reservoir
3. Engine oil filler cap
4. Engine coolant reservoir
5. Inverter reservoir tank
6. Fuse block
7. Radiator and condenser
8. Engine oil level dipstick
9. Auxiliary battery
81p001g
Page 283 of 336

283
Parts and tools
Here is a list of parts and tools you will
need to perform do−it−yourself mainte-
nance. Remember all Toyota parts are de-
signed in metric sizes, so your tools must
be metric.
CHECKING THE ENGINE OIL LEVEL
Parts (if level is low):
�Engine oil API grade SL “Energy −Con-
serving” or ILSAC multigrade having
viscosity proper for your climate
Tools:
�Rag or paper towel
�Funnel (only for adding oil)
CHECKING THE COOLANT LEVEL
Parts (if level is low):
�“Toyota Super Long Life Coolant” or
similar high quality ethylene glycol
based non− silicate, non −amine, non− ni-
trite, and non −borate coolant with long −
life hybrid organic acid technology.
“Toyota Super Long Life Coolant” is a
mixture of 50% coolant and 50% deion-
ized water (for the U.S.A.) or 55%
coolant and 45% deionized water (for
Canada).
Tools:
�Funnel (only for adding coolant) CHECKING BRAKE FLUID
Parts (if level is low):
�SAE J1703 or FMVSS No.116 DOT 3
brake fluid
Tools:
�Rag or paper towel
�Funnel (only for adding fluid)
CHECKING AUXILIARY BATTERY CON-
DITION
Tools:
�Warm water
�Baking soda
�Grease
�Conventional wrench (for terminal
clamp bolts)
CHECKING AND REPLACING FUSES
Parts (if replacement is necessary):
�Fuse with same amperage rating as
original
ADDING WASHER FLUID
Parts:
�Water
�Washer fluid containing antifreeze (for
winter use) Tools:
�Funnel
REPLACING LIGHT BULBS
Parts:
�Bulb with same number and wattage
rating as original (See charts in “Re-
placing light bulbs–” on page 304.)
Tools:
�Screwdriver
Page 299 of 336
299
DO�IT�YOURSELF MAINTENANCE
Electrical components
Checking auxiliary battery condition 300
. . . . . . . . . . . . . . . . . . . . . . . . . .
Auxiliary battery recharging precautionss 302
. . . . . . . . . . . . . . . . . . . . .
Checking and replacing fuses 302
. . . . . . . . . . . . . . . . . . . . . . . . . . . . . . . .
Adding washer fluid 304
. . . . . . . . . . . . . . . . . . . . . . . . . . . . . . . . . . . . \
. . . . .
Replacing light bulbs 304
. . . . . . . . . . . . . . . . . . . . . . . . . . . . . . . . . . . . \
. . . .
SECTION 8– 3