Page 57 of 268

NOTICE
Do not perform any of the following
changes without consulting your
Toyota dealer. Such changes can
interfere with proper operation of the
SRS front")
492005 ECHO from Aug. ’04 Prod. (OM52636U)
NOTICE
Do not perform any of the following
changes without consulting your
Toyota dealer. Such changes can
interfere with proper operation of the
SRS front airbag system in some
cases.
�Installation of electronic devices
such as a mobile two�way radio,
cassette tape player or compact
disc player
� Modification of the suspension sys-
tem
� Modification of the front end struc-
ture
� Attachment of a grille guard (bull
bar, kangaroo bar, etc.), snowplow,
winches or any other equipment to
the front end
� Repairs made on or near the front
fenders, front end structure, con-
sole, steering column, steering
wheel or dashboard near the front
passenger airbag
SP13504
This indicator comes on when the igni-
tion key is turned to the “ON” position.
It goes off after about 6 seconds. This
means the SRS front airbags are oper-
ating properly.
This warning light system monitors the
airbag sensor assembly, front airbag
sensors, side airbag sensors, door side
airbag sensors, seat belt pretensioner
assemblies, inflators, warning light,
interconnecting wiring and power sources.
(For details, see “Service reminder
indicators and warning buzzers” on page
90.) If any of the following conditions occurs,
this indicates a malfunction of the airbags
or seat belt pretensioners. Contact your
Toyota dealer as soon as possible.
�The light does not come on when the
ignition key is turned to the “ON” posi-
tion or remains on for more than 6
seconds or flashes.
�The light comes on or flashes while
driving.
Page 60 of 268

SU13125
The SRS side airbag system may not
activate if the vehicle is subjected to a
collision from the side at certain
angles, or a collision to the side")
522005 ECHO from Aug. ’04 Prod. (OM52636U)
SU13125
The SRS side airbag system may not
activate if the vehicle is subjected to a
collision from the side at certain
angles, or a collision to the side of the
vehicle body other than the passenger
compartment as shown in the illustra-
tion.
The SRS side airbags are designed to
inflate when the passenger compartment
area suffers a severe impact from the
side.
Always wear your seat belts properly.
SU13126
Collision from the rear
Collision from the front Vehicle rollover
The SRS side airbags are not generally
designed to inflate if the vehicle is in-
volved in a front or rear collision, if it
rolls over, or if it is involved in a low�
speed side collision.
SX13009
The SRS side airbag system consists
mainly of the following components, and
their locations are shown in the illustra-
tion.
1. SRS warning light
2. Side airbag modules (airbag and inflator)
3. Side airbag sensors
4. Airbag sensor assembly
5. Door side airbag sensor (only for 2−door models)
The SRS side airbag system is controlled
by the airbag sensor assembly. The side
airbag sensors consist of a safing sensor
and airbag sensor.
Page 63 of 268

SP13504
This indicator comes on when the igni-
tion key is turned to the “ON” position.
It goes off after about 6 seconds. This
means the SRS side airb")
552005 ECHO from Aug. ’04 Prod. (OM52636U)
SP13504
This indicator comes on when the igni-
tion key is turned to the “ON” position.
It goes off after about 6 seconds. This
means the SRS side airbags are operat-
ing properly.
This warning light system monitors the
airbag sensor assembly, front airbag
sensors, side airbag sensors, door side
airbag sensors, seat belt pretensioner
assemblies, inflators, warning light,
interconnecting wiring and power sources.
(For details, see “Service reminder
indicators and warning buzzers” on page
90.)If any of the following conditions occurs,
this indicates a malfunction of the airbags
or seat belt pretensioners. Contact your
Toyota dealer as soon as possible.
�The light does not come on when the
ignition key is turned to the “ON” posi-
tion or remains on for more than 6
seconds or flashes.
�The light comes on or flashes while
driving.
SU13128
In the following cases, contact your Toyota
dealer as soon as possible:
�Any of the SRS side airbags have
been inflated.
�The portion of the doors (shaded in the
illustration) was involved in an accident
that was not severe enough to cause
the SRS side airbags to inflate.
�The surface of the seats with the side
airbag (shaded in the illustration) is
scratched, cracked, or otherwise dam-
aged.
Page 68 of 268
602005 ECHO from Aug. ’04 Prod. (OM52636U)
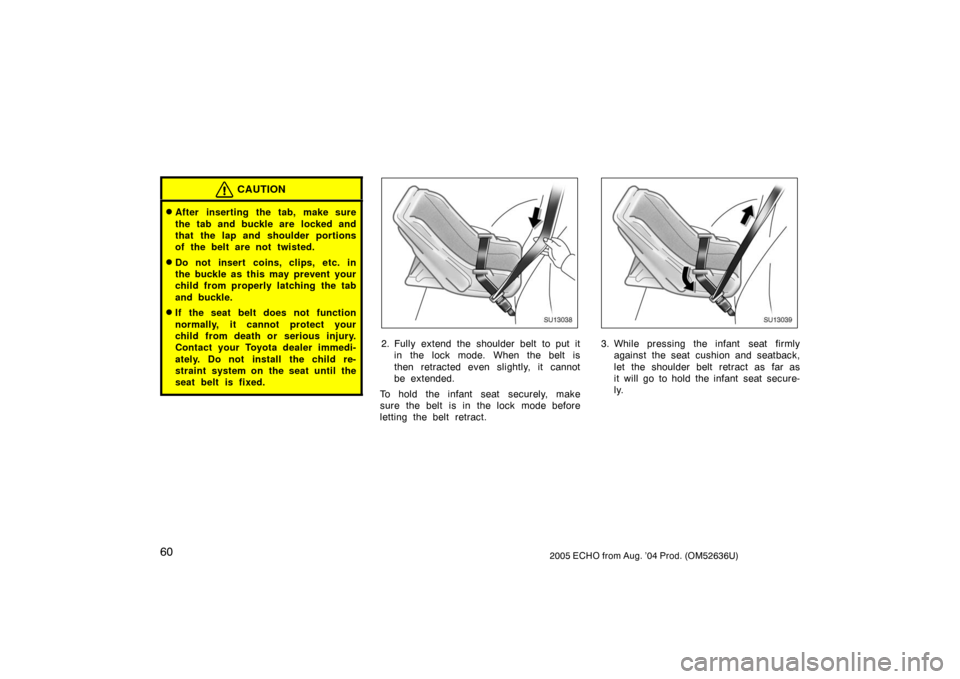
CAUTION
�After inserting the tab, make sure
the tab and buckle are locked and
that the lap and shoulder portions
of the belt are not twisted.
�Do not insert coins, clips, etc. in
the buckle as this may prevent your
child from properly latching the tab
and buckle.
�If the seat belt does not function
normally, it cannot protect your
child from death or serious injury.
Contact your Toyota dealer immedi-
ately. Do not install the child re-
straint system on the seat until the
seat belt is fixed.
SU13038
2. Fully extend the shoulder belt to put itin the lock mode. When the belt is
then retracted even slightly, it cannot
be extended.
To hold the infant seat securely, make
sure the belt is in the lock mode before
letting the belt retract.
SU13039
3. While pressing the infant seat firmly against the seat cushion and seatback,
let the shoulder belt retract as far as
it will go to hold the infant seat secure-
ly.
Page 72 of 268
642005 ECHO from Aug. ’04 Prod. (OM52636U)
SU13047
2. Fully extend the shoulder belt to put itin the lock mode. When the belt is
then retracted even slightly, it cannot
be extended.
To hold the convertible seat securely,
make sure the belt is in the lock mode
before letting the belt retract.
SU13048
3. While pressing the convertible seat firmly against the seat cushion and
seatback, let the shoulder belt retract
as far as it will go to hold the convert-
ible seat securely.
SU13049
CAUTION
Push and pull the child restraint sys-
tem in different directions to be sure
it is secure. Follow all the installation
instructions provided by its manufac-
turer.
Page 79 of 268
712005 ECHO from Aug. ’04 Prod. (OM52636U)
SU13253
Canada only
Type B (anchor position indicated by but-
tons)
SU13207b
Canada only
Type B (anchor position indicated by
tags)
CHILD RESTRAINT SYSTEM
INSTALLATION
Ty p e A —1. Widen the gap between the seat cushion and seatback slightly and
confirm the position of the lower an-
chorages below the button or tag in
the seatback.
2. Latch the hooks of lower straps onto the anchorages and tighten the lower
straps.
Ty p e B — 1. Widen the gap between the seat cushion and seatback slightly and
confirm the position of the lower an-
chorages below the button or tag in
the seatback.
2. Latch the buckles onto the anchor- ages.
For owners in Canada
The symbol on a child restraint system
indicates the presence of a lower connec-
tor system.
If your child restraint system has a top
strap, it should be anchored. (For the
installation of the top strap, see “—Using
a top strap” on page 67.)
Page 85 of 268
772005 ECHO from Aug. ’04 Prod. (OM52636U)
SH13038
Adjust the mirror so you can just see
the rear of your vehicle in the mirror.
To reduce glare from the headlights of
the vehicle behind you during night
driving, operate the lever on the lower
edge of the mirror.
Daylight driving—Lever at position 1
The reflection in the mirror has greater
clarity at this position.
Night driving—Lever at position 2
Remember that by reducing glare you also
lose some rear view clarity.
CAUTION
Do not adjust the mirror while the
vehicle is moving. Doing so may
cause the driver to mishandle the ve-
hicle and an accident may occur re-
sulting in death or serious injuries.
Vanity mirrors
SU13061
To use the vanity mirrors, swing down
the sun visor and open the cover.
Anti�glare inside rear view
mirror
Page 87 of 268
792005 ECHO from Aug. ’04 Prod. (OM52636U)
OPERATION OF INSTRUMENTS AND
CONTROLS
Lights, Wipers and Defogger
Headlights and turn signals80
. . . . . . . . . . . . . . . . . . . . . . . . . . . . . . . . . . .
Emergency flashers 81
. . . . . . . . . . . . . . . . . . . . . . . . . . . . . . . . . . . . \
. . . . . .
Instrument panel light control 82
. . . . . . . . . . . . . . . . . . . . . . . . . . . . . . . . .
Front fog lights 82
. . . . . . . . . . . . . . . . . . . . . . . . . . . . . . . . . . . . \
. . . . . . . . . .
Interior light 82
. . . . . . . . . . . . . . . . . . . . . . . . . . . . . . . . . . . . \
. . . . . . . . . . . . .
Windshield wipers and washer 83
. . . . . . . . . . . . . . . . . . . . . . . . . . . . . . . .
Rear window defogger 84
. . . . . . . . . . . . . . . . . . . . . . . . . . . . . . . . . . . . \
. . .
SECTION 1� 5

SU13047
2. Fully extend the shoulder belt to put itin the lock mode. When the belt is
then retracted even slightly, it cannot
be extended.
To hold the conv")

SU13253
Canada only
Type B (anchor position indicated by but-
tons)
SU13207b
Canada only
Type B (anchor position indicated by
tags)
CHILD RESTRAINT SYSTEM")

SH13038
Adjust the mirror so you can just see
the rear of your vehicle in the mirror.
To reduce glare from the headlights of
the vehicle behind you during")

OPERATION OF INSTRUMENTS AND
CONTROLS
Lights, Wipers and Defogger
Headlights and turn signals80
. . . . . . . . . . . . . . . . . . . . . . . . . . . . . .")