Page 377 of 687

Downloaded from www.Manualslib.com manuals search engine 6-20 ENGINE GENERAL INFORMATION AND DIAGNOSIS
Visual inspection
Visually check following parts and systems.
INSPECTION ITEM REFERRING SECTION
Engine oil – level, leakage Section 0B
Engine coolant – level, leakage Section 0B
Fuel – level, leakage Section 0B
A/T fluid – level, leakage Section 0B
Air cleaner element – dirt, clogging Section 0B
Battery – fluid level, corrosion of terminal
Water pump belt – tension, damage Section 0B
Throttle cable – play, installation
Section 6E Vacuum hoses of air intake system – disconnection, looseness,
deterioration, bend
Connectors of electric wire harness – disconnection, friction
Fuses – burning Section 8
Parts – installation, bolt – looseness
Parts – deformation
Other parts that can be checked visually
Also check following items at engine start, if possible
Malfunction indicator lamp – operation Section 6
Charge warning lamp – operation Section 6H
Engine oil pressure warning lamp – operation Section 8 (Section 6 for pressure check)
Engine coolant temp. meter – operation Section 8
Fuel level meter – operation Section 8
Tachometer, if equipped – operation
Abnormal air being inhaled from air intake system
Exhaust system – leakage of exhaust gas, noise
Other parts that can be checked visually
Page 400 of 687

Downloaded from www.Manualslib.com manuals search engine ENGINE GENERAL INFORMATION AND DIAGNOSIS 6-43
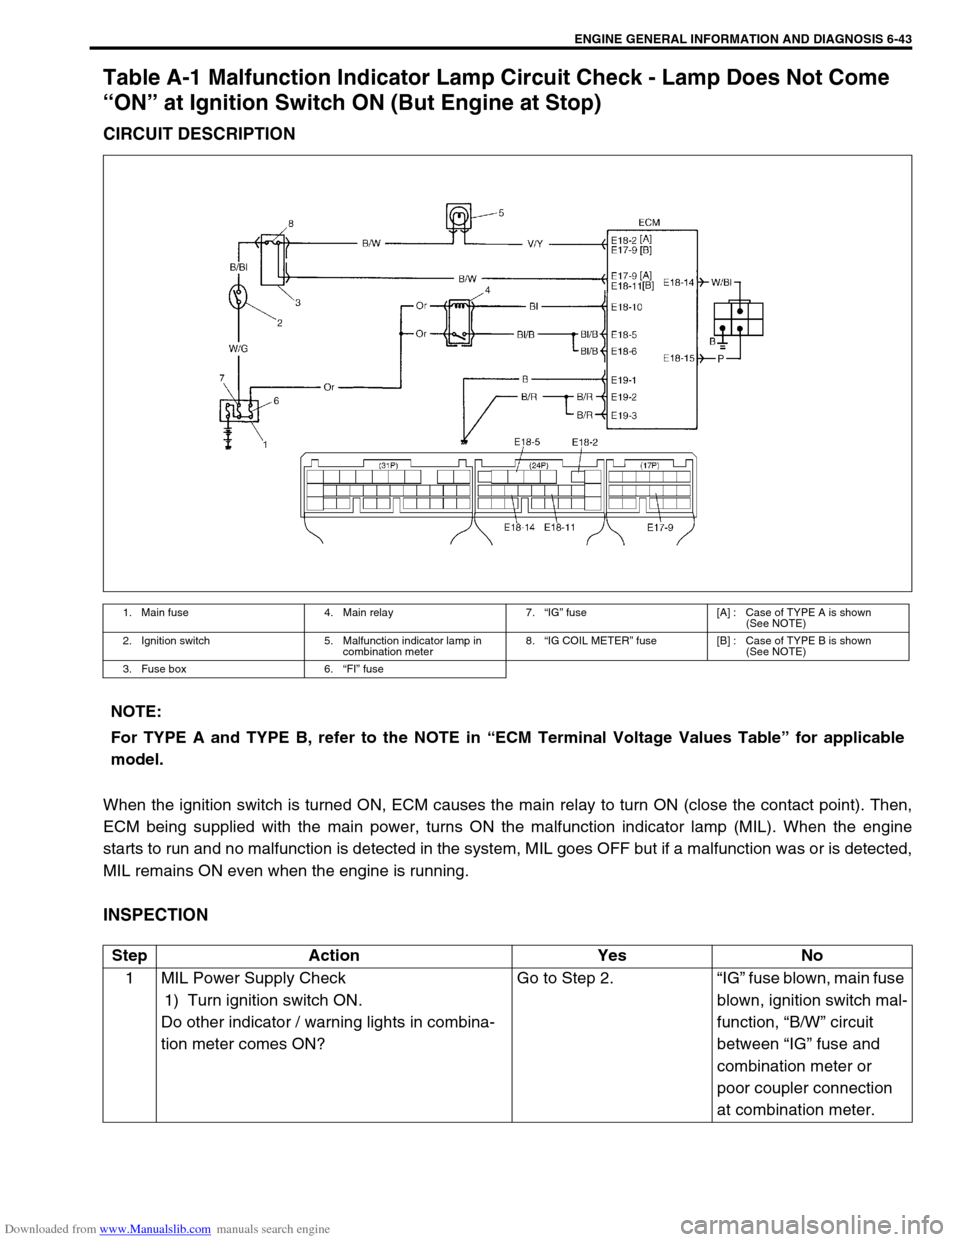
Table A-1 Malfunction Indicator Lamp Circuit Check - Lamp Does Not Come
“ON” at Ignition Switch ON (But Engine at Stop)
CIRCUIT DESCRIPTION
When the ignition switch is turned ON, ECM causes the main relay to turn ON (close the contact point). Then,
ECM being supplied with the main power, turns ON the malfunction indicator lamp (MIL). When the engine
starts to run and no malfunction is detected in the system, MIL goes OFF but if a malfunction was or is detected,
MIL remains ON even when the engine is running.
INSPECTION
1. Main fuse 4. Main relay 7.“IG” fuse [A] : Case of TYPE A is shown
(See NOTE)
2. Ignition switch 5. Malfunction indicator lamp in
combination meter8.“IG COIL METER” fuse [B] : Case of TYPE B is shown
(See NOTE)
3. Fuse box 6.“FI” fuse
NOTE:
For TYPE A and TYPE B, refer to the NOTE in “ECM Terminal Voltage Values Table” for applicable
model.
Step Action Yes No
1 MIL Power Supply Check
1) Turn ignition switch ON.
Do other indicator / warning lights in combina-
tion meter comes ON?Go to Step 2.“IG” fuse blown, main fuse
blown, ignition switch mal-
function, “B/W” circuit
between “IG” fuse and
combination meter or
poor coupler connection
at combination meter.
Page 403 of 687

Downloaded from www.Manualslib.com manuals search engine 6-46 ENGINE GENERAL INFORMATION AND DIAGNOSIS
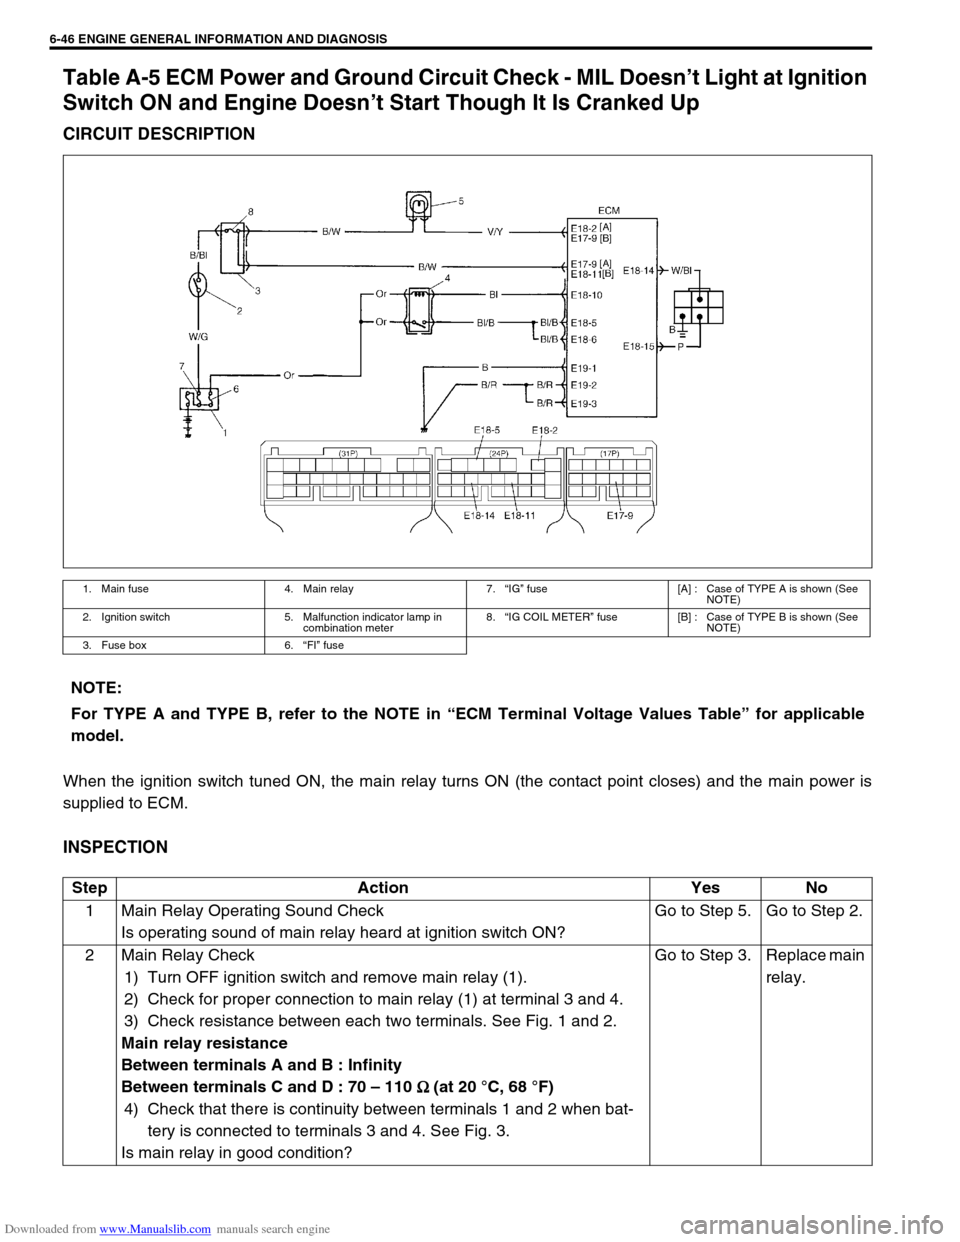
Table A-5 ECM Power and Ground Circuit Check - MIL Doesn’t Light at Ignition
Switch ON and Engine Doesn’t Start Though It Is Cranked Up
CIRCUIT DESCRIPTION
When the ignition switch tuned ON, the main relay turns ON (the contact point closes) and the main power is
supplied to ECM.
INSPECTION
1. Main fuse 4. Main relay 7.“IG” fuse [A] : Case of TYPE A is shown (See
NOTE)
2. Ignition switch 5. Malfunction indicator lamp in
combination meter8.“IG COIL METER” fuse [B] : Case of TYPE B is shown (See
NOTE)
3. Fuse box 6.“FI” fuse
NOTE:
For TYPE A and TYPE B, refer to the NOTE in “ECM Terminal Voltage Values Table” for applicable
model.
Step Action Yes No
1 Main Relay Operating Sound Check
Is operating sound of main relay heard at ignition switch ON?Go to Step 5. Go to Step 2.
2 Main Relay Check
1) Turn OFF ignition switch and remove main relay (1).
2) Check for proper connection to main relay (1) at terminal 3 and 4.
3) Check resistance between each two terminals. See Fig. 1 and 2.
Main relay resistance
Between terminals A and B : Infinity
Between terminals C and D : 70 – 110
Ω
Ω Ω Ω (at 20 °C, 68 °F)
4) Check that there is continuity between terminals 1 and 2 when bat-
tery is connected to terminals 3 and 4. See Fig. 3.
Is main relay in good condition?Go to Step 3. Replace main
relay.
Page 404 of 687
![SUZUKI JIMNY 2005 3.G Service Workshop Manual Downloaded from www.Manualslib.com manuals search engine ENGINE GENERAL INFORMATION AND DIAGNOSIS 6-47
[A] Fig. 1 for Step 2 and 3 / [B] Fig. 2 for Step 2 / [C] Fig. 3 for Step 23 Fuse Check
Is main � SUZUKI JIMNY 2005 3.G Service Workshop Manual Downloaded from www.Manualslib.com manuals search engine ENGINE GENERAL INFORMATION AND DIAGNOSIS 6-47
[A] Fig. 1 for Step 2 and 3 / [B] Fig. 2 for Step 2 / [C] Fig. 3 for Step 23 Fuse Check
Is main �](/manual-img/20/7588/w960_7588-403.png)
Downloaded from www.Manualslib.com manuals search engine ENGINE GENERAL INFORMATION AND DIAGNOSIS 6-47
[A] Fig. 1 for Step 2 and 3 / [B] Fig. 2 for Step 2 / [C] Fig. 3 for Step 23 Fuse Check
Is main “FI” fuse in good condition? See Fig. 1.Go to Step 4. Check for
short in cir-
cuits con-
nected to this
fuse.
4 ECM Power Circuit Check
1) Turn OFF ignition switch, disconnect connectors from ECM and
install main relay.
2) Check for proper connection to ECM at terminals E17-9 (Case of
TYPE A) (See NOTE) or E18-11 (Case of TYPE B) (See NOTE),
E18-10, E18-5 and E18-6.
3) If OK, then measure voltage between terminal E18-10 and ground,
E17-9 (Case of TYPE A) (See NOTE) or E18-11 (Case of TYPE B)
(See NOTE) and ground with ignition switch ON.
Is each voltage 10 – 14 V?Go to Step 5.“B/W”, “Or” or
“Bl/B” circuit
open.
5 ECM Power Circuit Check
1) Using service wire, ground terminal E18-10 and measure voltage
between terminal E18-5 and ground at ignition switch ON.
Is it 10 – 14 V?Check
ground cir-
cuits “B” and
“B/R” for
open.
If OK, then
substitute a
known-good
ECM and
recheck.Go to Step 6.
6 Is operating sound of main relay heard in Step 1? Go to Step 7.“Bl/B” or “B/
R” wire open.
7 Main Relay Check
1) Check main relay according to procedure in Step 2.
Is main relay in good condition?“Or” or “Bl/B”
wire open.Replace main
relay. Step Action Yes No
2.“F1” fuse
Page 449 of 687
Downloaded from www.Manualslib.com manuals search engine 6-92 ENGINE GENERAL INFORMATION AND DIAGNOSIS
DTC P0481 A/C Condenser Fan Control Circuit Malfunction
CIRCUIT DESCRIPTION
DTC CONFIRMATION PROCEDURE
1) Turn ignition switch OFF.
2) Clear DTC with ignition switch ON.
3) Start engine and then turn both A/C switch and heater blower switch ON for 2 sec or more.
4) Run engine at idle for 5 sec or more which A/C switch and heater blower switch OFF.
5) Check DTC and pending DTC.
1. Ignition switch 3. A/C condenser fan relay 5. A/C condenser fan 7. Fuse box
DTC DETECTING CONDITION POSSIBLE CAUSE
Low voltage at terminal E18-18 when ECM doesn’t out-
put A/C ON signal to A/C amplifier or when engine cool-
ant temp. is not 110 °C (230 °F) or more.
✱
✱✱ ✱2 driving cycle detection logic, continuous monitoring.“P/B” or “Lg” circuit open or short
Condenser fan motor relay malfunction
ECM malfunction
Page 453 of 687
Downloaded from www.Manualslib.com manuals search engine 6-96 ENGINE GENERAL INFORMATION AND DIAGNOSIS
DTC P0505 Idle Control System Malfunction
CIRCUIT DESCRIPTION
DTC CONFIRMATION PROCEDURE
1) Turn ignition switch OFF.
2) Clear DTC with ignition switch ON.
3) Start engine and run it at idle for 1 min.
4) Check DTC and pending DTC.
INSPECTION
1. IAC valve 3. Ignition switch 5.“FI” fuse
2. Main relay 4.“IG COIL METER” fuse .
DTC DETECTING CONDITION POSSIBLE CAUSE
No closed signal to IAC valve is detected after
engine start.
✱
✱✱ ✱2 driving cycle detection logic, continuous monitoring.“Bl/B”, “G/Y” or “B/R” circuit open or short
IAC valve malfunction
ECM malfunction
Step Action Yes No
1Was “Engine Diag. Flow Table” performed? Go to Step 2. Go to “Engine Diag. Flow
Table”.
2 Is SUZUKI scan tool available? Go to Step 3. Go to Step 4.
Page 458 of 687

Downloaded from www.Manualslib.com manuals search engine ENGINE GENERAL INFORMATION AND DIAGNOSIS 6-101
DTC P1500 Engine Starter Signal Circuit Malfunction
CIRCUIT DESCRIPTION
DTC CONFIRMATION PROCEDURE
1) Turn ignition switch OFF.
2) Clear DTC with ignition switch ON, crank engine and run it at idle for 3 min.
3) Check pending DTC in “ON BOARD TEST” or “PENDING DTC” mode and DTC in “DTC” mode.
1. Starter 3. Ignition switch (starter switch) [A] : Case of TYPE A is shown (See NOTE) [C] : M/T vehicle
2. Transmission range sensor (switch) 4. Main fuse [B] : Case of TYPE B is shown (See NOTE) [D] : A/T vehicle
NOTE:
For TYPE A and TYPE B, refer to the NOTE in “ECM Terminal Voltage Values Table” for applicable
model.
DTC DETECTING CONDITION POSSIBLE CAUSE
Low voltage at terminal E17-13 or E18-20 when cranking
engine or
High voltage at terminal E17-13 or E18-20 after starting
engine.
✱
✱✱ ✱2 driving cycle detection logic, continuous monitoring.“B/Y” circuit open
ECM malfunction
Page 460 of 687

Downloaded from www.Manualslib.com manuals search engine ENGINE GENERAL INFORMATION AND DIAGNOSIS 6-103
DTC P1510 ECM Back-up Power Supply Malfunction
CIRCUIT DESCRIPTION
Battery voltage is supplied so that diagnostic trouble code memory, values for engine control learned by ECM,
etc. are kept in ECM even when the ignition switch is turned OFF.
DTC CONFIRMATION PROCEDURE
1) Clear DTC, start engine and run it at idle for 1 min.
2) Select “DTC” mode on scan tool and check DTC.
INSPECTION
1. Main fuse
2. Fuse box
DTC DETECTING CONDITION POSSIBLE CAUSE
Low voltage at terminal E18-7 after starting engine.“W” circuit open
ECM malfunction
Step Action Yes No
1 Check for voltage at terminal E18-7 of ECM
connector connected, under each condition,
ignition switch OFF and engine running.
Is it 10 – 14 V at each condition?Poor E18-7 connection or
intermittent trouble.
Check for intermittent
referring to “Intermittent
and Poor Connection” in
Section 0A.
If wire and connections
are OK, substitute a
known- good ECM and
recheck.“W” circuit open.